概要
前回、Amazon CognitoでMFAをお試ししてみましたが、ユーザープールを作成するのにAWS マネジメントコンソールを利用して、若干面倒だったので、AWS SDKを利用して作成してみました。
環境構築
ソースはGitHubにアップしていますので、よければご参考ください。
https://github.com/kai-kou/create-cognito-user-pool-at-python
仮想環境を作成していますが、ここは素でも、Dockerコンテナ上でもお好きにどうぞ。
> python --version
Python 3.6.6

> mkdir 任意のディレクトリ
> cd 任意のディレクトリ
> python -m venv venv
> . venv/bin/activate
Pythonの場合、boto3というSDKがありますので、それを利用します。
boto/boto3
https://github.com/boto/boto3
> pip install boto3
実装
公式ドキュメントが詳しかったのでそちらを参考にしました。
CognitoIdentityProvider - Boto 3 Docs 1.9.39 documentation
https://boto3.amazonaws.com/v1/documentation/api/latest/reference/services/cognito-idp.html#CognitoIdentityProvider.Client.admin_create_user
> touch main.py
SDKの各パラメータは今回、最低限の設定のみとしています。[Cognitoのユーザープール名] 、[ユーザー名] 、[仮パスワード] は任意で指定してください。
import boto3


def main():
  client = boto3.client('cognito-idp')

  poot_name = '[Cognitoのユーザープール名]'

  # ユーザープールの作成
  user_pool = _create_user_pool(client, poot_name)

  # アプリクライアントの作成
  _create_user_pool_app_client(client, user_pool)

  # TOTPを利用したMFAを有効にする
  _set_user_pool_mfa_config(client, user_pool)

  # ユーザーの作成
  _create_user(client, user_pool, '[ユーザー名]', '[仮パスワード]')


def _create_user_pool(client, pool_name):
  response = client.create_user_pool(
    PoolName=pool_name,
    Policies={
      'PasswordPolicy': {
        'MinimumLength': 8,
        'RequireUppercase': True,
        'RequireLowercase': True,
        'RequireNumbers': True,
        'RequireSymbols': True
      }
    },
    # LambdaConfig={
    #   'PreSignUp': 'string',
    #   'CustomMessage': 'string',
    #   'PostConfirmation': 'string',
    #   'PreAuthentication': 'string',
    #   'PostAuthentication': 'string',
    #   'DefineAuthChallenge': 'string',
    #   'CreateAuthChallenge': 'string',
    #   'VerifyAuthChallengeResponse': 'string',
    #   'PreTokenGeneration': 'string',
    #   'UserMigration': 'string'
    # },
    # AutoVerifiedAttributes=[
    #   'phone_number'|'email',
    # ],
    # AliasAttributes=[
    #   'phone_number'|'email'|'preferred_username',
    # ],
    # UsernameAttributes=[
    #   'phone_number'|'email',
    # ],
    # SmsVerificationMessage='string',
    # EmailVerificationMessage='string',
    # EmailVerificationSubject='string',
    # VerificationMessageTemplate={
    #   'SmsMessage': 'string',
    #   'EmailMessage': 'string',
    #   'EmailSubject': 'string',
    #   'EmailMessageByLink': 'string',
    #   'EmailSubjectByLink': 'string',
    #   'DefaultEmailOption': 'CONFIRM_WITH_LINK'|'CONFIRM_WITH_CODE'
    # },
    # SmsAuthenticationMessage='string',
    MfaConfiguration='OFF',
    # DeviceConfiguration={
    #   'ChallengeRequiredOnNewDevice': True|False,
    #   'DeviceOnlyRememberedOnUserPrompt': True|False
    # },
    # EmailConfiguration={
    #   'SourceArn': 'string',
    #   'ReplyToEmailAddress': 'string'
    # },
    # SmsConfiguration={
    #   'SnsCallerArn': 'string',
    #   'ExternalId': 'string'
    # },
    # UserPoolTags={
    #   'string': 'string'
    # },
    AdminCreateUserConfig={
      'AllowAdminCreateUserOnly': False,
      'UnusedAccountValidityDays': 7,
      # 'InviteMessageTemplate': {
      #     'SMSMessage': 'string',
      #     'EmailMessage': 'string',
      #     'EmailSubject': 'string'
      # }
    },
    # Schema=[
    #   {
    #     'Name': 'string',
    #     'AttributeDataType': 'String'|'Number'|'DateTime'|'Boolean',
    #     'DeveloperOnlyAttribute': True|False,
    #     'Mutable': True|False,
    #     'Required': True|False,
    #     'NumberAttributeConstraints': {
    #       'MinValue': 'string',
    #       'MaxValue': 'string'
    #     },
    #     'StringAttributeConstraints': {
    #       'MinLength': 'string',
    #       'MaxLength': 'string'
    #     }
    #   },
    # ],
    # UserPoolAddOns={
    #   'AdvancedSecurityMode': 'OFF'|'AUDIT'|'ENFORCED'
    # }
  )
  return response


def _create_user_pool_app_client(client, user_pool):
  user_pool_id = user_pool['UserPool']['Id']
  user_pool_name = user_pool['UserPool']['Name']
  response = client.create_user_pool_client(
    UserPoolId=user_pool_id,
    ClientName=f'{user_pool_name}-client',
    # GenerateSecret=True|False,
    RefreshTokenValidity=30,
    # ReadAttributes=[
    #   'string',
    # ],
    # WriteAttributes=[
    #   'string',
    # ],
    # ExplicitAuthFlows=[
    #   'ADMIN_NO_SRP_AUTH'|'CUSTOM_AUTH_FLOW_ONLY'|'USER_PASSWORD_AUTH',
    # ],
    # SupportedIdentityProviders=[
    #   'string',
    # ],
    # CallbackURLs=[
    # 'string',
    # ],
    # LogoutURLs=[
    #   'string',
    # ],
    # DefaultRedirectURI='string',
    # AllowedOAuthFlows=[
    #   'code'|'implicit'|'client_credentials',
    # ],
    # AllowedOAuthScopes=[
    #   'string',
    # ],
    # AllowedOAuthFlowsUserPoolClient=True|False,
    # AnalyticsConfiguration={
    #   'ApplicationId': 'string',
    #   'RoleArn': 'string',
    #   'ExternalId': 'string',
    #   'UserDataShared': True|False
    # }
  )
  return response


def _set_user_pool_mfa_config(client, user_pool):
  user_pool_id = user_pool['UserPool']['Id']
  response = client.set_user_pool_mfa_config(
    UserPoolId=user_pool_id,
    # SmsMfaConfiguration={
    #   'SmsAuthenticationMessage': 'string',
    #   'SmsConfiguration': {
    #     'SnsCallerArn': 'string',
    #     'ExternalId': 'string'
    #   }
    # },
    SoftwareTokenMfaConfiguration={
      'Enabled': True # True|False
    },
    MfaConfiguration='ON' # 'OFF'|'ON'|'OPTIONAL'
  )
  return response


def _create_user(client, user_pool, user_name, password):
  user_pool_id = user_pool['UserPool']['Id']
  response = client.admin_create_user(
    UserPoolId=user_pool_id,
    Username=user_name,
    # UserAttributes=[
    #   {
    #     'Name': 'string',
    #     'Value': 'string'
    #   },
    # ],
    # ValidationData=[
    #   {
    #     'Name': 'string',
    #     'Value': 'string'
    #   },
    # ],
    TemporaryPassword=password,
    # ForceAliasCreation=True|False,
    MessageAction='SUPPRESS' # 'RESEND'|'SUPPRESS',
    # DesiredDeliveryMediums=[
    #   'SMS'|'EMAIL',
    # ]
  )
  return response

if __name__ == '__main__':
  main()
いくつか抜粋して説明してみます。
大まかな流れ
今回は、前回の記事で利用するユーザープールを作成したかったので、MFAを有効にしてTOTPを選択して、検証用のユーザーが作成できるようにしています。
Amazon Cognitoのワンタイムパスワード(TOTP)認証をNode.jsで試してみた
https://qiita.com/kai_kou/items/aa7dc0042b44649f576a
ポイントとしては、ユーザープール作成時にMFA有効化する場合、SMSのみ指定が可能でTOTPが指定できません。(2018/11/08時点)
ですので、ユーザープール作成後にset_user_pool_mfa_config というメソッドでMFAを有効化するようにしました。
def main():
  client = boto3.client('cognito-idp')

  poot_name = 'create-user-pool-at-lambda'

  # ユーザープールの作成
  user_pool = _create_user_pool(client, poot_name)

  # アプリクライアントの作成
  _create_user_pool_app_client(client, user_pool)

  # TOTPを利用したMFAを有効にする
  _set_user_pool_mfa_config(client, user_pool)

  # ユーザーの作成
  _create_user(client, user_pool, '[ユーザー名]', '[仮パスワード]')
各パラメータの指定方法
下記記事で良い方法を紹介されていました。
CloudFormationでCognito UserPoolを作る
https://wp-kyoto.net/create-cognito-userpool-by-cloudformation/
「作りたいリソースを一旦手組みして、作成されたリソースのパラメータをYAML化する」という流れが多分一番ストレスなく作れます。
ということでまずAWS マネジメントコンソールからCognito UserPoolを作りましょう。
作成できたらAWS-CLIを使って、どんな設定を書けばいいかを確認します。
下記ドキュメントに各リソース情報を取得するコマンドが記載されています。
cognito-idp
https://docs.aws.amazon.com/cli/latest/reference/cognito-idp/index.html#cli-aws-cognito-idp
MFAの有効化
AWS マネジメントコンソールのユーザープール画面では、MFAを必須にするには、ユーザープール初回時とあります。
ユーザープールの初回作成時にのみ [必須] を選択できます。
ただ、下記のように、MfaConfiguration='ON' として、設定すると、必須が指定できました。記述か実装のどちらかが間違っているのでしょうか???

  response = client.set_user_pool_mfa_config(
    UserPoolId=user_pool_id,
    # SmsMfaConfiguration={
    #   'SmsAuthenticationMessage': 'string',
    #   'SmsConfiguration': {
    #     'SnsCallerArn': 'string',
    #     'ExternalId': 'string'
    #   }
    # },
    SoftwareTokenMfaConfiguration={
      'Enabled': True # True|False
    },
    MfaConfiguration='ON' # 'OFF'|'ON'|'OPTIONAL'
  )
動作確認
実行して、Cognitoのユーザープールが作成されるか確認します。
> python main.py
実行時に、AWSへアクセスするのに、.aws/credentials を参照しますので、AWS CLIをインストールしておくとスムーズかと思います。
AWS CLIやboto3の利用に関しては下記が参考になります。
AWS CLIのインストール
https://qiita.com/yuyj109/items/3163a84480da4c8f402c
boto3を使った一時的なAWS認証情報の取得
https://qiita.com/speg03/items/9ba5a34d721c9f4f90c5
はい。
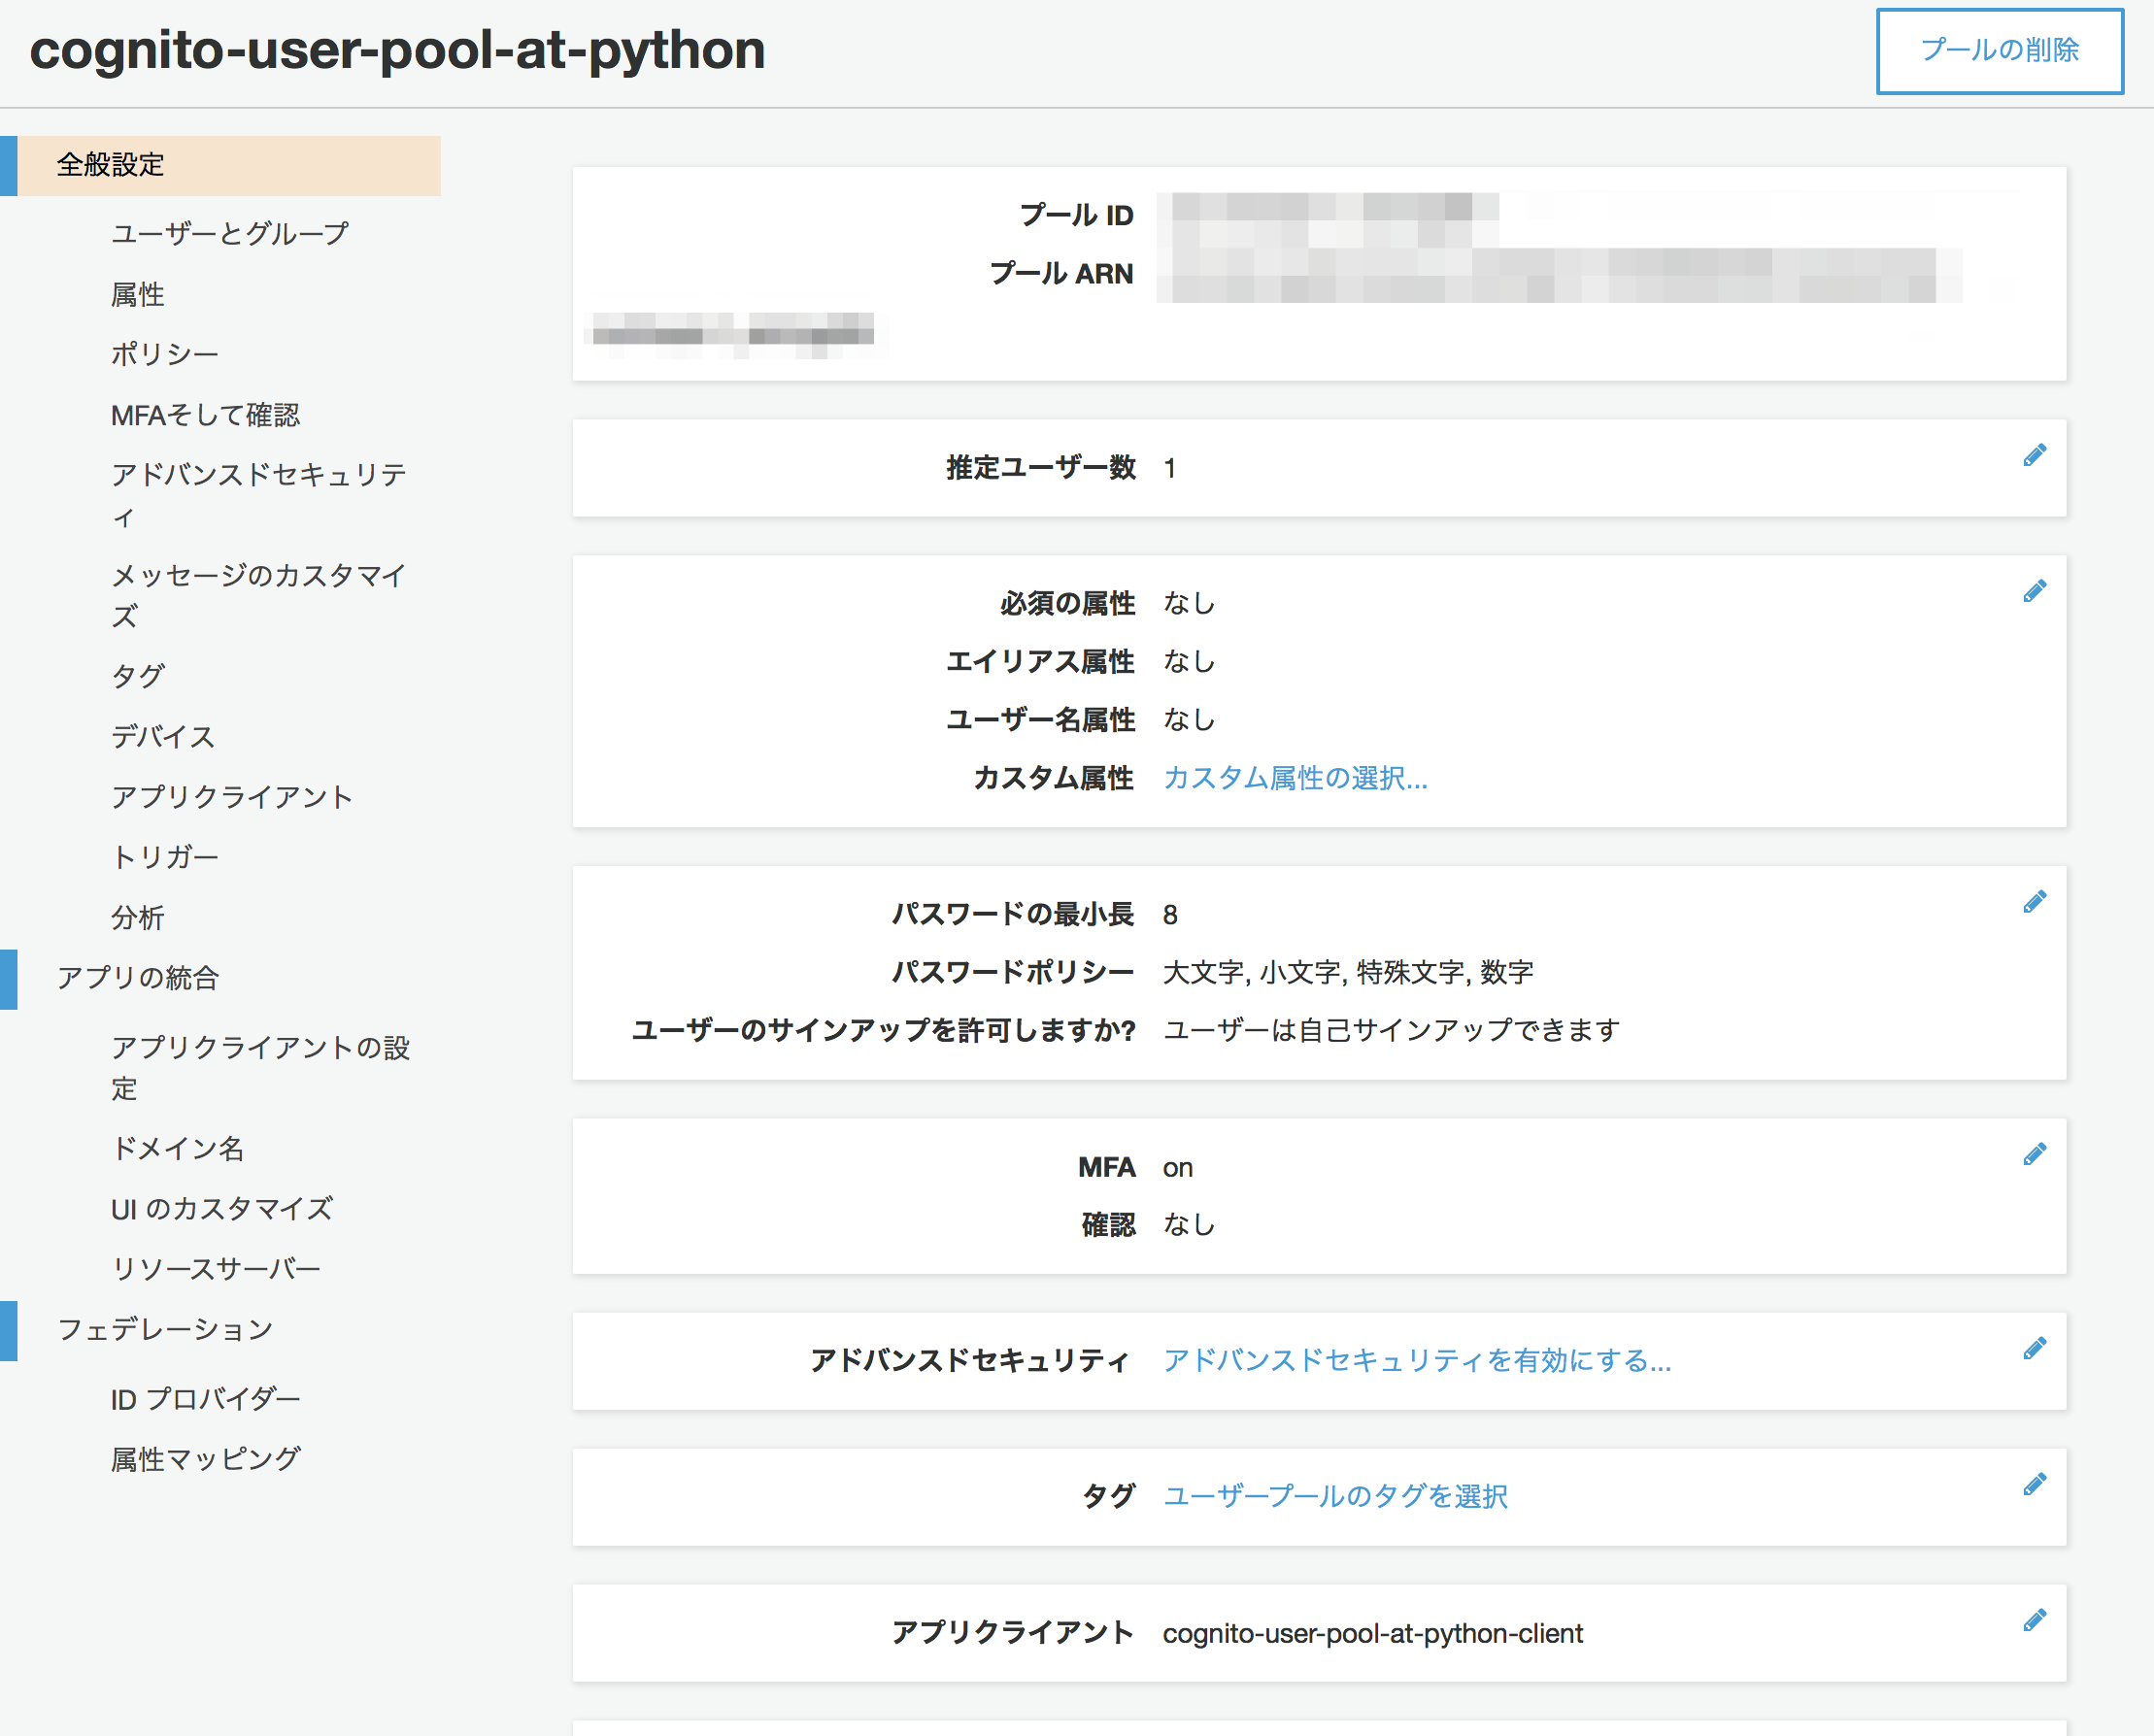
ユーザープールが作成できました。アプリクライアントやユーザーも作成できています。
前回実装したNode.jsで認証してみます。

はい。うまく認証できました。
やったぜ。
まとめ
思っていたより簡単に作成することができました。公式ドキュメントが最新の仕様に追いついていない感がありますので、SDKを利用する場合には実際に動作させながらが良さそうです。
参考
CognitoIdentityProvider — Boto 3 Docs 1.9.39 documentation
https://boto3.amazonaws.com/v1/documentation/api/latest/reference/services/cognito-idp.html
CloudFormationでCognito UserPoolを作る
https://wp-kyoto.net/create-cognito-userpool-by-cloudformation/
Amazon Cognitoのワンタイムパスワード(TOTP)認証をNode.jsで試してみた
https://qiita.com/kai_kou/items/aa7dc0042b44649f576a
