はじめに
この記事は、ミロゴス Advent Calendar 2022 16日目の記事です。
AWSを使った環境構築をしていると本番環境、検証環境、開発環境とアカウント単位で環境を分ける場合があります。
上記のような運用ではmainブランチが更新されると本番環境に、developブランチが更新されると開発環境に自動で反映されるといった仕組みがあると開発効率が向上します。
この記事ではAWS CDKを使ってCodePipelineとGitHubを連携してCICDを作成する方法を紹介します。
構成
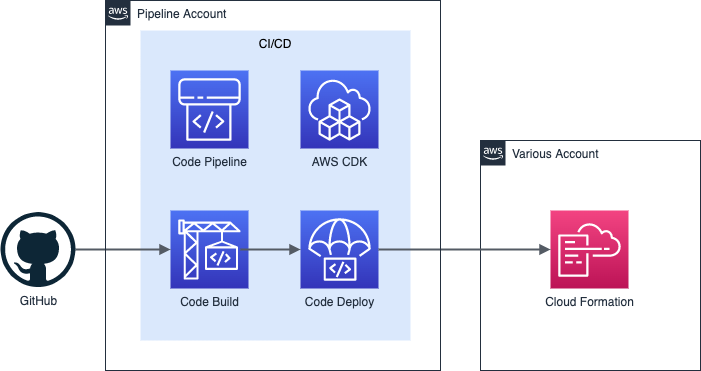
Pipeline用アカウントにCICDのスタックを作成し、そこから各アカウント毎の環境へデプロイする構成となります。
環境
cdk --version
2.21.1 (build a6ee543)
- ディレクトリ構成
├── README.md
├── bin
│   └── cdk-pipeline.ts
├── cdk.json
├── jest.config.js
├── lib
│   ├── cdk-pipeline-stack.ts
│   ├── deploy-stage.ts
│   ├── sample-project-stack.ts
│   ├── type
│   │   └── index.ts
│   └── util
│       └── index.ts
├── package-lock.json
├── package.json
├── scripts
│   └── run_prebuild.sh
└── tsconfig.json
- 主要な処理をしているスクリプトは次の通りです。
| スクリプト名 | 役割 |
|---|---|
| cdk-pipeline.ts | CICDのスタックを作成する処理 |
| type/index.ts | cdk.jsonから取得した値を格納する型を定義 |
| util/index.ts | cdk-pipeline.tsで呼び出されるcdk.jsonから値を取得するメソッドを定義 |
| cdk-pipeline-stack.ts | パイプラインの中身の処理 |
| deploy-stage.ts | パイプラインによってデプロイするスタックを指定 |
| sample-project-stack.ts | サンプルスタックの処理 |
| run_prebuild.sh | パイプラインからビルドを実行する際のコマンドを記載 |
| cdk.json | デプロイに使用する環境別のパラメータを記載 |
事前準備
- AWSアカウント
- パイプライン用のアカウントとデプロイ先のアカウントを用意しておきます。
- AWSとGitHubの連携
- パイプライン用のアカウントのCodePipelineの設定からGitHubとの接続を作成します。
- GitHub 接続を参照
完成系
cdk-pipeline.ts
CICDのスタックを作成する処理を書いています。
後述のutil/index.tsに記載しているgetConfigメソッドを使うことで、cdk.jsonに記載されている各パラメータを取得することが可能です。その後同じく別スクリプトで定義しているBuildParameterに取得した値を格納し各処理で使用しています。
#!/usr/bin/env node
import "source-map-support/register";

import * as cdk from "aws-cdk-lib";
import { CdkPipelineStack } from "../lib/cdk-pipeline-stack";
import { BuildParameter } from "../lib/type";
import { getConfig } from "../lib/util";

const app = new cdk.App();
const buildParameter: BuildParameter = getConfig(app);

cdk.Tags.of(app).add("App", buildParameter.App);
cdk.Tags.of(app).add("Environment", buildParameter.BuildConfig.Environment);

const makeStack = () => {
  new CdkPipelineStack(
    app,
    buildParameter.PipelineConfig.EnvApplication.EnvName +
      buildParameter.App +
      "CdkPipelineStack",
    {
      env: {
        account: buildParameter.PipelineConfig.PipelineAccountID,
        region: buildParameter.PipelineConfig.PipelineProfileRegion,
      },
    },
    buildParameter
  );
};

makeStack();
type/index.ts
BuildParameterを始め、主にcdk.jsonから取得した値を格納するinterfaceを記載しています。
export interface BuildParameter {
  readonly App: string;
  readonly BuildConfig: BuildConfig;
  readonly PipelineConfig: PipelineConfig;
}

export interface BuildConfig {
  readonly Environment: string;
  readonly ProjectCode: string;
}

export interface PipelineConfig {
  readonly PipelineAccountID: string;
  readonly PipelineProfileRegion: string;
  readonly repoName: string;
  readonly connectionArn: string;
  readonly EnvApplication: EnvApplication;
}

export interface EnvApplication {
  readonly EnvName: string;
  readonly ApplicationAWSAccountID: string;
  readonly ApplicationAWSProfileRegion: string;
  readonly TargetBranch: string;
}
util/index.ts
cdk-pipeline.tsで使用しているgetConfigメソッドを定義しています。
ensureStringメソッドでは渡されたオブジェクトからstring型の特定のpropNameを持つ値を参照し戻り値として返します。
getConfigメソッドではまずAWS CDK側で用意されているtryGetContextメソッドを利用してcdk.jsonに記載されているコンテキスト変数から指定の値を取得します。各環境ごとにcdk.jsonで値は分かれていますが、importしたlodashパッケージのmergeメソッドを使いdefaultの値を取得後、dev/stg/prdから該当する環境の値を上書きすることで環境に応じた値を使用できるようにしています。
その後ensureStringメソッドを利用し上記処理で取得した値からアプリケーションサービスのパラメータ、パイプラインのパラメータなど各パラメータを取り出しBuildParameterとして返します。
パラメータの詳細に関してはcdk.jsonの項目で解説しています。
import { App } from "aws-cdk-lib";
import * as _ from "lodash";
import {
  BuildConfig,
  BuildParameter,
  EnvApplication,
  PipelineConfig,
} from "../type";

const ensureString = (
  object: { [name: string]: string },
  propName: string
): string => {
  if (!object[propName] || object[propName].trim().length === 0)
    throw new Error(propName + " does not exist or is empty");

  return object[propName];
};

export const getConfig = (app: App): BuildParameter => {
  // アプリケーションサービスのパラメータ
  const env = app.node.tryGetContext("config");
  if (!env)
    throw new Error(
      "Context variable missing on CDK command. Pass in as `-c config=XXX`"
    );

  const unparsedEnv = app.node.tryGetContext(env);
  const unparsedDefaultEnv = app.node.tryGetContext("default");
  const configObject = _.merge(unparsedDefaultEnv, unparsedEnv);

  const buildConfig: BuildConfig = {
    Environment: ensureString(configObject, "Environment"),
    ProjectCode: ensureString(configObject["Parameters"], "projectCode"),
  };

  // パイプラインのパラメータ
  const pipelineContext = app.node.tryGetContext("pipeline");
  const envApplication: EnvApplication = {
    EnvName: ensureString(pipelineContext["Env"][env], "EnvName"),
    ApplicationAWSAccountID: ensureString(
      pipelineContext["Env"][env],
      "ApplicationAWSAccountID"
    ),
    ApplicationAWSProfileRegion: ensureString(
      pipelineContext["Env"][env],
      "ApplicationAWSProfileRegion"
    ),
    TargetBranch: ensureString(pipelineContext["Env"][env], "TargetBranch"),
  };

  const pipelineConfig: PipelineConfig = {
    PipelineAccountID: ensureString(pipelineContext, "PipelineAccountID"),
    PipelineProfileRegion: ensureString(
      pipelineContext,
      "PipelineProfileRegion"
    ),
    repoName: ensureString(pipelineContext, "repoName"),
    connectionArn: ensureString(pipelineContext, "connectionArn"),
    EnvApplication: envApplication,
  };

  const commonContext = app.node.tryGetContext("common");
  const buildParameter: BuildParameter = {
    App: ensureString(commonContext, "App"),
    BuildConfig: buildConfig,
    PipelineConfig: pipelineConfig,
  };

  return buildParameter;
};
deploy-stage.ts
パイプラインによってデプロイするスタックをここで指定しています。
import { Stage, StageProps } from "aws-cdk-lib";
import { Construct } from "constructs";
import { SampleProjectStack } from "./sample-project-stack";

export class DeployStage extends Stage {
  constructor(scope: Construct, id: string, props: StageProps) {
    super(scope, id, props);

    new SampleProjectStack(this, "SampleProjectStack", {
      env: {
        region: props.env?.region,
        account: props.env?.account,
      },
    });
  }
}
cdk-pipeline-stack.ts
パイプラインの中身の処理を記載しています。
CodePipelineを構築するには、まずパイプラインで参照するソースリポジトリを指定しその後ビルドを実行します。
ビルドを実行する際、本プロジェクトでは後述するrun_prebuild.shにビルドで必要な処理をまとめビルドステップのコマンドを実行する際に呼び出しています。
BuildStepのcommandsなどのパイプライン自体に変更を加えた際に、self-mutation(パイプラインが新しいステージやスタックをデプロイするように自動的に再構成すること)が失敗して動作しなくなります。パイプラインを再び動作可能な状態にするには、パイプライン自体を再デプロイするしかなく、それを事前に防ぐためこのような処理を取っています。
パイプラインは単体では動作せず、ステージを紐づける必要があります。
ここではdeploy-stage.tsでデプロイ対象が定義されたインスタンスを作成し、ステージとしてパイプラインに紐づけています。ステージで指定されたスタックの作成とデプロイが行われます。
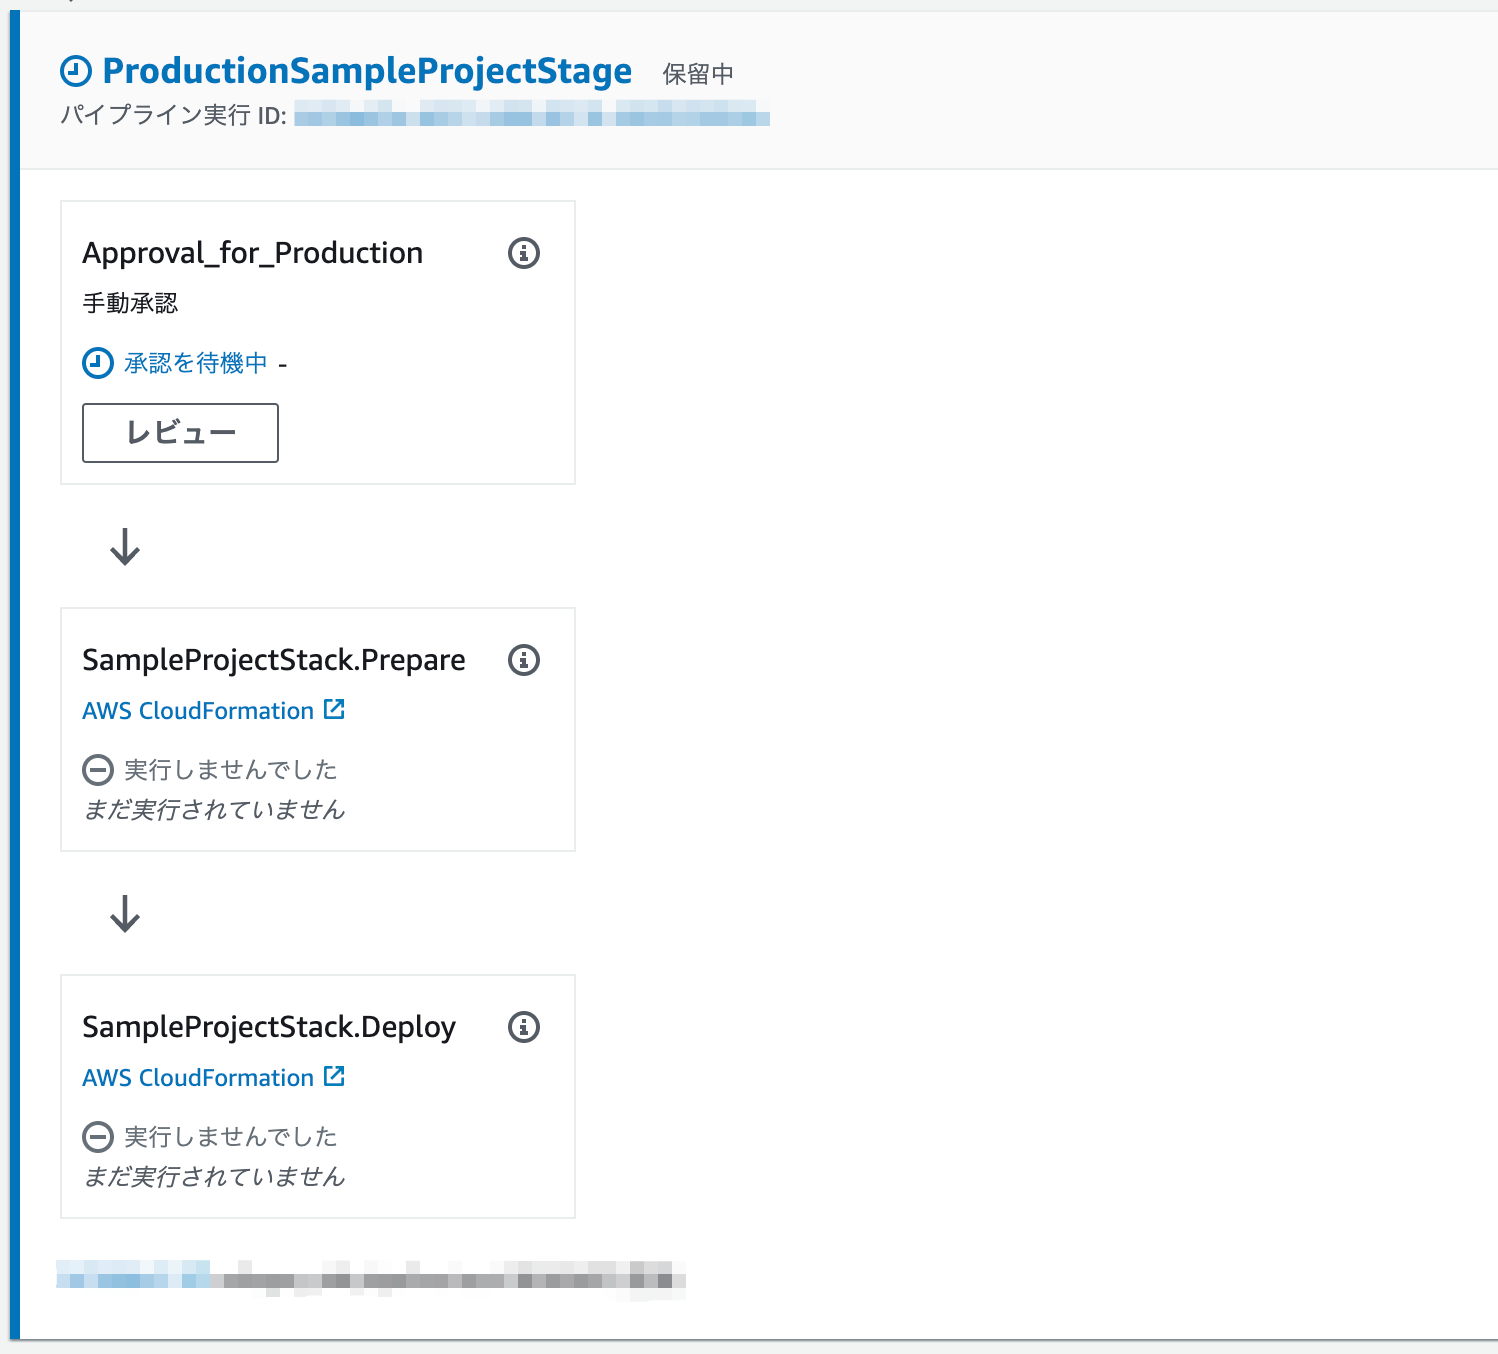
本プロジェクトでは本番環境のみ自動でデプロイされるのを避けるため手動承認のステージを採用しています。
参考:CodePipeline パイプライン構造リファレンス
import { Stack, StackProps } from "aws-cdk-lib";
import * as pipelines from "aws-cdk-lib/pipelines";
import { Construct } from "constructs";
import { DeployStage } from "./deploy-stage";
import { BuildParameter } from "./type";

/**
 * クロスアカウント用Pipeline作成
 */
export class CdkPipelineStack extends Stack {
  constructor(
    scope: Construct,
    id: string,
    props: StackProps,
    buildParameter: BuildParameter
  ) {
    super(scope, id, props);

    const pipeline = new pipelines.CodePipeline(
      this,
      buildParameter.PipelineConfig.EnvApplication.EnvName + "Pipeline",
      {
        synth: new pipelines.CodeBuildStep(
          buildParameter.PipelineConfig.EnvApplication.EnvName +
            "CodeBuildStep",
          {
            input: pipelines.CodePipelineSource.connection(
              buildParameter.PipelineConfig.repoName,
              buildParameter.PipelineConfig.EnvApplication.TargetBranch,
              {
                connectionArn: buildParameter.PipelineConfig.connectionArn,
              }
            ),
            commands: [
              "chmod 755 ./scripts/run_prebuild.sh",
              `./scripts/run_prebuild.sh ${buildParameter.BuildConfig.Environment}`,
              `npx cdk synth -c config=${buildParameter.BuildConfig.Environment} --all`,
            ],
          }
        ),
        dockerEnabledForSynth: true,
        crossAccountKeys: true,
      }
    );

    const deployStage = new DeployStage(
      this,
      buildParameter.PipelineConfig.EnvApplication.EnvName +
        buildParameter.App +
        "Stage",
      {
        env: {
          account:
            buildParameter.PipelineConfig.EnvApplication
              .ApplicationAWSAccountID,
          region:
            buildParameter.PipelineConfig.EnvApplication
              .ApplicationAWSProfileRegion,
        },
      }
    );

    // 本番環境のみ承認が必要なステップを加える
    if (buildParameter.BuildConfig.Environment == "prd") {
      pipeline.addStage(deployStage, {
        pre: [new pipelines.ManualApprovalStep("Approval for Production")],
      });
    } else {
      pipeline.addStage(deployStage);
    }
  }
}
sample-project-stack.ts
サンプルスタックの処理を記載しています。
実際にデプロイしたいリソース群はこちらのスクリプト内に書くことになります。
import { Stack, StackProps } from "aws-cdk-lib";
import { Construct } from "constructs";

export class SampleProjectStack extends Stack {
  constructor(scope: Construct, id: string, props: StackProps) {
    super(scope, id, props);
  }
}
run_prebuild.sh
パイプラインからビルドを実行する際に必要な処理をこのスクリプトに記載します。
本プロジェクトではyarnコマンドによるパッケージのインストールのみとなっていますが、ファイルの配置やコピーが必要な際などにここに処理を書くことで実現できます。引数には環境名も渡しているため環境別に対応が必要な場合にも対処が可能です。
#!/bin/bash
yarn
if [ $1 == 'dev' ] || [ $1 == 'stg' ] || [ $1 == 'prd' ]; then
    echo "Environment is $1 ."
    # 環境別に対応が必要な処理がある場合ここに記載する
else
    echo Invalid Argument
    exit 1
fi
exit 0
cdk.json
デプロイに使用する各パラメータを記載しています。
util/index.tsの項目で解説をしましたが、defaultの値にdev/stg/prdの値を上書きしてソース内で利用しています。
{
  "app": "npx ts-node --prefer-ts-exts bin/cdk-pipeline.ts",
  "watch": {
    "include": ["**"],
    "exclude": [
      "README.md",
      "cdk*.json",
      "**/*.d.ts",
      "**/*.js",
      "tsconfig.json",
      "package*.json",
      "yarn.lock",
      "node_modules",
      "test"
    ]
  },
  "context": {
    "@aws-cdk/aws-apigateway:usagePlanKeyOrderInsensitiveId": true,
    "@aws-cdk/core:stackRelativeExports": true,
    "@aws-cdk/aws-rds:lowercaseDbIdentifier": true,
    "@aws-cdk/aws-lambda:recognizeVersionProps": true,
    "@aws-cdk/aws-cloudfront:defaultSecurityPolicyTLSv1.2_2021": true,
    "@aws-cdk-containers/ecs-service-extensions:enableDefaultLogDriver": true,
    "@aws-cdk/aws-ec2:uniqueImdsv2TemplateName": true,
    "@aws-cdk/core:checkSecretUsage": true,
    "@aws-cdk/aws-iam:minimizePolicies": true,
    "@aws-cdk/core:target-partitions": ["aws", "aws-cn"],
    "common": {
      "App": "SampleProject"
    },
    "default": {
      "Parameters": {
        "projectCode": "aws-cdk-sample-project"
      }
    },
    "dev": {
      "Environment": "dev",
      "Parameters": {
        "sampleParameter": "XXXXXX"
      }
    },
    "stg": {
      "Environment": "stg",
      "Parameters": {
        "sampleParameter": "XXXXXX"
      }
    },
    "prd": {
      "Environment": "prd",
      "Parameters": {
        "sampleParameter": "XXXXXX"
      }
    },
    "pipeline": {
      "PipelineAccountID": "XXXXXXXXXXXX",
      "PipelineProfileRegion": "ap-northeast-1",
      "repoName": "cdk-pipeline-test",
      "connectionArn": "arn:aws:codestar-connections:ap-northeast-1:XXXXXXXXXXXX:connection/XXXXXXXX-XXXX-XXXX-XXXX-XXXXXXXXXXXX",
      "Env": {
        "dev": {
          "EnvName": "Development",
          "ApplicationAWSAccountID": "XXXXXXXXXXXX",
          "ApplicationAWSProfileRegion": "ap-northeast-1",
          "TargetBranch": "develop"
        },
        "stg": {
          "EnvName": "Staging",
          "ApplicationAWSAccountID": "XXXXXXXXXXXX",
          "ApplicationAWSProfileRegion": "ap-northeast-1",
          "TargetBranch": "staging"
        },
        "prd": {
          "EnvName": "Production",
          "ApplicationAWSAccountID": "XXXXXXXXXXXX",
          "ApplicationAWSProfileRegion": "ap-northeast-1",
          "TargetBranch": "main"
        }
      }
    }
  }
}
各パラメータの設定
- cdk.jsonにパイプライン用のアカウントやスタックをデプロイするアカウントを指定する必要があります。
| パラメータ名 | 指定する値 |
|---|---|
| PipelineAccountID | パイプライン用アカウントのID |
| PipelineProfileRegion | パイプライン用アカウントのリージョン |
| repoName | GitHubのリポジトリ |
| connectionArn | 事前準備で作成したGitHubへの接続のArn |
| EnvName | 環境名 |
| ApplicationAWSAccountID |
デプロイ先のアカウントのID |
| ApplicationAWSProfileRegion |
デプロイ先のリージョン |
| TargetBranch | 更新時にパイプラインを稼働させるブランチ |
デプロイ方法
パイプライン本体のデプロイ(初回のみ)
- パイプライン用アカウントへポリシーの付与
npx cdk bootstrap --profile pipeline-profile --cloudformation-execution-policies arn:aws:iam::aws:policy/AdministratorAccess aws://XXXXXXXXXXXX/ap-northeast-1 -c config=dev
- パイプライン用アカウントからデプロイ先アカウントへのアクセス権限付与
npx cdk bootstrap --profile development-profile --trust {デプロイ先アカウントID} --cloudformation-execution-policies arn:aws:iam::aws:policy/AdministratorAccess aws://{パイプライン用アカウントID}/ap-northeast-1 -c config=dev
- パイプラインスタックのデプロイ
npx cdk deploy -c config=dev --profile pipeline-profile DevelopmentSampleProjectCdkPipelineStack
パイプラインによるデプロイ
-
TargetBranchに設定したブランチが更新されると自動でCodePipelineが動き始めます。
まとめ
GitHubのブランチを更新するだけで自動でデプロイが行われるCICDを紹介しました。
自身でデプロイをする手間が省ける他、一度一つの環境を作成してしまえば検証環境や本番環境の構築もスムーズに進行することも可能です。
AWS CDKを用いて開発環境の効率化を考えている方の参考になれば幸いです。


