やりたいこと
Googleサイトについて、個人的に魅力に感じている以下の3点。
これらをWordpressで実現したいと思います。
- 広告なし・無料でWebサイトを作る
- SSL対応する
- Googleグループのメンバーに対して編集権限を付与する
この記事ではやらないこと
Googleサイトからの記事のインポート
思い至ったきっかけ
新しいGoogleサイトのフッターが大きくて不満に感じたのがきっかけです。

それと、Googleの検索結果にGoogleサイトと表示されるのもなんとかしたいと考えていました(こちらは今までのGoogleサイトも同様)。
とはいえ現状ではGoogleグループに紐づけて編集者を設定しているので、単純にWordpressを導入しただけでは運用に大きな変更が生じてしまうことが懸念事項でした。
(Googleサイトは個人だけでなくGoogleグループ単位でサイトの権限を設定できます。)
問題と解決策
これらの内容を順に説明します。
- 広告なし・無料でWebサイトを作る → Google Compute Engineの無料枠を利用
- SSL対応する → Let's Encryptを利用
- Googleグループのメンバーに対して編集権限を付与する → WordpressのAPIをGoogle Apps Scriptから叩く
なお、以下の前提がありますので予めご了解ください。
- 独自ドメインは取得済みでDNSの設定などは自由にできる状況だとします
- Google Cloud Platform の利用は開始しているものとします
- GSuiteを契約して作業した際の記録ですので一般のGoogleアカウントで進めると多少異なる画面になる可能性があります
無料でWordpressを使う - GCEにデプロイ
Google Cloud Engineに所定の環境をボタン一つで作ることができるCloud Launcherという仕組みを使います。
以下の記事に沿って作業しました(無料枠はたまに変わるので調べてください。2018.8現在では記事中の値と同じでした)
https://itbouzy.site/server/gcp-wordpress02/
5分くらいでWordpressが使えるようになります。MySQLをインストールして……とかやっていた時代から考えると隔世の感があります……
無料でWordpressをSSL対応 - Let's Encrypt
SSLの証明書を取得するにあたり、まずは独自ドメインでアクセスできるようにします。
この手順は各所で説明されておりますので割愛します。GCP上で固定IPを設定→DNSを設定→WPの設定を書き換えという3Stepで完了する作業です。
独自ドメインでWPを開けることを確認したら、SSHで入って証明書を作成・設定します。
以下の手順に沿ってやれば数分でできます。
https://www.onepagezen.com/free-ssl-certificate-wordpress-google-cloud-click-to-deploy/
自動更新の設定まで忘れずにやりましょう。
WordpressのユーザーにGoogleグループのメンバーを同期 - APIでユーザー設定
下準備
「 /wp-json を見るとURLの一覧が出てくるよ」という記事は各所で見かけますがデフォルトの設定では表示されません。
Pretty Permalinks が有効化されていないサイトでは、 WordPress が /wp-json/ を扱うことができません。従って、 WordPress のデフォルトのパーマリンクが代わりに使われ、リンクヘッダーは以下のようになります。
こちらを参考にURLを適宜読み替えるかパーマリンクとしてPretty Permalinksを設定してください。
http://ja.wp-api.org/guide/discovery/
OAuth利用
結論から言うと、この方法ではApplicationに権限を設定できずうまくいきませんでした。
認証しているユーザーにのみ許可されているAPIなどは実行できるものもあるようですが、ユーザーの追加はできませんでした。
WordpressにOauth1でつなぎたい人のために手順とサンプルコードを残しておきます。
プラグインの設定
WP REST API - OAuth 1.0a Server をインストールしました。
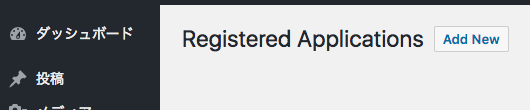
Applicationsユーザーの追加
ユーザータブからApplicationsを開きます。
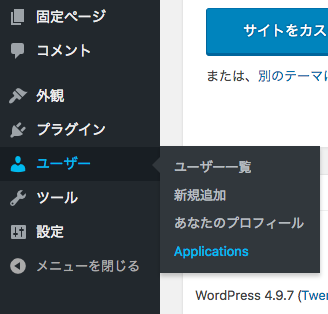
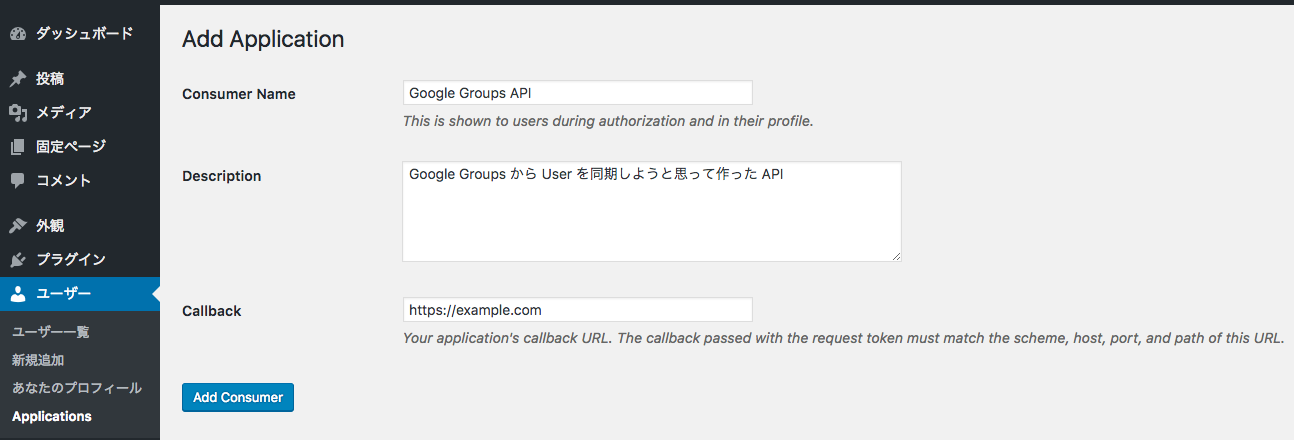
画面上部 [Add New] から新規登録します。
ここでCallbackには一旦適当な文字列を入れておき、あとでGASのWebアプリケーションを作ったときにそのURLを入れます。
Google Apps Scriptの作成
Google Apps ScriptでOAuth1認証をする際には、こちらのライブラリを使用しました。
https://github.com/gsuitedevs/apps-script-oauth1
自分の環境ではそのままでは動かなかったので2点直しています。
- GSuiteを契約していると、ライブラリが想定しているScriptのURLと異なる形になります。そのためCallbackのURLが適切に生成されません。
OAuth1.getCallbackUrlを自分の環境の値で上書きすることで解消しました - 普通にWebアプリケーションとして作成すると
doGetしか動作しなかったので初期化時のみパラメーターを渡すことで分岐させています
なお、WordpressのApplicationを設定する際に指定するCallback URLと上記URLが完全一致している必要があるようです(ちゃんと調べてない)
var clientKey = 'xxxxxxxxxxxx';
var clientSecret = 'xxxxxxxxxxxxxxxxxxxxxxxxxxxxxxxxxxxxxxxxxxxxxxxx';

var base = 'https://kaerunoko.com/';

// /wp-json を開くと表示される各種値をコピペ
var auth = {
  "request": "https://kaerunoko.com/oauth1/request",
  "authorize": "https://kaerunoko.com/oauth1/authorize",
  "access": "https://kaerunoko.com/oauth1/access",
  "version": "0.1"
};

function doGet(request) {
  // 初期化のときはパラメーターとしてinit=trueを渡す
  if (request.parameter.init) {
    return init();
  } else {
    return authCallback(request);
  }
}

function init() {
  var wpService = getWpService();
  if (!wpService.hasAccess()) {
    var authorizationUrl = wpService.authorize();
    var template = HtmlService.createTemplate('<a href="<?= authorizationUrl ?>" target="_blank">Authorize</a>.');
    template.authorizationUrl = authorizationUrl;
    return HtmlService.createHtmlOutput(template.evaluate());
  } else {
    exec();
    return HtmlService.createHtmlOutput('OK');
  }
}

function exec() {
  try{
    UrlFetchApp.fetch(base + 'wp-json/wp/v2/users', {
      muteHttpExceptions: false,
      method: 'POST',
      payload: {
        username: 'test',
        email: 'test@kaerunoko.com',
        password: 'password'
      }
    })
  } catch (e) {
    Logger.log(e);
  }
}

function authCallback(request) {
  var wpService = getWpService();
  var isAuthorized = wpService.handleCallback(request);
  if (isAuthorized) {
    exec();
    return HtmlService.createHtmlOutput('Success!');
  } else {
    return HtmlService.createHtmlOutput('Denied.');
  }
}

function getWpService() {
  // どうやらWP側の設定と一致している必要がある模様
  OAuth1.getCallbackUrl = function(){
    return 'https://script.google.com/a/kaerunoko.com/macros/s/xxxxxxxxxxxxxxxxxxxxx/exec';
  }

  return OAuth1.createService('wp')
      // Set the endpoint URLs.
      .setAccessTokenUrl(auth.access)
      .setRequestTokenUrl(auth.request)
      .setAuthorizationUrl(auth.authorize)
      // Set the consumer key and secret.
      .setConsumerKey(clientKey)
      .setConsumerSecret(clientSecret)
      // Set the name of the callback function in the script referenced
      // above that should be invoked to complete the OAuth flow.
      .setCallbackFunction('authCallback')
      // Set the property store where authorized tokens should be persisted.
      .setPropertyStore(PropertiesService.getUserProperties());
}
この状態でScriptの実行用URL+ ?init=true を開き、表示される画面でぽちぽちと進んでいけばWPに認証されTokenが取得できます。
次回以降は認証は不要でScriptを実行できます。タイマーによる実行も可能です。
...と、ここまで実装してエラーに遭遇しました。新規ユーザーを作る権限がないそうです。
Exception: https://kaerunoko.com/wp-json/wp/v2/users のリクエストに失敗しました(エラー: 401)。サーバー応答の一部: {"code":"rest_cannot_create_user","message":"\u65b0\u898f\u30e6\u30fc\u30b6\u30fc\u3092\u4f5c\u6210\u3059\u308b\u6a29\u9650\u304c\u3042\u308a\u307e...(応答の全文を見るには muteHttpExceptions オプションを使用してください)
残念。OAuthでユーザーの登録などを実行できるように研究を続けますが一旦置いておいて目的達成のため別の方法を採用します。
パスワード利用
プラグインインストール
Application password というプラグインを使います。
https://github.com/georgestephanis/application-passwords/
この方法ではScriptにパスワードの平文が記録されてしまうので個人的には好みではありません。
OAuthでうまくいく方法が見つかるまでの暫定のつもりです。
HTTPヘッダーにパスワードが平文で含まれるので、必ずHTTPSの設定をした上で利用してください。
ユーザー管理用のユーザーを作成
あとで権限を絞れるように、専用のユーザーを作成します。
一旦権限は管理者としておきます。
画面最下部にある Application Passwords セクションにて、[Add New] します。
ここで入れる名称は識別できれば何でもいいです。

生成時に表示されるパスワードを控えてください。一回しか表示されないので注意してください。
なお、4文字ごとに空白で区切られていますが、認証時に空白は無視されるようです。
curlで導通確認
※飛ばして次のセクションに進んでも大丈夫です
まずはアクセスに使うトークンを生成します。
echo "USERNAME:PASSWORD" | base64
パスワードには空白が含まれると思いますがそれもそのまま入力して大丈夫です。
得られたトークンを用いてPOSTを実行してみます。(適宜上記echoの結果を変数に入れるなりしてください)
curl --header "Authorization: Basic XXXXXXXXXXXXXXXXXXXXXXXXXXXXXXXXXXXXXXXXXXXXXXXXXXXXXXX=" -X POST -d "email=test2@kaerunoko.com&username=test2&password=password&roles=editor" https://kaerunoko.com/wp-json/wp/v2/users
これで編集権限のユーザーが追加できることを確認したらScriptの実装に入ります。
Google Apps Script で Google Groups と Wordpress のユーザーを同期
以下のコードでユーザー一覧の取得とユーザーの追加ができます。
var userName = 'user_admin';
var password = 'xxxxxxxxxxxxxxxxxxxx';
var base = 'https://kaerunoko.com';

function fetchAllUsers() {
  var users = fetch('users');
  Logger.log(users);
}

function addNewUser() {
  try {
    var user = fetch('users', 'post', {email: 'test4@kaerunoko.com', username: 'test4', password: 'password', roles: 'editor'});
    Logger.log(user);
  } catch (e) {
    Logger.log(e);
  }
}

function removeUser() {
  try {
    var id = 7;
    // ゴミ箱がないリソースは削除時に force 指定が必要
    // 削除するユーザーの担当を引き継ぐユーザーをreassignで指定
    var res = fetch('users/' + id, 'delete', {force: true, reassign: 1});
    Logger.log(res);
  } catch (e) {
    Logger.log(e);
  }
}

/**
 * @param {string} path
 * @param {string} [method=get] get, post, and etc.
 * @param {Object} [params={}]
 */
function fetch(path, method, params) {
  method = method || 'get';
  params = params || {};
  var token = Utilities.base64Encode(userName + ':' + password);
  // context に応じてレスポンスに含まれるフィールドが変化する(view/embed/edit)。調べた範囲では edit は全部盛り
  var url = base + '/wp-json/wp/v2/' + path + '?context=edit';
  var response = UrlFetchApp.fetch(url, {
    headers: {
      Authorization: 'Basic ' + token
    },
    payload: params,
    method: method,
    muteHttpExceptions: true
  })

  try {
    var content = JSON.parse(response.getContentText());
  } catch (e) {
    throw new Error(Utilities.formatString('[不正な応答] %s', response.getContentText()));
  }

  if (response.getResponseCode() >= 400) {
    throw new Error(Utilities.formatString('[エラーコード: %s] %s', content.code, content.message));
  }
  return content;
}
あとは普通に Googleグループのメンバー一覧と照らし合わせて不足分を追加/過剰分を削除するだけですね。
var groupEmail = 'site-editors@kaerunoko.com';
var wpOnlyUsers = ['user_admin@kaerunoko.com'];
var ggOnlyUsers = ['bot-tool@kaerunoko.com'];

function doSync() {
  var ggUserEmails = GroupsApp.getGroupByEmail(groupEmail).getUsers()
  .map(function(ggUser){
    return ggUser.getEmail();
  });

  var wpUsers = fetch('users');

  // GGにいてWPにいないユーザーを探す
  var wpUserEmails = wpUsers
  .map(function(wpUser){
    return wpUser.email;
  });
  var newUsers = ggUserEmails.filter(function(ggUser){
    return existsInArray(ggUser, wpUserEmails, ggOnlyUsers);
  });

  // WPにいてGGにいないユーザーを探す
  var removeUserIds = wpUsers.filter(function(wpUser){
    return existsInArray(wpUser, ggUserEmails, wpOnlyUsers, function(wpUser) {return wpUser.email});
  }).map(function(wpUser) {
    return wpUser.id
  });

  Logger.log(newUsers);
  newUsers.every(addUser);

  Logger.log(removeUserIds);
  removeUserIds.every(removeUser);

  // TODO: 追加したユーザーにメールしたり増減を管理者にメールしたり
}

function existsInArray(target, array, excludes, targetConverter) {
  var _target = targetConverter ? targetConverter(target) : target;
  if (excludes && excludes.indexOf(_target) >= 0) {
    return false;
  }
  return !array.some(function(obj){
    return obj === _target;
  });
}

function addUser(mail) {
  var username = mail.split('@')[0];
  var password = mail + mail; // パスワードは一旦適当なものを
  fetch('users', 'post', {email: mail, username: username, password: password, roles: 'editor'})
}

function removeUser(id) {
  fetch('users/' + id, 'delete', {force: true, reassign: 1});
}

// fetchは前述のもの
追加の設定
GASの定期実行
前述のScriptをスケジュールで実行するようにします。ご利用の状況に応じて頻度を設定してください。
(もちろんグループの変更も自前のツールでやっている場合はその処理後にWordpressへの同期処理を入れるのがベストだと思います)
GoogleアカウントでWordpressログイン
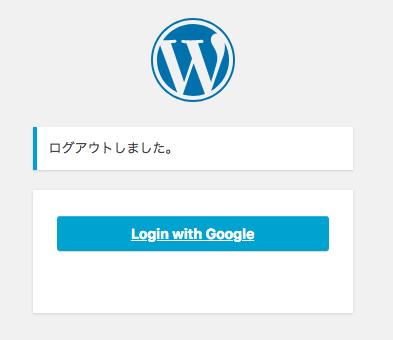
Googleサイトを編集するときと同様、Googleアカウントでログインできるようにしたいですね。
Google Apps Loginを使うとGoogleで認証ができるようになります。
https://wp-glogin.com/glogin/
この設定をする場合、パスワードは撤廃した方がシンプルかつ安全です。
上記プラグインで「ログインページから Google に自動的にリダイレクトする」を選択します。
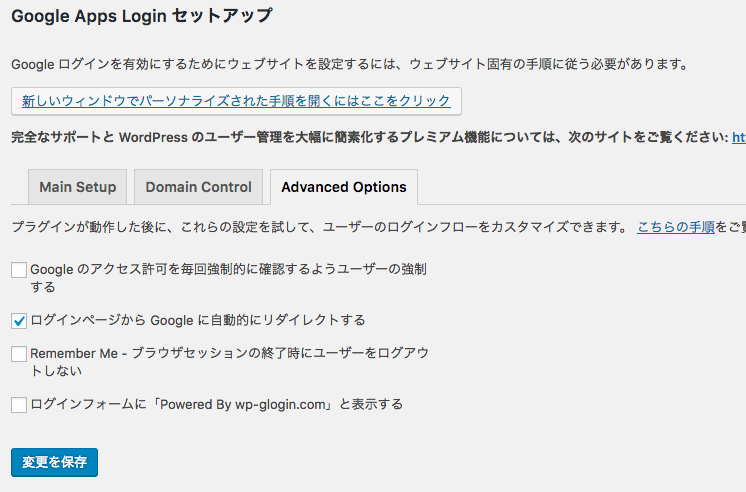
これで編集者はログインページに遷移することなくGoogleの認証へと飛ばされます。
こうなるともうパスワードは使わないので、先のScriptでパスワードを入れている箇所は完全にランダムな文字列にしましょう。
最後にログアウトページでGoogle認証以外を隠して完成です。
完全にDOMから削除してもいいのですが、万が一adminがGoogle経由でログインできなくなったときにSSH経由でごにょごにょすることになるのでこのサンプルコードでは一旦隠すだけにしておきました。
function login_custom() { ?>
  <style>
    #login #nav,
    #login #backtoblog,
    #login .galogin-or {
      display: none;
    }
    #login label[for="user_login"],
    #login label[for="user_pass"],
    #login .forgetmenot,
    #login p.submit {
      display: none; //ブラウザの開発コンソールなどでこれを消せばID/PWのログインが復活
    }
  </style>
<?php }
add_action( 'login_enqueue_scripts', 'login_custom' );
まとめ
Google Apps Script でアロー関数書きたい