社外コミュニティや AWS Summit をいろいろ見ていると、 GitHub × Terraform で AWS の構築をしているケースが見られました。
今回は自分なりに開発環境を整える意図で記載してます。
また、最近ライセンスの発表がありましたがこちらには触れません。
VSCode × GitHub Actions × Terraform の準備
事前インストール
Git のインストール
Windows の場合は下記からインストールが必要です。
https://gitforwindows.org/
Terraform のモジュール配置
下記からダウンロードします。
https://developer.hashicorp.com/terraform/downloads
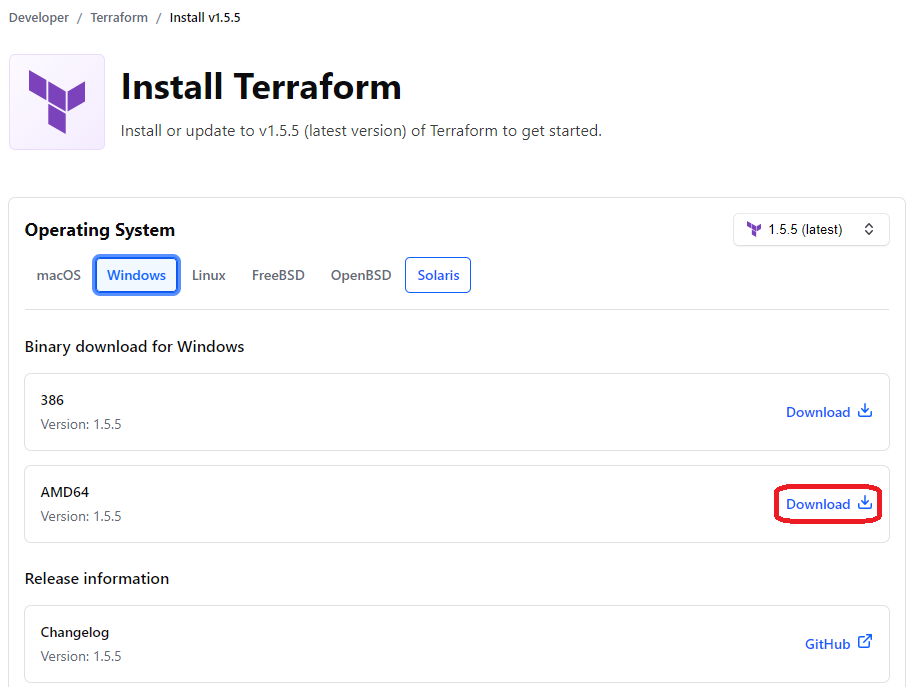
配置は任意でよいとのことなのでC:\GitHub\terraformなどに配置します。
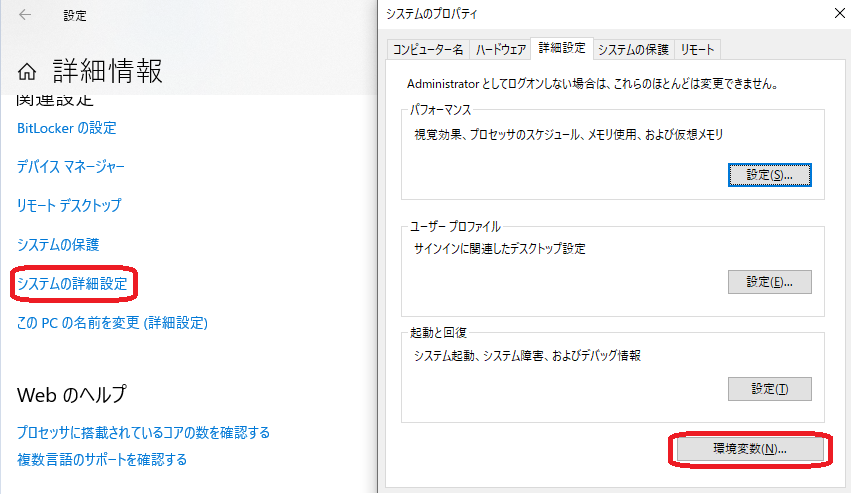
システムの詳細設定>詳細設定タブ>環境変数>Pathを選択して編集
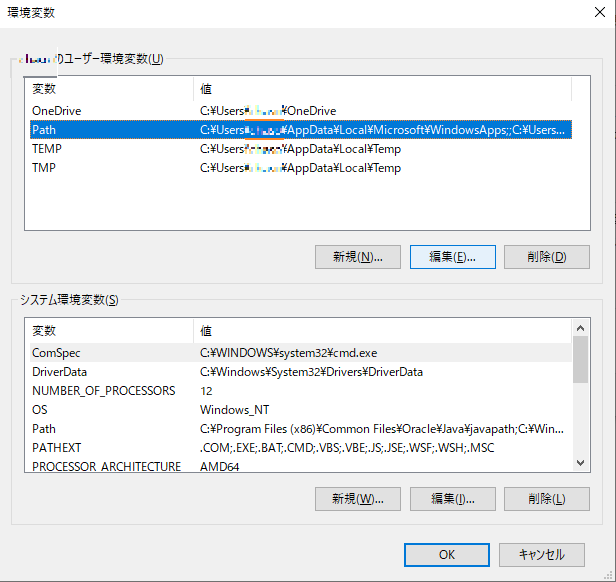
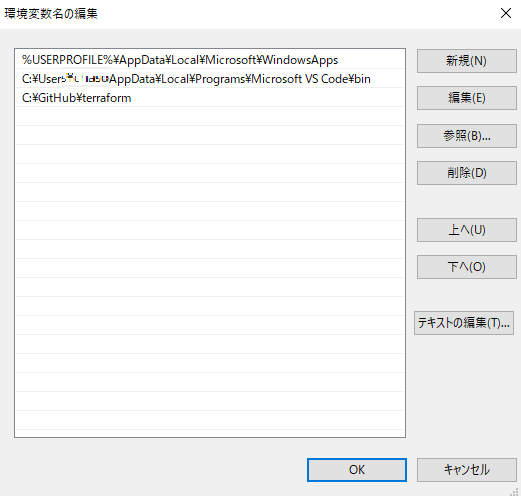
新規>terraform.exeを配置したパス(ここではC:\GitHub\terraform)
すると、terraform -vコマンドが効くようになります。
PS C:\GitHub> terraform -v
Terraform v1.5.5
on windows_amd64
PS C:\GitHub>
PS C:\GitHub\terraform> terraform -v
Terraform v1.5.5
on windows_amd64
PS C:\GitHub\terraform>
VSCode の拡張機能インストール
- HashiCorp Terraform
- GitHub Pull Requests and Issue
- Markdown Preview Github Styling
- GitHub Actions
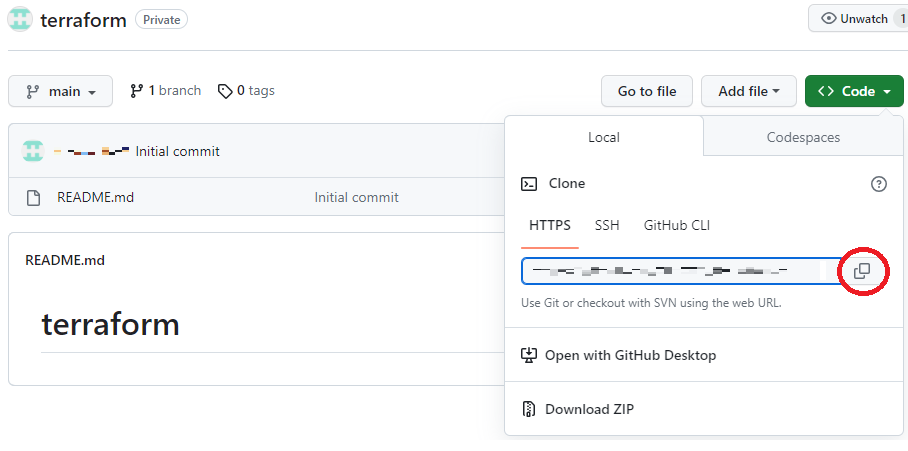
git clone
VSCode のターミナルでローカルにリポジトリをコピーします。
PS C:\GitHub> git clone https://github.com/***/terraform.git
Cloning into 'terraform'...
remote: Enumerating objects: 3, done.
remote: Counting objects: 100% (3/3), done.
remote: Total 3 (delta 0), reused 0 (delta 0), pack-reused 0
Receiving objects: 100% (3/3), done.
PS C:\GitHub>
git clone の対象 URL は以下から取得です。
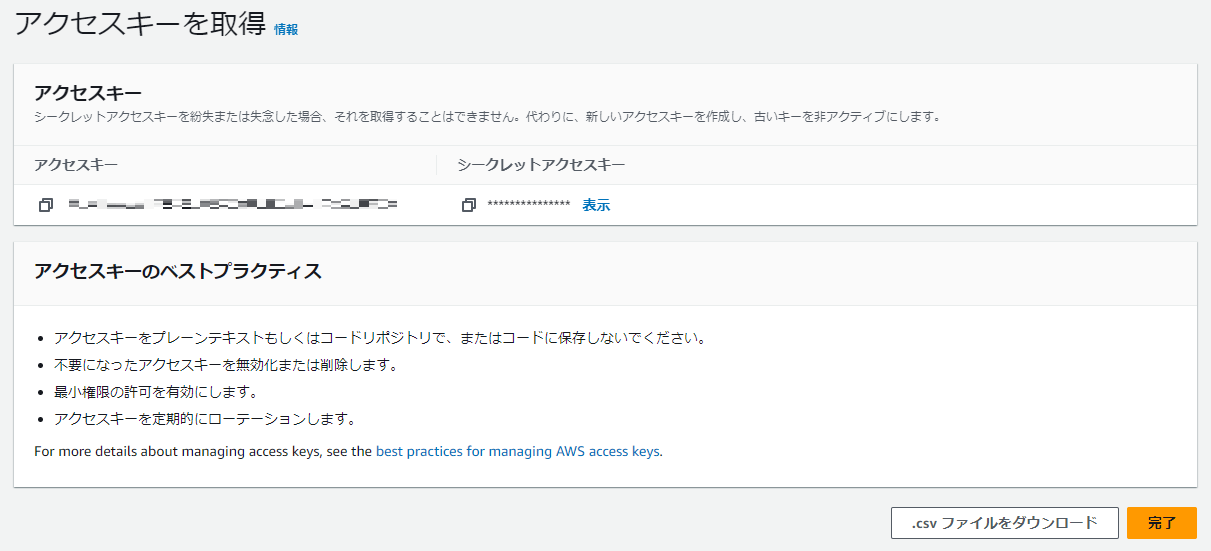
IAM ユーザーの CLI アクセスキーの発行してダウンロード

この先のCLIのインストールは過去にやってしまったので省略します。
また、上記のガイドには
ステップ 1: MFA サインインを強制するポリシーを作成する
(中略)
[JSON] タブを選択し、以下の JSON ポリシードキュメントからテキストをコピーします。AWS: MFA で認証された IAM ユーザーが [My security credentials] (セキュリティ認証情報) ページで自分の認証情報を管理できるようにします
とあり、下記のポリシーを作成して割り当てると CLI でも MFA を強制できます。
あまりこの話で脱線したくないので認証できたところから開始します。
terraform コマンドを実施
現状、この VSCode 上でこの状態です。
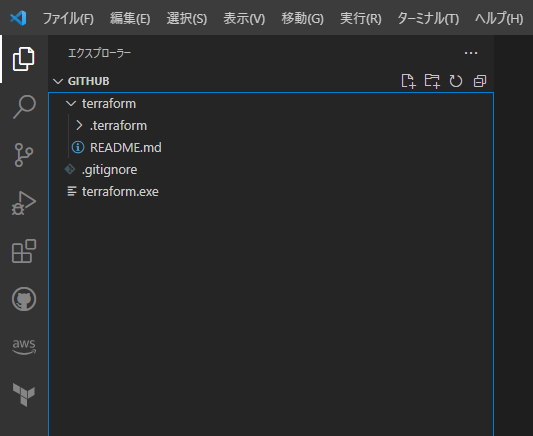
まずは VPC 作成レベルのmain.tfを.terraformの配下に作成します。
resource "aws_vpc" "main" {
    cidr_block = "10.10.0.0/16"

    tags = {
      Name = "terraform-vpc"
    }

}
terraform はコマンド実行時にカレントディレクトリにあるtfファイルを全て読み込んで実行しようとし、
ファイル名に指定はないのでmain.tfとしました。
この状態でmain.tfのあるディレクトリから下記のコマンドを行います。
terraform init
terraform initについてはこちらに記載があります。
exe ファイルを配置して初回実行なので事前に初期化コマンドが必要になります。
terraform plan
terraform planについてはこちらに記載があります。
現状だとmain.tfファイルに記載あるリソースと、AWSの実機上の差分が出力されます。
PS C:\GitHub\terraform\.terraform> terraform plan

Terraform used the selected providers to generate the following execution plan. Resource actions are indicated with the following symbols:
  + create

Terraform will perform the following actions:

  # aws_vpc.main will be created
  + resource "aws_vpc" "main" {
      + arn                                  = (known after apply)
      + cidr_block                           = "10.10.0.0/16"
      + default_network_acl_id               = (known after apply)
      + default_route_table_id               = (known after apply)
      + default_security_group_id            = (known after apply)
      + dhcp_options_id                      = (known after apply)
      + enable_dns_hostnames                 = (known after apply)
      + enable_dns_support                   = true
      + enable_network_address_usage_metrics = (known after apply)
      + id                                   = (known after apply)
      + instance_tenancy                     = "default"
      + ipv6_association_id                  = (known after apply)
      + ipv6_cidr_block                      = (known after apply)
      + ipv6_cidr_block_network_border_group = (known after apply)
      + main_route_table_id                  = (known after apply)
      + owner_id                             = (known after apply)
      + tags                                 = {
          + "Name" = "terraform-vpc"
        }
      + tags_all                             = {
          + "Name" = "terraform-vpc"
        }
    }

Plan: 1 to add, 0 to change, 0 to destroy.

─────────────────────────────────────────────────────────────────────────────────────────────────────────────────────────────────────────────────────────────────────────────────────────────────────

Note: You didn't use the -out option to save this plan, so Terraform can't guarantee to take exactly these actions if you run "terraform apply" now.
PS C:\GitHub\terraform\.terraform>
問題なければterraform applyで適用します。
PS C:\GitHub\terraform\.terraform> terraform apply
(差分出力省略)
Plan: 1 to add, 0 to change, 0 to destroy.

Do you want to perform these actions?
  Terraform will perform the actions described above.
  Only 'yes' will be accepted to approve.

  Enter a value: yes

aws_vpc.main: Creating...
aws_vpc.main: Creation complete after 1s [id=vpc-02209b094c4b015b0]

Apply complete! Resources: 1 added, 0 changed, 0 destroyed.
PS C:\GitHub\terraform\.terraform>
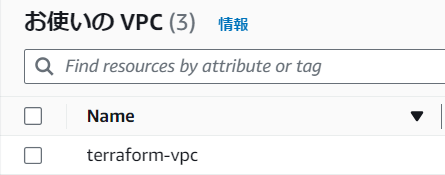
という訳で、VPCの作成ができました。
GitHub の設定
.gitignore
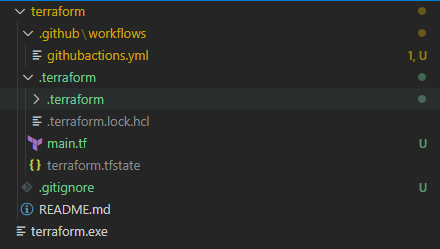
まずは VSCode 上のローカルファイルを確認するといくつかファイルが増えているかと思います。
Terraform は通常だとローカルにterraform.tfstateや.terraform.lock.hclファイルを配置して、
GitHub へ push してしまう恐れがあります。
そのため、.gitignore ファイルにファイル名を記載しておくことで明示的に push しない設定にします。
terraform.exe
terraform.tfstate
.terraform.lock.hcl
GitHub と AWS の連携
ここでやるのは下記のガイドの通りです。
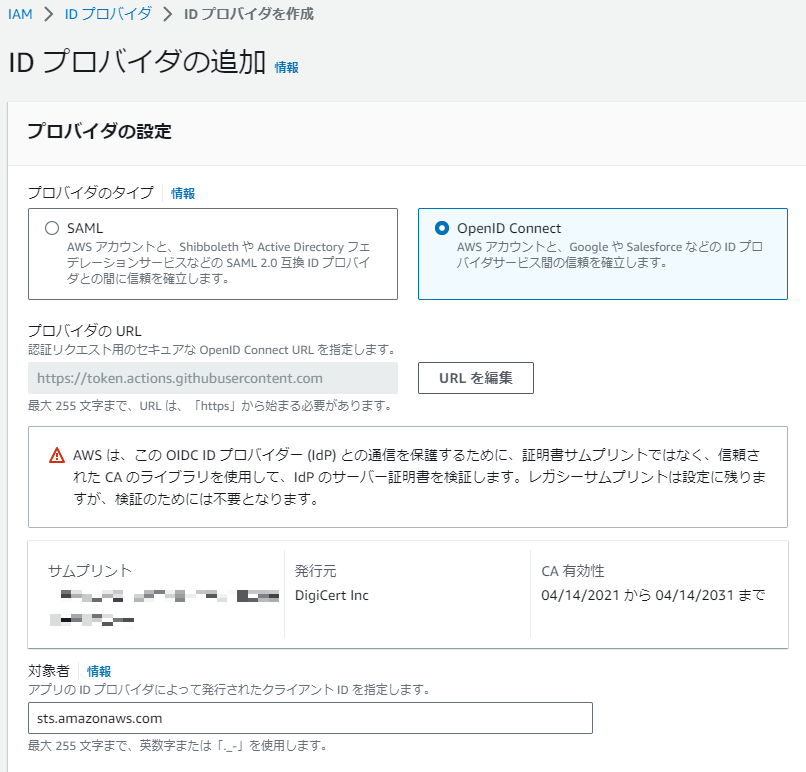
1.IAM で OIDC プロバイダを作成する
プロバイダのURL:https://token.actions.githubusercontent.com
対象者:sts.amazonaws.com
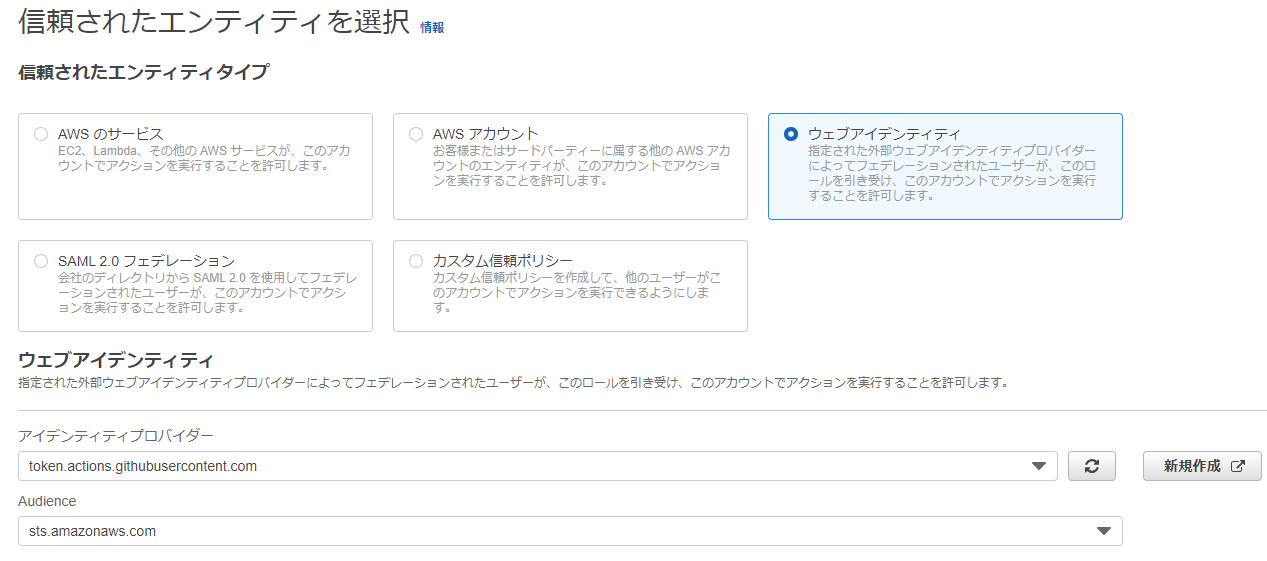
2.OIDC プロバイダを信頼する IAM ロールを作成
IAM ロールの作成画面へ移動し、下記の項目で作成する。
信頼されたエンティティタイプ:ウェブアイデンティティ
アイデンティティプロバイダ:oken.action.githubuser
Audience:sts.amazonaws.com
ポリシーの修正( StringLike を足して、GitHub の特定のリポジトリからのアクセスに絞ってます)
{
    "Version": "2012-10-17",
    "Statement": [
        {
            "Effect": "Allow",
            "Principal": {
                "Federated": "arn:aws:iam::(略):oidc-provider/token.actions.githubusercontent.com"
            },
            "Action": "sts:AssumeRoleWithWebIdentity",
            "Condition": {
                "StringEquals": {
                    "token.actions.githubusercontent.com:aud": "sts.amazonaws.com"
                },
                "StringLike": {
                    "token.actions.githubusercontent.com:sub": "repo:"オーナー名"/"リポジトリ名":*"
                }
            }
        }
    ]
}
また、作成するリソースは VPC のみですが、PowerUserAccess相当を割り当てます。(あとで検証の予定があるので)

3.GitHub にロールを登録
パブリックリポジトリでは特に IAM ロールの ARN を直接コードに記載しないために GitHub の secret に登録します。
GitHub の Setting > Secret and Variable > Actionsと進むと下記画面になります。
緑のNew repository secret を選択。
Name:AWS_ROLE_ARN
Secret:「2.OIDC プロバイダを信頼する IAM ロールを作成」で作成した IAM ロールのARN
GitHub Actions の設定ファイル作成
GitHub Actions の設定ファイルを下記の階層で配置。
name: 'GitHubActions-Terraform'

#ワークフロー実施のトリガーはmainブランチにpushされたとき
on:
  push:
    branches:
      - "main"

#ワークフロー内のジョブグループ
jobs:

  #ジョブID
  apply_tf:

    #ジョブ名
    name: Terraform apply

    #ジョブ実行するマシンのタイプ
    runs-on: ubuntu-latest

    #ジョブの権限設定
    permissions:
      id-token: write
      contents: read

    #タスクのグループ
    steps:
    - name: set ROLE
      run: |
        echo "AWS_ROLE_ARN=$" >> $GITHUB_ENV

    #GitHubの公式アクション、CI/CDを実行するサーバへチェックアウト
    #https://github.com/actions/checkout
    - name: Checkout
      uses: actions/checkout@v3

    #AWS公式のアクション、AWSへの認証
    #https://github.com/aws-actions/configure-aws-credentials
    - name: configure AWS credentials
      uses: aws-actions/configure-aws-credentials@v2
      with:
        role-to-assume: ${{secrets.AWS_ROLE_ARN}}
        aws-region: ap-northeast-1

    #hashicorpの公式のアクション
    #https://github.com/hashicorp/setup-terraform
    - name: Setup Terraform
      uses: hashicorp/setup-terraform@v2
      with:
        terraform_version: ~1.2.0

    - name: Terraform Init
      run: terraform init
      working-directory: .terraform     #.terraformにtfファイルがあるため

    - name: Terraform Apply
      run: terraform apply -auto-approve
      working-directory: .terraform     #.terraformにtfファイルがあるため
main ブランチへマージ
この状態で main ブランチへマージします。
するとActionsで実行されています。
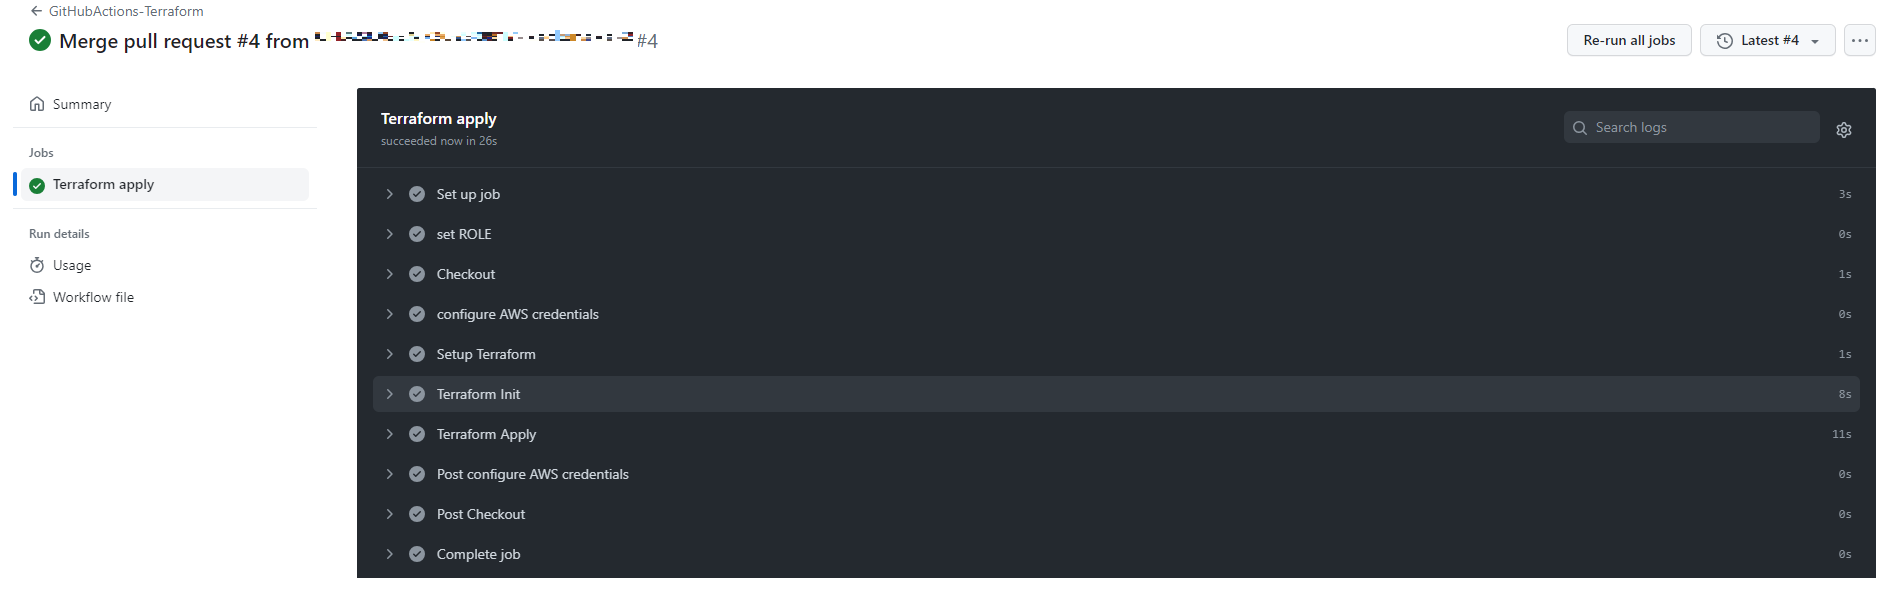
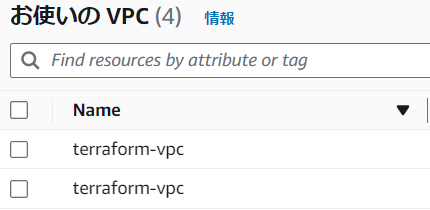
2個目ができてしまいました。
これは tfstate ファイルを参照できていないからですが、GitHub 上で tfstate ファイルを管理すると
複数人で開発したときにコンフリクトが起きてしまいます。
そこで AWS 上に backend (tfstateファイルの管理)用の S3 を作成します。
backend の作成
これは検証環境で、今後は作って満足したら terraform destroyコマンドでリソースを削除して終わるという構成を取りたいです。
そうすると terraform で backend 用の S3 を作成して、terraform destroyに注意を払わなきゃならなくなります。。(ディレクトリ分けるでも対応は可)
なので、CloudFormation で作ってしまいましょう。
AWSTemplateFormatVersion: 2010-09-09
Description: CloudFormation template for Terraform S3 backend

########################################################################

Resources:
  S3Bucket:
    Type: AWS::S3::Bucket
    Properties:
      AccessControl: Private
      BucketEncryption:
        ServerSideEncryptionConfiguration:
          - ServerSideEncryptionByDefault:
              SSEAlgorithm: AES256
      PublicAccessBlockConfiguration:
        BlockPublicAcls: true
        BlockPublicPolicy: true
        IgnorePublicAcls: true
        RestrictPublicBuckets: true
      VersioningConfiguration:
        Status: Enabled

  TerraformS3BackendPolicy:
    Type: AWS::IAM::ManagedPolicy
    Properties:
      PolicyDocument:
        Version: 2012-10-17
        Statement:
          - Effect: Allow
            Action: s3:ListBucket
            Resource: !GetAtt S3Bucket.Arn
          - Effect: Allow
            Action:
              - s3:GetObject
              - s3:PutObject
              - s3:DeleteObject
            Resource: !Sub ${S3Bucket.Arn}/*

Outputs:
  S3Bucket:
    Value: !Ref S3Bucket
ここで作成された S3 を backend にしたいので main.tf と同じディレクトリに backend.tf を作成します。
terraform {
    required_version = "1.5.5"
  backend "s3" {
    bucket = "バケット名"
    key    = "terraform.tfstate"
    region = "ap-northeast-1"
  }
}
これでVSCodeからterraform applyでVCPを作成してみます。
terraform apply 実行
PS C:\GitHub\terraform\.terraform> terraform apply
aws_vpc.main: Refreshing state... [id=vpc-02209b094c4b015b0]

Terraform used the selected providers to generate the following execution plan. Resource actions are indicated with the following symbols:
  + create

Terraform will perform the following actions:

  # aws_vpc.main will be created
  + resource "aws_vpc" "main" {
      + arn                                  = (known after apply)
      + cidr_block                           = "10.10.0.0/16"
      + default_network_acl_id               = (known after apply)
      + default_route_table_id               = (known after apply)
      + default_security_group_id            = (known after apply)
      + dhcp_options_id                      = (known after apply)
      + enable_dns_hostnames                 = (known after apply)
      + enable_dns_support                   = true
      + enable_network_address_usage_metrics = (known after apply)
      + id                                   = (known after apply)
      + instance_tenancy                     = "default"
      + ipv6_association_id                  = (known after apply)
      + ipv6_cidr_block                      = (known after apply)
      + ipv6_cidr_block_network_border_group = (known after apply)
      + main_route_table_id                  = (known after apply)
      + owner_id                             = (known after apply)
      + tags                                 = {
          + "Name" = "terraform-vpc"
        }
      + tags_all                             = {
          + "Name" = "terraform-vpc"
        }
    }

Plan: 1 to add, 0 to change, 0 to destroy.

Do you want to perform these actions?
  Terraform will perform the actions described above.
  Only 'yes' will be accepted to approve.

  Enter a value: yes

aws_vpc.main: Creating...
aws_vpc.main: Creation complete after 1s [id=vpc-010f8818d04c4a235]

Apply complete! Resources: 1 added, 0 changed, 0 destroyed.
PS C:\GitHub\terraform\.terraform>
さらに GitHub Action を実行すると変更はないとのことでした。
これで GitHub Action が動くたびに VPC が増えることがなくなる = GitHub Actions を実行時に S3 のバックエンド(tfstateファイル)を参照できている ようになりました。
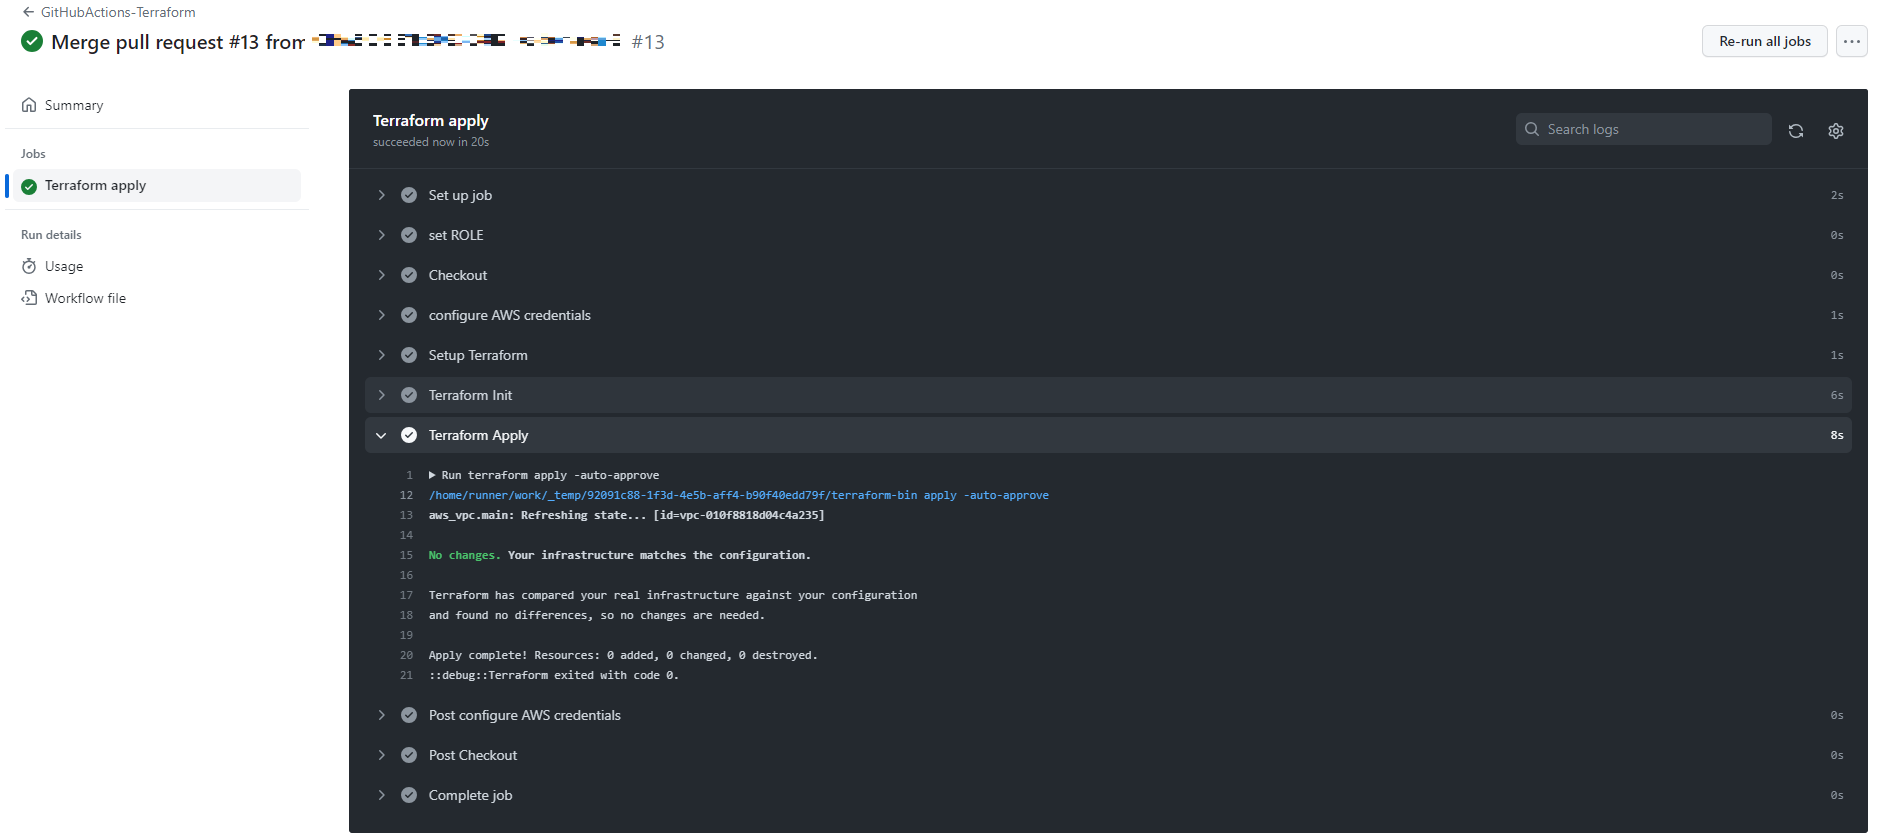
VPC の ID 見えちゃったのでリソース削除します。
terraform destroy 実行
PS C:\GitHub\terraform.terraform> terraform destroy
aws_vpc.main: Refreshing state... [id=vpc-010f8818d04c4a235]
Terraform used the selected providers to generate the following execution plan. Resource actions are indicated with the following symbols:
- destroy
Terraform will perform the following actions:
aws_vpc.main will be destroyed
- resource "aws_vpc" "main" {
- arn = "arn:aws:ec2:ap-northeast-1:446531955624:vpc/vpc-010f8818d04c4a235" -> null
- assign_generated_ipv6_cidr_block = false -> null
- cidr_block = "10.10.0.0/16" -> null
- default_network_acl_id = "acl-0fc822dbd539b2001" -> null
- default_route_table_id = "rtb-0c6ee00e2310b39fb" -> null
- default_security_group_id = "sg-0788a5f35a051edf8" -> null
- dhcp_options_id = "dopt-0c1401298c9af1787" -> null
- enable_dns_hostnames = false -> null
- enable_dns_support = true -> null
- enable_network_address_usage_metrics = false -> null
- id = "vpc-010f8818d04c4a235" -> null
- instance_tenancy = "default" -> null
- ipv6_netmask_length = 0 -> null
- main_route_table_id = "rtb-0c6ee00e2310b39fb" -> null
- owner_id = "446531955624" -> null
- tags = {
- "Name" = "terraform-vpc"
} -> null
- "Name" = "terraform-vpc"
- tags_all = {
- "Name" = "terraform-vpc"
} -> null
}
- "Name" = "terraform-vpc"
Plan: 0 to add, 0 to change, 1 to destroy.
Do you really want to destroy all resources?
Terraform will destroy all your managed infrastructure, as shown above.
There is no undo. Only 'yes' will be accepted to confirm.
Enter a value: yes
aws_vpc.main: Destroying... [id=vpc-010f8818d04c4a235]
aws_vpc.main: Destruction complete after 0s
Destroy complete! Resources: 1 destroyed.
PS C:\GitHub\terraform.terraform>
終わりに
という訳で、GitHub Actions を使った構築準備でした。
使いこなしている方は main ブランチへマージする一段階前のブランチへ
push されたらterraform planを実行するように GitHun Actions を設定するかと思います。
が、とりあえず環境構築を調べて作ってみました。
また、バケット名をうまいこと環境変数に入れて GitHub に上げないようかなり格闘したのですがちょっと知識が足りなかった気がしてます。。
ひとまず環境を作れたのでここからやっていくうちに直したいですね。