JAWS-UG SRE支部#6 にLT登壇させていただきました!
噂通り登壇してみる前が億劫で、登壇すると楽しかったという感覚です!
きれいにまとめようとするときりがないのでとりあえずブログに吐き出してしまいます。
長いので概要はスライドや動画から見てもらえると幸いです。
また、業務PCをやりたい放題いじっているように話してますが
話の都合上、業務PCでの利用を意識したトークにしたくて「業務PC」という言葉が出てます。
実際に検証したのは個人のPCです。(話の構成って難しいですね)
CloudWatch Agent を PC に?
簡単に説明しておくとCloudWatchのAgentをインストールすればオンプレのサーバのログとメトリクスをCloudWatchへ送れます。
PCをオンプレサーバと見立ててCloudWatchのAgentをインストールしようって変な発想な気もします。
MacOSやWindowsも対応していることはドキュメントに記載があったので完全に勝ち目のない戦いではないと思ってました。
問題はネット上の情報を漁っても全く同じケースがないということです。
出てくるのは「AWS上にMacのEC2を立てて、そのEC2にAgentのインストールをSystemsManagerから実施する」でした。
DRSでのAgentインストールをGCP上でやりましたが、その時はSystemsManagerをAWS外のサーバに向けてやっていませんでした。
その時と同様にMacのterminalからやる方式にしたかったので完全一致するケースがない状態での挑戦です。
細かい設定方法は以下を参考にPCをオンプレミスとして設定していくだけです。
CloudWatch Agent を PC にインストール
MacとWindowsでやってます。
Macはterminalで、WindowsはSystems ManagerでインストールしているのでどちらもAgentのインストールができることを確認してます。
Mac編
ひとまずAgentを取得して
~ % wget https://s3.amazonaws.com/amazoncloudwatch-agent/darwin/amd64/latest/amazon-cloudwatch-agent.pkg
--2023-05-01 16:50:02--  https://s3.amazonaws.com/amazoncloudwatch-agent/darwin/amd64/latest/amazon-cloudwatch-agent.pkg
s3.amazonaws.com (s3.amazonaws.com) をDNSに問いあわせています... 52.217.38.198, 52.217.75.158, 52.217.226.8, ...
s3.amazonaws.com (s3.amazonaws.com)|52.217.38.198|:443 に接続しています... 接続しました。
HTTP による接続要求を送信しました、応答を待っています... 200 OK
長さ: 38071448 (36M) [application/octet-stream]
`amazon-cloudwatch-agent.pkg' に保存中

amazon-cloudwatch-agent.pkg                       100%[=============================================================================================================>]  36.31M  2.14MB/s 時間 16s

2023-05-01 16:50:19 (2.24 MB/s) - `amazon-cloudwatch-agent.pkg' へ保存完了 [38071448/38071448]

~ %
インストールします。
~ % sudo installer -pkg amazon-cloudwatch-agent.pkg -target /
installer: Package name is amazon-cloudwatch-agent
installer: Installing at base path /
installer: The install was successful.
~ %
モニタリング設定をしますが、この辺りは自己責任ですが対象は以下を指定してみます。
- /var/log/system.log
いわゆるsyslogです。 - /Users/[username]/Library/Application Support/Firefox/Profiles/[ランダムな値].default-release/places.sqlite
FireFoxの履歴ログです。PCのログでインパクトあるのがブラウザログかなと思って収集定義に入れてみました。
また、後ほどIAMユーザが必要になるので作っておきます。
次に設定ファイルを作成します。
今回はウィザードを使用して設定ファイルを作成していますが、後ほど問題があったので出来上がった設定ファイルを直してます。
ウィザードを使って設定ファイルを作成(長いので畳んでます)
~ % sudo /opt/aws/amazon-cloudwatch-agent/bin/amazon-cloudwatch-agent-config-wizard
Password:
================================================================
= Welcome to the Amazon CloudWatch Agent Configuration Manager =
=                                                              =
= CloudWatch Agent allows you to collect metrics and logs from =
= your host and send them to CloudWatch. Additional CloudWatch =
= charges may apply.                                           =
================================================================
On which OS are you planning to use the agent?
1. linux
2. windows
3. darwin
default choice: [3]:
1
Trying to fetch the default region based on ec2 metadata...
Are you using EC2 or On-Premises hosts?
1. EC2
2. On-Premises
default choice: [2]:
2
Please make sure the credentials and region set correctly on your hosts.
Refer to http://docs.aws.amazon.com/cli/latest/userguide/cli-chap-getting-started.html
Which user are you planning to run the agent?
1. root
2. cwagent
3. others
default choice: [1]:
1
Do you want to turn on StatsD daemon?
1. yes
2. no
default choice: [1]:
1
Which port do you want StatsD daemon to listen to?
default choice: [8125]
8125
What is the collect interval for StatsD daemon?
1. 10s
2. 30s
3. 60s
default choice: [1]:
1
What is the aggregation interval for metrics collected by StatsD daemon?
1. Do not aggregate
2. 10s
3. 30s
4. 60s
default choice: [4]:
4
Do you want to monitor metrics from CollectD? WARNING: CollectD must be installed or the Agent will fail to start
1. yes
2. no
default choice: [1]:
1
Do you want to monitor any host metrics? e.g. CPU, memory, etc.
1. yes
2. no
default choice: [1]:
1
Do you want to monitor cpu metrics per core?
1. yes
2. no
default choice: [1]:
1
Would you like to collect your metrics at high resolution (sub-minute resolution)? This enables sub-minute resolution for all metrics, but you can customize for specific metrics in the output json file.
1. 1s
2. 10s
3. 30s
4. 60s
default choice: [4]:
4
Which default metrics config do you want?
1. Basic
2. Standard
3. Advanced
4. None
default choice: [1]:
1
Current config as follows:
{
	"agent": {
		"metrics_collection_interval": 60,
		"run_as_user": "root"
	},
	"metrics": {
		"metrics_collected": {
			"collectd": {
				"metrics_aggregation_interval": 60
			},
			"cpu": {
				"measurement": [
					"cpu_usage_idle"
				],
				"metrics_collection_interval": 60,
				"resources": [
					"*"
				],
				"totalcpu": true
			},
			"disk": {
				"measurement": [
					"used_percent"
				],
				"metrics_collection_interval": 60,
				"resources": [
					"*"
				]
			},
			"diskio": {
				"measurement": [
					"write_bytes",
					"read_bytes",
					"writes",
					"reads"
				],
				"metrics_collection_interval": 60,
				"resources": [
					"*"
				]
			},
			"mem": {
				"measurement": [
					"mem_used_percent"
				],
				"metrics_collection_interval": 60
			},
			"net": {
				"measurement": [
					"bytes_sent",
					"bytes_recv",
					"packets_sent",
					"packets_recv"
				],
				"metrics_collection_interval": 60,
				"resources": [
					"*"
				]
			},
			"statsd": {
				"metrics_aggregation_interval": 60,
				"metrics_collection_interval": 10,
				"service_address": ":8125"
			},
			"swap": {
				"measurement": [
					"swap_used_percent"
				],
				"metrics_collection_interval": 60
			}
		}
	}
}
Are you satisfied with the above config? Note: it can be manually customized after the wizard completes to add additional items.
1. yes
2. no
default choice: [1]:
1
Do you have any existing CloudWatch Log Agent (http://docs.aws.amazon.com/AmazonCloudWatch/latest/logs/AgentReference.html) configuration file to import for migration?
1. yes
2. no
default choice: [2]:
2
Do you want to monitor any log files?
1. yes
2. no
default choice: [1]:
1
Log file path:
/var/log/system.log
Log group name:
default choice: [system.log]

Log stream name:
default choice: [{hostname}]

Log Group Retention in days
1. -1
2. 1
3. 3
4. 5
5. 7
6. 14
7. 30
8. 60
9. 90
10. 120
11. 150
12. 180
13. 365
14. 400
15. 545
16. 731
17. 1827
18. 2192
19. 2557
20. 2922
21. 3288
22. 3653
default choice: [1]:
1
Do you want to specify any additional log files to monitor?
1. yes
2. no
default choice: [1]:
1
Log file path:
/Users/[ユーザ名]/Library/Application Support/Firefox/Profiles/va9vyy5y.default-release/places.sqlite
Log group name:
default choice: [places.sqlite]

Log stream name:
default choice: [{hostname}]

Log Group Retention in days
1. -1
2. 1
3. 3
4. 5
5. 7
6. 14
7. 30
8. 60
9. 90
10. 120
11. 150
12. 180
13. 365
14. 400
15. 545
16. 731
17. 1827
18. 2192
19. 2557
20. 2922
21. 3288
22. 3653
default choice: [1]:
1
Do you want to specify any additional log files to monitor?
1. yes
2. no
default choice: [1]:
2
Saved config file to /opt/aws/amazon-cloudwatch-agent/bin/config.json successfully.
Current config as follows:
{
	"agent": {
		"metrics_collection_interval": 60,
		"run_as_user": "root"
	},
	"logs": {
		"logs_collected": {
			"files": {
				"collect_list": [
					{
						"file_path": "/var/log/system.log",
						"log_group_name": "system.log",
						"log_stream_name": "{hostname}",
						"retention_in_days": -1
					},
					{
						"file_path": "/Users/[ユーザ名]/Library/Application Support/Firefox/Profiles/va9vyy5y.default-release/places.sqlite",
						"log_group_name": "places.sqlite",
						"log_stream_name": "{hostname}",
						"retention_in_days": -1
					}
				]
			}
		}
	},
	"metrics": {
		"metrics_collected": {
			"collectd": {
				"metrics_aggregation_interval": 60
			},
			"cpu": {
				"measurement": [
					"cpu_usage_idle"
				],
				"metrics_collection_interval": 60,
				"resources": [
					"*"
				],
				"totalcpu": true
			},
			"disk": {
				"measurement": [
					"used_percent"
				],
				"metrics_collection_interval": 60,
				"resources": [
					"*"
				]
			},
			"diskio": {
				"measurement": [
					"write_bytes",
					"read_bytes",
					"writes",
					"reads"
				],
				"metrics_collection_interval": 60,
				"resources": [
					"*"
				]
			},
			"mem": {
				"measurement": [
					"mem_used_percent"
				],
				"metrics_collection_interval": 60
			},
			"net": {
				"measurement": [
					"bytes_sent",
					"bytes_recv",
					"packets_sent",
					"packets_recv"
				],
				"metrics_collection_interval": 60,
				"resources": [
					"*"
				]
			},
			"statsd": {
				"metrics_aggregation_interval": 60,
				"metrics_collection_interval": 10,
				"service_address": ":8125"
			},
			"swap": {
				"measurement": [
					"swap_used_percent"
				],
				"metrics_collection_interval": 60
			}
		}
	}
}
Please check the above content of the config.
The config file is also located at /opt/aws/amazon-cloudwatch-agent/bin/config.json.
Edit it manually if needed.
Do you want to store the config in the SSM parameter store?
1. yes
2. no
default choice: [1]:
1
What parameter store name do you want to use to store your config? (Use 'AmazonCloudWatch-' prefix if you use our managed AWS policy)
default choice: [AmazonCloudWatch-linux]

Which region do you want to store the config in the parameter store?
default choice: [us-east-1]
ap-northeast-1
Please provide credentials to upload the json config file to parameter store.
AWS Access Key:
上で作ったユーザのアクセスキー
AWS Secret Key:
上で作ったユーザのシークレットキー
Successfully put config to parameter store AmazonCloudWatch-linux.
Program exits now.
~ %
~ % ls -l /opt/aws/amazon-cloudwatch-agent/bin/config.json
-rwxr-xr-x  1 root  wheel  1850  5  5 21:41 /opt/aws/amazon-cloudwatch-agent/bin/config.json
~ %
ちなみにこの時点でSystems Managerのパラメータストアにきちんと記載ありますね。
中身はウィザードで設定したjsonファイルが入ってます。

AmazonSSMManagedInstanceCoreはこのためで、ウィザード設定内で以下の設定起因で入っているみたいです。
Do you want to store the config in the SSM parameter store?
1. yes
2. no
default choice: [1]:
1
Which region do you want to store the config in the parameter store?
default choice: [us-east-1]
ap-northeast-1
Please provide credentials to upload the json config file to parameter store.
AWS Access Key:
略
AWS Secret Key:
略
Successfully put config to parameter store AmazonCloudWatch-linux.
Program exits now.
IAMユーザ作成でハマった点(テンポ悪くなるので畳んでます)
- 作成したIAMユーザのポリシーに
CloudWatchAgentServerPolicyを入れてましたが、正しくはCloudWatchAgentAdminPolicyであること。 - 作成したIAMユーザのポリシーに
AmazonSSMManagedInstanceCoreがいない
展開したガイドに上記の話が書いてあるんですが、よくわからなかったので必要なら足そうとかしているうちに訳がわからなくなってハマりました。。
次にcollectdのインストールが必要になります。
インストールしてそのままOKとはいかず、インストールして先ほど作ったjsonファイルの修正が必要になります。
json設定ファイル作成でハマった点(テンポ悪くなるので畳んでます)
下記リンク先にありますが、type.dbのデフォルト配置先が/usr/share/collectd/types.dbになっているので/opt/homebrew/Cellar/collectd/(ランダムな値)/share/collectd/types.db修正が必要です。
しかも、何度も試してわかったことなんですが配列として表記しないといけないらしく[]が必要でした。
	"metrics": {
		"metrics_collected": {
			"collectd": {
				"metrics_aggregation_interval": 60
                                "collectd_typesdb": ["/opt/homebrew/Cellar/collectd/5.12.0_5/share/collectd/types.db"]
というわけで準備完了です。
Agent起動しましょう。
せっかくなのでSSMパラメータを指定してのAgent起動をします。
~ % sudo /opt/aws/amazon-cloudwatch-agent/bin/amazon-cloudwatch-agent-ctl -a fetch-config -m onPremise -c ssm:AmazonCloudWatch-linux
Got Home directory: /var/root
I! Set home dir Linux: /var/root
I! SDKRegionWithCredsMap region:  ap-northeast-1
Region: ap-northeast-1
credsConfig: map[shared_credential_file:/Users/kakuchuugentarou/.aws/credentials]
Successfully fetched the config and saved in /opt/aws/amazon-cloudwatch-agent/etc/amazon-cloudwatch-agent.d/ssm_AmazonCloudWatch-linux.tmp
2023/05/06 18:28:57 Reading json config file path: /opt/aws/amazon-cloudwatch-agent/etc/amazon-cloudwatch-agent.d/ssm_AmazonCloudWatch-linux.tmp ...
2023/05/06 18:28:57 I! Valid Json input schema.
Got Home directory: /var/root
I! Set home dir Linux: /var/root
I! SDKRegionWithCredsMap region:  ap-northeast-1
No csm configuration found.
Under path : /logs/ | Info : Got hostname kakuchuugentarounoMac-mini.local as log_stream_name
Configuration validation first phase succeeded
/opt/aws/amazon-cloudwatch-agent/bin/amazon-cloudwatch-agent -schematest -config /opt/aws/amazon-cloudwatch-agent/etc/amazon-cloudwatch-agent.toml
Configuration validation second phase succeeded
Configuration validation succeeded
~ %
/Library/LaunchDaemons/com.amazonaws.cloudwatch.agent.plistの作成
<?xml version="1.0" encoding="UTF-8"?>
<!DOCTYPE plist PUBLIC "-//Apple Computer//DTD PLIST 1.0//EN"
        "http://www.apple.com/DTDs/PropertyList-1.0.dtd">
<plist version="1.0">
<dict>
    <key>Label</key>
    <string>com.amazonaws.cloudwatch.agent</string>
    <key>ProgramArguments</key>
    <array>
        <string>/opt/aws/amazon-cloudwatch-agent/bin/amazon-cloudwatch-agent</string>
        <string>-c</string>
        <string>/opt/aws/amazon-cloudwatch-agent/etc/amazon-cloudwatch-agent.json</string>
    </array>
    <key>RunAtLoad</key>
    <true/>
    <key>KeepAlive</key>
    <true/>
</dict>
</plist>
launchctlで起動してみる(MacOSでsysctlコマンドなんてないんです。。)
sudo launchctl load /Library/LaunchDaemons/com.amazonaws.cloudwatch.agent.plist
ここからは実際にCloudWatchの画面を見ていきます。
こちらからCloudWatchのコンソールで難しい設定を入れることなくロググループの作成などが行われていました。
Windows編
こちらはSystemManagerを使う手順で書きます。
また、ここからは基本的にWindowsのみで検証してます。
Macと同様にIAM設定が必要ですが省略します。
まずはSSM Agentの準備で、これをやるとPCへカスタムスクリプトの実行などが行えます。
PS C:\WINDOWS\system32> $code = "Activation Code"
PS C:\WINDOWS\system32> $id = "Activation ID"
PS C:\WINDOWS\system32> $region = "ap-northeast-1"
PS C:\WINDOWS\system32> $dir = $env:TEMP + "\ssm"
PS C:\WINDOWS\system32> New-Item -ItemType directory -Path $dir -Force


    ディレクトリ: C:\Users\[ユーザ名]\AppData\Local\Temp


Mode                 LastWriteTime         Length Name
----                 -------------         ------ ----
d-----        2023/05/08     22:35                ssm


PS C:\WINDOWS\system32> cd $dir
PS C:\Users\[ユーザ名]\AppData\Local\Temp\ssm> (New-Object System.Net.WebClient).DownloadFile("https://amazon-ssm-$region.s3.$region.amazonaws.com/latest/windows_amd64/AmazonSSMAgentSetup.exe", $dir + "\AmazonSSMAgentSetup.exe")
PS C:\Users\[ユーザ名]\AppData\Local\Temp\ssm> Start-Process .\AmazonSSMAgentSetup.exe -ArgumentList @("/q", "/log", "install.log", "CODE=$code", "ID=$id", "REGION=$region") -Wait
PS C:\Users\[ユーザ名]\AppData\Local\Temp\ssm> Get-Content ($env:ProgramData + "\Amazon\SSM\InstanceData\registration")
{"ManagedInstanceID":"mi-085ec04fb1ba62796","Region":"ap-northeast-1"}
PS C:\Users\[ユーザ名]\AppData\Local\Temp\ssm> Get-Service -Name "AmazonSSMAgent"

Status   Name               DisplayName
------   ----               -----------
Running  AmazonSSMAgent     Amazon SSM Agent


PS C:\Users\[ユーザ名]\AppData\Local\Temp\ssm>
PS C:\Users\[ユーザ名]\AppData\Local\Temp\ssm> dir C:\ProgramData\Amazon\AmazonCloudWatchAgent


    ディレクトリ: C:\ProgramData\Amazon\AmazonCloudWatchAgent


Mode                 LastWriteTime         Length Name
----                 -------------         ------ ----
d-----        2023/05/08     22:49                Configs
d-----        2023/05/08     22:49                Logs
-a----        2023/02/21     12:49            925 common-config.toml


PS C:\Users\[ユーザ名]\AppData\Local\Temp\ssm>
PS C:\Users\[ユーザ名]\AppData\Local\Temp\ssm> notepad  C:\ProgramData\Amazon\AmazonCloudWatchAgent\common-config.toml
PS C:\Users\[ユーザ名]\AppData\Local\Temp\ssm>
ウィザードを使って設定ファイルを作成(長いので畳んでます)
PS C:\> cd "C:\Program Files\Amazon\AmazonCloudWatchAgent"
PS C:\Program Files\Amazon\AmazonCloudWatchAgent> dir


    ディレクトリ: C:\Program Files\Amazon\AmazonCloudWatchAgent


Mode                 LastWriteTime         Length Name
----                 -------------         ------ ----
-a----        2023/02/21     12:49       10859208 amazon-cloudwatch-agent-config-wizard.exe
-a----        2023/02/21     12:49          16707 amazon-cloudwatch-agent-ctl.ps1
-a----        2023/02/21     12:49          33626 amazon-cloudwatch-agent-schema.json
-a----        2023/02/21     12:49       80427096 amazon-cloudwatch-agent.exe
-a----        2023/02/21     12:49       10449120 config-downloader.exe
-a----        2023/02/21     12:49       13726816 config-translator.exe
-a----        2023/02/21     12:49             18 CWAGENT_VERSION
-a----        2023/02/21     12:49           1148 LICENSE
-a----        2023/02/21     12:49             96 NOTICE
-a----        2023/02/21     12:49            411 permission.ps1
-a----        2023/02/21     12:49          17363 RELEASE_NOTES
-a----        2023/02/21     12:49        1855600 start-amazon-cloudwatch-agent.exe
-a----        2023/02/21     12:49         170730 THIRD-PARTY-LICENSES


PS C:\Program Files\Amazon\AmazonCloudWatchAgent> .\amazon-cloudwatch-agent-config-wizard.exe
================================================================
= Welcome to the Amazon CloudWatch Agent Configuration Manager =
=                                                              =
= CloudWatch Agent allows you to collect metrics and logs from =
= your host and send them to CloudWatch. Additional CloudWatch =
= charges may apply.                                           =
================================================================
On which OS are you planning to use the agent?
1. linux
2. windows
3. darwin
default choice: [2]:
2
Trying to fetch the default region based on ec2 metadata...
Are you using EC2 or On-Premises hosts?
1. EC2
2. On-Premises
default choice: [2]:
2
Please make sure the credentials and region set correctly on your hosts.
Refer to http://docs.aws.amazon.com/cli/latest/userguide/cli-chap-getting-started.html
Do you want to turn on StatsD daemon?
1. yes
2. no
default choice: [1]:
1
Which port do you want StatsD daemon to listen to?
default choice: [8125]
8125
What is the collect interval for StatsD daemon?
1. 10s
2. 30s
3. 60s
default choice: [1]:
1
What is the aggregation interval for metrics collected by StatsD daemon?
1. Do not aggregate
2. 10s
3. 30s
4. 60s
default choice: [4]:
4
Do you have any existing CloudWatch Log Agent configuration file to import for migration?
1. yes
2. no
default choice: [2]:
2
Do you want to monitor any host metrics? e.g. CPU, memory, etc.
1. yes
2. no
default choice: [1]:
1
Do you want to monitor cpu metrics per core?
1. yes
2. no
default choice: [1]:
1
Would you like to collect your metrics at high resolution (sub-minute resolution)? This enables sub-minute resolution for all metrics, but you can customize for specific metrics in the output json file.
1. 1s
2. 10s
3. 30s
4. 60s
default choice: [4]:
4
Which default metrics config do you want?
1. Basic
2. Standard
3. Advanced
4. None
default choice: [1]:
1
Current config as follows:
{
        "metrics": {
                "metrics_collected": {
                        "LogicalDisk": {
                                "measurement": [
                                        "% Free Space"
                                ],
                                "metrics_collection_interval": 60,
                                "resources": [
                                        "*"
                                ]
                        },
                        "Memory": {
                                "measurement": [
                                        "% Committed Bytes In Use"
                                ],
                                "metrics_collection_interval": 60
                        },
                        "Network Interface": {
                                "measurement": [
                                        "Bytes Sent/sec",
                                        "Bytes Received/sec",
                                        "Packets Sent/sec",
                                        "Packets Received/sec"
                                ],
                                "metrics_collection_interval": 60,
                                "resources": [
                                        "*"
                                ]
                        },
                        "Paging File": {
                                "measurement": [
                                        "% Usage"
                                ],
                                "metrics_collection_interval": 60,
                                "resources": [
                                        "*"
                                ]
                        },
                        "PhysicalDisk": {
                                "measurement": [
                                        "Disk Write Bytes/sec",
                                        "Disk Read Bytes/sec",
                                        "Disk Writes/sec",
                                        "Disk Reads/sec"
                                ],
                                "metrics_collection_interval": 60,
                                "resources": [
                                        "*"
                                ]
                        },
                        "Processor": {
                                "measurement": [
                                        "% Processor Time"
                                ],
                                "metrics_collection_interval": 60,
                                "resources": [
                                        "*"
                                ]
                        },
                        "statsd": {
                                "metrics_aggregation_interval": 60,
                                "metrics_collection_interval": 10,
                                "service_address": ":8125"
                        }
                }
        }
}
Are you satisfied with the above config? Note: it can be manually customized after the wizard completes to add additional items.
1. yes
2. no
default choice: [1]:
1
Do you want to monitor any customized log files?
1. yes
2. no
default choice: [1]:
1
Log file path:
'C:\Users\[ユーザ名]\AppData\Local\Google\Chrome\User Data\Default\History'
Log group name:
default choice: [History']
History
Log stream name:
default choice: [{hostname}]

Log Group Retention in days
1. -1
2. 1
3. 3
4. 5
5. 7
6. 14
7. 30
8. 60
9. 90
10. 120
11. 150
12. 180
13. 365
14. 400
15. 545
16. 731
17. 1827
18. 2192
19. 2557
20. 2922
21. 3288
22. 3653
default choice: [1]:
1
Do you want to specify any additional log files to monitor?
1. yes
2. no
default choice: [1]:
2
Do you want to monitor any Windows event log?
1. yes
2. no
default choice: [1]:
2
Saved config file to config.json successfully.
Current config as follows:
{
        "logs": {
                "logs_collected": {
                        "files": {
                                "collect_list": [
                                        {
                                                "file_path": "'C:\\Users\\chaso\\AppData\\Local\\Google\\Chrome\\User Data\\Default\\History'",
                                                "log_group_name": "History",
                                                "log_stream_name": "{hostname}",
                                                "retention_in_days": -1
                                        }
                                ]
                        }
                }
        },
        "metrics": {
                "metrics_collected": {
                        "LogicalDisk": {
                                "measurement": [
                                        "% Free Space"
                                ],
                                "metrics_collection_interval": 60,
                                "resources": [
                                        "*"
                                ]
                        },
                        "Memory": {
                                "measurement": [
                                        "% Committed Bytes In Use"
                                ],
                                "metrics_collection_interval": 60
                        },
                        "Network Interface": {
                                "measurement": [
                                        "Bytes Sent/sec",
                                        "Bytes Received/sec",
                                        "Packets Sent/sec",
                                        "Packets Received/sec"
                                ],
                                "metrics_collection_interval": 60,
                                "resources": [
                                        "*"
                                ]
                        },
                        "Paging File": {
                                "measurement": [
                                        "% Usage"
                                ],
                                "metrics_collection_interval": 60,
                                "resources": [
                                        "*"
                                ]
                        },
                        "PhysicalDisk": {
                                "measurement": [
                                        "Disk Write Bytes/sec",
                                        "Disk Read Bytes/sec",
                                        "Disk Writes/sec",
                                        "Disk Reads/sec"
                                ],
                                "metrics_collection_interval": 60,
                                "resources": [
                                        "*"
                                ]
                        },
                        "Processor": {
                                "measurement": [
                                        "% Processor Time"
                                ],
                                "metrics_collection_interval": 60,
                                "resources": [
                                        "*"
                                ]
                        },
                        "statsd": {
                                "metrics_aggregation_interval": 60,
                                "metrics_collection_interval": 10,
                                "service_address": ":8125"
                        }
                }
        }
}
Please check the above content of the config.
The config file is also located at config.json.
Edit it manually if needed.
Do you want to store the config in the SSM parameter store?
1. yes
2. no
default choice: [1]:
1
What parameter store name do you want to use to store your config? (Use 'AmazonCloudWatch-' prefix if you use our managed AWS policy)
default choice: [AmazonCloudWatch-windows]

Which region do you want to store the config in the parameter store?
default choice: [us-east-1]
ap-northeast-1
Please provide credentials to upload the json config file to parameter store.
AWS Access Key:
略
AWS Secret Key:
略
Successfully put config to parameter store AmazonCloudWatch-windows.
Please press Enter to exit...

Program exits now.
PS C:\Program Files\Amazon\AmazonCloudWatchAgent>
ちなみにChromeのログはこちらです。
C:\Users\[ユーザ名]\AppData\Local\Google\Chrome\User Data\Default\History
設定定義は作成できました。
SystemManagerからPCを認識させます。
AgentをPCへインストールするようにコマンド実行します。

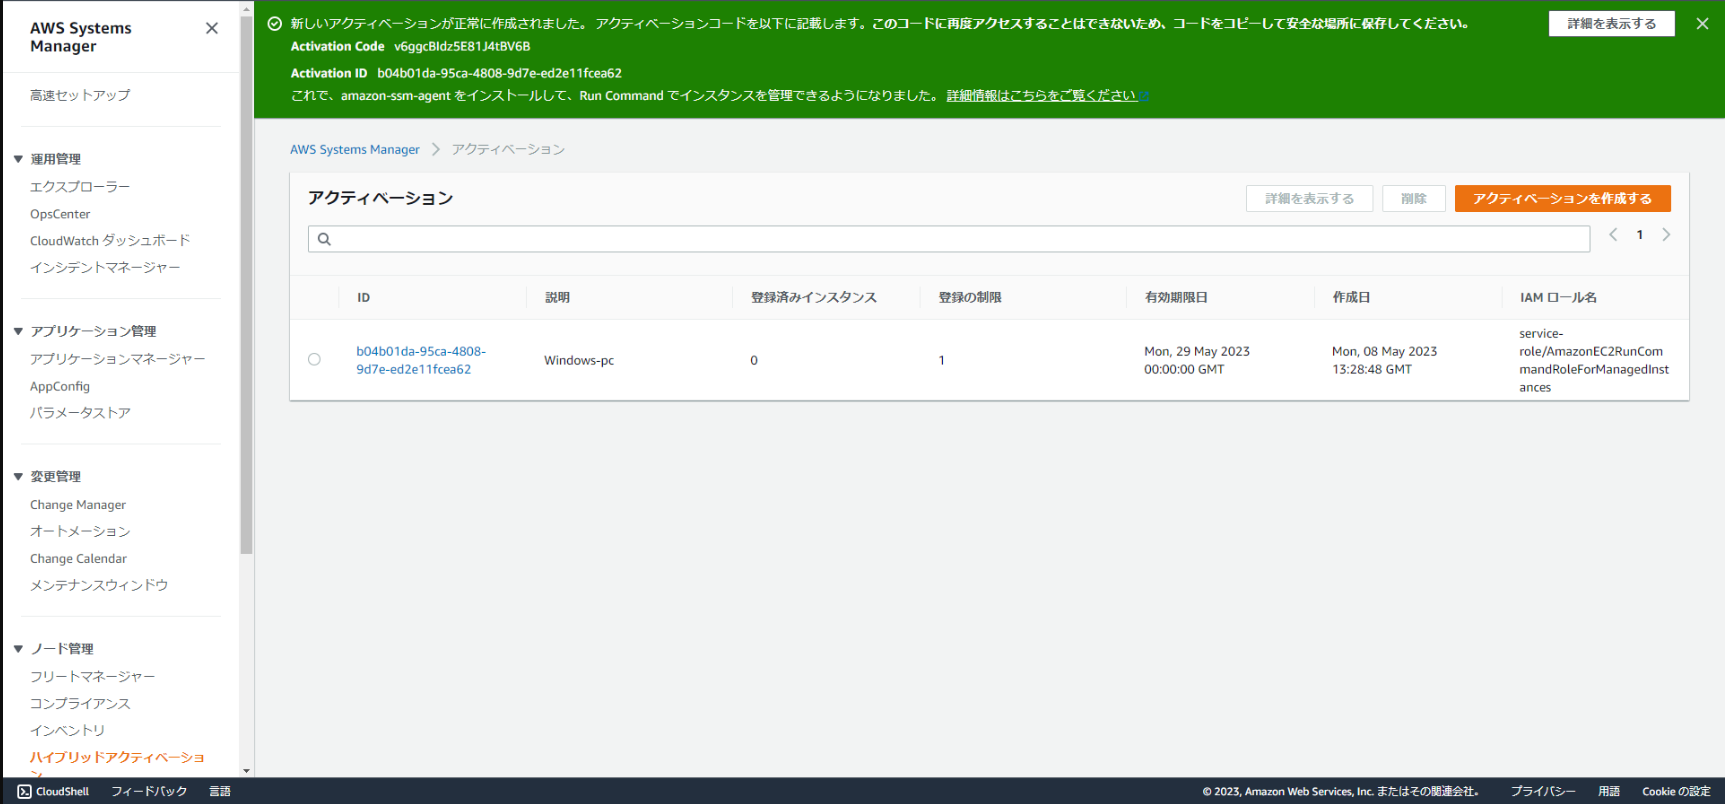
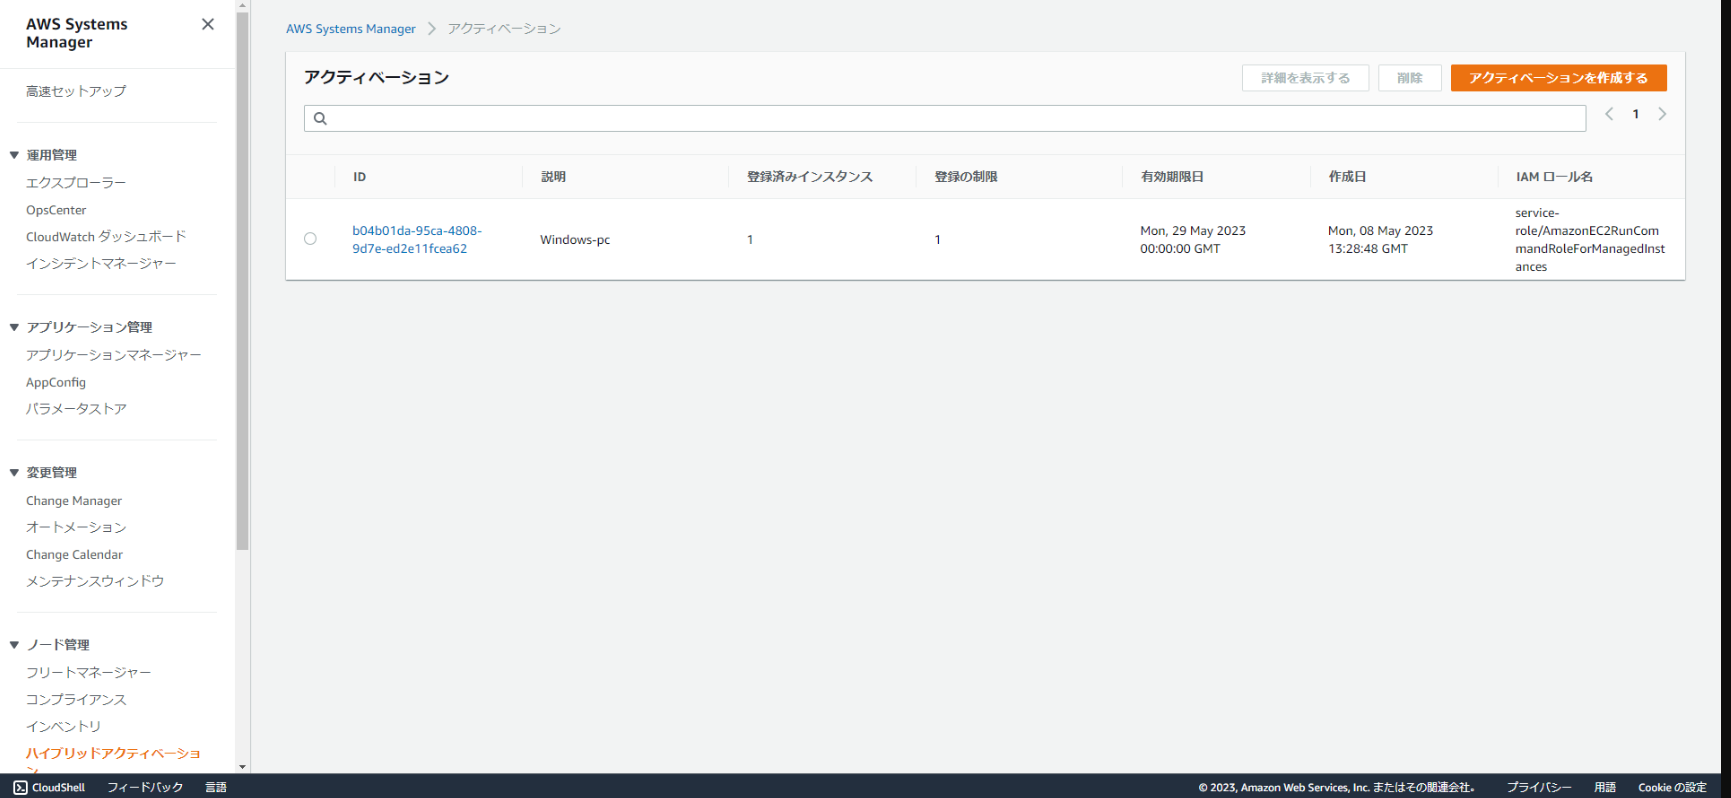
しばらくすると登録済みインスタンスが0→1になります。
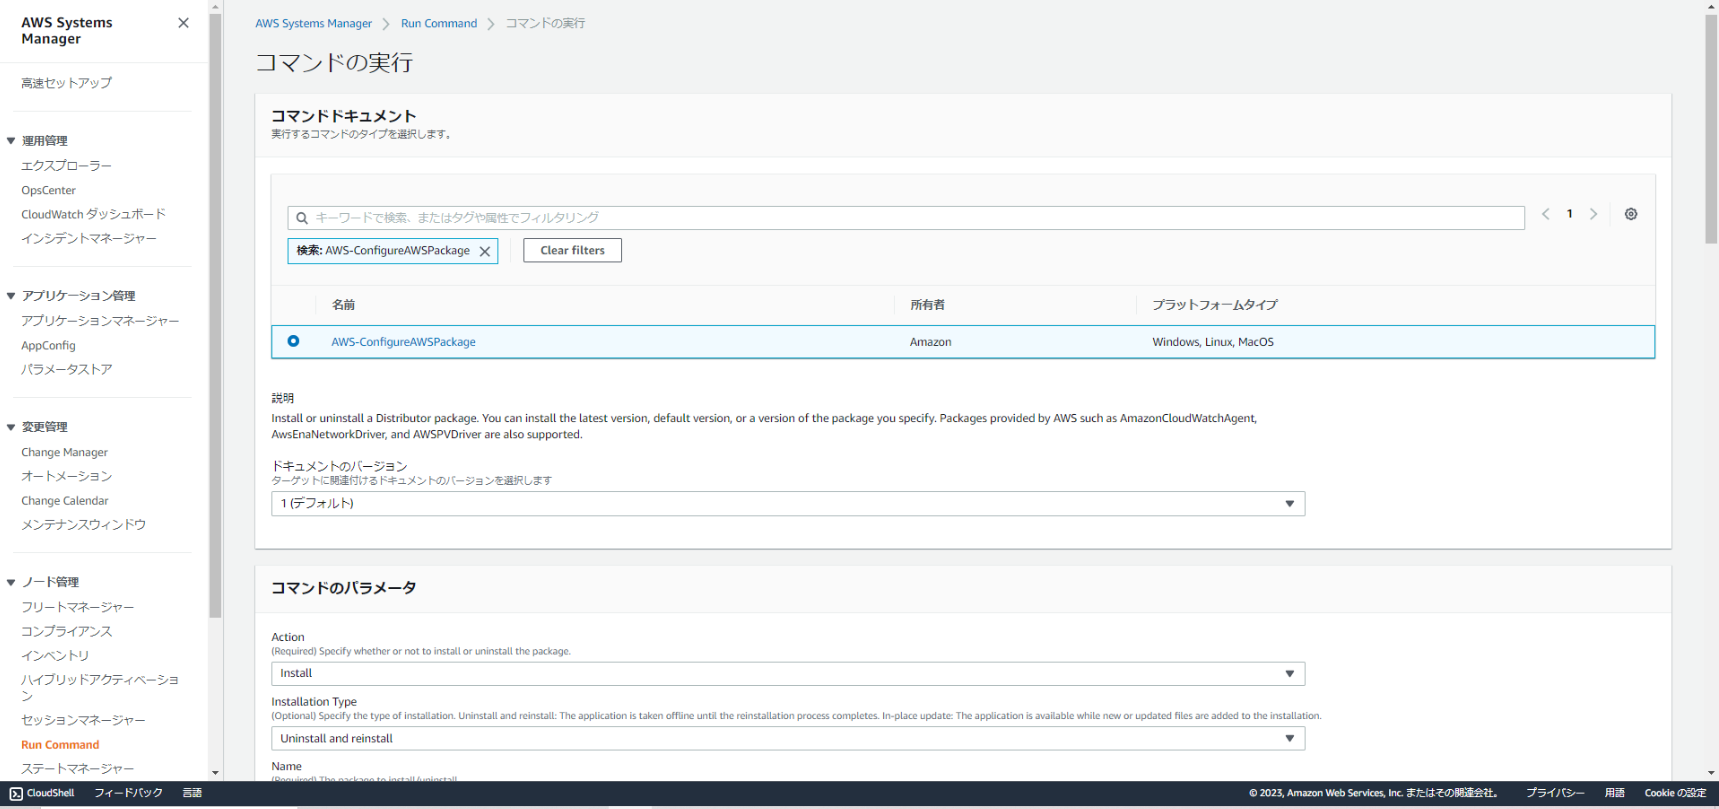
次にそのインスタンス(PC)にRum CommandでCloudWatch Agentをインストールします。

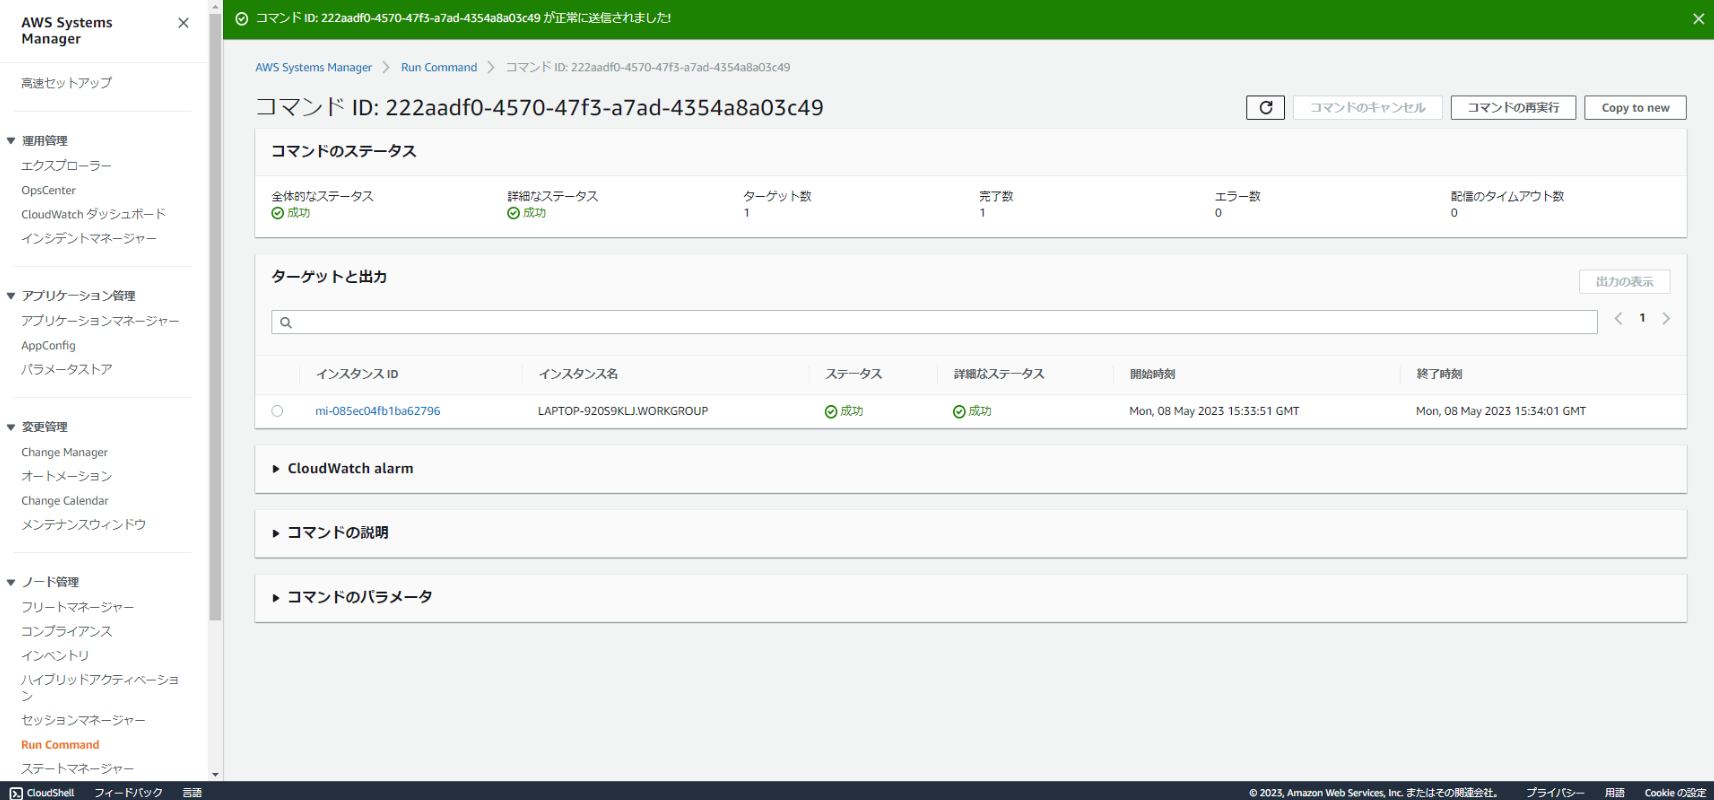
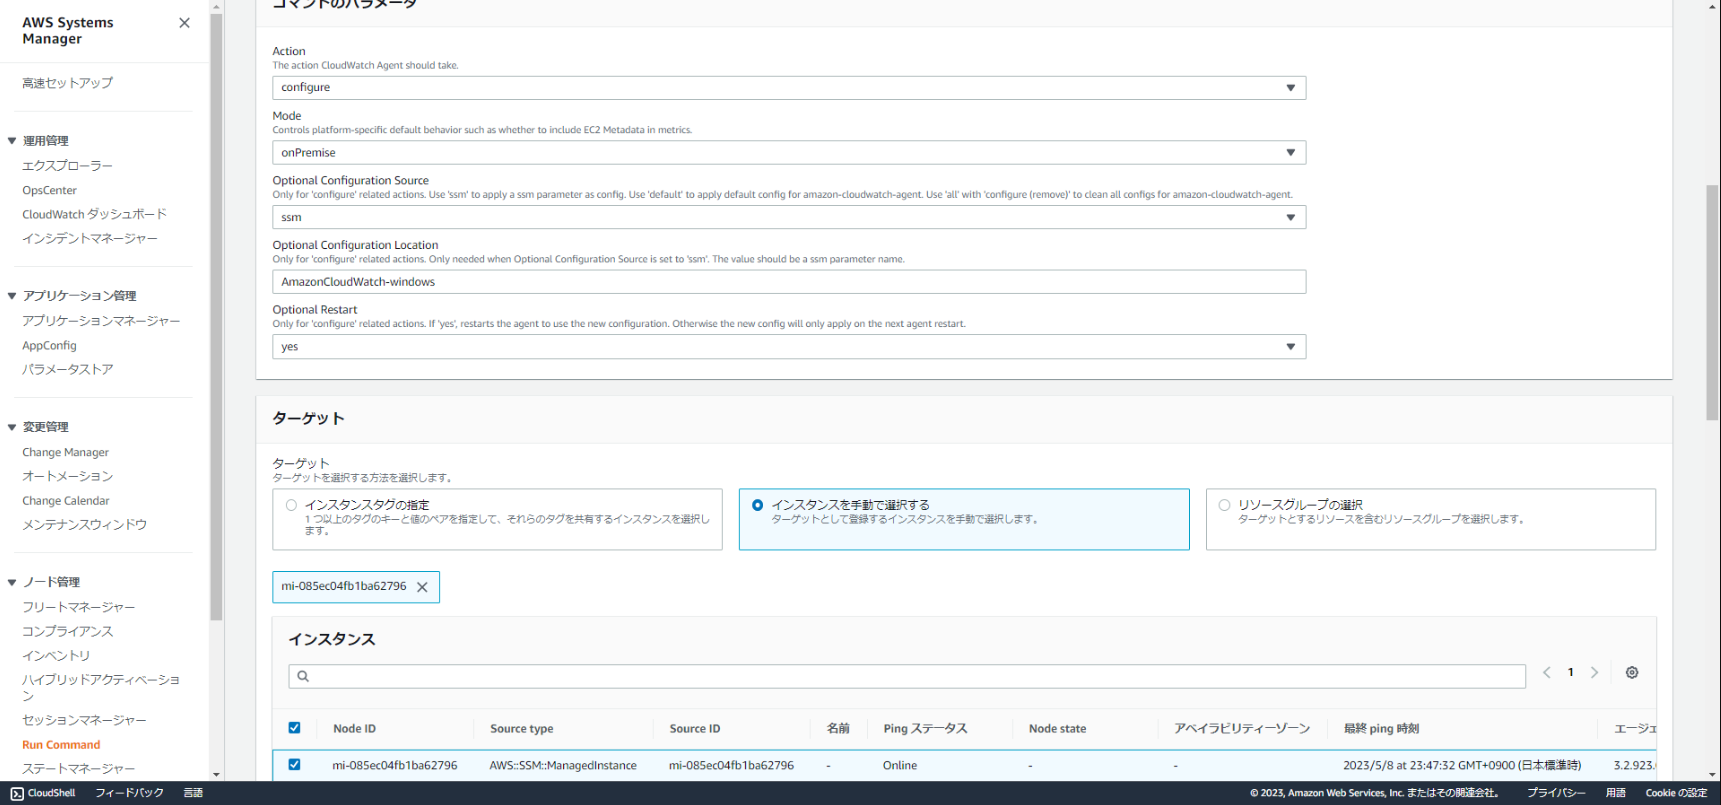
Agentの起動を行います。
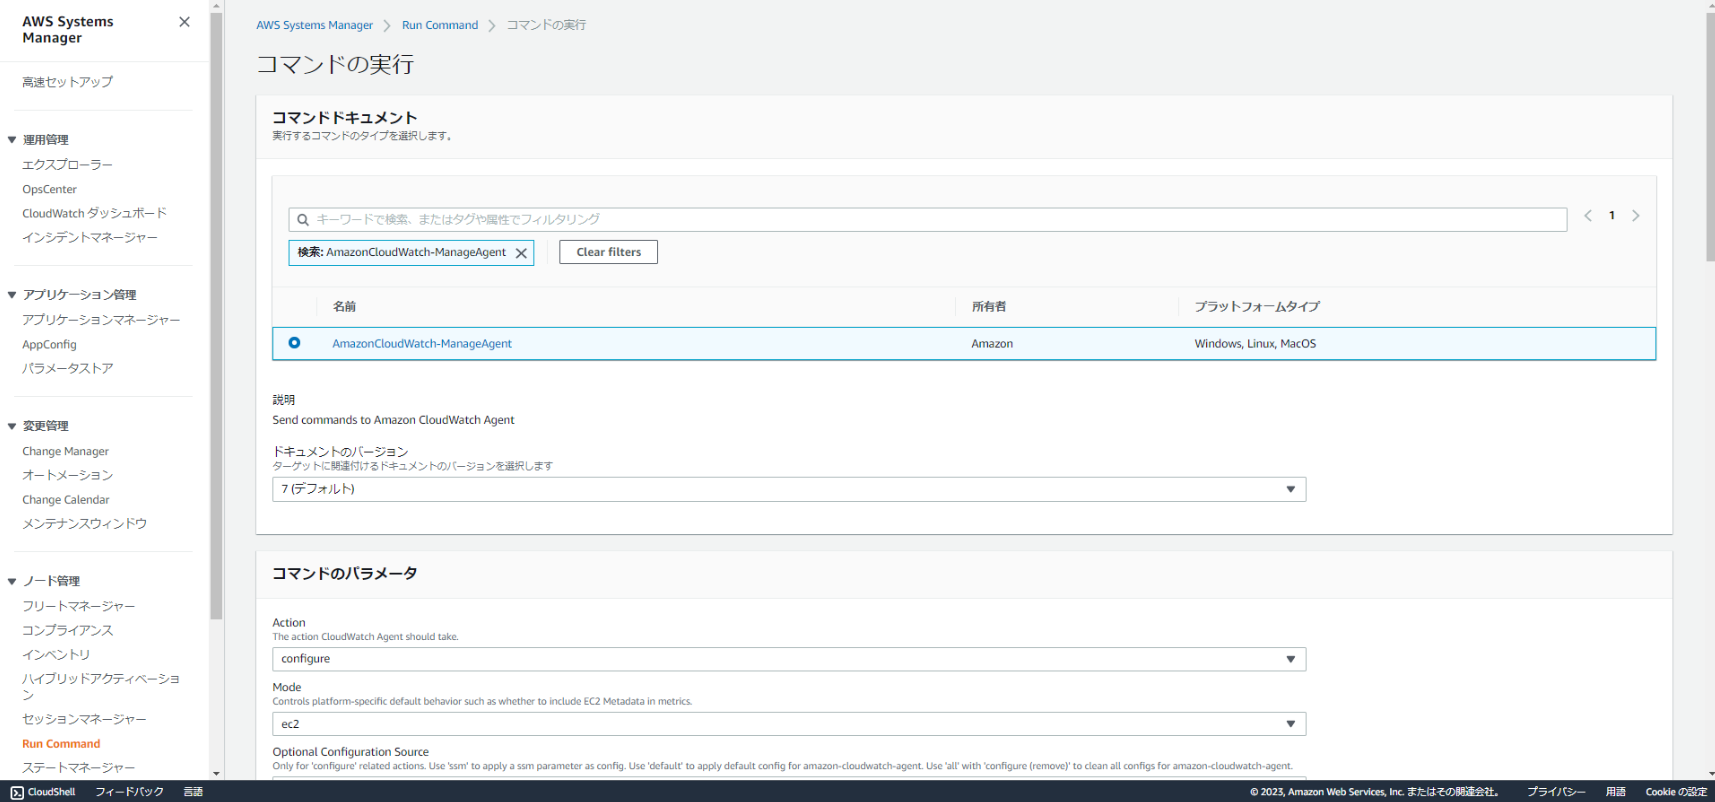
Optional Configuration SourceにSSM Parameter Storeへ格納したパラメータを指定します。
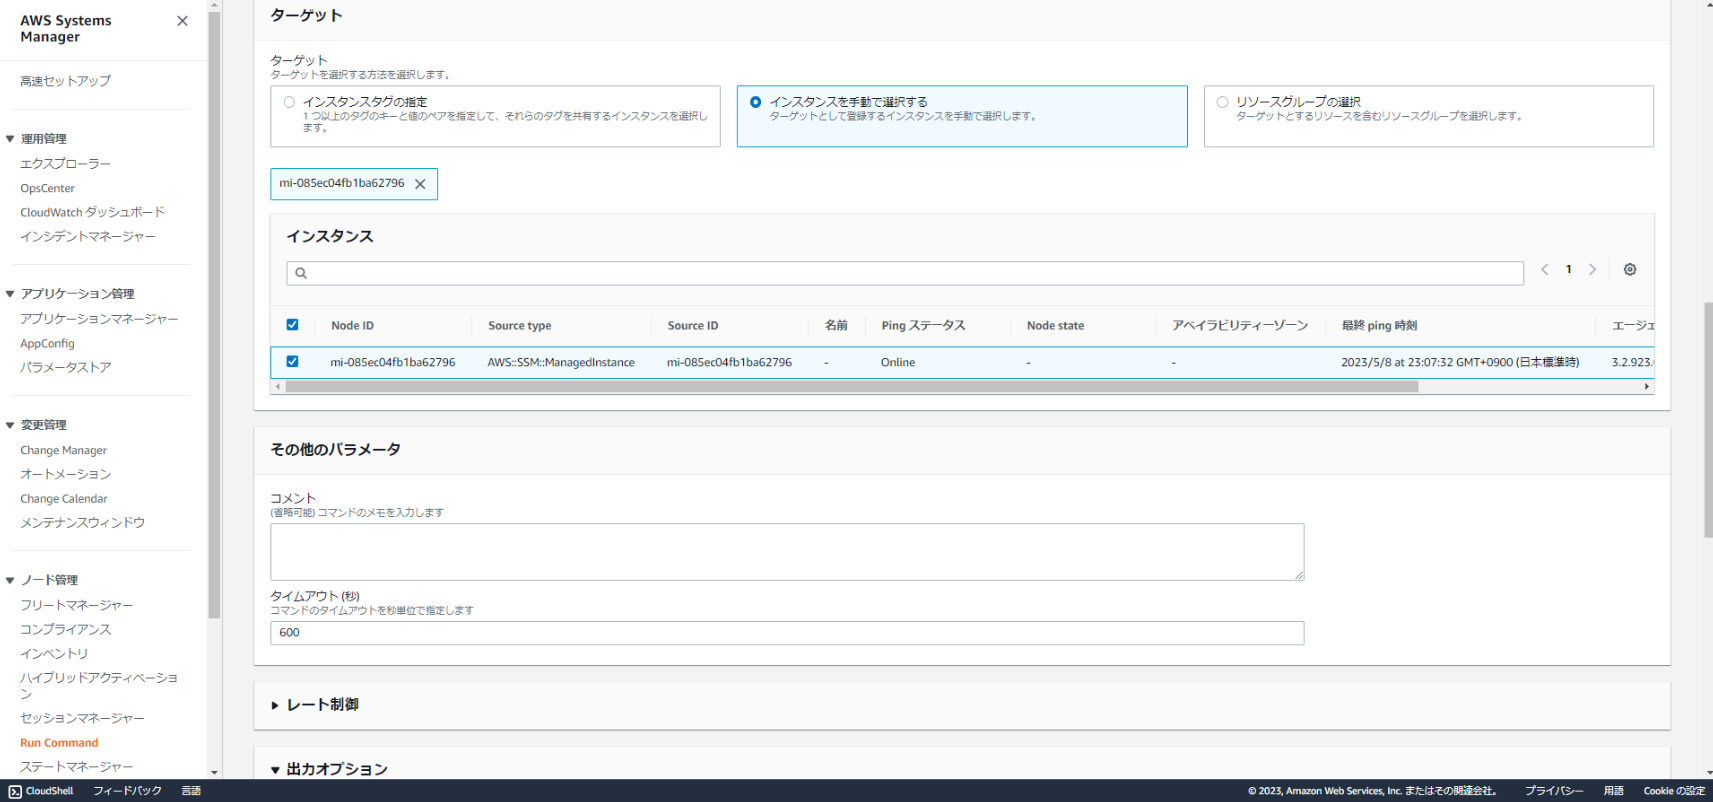
Agentの起動が終わるとPCのサービスにCloudWatch AgentとSSM Agentが実行中になっています。
Windowsのイベントビューアのログはもともとテキスト形式ではないのですが、
Agentの設定ファイルを作成中にSystemログを転送するか最後の方で聞かれるのでそこで転送できるようになります。

一方でChromeのログが文字化けしてますね。
SQLiteファイルなのでテキスト形式ではなくこのままだときちんと見れません。
(コスト最適化について知りたかったのでyoutube見てたんです!と言い訳聞きそうな画面ですね。)

SQLite形式のファイルは必要な設定がないと見れません。
https://www.sqlite.org/index.html
から必要なモジュールをダウンロードして配置します。
powershellでsqlite3コマンドをブラウザログに行うと各テーブル情報が出てきます。
PS C:\Users\[ユーザ名]\AppData\Local\Google\Chrome\User Data\Default> sqlite3 History
SQLite version 3.42.0 2023-05-16 12:36:15
Enter ".help" for usage hints.
sqlite> .tables
cluster_keywords          downloads                 segments
cluster_visit_duplicates  downloads_slices          typed_url_sync_metadata
clusters                  downloads_url_chains      urls
clusters_and_visits       keyword_search_terms      visit_source
content_annotations       meta                      visits
context_annotations       segment_usage
sqlite>
sqlite> SELECT datetime(last_visit_time/1000000-11644473600, 'unixepoch') AS visit_time, url FROM urls;
(一部略)
2023-05-19 14:07:59|https://www.youtube.com/watch?v=x7qzUf4ZY_w
2023-05-19 14:36:20|https://www.youtube.com/watch?v=YmcwQjwSMJI
2023-05-20 07:30:45|https://www.youtube.com/watch?v=4K3_hY0eY2w
2023-05-20 07:31:38|https://www.youtube.com/watch?v=OsN8H6u3Vs4&t=642s
これをSystemManagerからカスタムスクリプトとして実行します。
https://www.sqlite.org/2021/sqlite-tools-win32-x86-3360000.zip
からexeを取り出して必要な位置に配置します。
それをカスタムスクリプト実行で配置して取り出したものをエクスポートするpowershellをChatGPTに書いてもらって実行します!

ログがリダイレクトされてCloudWatchに表示されます。

終わりに
今回はCloudWatchどこまでいけるか選手権という趣旨だったので登場人物を増やさない方向にしたかったです。
カスタムスクリプトで加工しましたが、本当にPC管理となるとスケジュールしてSystemManagerを動かさないといけなかったり考慮事項ありそうですね。。
なんにせよ、Cloudwatch AgentでPCをオンプレミスのサーバと見立ててここまで見れるのはすごいなと思いました!


