ReactNativeをTypeScriptで書いていてReduxを使おうと思ったはいいものの、Reduxの概念の説明やJavascriptでのサンプルコードはあれど、意外とTypeScriptでの情報が少なく感じたので、今から挑戦するって人の助けになればと思い、サンプルを残しておきます。
実際のコードはGithubに置いてあります。記事内ではわかりにくいところもあると思いますので、Cloneしてみてください。
想定する読者層
Reactの考えを基本的に理解した上で、ReactやReactNativeで軽く構築はしたことがある上で、ReduxにTypescriptで挑戦したい程度の人を想定しています。
概念に関してはあまり記載しませんが、Reduxの理解には概念の理解が不可欠なので、「たぶんこれが一番分かりやすいと思います React + Redux のフロー図解」や、「Redux入門【ダイジェスト版】10分で理解するReduxの基礎」を流し読みして大体の流れだけでも理解しておくことをおすすめします。
そもそも自分が挑む際にReduxの概念はわかるけど、どこから書けばいいんや...!って自分がなってしまったので、簡単な例を流れに沿って作り上げていくTutorialみたいな感じを想定しています。
作業内容
簡単なカウンターを作ります。
1ずつ数字を増やすことができ、任意のタイミングでリセットできる以外の機能はありません。

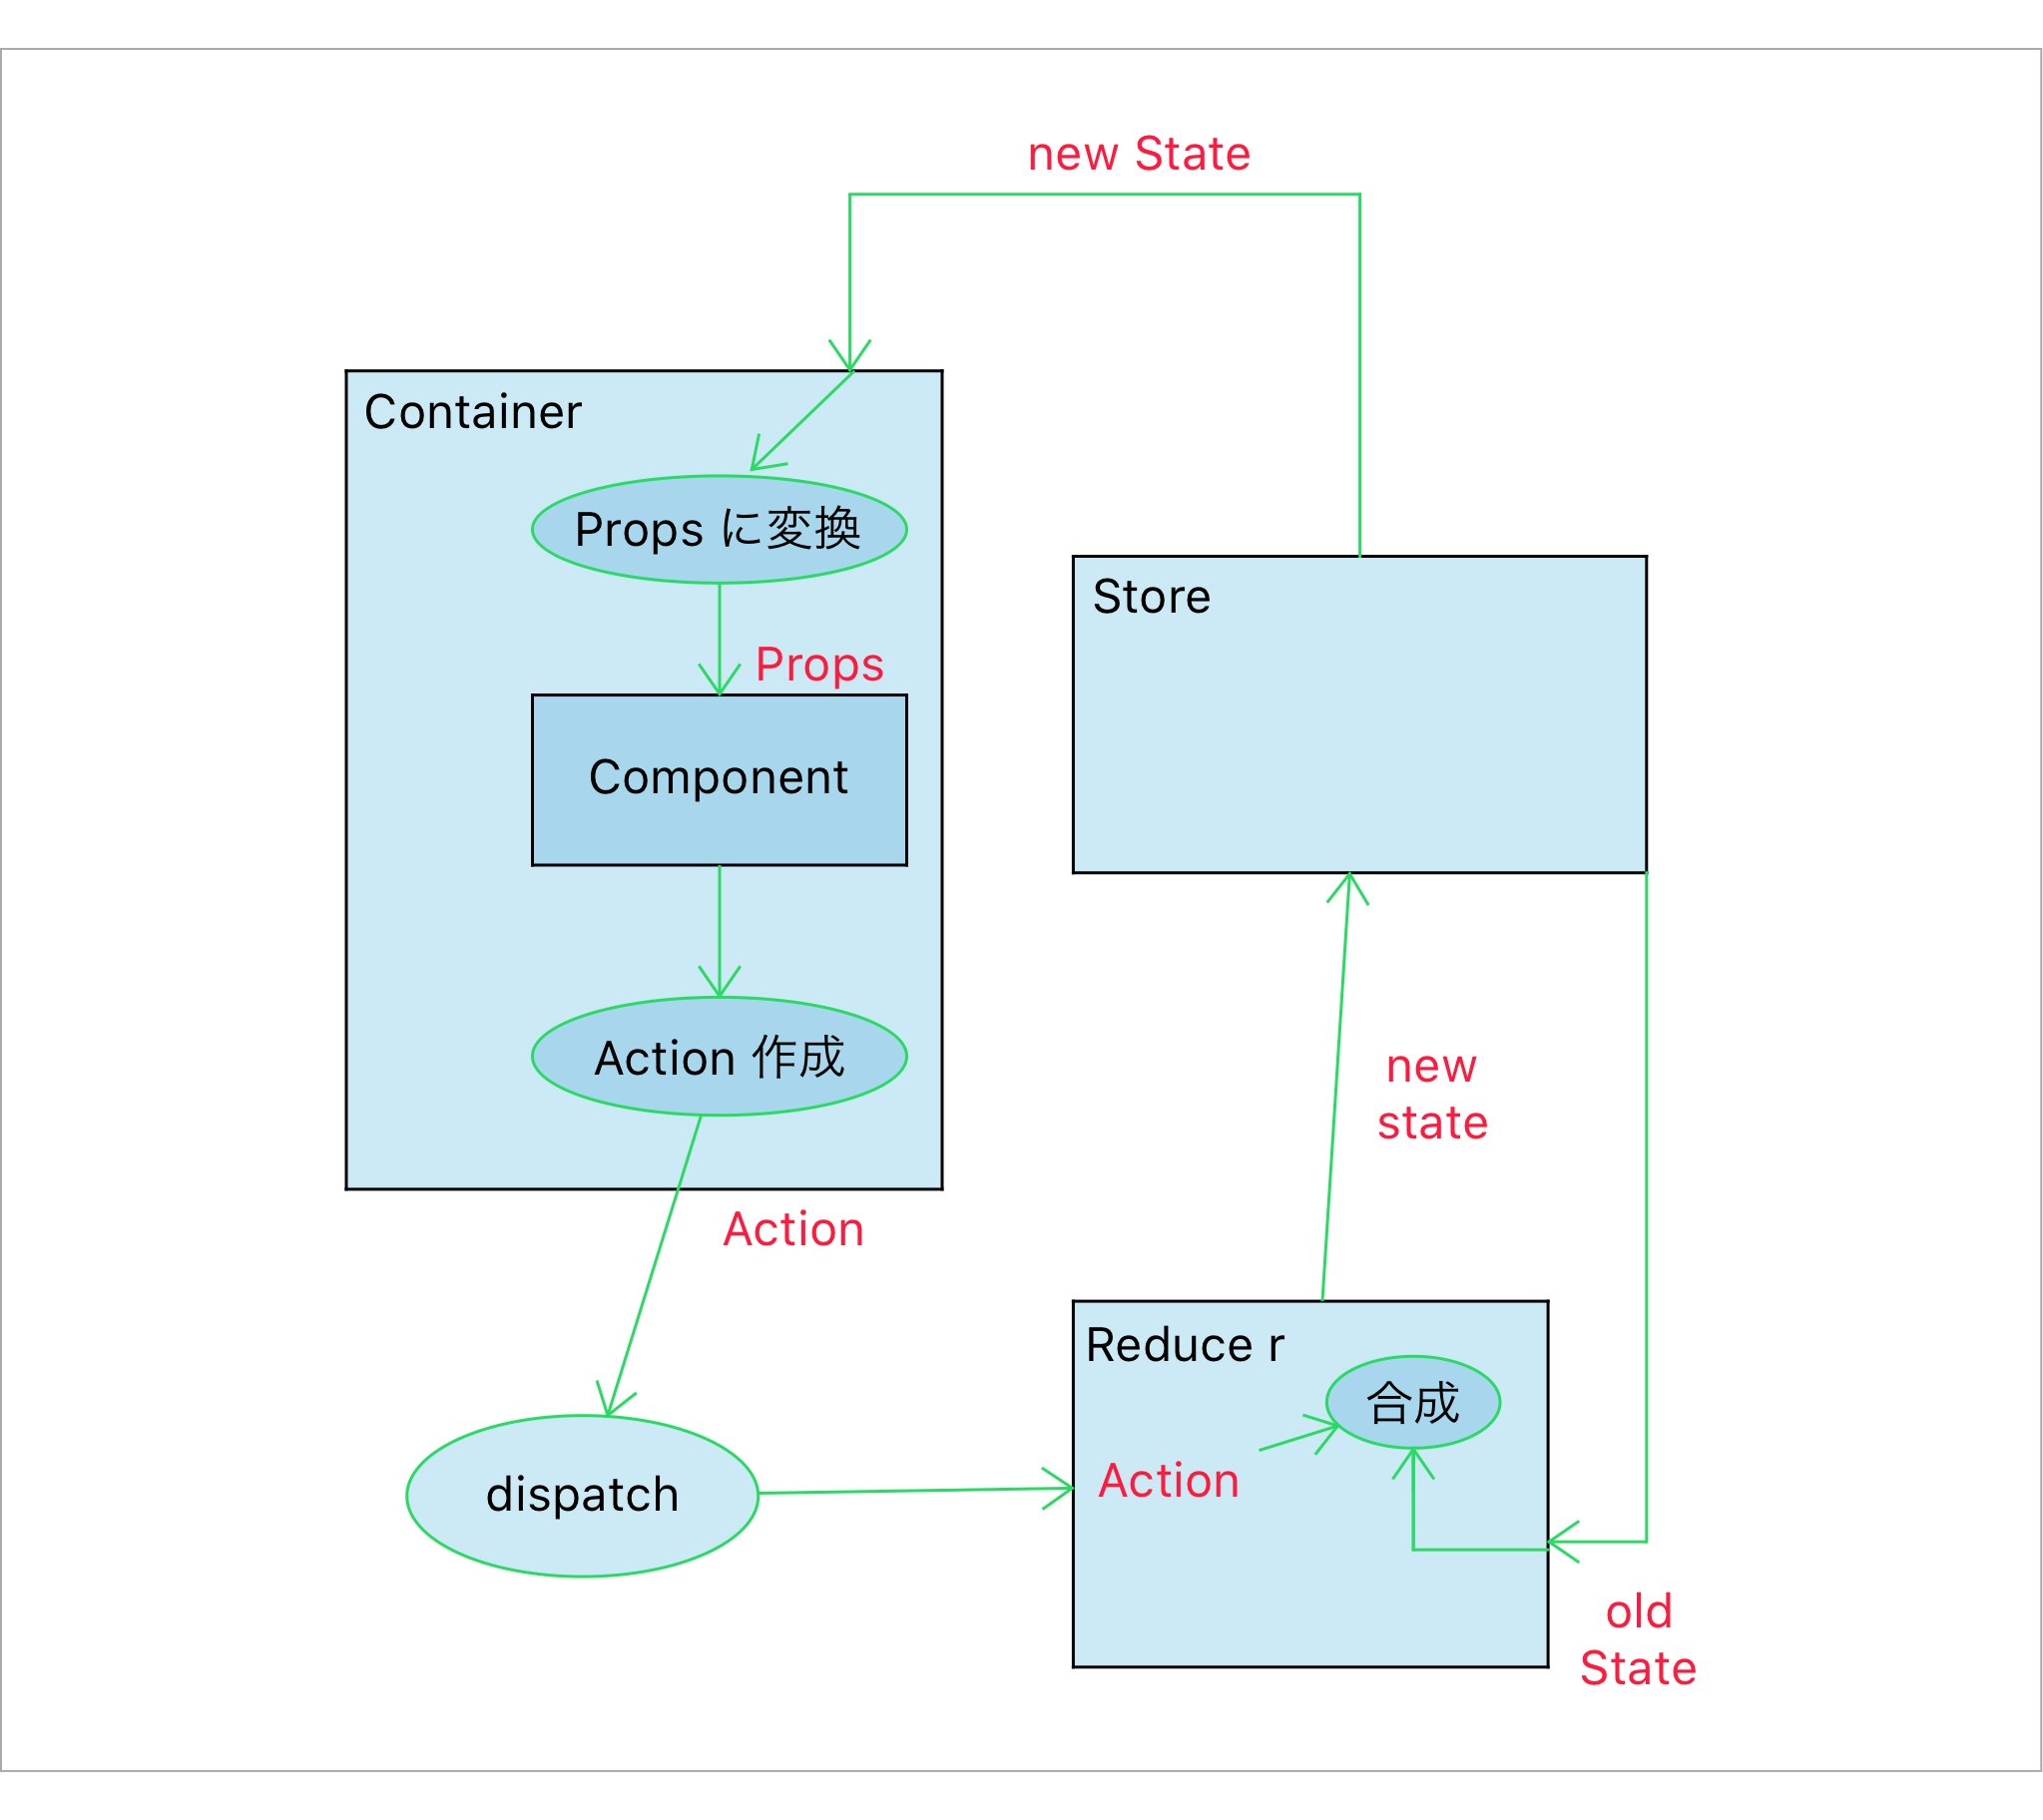
このアプリ上でのReduxを用いたデータの流れをめちゃくちゃ簡略化するとこんな感じ。

下準備
まずはReactNativeとTypeScriptの環境構築は済んでいるという前提でいきます。
もし済んでなければ、この記事でとりあえずTypeScriptを使える様にはしておいてください。
プロジェクトフォルダ内でyarnを用いてRedux関連のパッケージを追加します。
$ yarn add redux
$ yarn add react-redux
$ yarn add --dev @types/react-redux
react-reduxだけは型定義が必要なので追加します。
Reduxを構成する要素のそれぞれの役割を適切に管理するためにApp.tsxと同じ階層にactions,components,containers,reducersディレクトリを作っておきます。
(フォルダ構成がわかりづらい場合はGithubの方から見てみてください。)
また、App.tsxからいらない記述を消してしまいます。
- const instructions = Platform.select({
-   ios: 'Press Cmd+R to reload,\n' + 'Cmd+D or shake for dev menu',
-   android:
-     'Double tap R on your keyboard to reload,\n' +
-     'Shake or press menu button for dev menu',
- });

  type Props = {};
  export default class App extends Component<Props> {
    render() {
      return (
        <View style={styles.container}>
-         <Text style={styles.welcome}>Welcome to React Native!</Text>
-         <Text style={styles.instructions}>To get started, edit App.js</Text>
-         <Text style={styles.instructions}>{instructions}</Text>
        </View>
      );
    }
  }
1. Viewを作る
ここはReduxというよりただのReactNativeで、フロー図ではcontainerの中にあるcomponentにあたります。
ReduxはStateの管理をReactから引き剥がすためのライブラリなので、見た目の部分はStateを持たない関数コンポーネントで作れる...ということで、今回はそこから作っていきます。
componentsディレクトリの中にCounter.tsxというファイルを作り、編集していきます。
今回のカウンターは状態として数値を1つ持っており、それに対して任意の値を追加することと、数値そのものをリセットすることの2つの状態を更新する機能を持っています。
それらは全てPropsから受け取る様に定義します。undefinedを許容する様にしているのはあとでReduxと繋ぐ際に必要な条件なので、そのまま真似してください。
// Viewだけを管理する
import { View, Text, Button, StyleSheet } from 'react-native';
import * as React from 'react';

export interface CounterProps {
  value?: number;
  addCount?: (val: number) => void;
  reset?: () => void;
}

const Counter: React.SFC<CounterProps> = (props: CounterProps) => {
  return (
    <View style={styles.container}>
      <Text style={styles.countText}>{props.value || 0}</Text>
      <View style={styles.buttons}>
        <Button
          title="increment"
          onPress={() => {
            if (props.addCount) props.addCount(1);
          }}
        />
        <Button
          title="reset"
          onPress={() => {
            if (props.reset) props.reset();
          }}
        />
      </View>
    </View>
  );
};

const styles = StyleSheet.create({
  container: {
    flex: 1,
    justifyContent: 'center',
    alignContent: 'center',
  },
  countText: {
    flex: 0.2,
    fontSize: 90,
    fontWeight: 'bold',
    textAlign: 'center',
    textAlignVertical: 'bottom',
    color: 'black',
  },
  buttons: {
    flex: 0.2,
    flexDirection: 'row',
  },
});

export default Counter;
この時点までうまくいってるか確かめるために、App.tsxの頭に次の行を加え、
import Counter from './components/Counter';
render()関数内を書き換えてみます。
export default class App extends Component<Props> {
  render() {
    return (
      <View style={styles.container}>
        <Counter />
      </View>
    );
  }
}
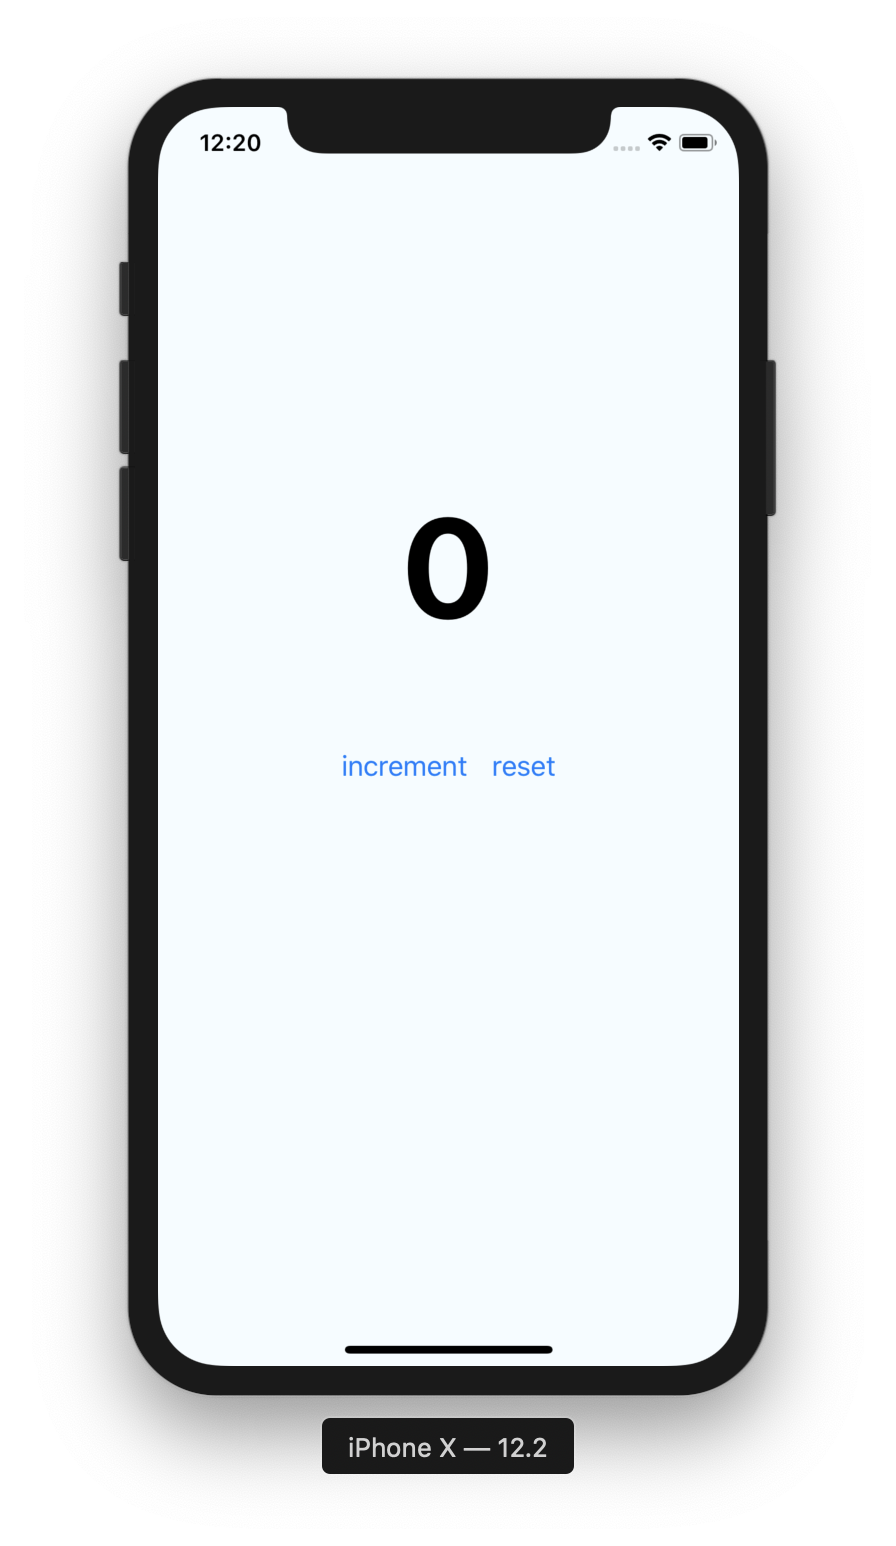
するとすでに最初のgifと同じ様な画面自体はできているはずです。

もちろんボタンを押しても反応はないし数値は常に0のままです。
2. ActionとActionCreaterを作る
ActionとActionCreaterは1つのファイルにまとめて記述してしまいます。
actionsディレクトリ内に、Count.tsというファイルを作ります。
ActionのイメージはReducerに対して「この様な変更をしますよ〜」と知らせるための手紙の様なものと考えてください。
そしてその手紙を書いてくれるのがActionCreaterです。
Reducerがどの様な内容の変更か判別できる様に、全てのActionにはtypeという識別子をつけます。
今回は数値の増加とリセットの2つなので、その2つをenumで列挙します。なお、識別子なのでプロジェクト内で被らない様に気をつけましょう。
export enum CounterActionType {
  ADD_COUNT = 'ADD_COUNT',
  RESET_COUNT = 'RESET_COUNT',
}
そして、そのtypeに加え、送りたい情報(今回は増加する値のみ)も扱える様にしたinterfaceを定義します。
export interface CounterAction {
  type: CounterActionType;  // 必須
  value?: number;  // 値増加の時のみ使う
}
そして、数値の増加とリセットのそれぞれで、引数に与えたい情報をもち、Actionを返す関数を定義します。
export const addCount = (value: number): CounterAction => ({
  type: CounterActionType.ADD_COUNT,
  value,
});

export const reset = (): CounterAction => ({
  type: CounterActionType.RESET_COUNT,
});
これにより、関数を叩くとActionが発行されるActionCreaterも完成です。
3. Reducerの作成
次は発行されたActionを受け取り、すでにStoreが保持しているstateを組み合わせることで新たなstateを生み出し、それをStoreに対して送る(dispatch)役割を担うReducerの作成です。
reducersディレクトリ内にCounterReducer.tsを作成し、Storeに保持したい情報を羅列したinterfaceと、そのstateの初期状態を定義します。
import { CounterAction, CounterActionType } from '../actions/Count';

export interface CounterState {
  value: number;
}

const initialState: CounterState = {
  value: 0,
};
そしてその下に、Reducerを構成していきます。
引数に、"Storeに保持している現在の状態であるstateと、Reducerとして受け付けるactionをとり、返り値に新たに更新後のCounterState発行する...という流れです。
具体的には、switch-case文でActionのtypeを判別し、"ADD_COUNT"であれば値の更新なので、スプレッド構文...stateで現在のStateの内容を展開します。その上で更新したい値であるvalueを元々のstateの値とactionで指定されたvalueの加算の結果を合成しています。
(action.value || 0)は前半が評価された際にnullなどであった場合に0となるだけです。
caseで全てのenumの例を網羅した上で、defaultでstateを返している点に注意してください。
初期化時にはdefaultが選ばれ、引数でstate: CounnterState = initialStateとしているためinitialStateが代入されます。
const counterReducer = (
  state: CounterState = initialState,
  action: CounterAction,
): CounterState => {
  switch (action.type) {
    case CounterActionType.ADD_COUNT:
      return {
        ...state,
        value: state.value + (action.value || 0),
      };
    case CounterActionType.RESET_COUNT:
      return {
        ...state,
        value: 0,
      };
    default:
      return state;
  }
};

export default counterReducer;
ちなみにReducerは純粋な関数になる様にしましょう。同じ引数をとったら必ず同じ結果が返ってくる様にしないといけないとされています(randomな結果やAPIリクエストなどを内部で行うことは禁止)。
今回の例では小規模なため1つのActionと1つのReducerから構成されますが、複数個定義することもあります。今回はそうなった時にも対応できるようスケールできる書き方をしていきます。
そこでReducerをまとめる親としてReducer.tsをプロジェクト直下に作成します。
ここで複数のReducerからstateを集めてRedux用のStateと、全てをまとめたReducerを定義します。
import counterReducer, { CounterState } from './reducers/CounterReducer';
import { combineReducers } from 'redux';

export interface AppState {
  counter: CounterState;
}

const appReducer = combineReducers<AppState>({
  counter: counterReducer,
});

export default appReducer;
(実際に動作する際に生成されるReducerは1つであり、コード上で定義したReducerは実際には1つにまとめられるため、コード側から見ると1つのActionを処理する際に全てのReducerが動作している様に見えます。そのため、一部のReducerでstateを破壊する様なコードを書いてしまうと他のstateにも影響します。)
4. Containerを作成してReduxとつなぐ
ここまでで、ReduxのAction,ActionCreater,そしてReducerを作成することでReduxのStoreを構成する準備をしてきました。ここではViewとReduxを繋ぐContainerComponentを作成します。
まず、先ほどReducerで定義したAppStateからコンポーネントが必要な値を受け渡す関数としてmapStateToPropsを定義します。
import { AppState } from '../Reducer';
import { CounterProps } from '../components/Counter';

const mapStateToProps = (state: AppState): CounterProps => ({
  value: state.counter.value,
});
次に、アクションを作成してReducerにdispatchする関数を列挙したinterfaceと、実際にそのinterfaceにそってdispatchするまでの流れを定義します。ここで定義するものは、components/Counters.tsxで定義したPropsのうち、Stateの更新時に走ってほしい関数です。
Component側からaddCountが呼ばれたら、__actionCreater__のaddCountに引数valを渡してActionを発行してもらい、その返戻値(Action)をReducerに向かってdispatchする...というイメージになります。
// import一部省略
import { Dispatch } from 'redux';
import { CounterAction, addCount, reset } from '../actions/Count';

interface DispatchProps {
  addCount: (val: number) => void;
  reset: () => void;
}

// mapStateToProps省略

const mapDispatchToProps = (dispatch: Dispatch<CounterAction>): DispatchProps => ({
  addCount: (val: number) => {
    dispatch(addCount(val));
  },
  reset: () => {
    dispatch(reset());
  },
});
最後に、このmapStateToPropsとmapDispatchToPropsを組み合わせて、component側のCounterに渡すために関数connectを使ってあげて、それをexportしてあげればOKです。
import Counter from '../components/Counter';
import { connect } from 'react-redux';

export default connect(
  mapStateToProps,
  mapDispatchToProps,
)(Counter);
Reduxと繋ぐ準備はできたので、次にStoreの実体を使える様にしていきましょう。App.tsxを開いてください。
まず、createStore()を用いてReducerをもとにStoreを作成し、<Provider>の引数に与えることで、これ以下のコンポーネントでReduxのStoreにアクセスできる様にします。(必ずApp.tsxなど最上部に設置すること)
そして、componentsではなくcontainerからCounterにアクセスする様に変更すると、Redux経由でStateにアクセスしているCounterが動く様になります。
  import React, { Component } from 'react';
  import { Platform, StyleSheet, Text, View } from 'react-native';
- import Counter from './components/Counter';
+ import Counter from './containers/Counter';
+ import { Provider } from 'react-redux';
+ import { createStore } from 'redux';
+ import appReducer from './Reducer';

  const store = createStore(appReducer);

  type Props = {};
  export default class App extends Component<Props> {
    render() {
      return (
+       <Provider store={store}>
          <View style={styles.container}>
            <Counter />
          </View>
+       </Provider>
      );
    }
  }
まとめ
これで無事Reduxを繋いだカウンターの完成です。
Reduxは初回の構築が一番わかりづらくてハードルが高いですが、1度構築しつつ流れを理解できれば、使う分にはそこまで難しくはないのかな...と思います。
カウンタとは種類の違う状態を作成したくなったら、またActionとReducerを増やしてまとめてあげればこのままスケールしていけます。
自分の理解を深める一環でこの記事を書いたのと、実際のコードを書いていくフロー重視だったので、違うところがあれば指摘していただけると幸いです。
(あと、フロー図書くのにiPadでMyScriptのNeboを使って手書きで書いたのですが、もっと楽に細かい部分までこだわったダイアグラムかけるツールご存知な方はぜひ教えて欲しいです!)