NextJsでAPIを使ってみたいと思い、メール機能を実装したので備忘録。
nodemailerとは
node.jsからメール送信をすることができるモジュール。
実際の動き
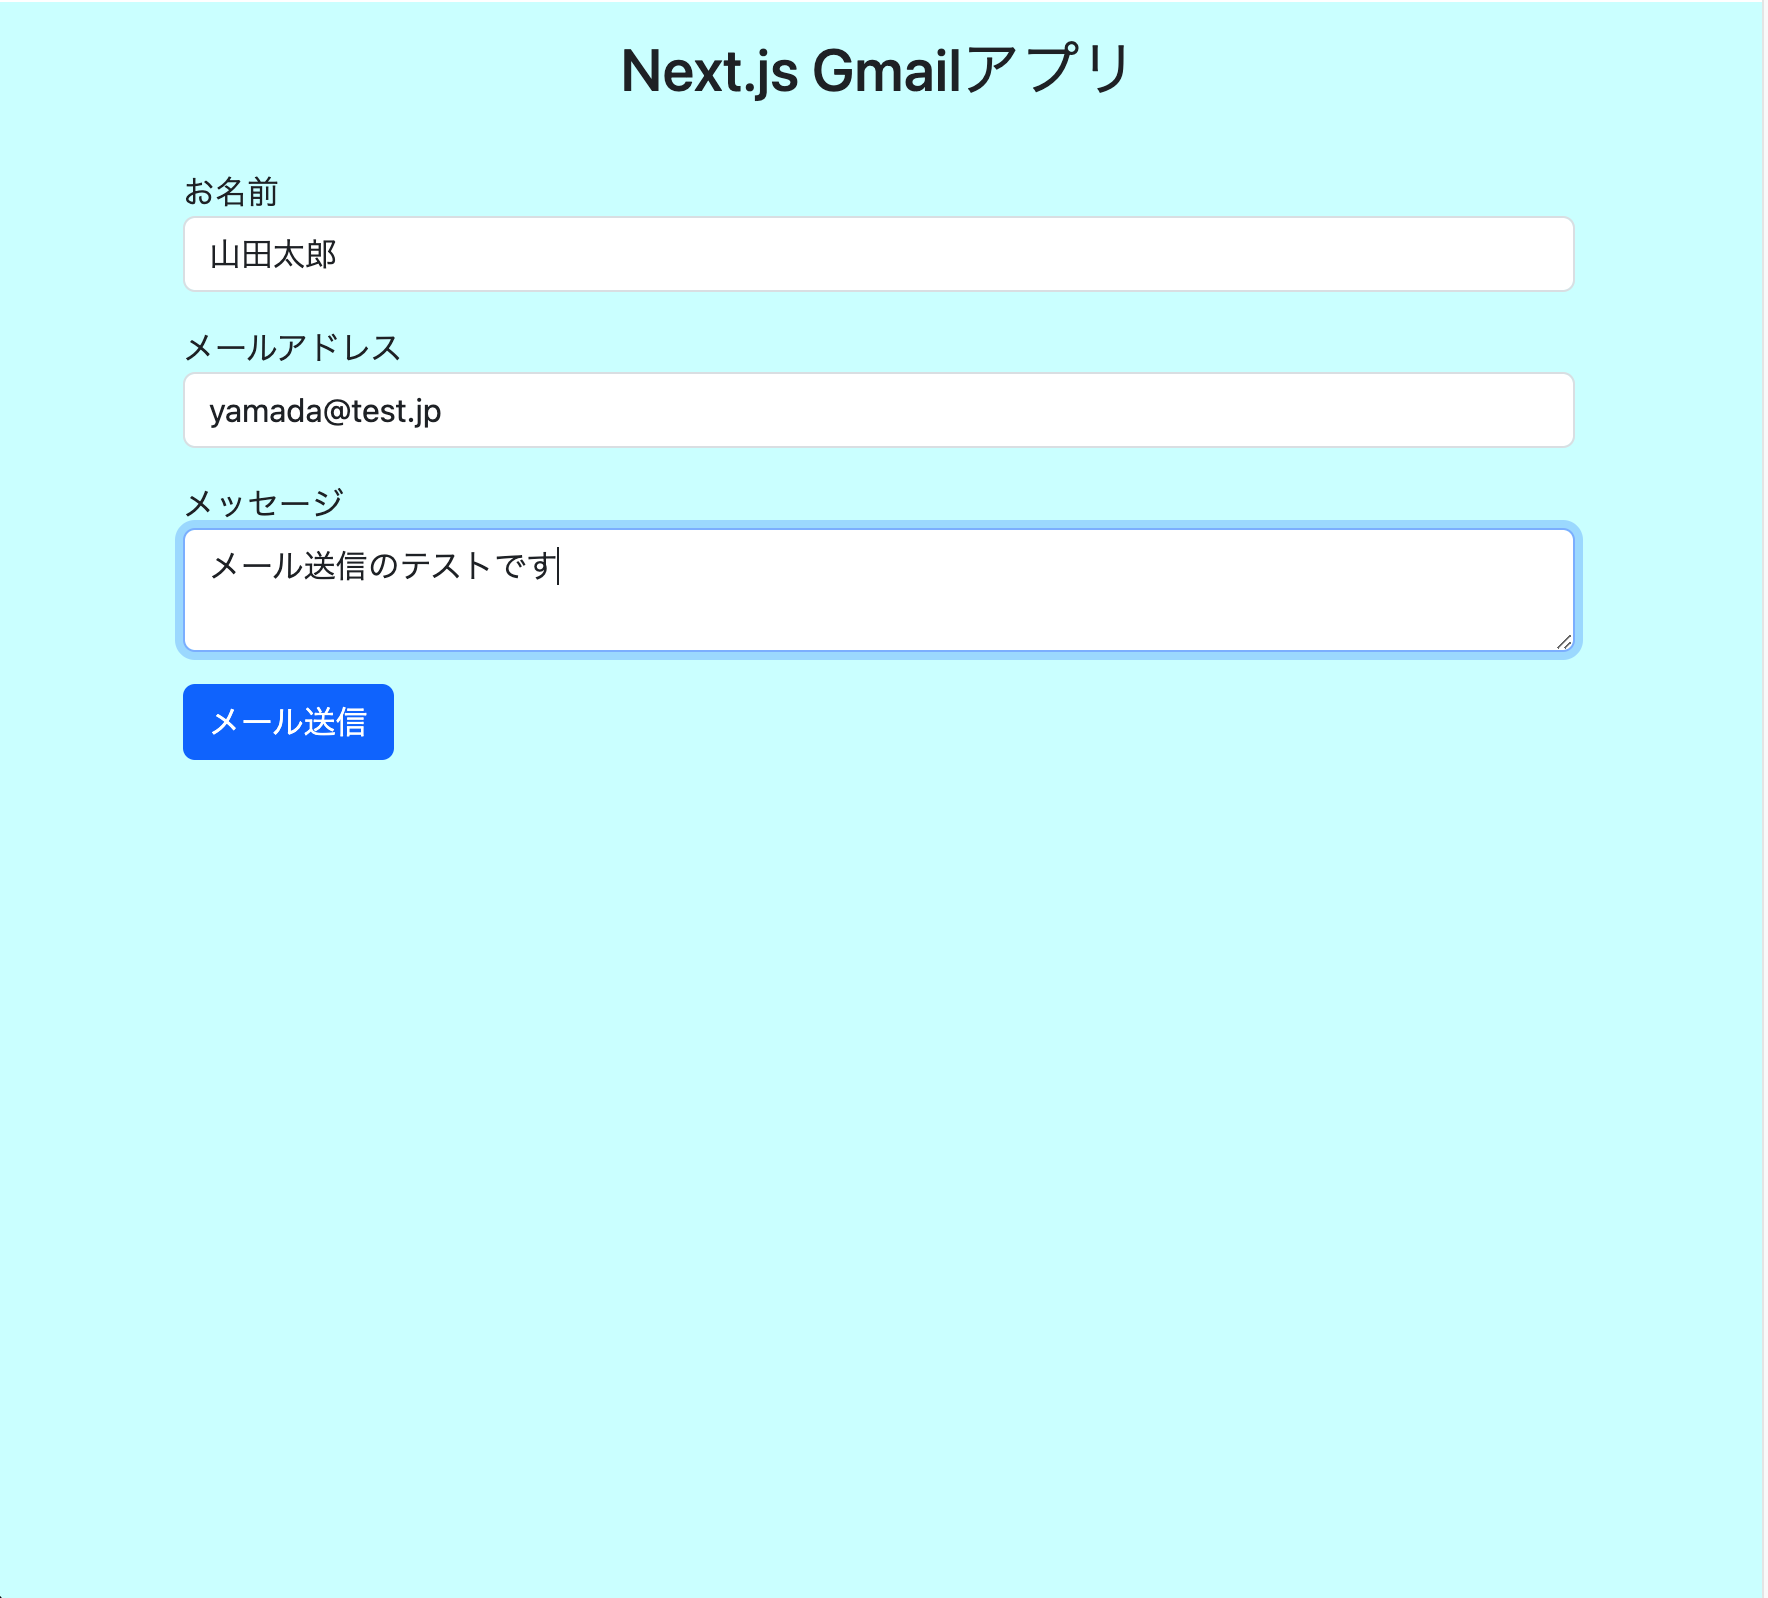
・内容を入力して「メール送信」ボタンを押下する
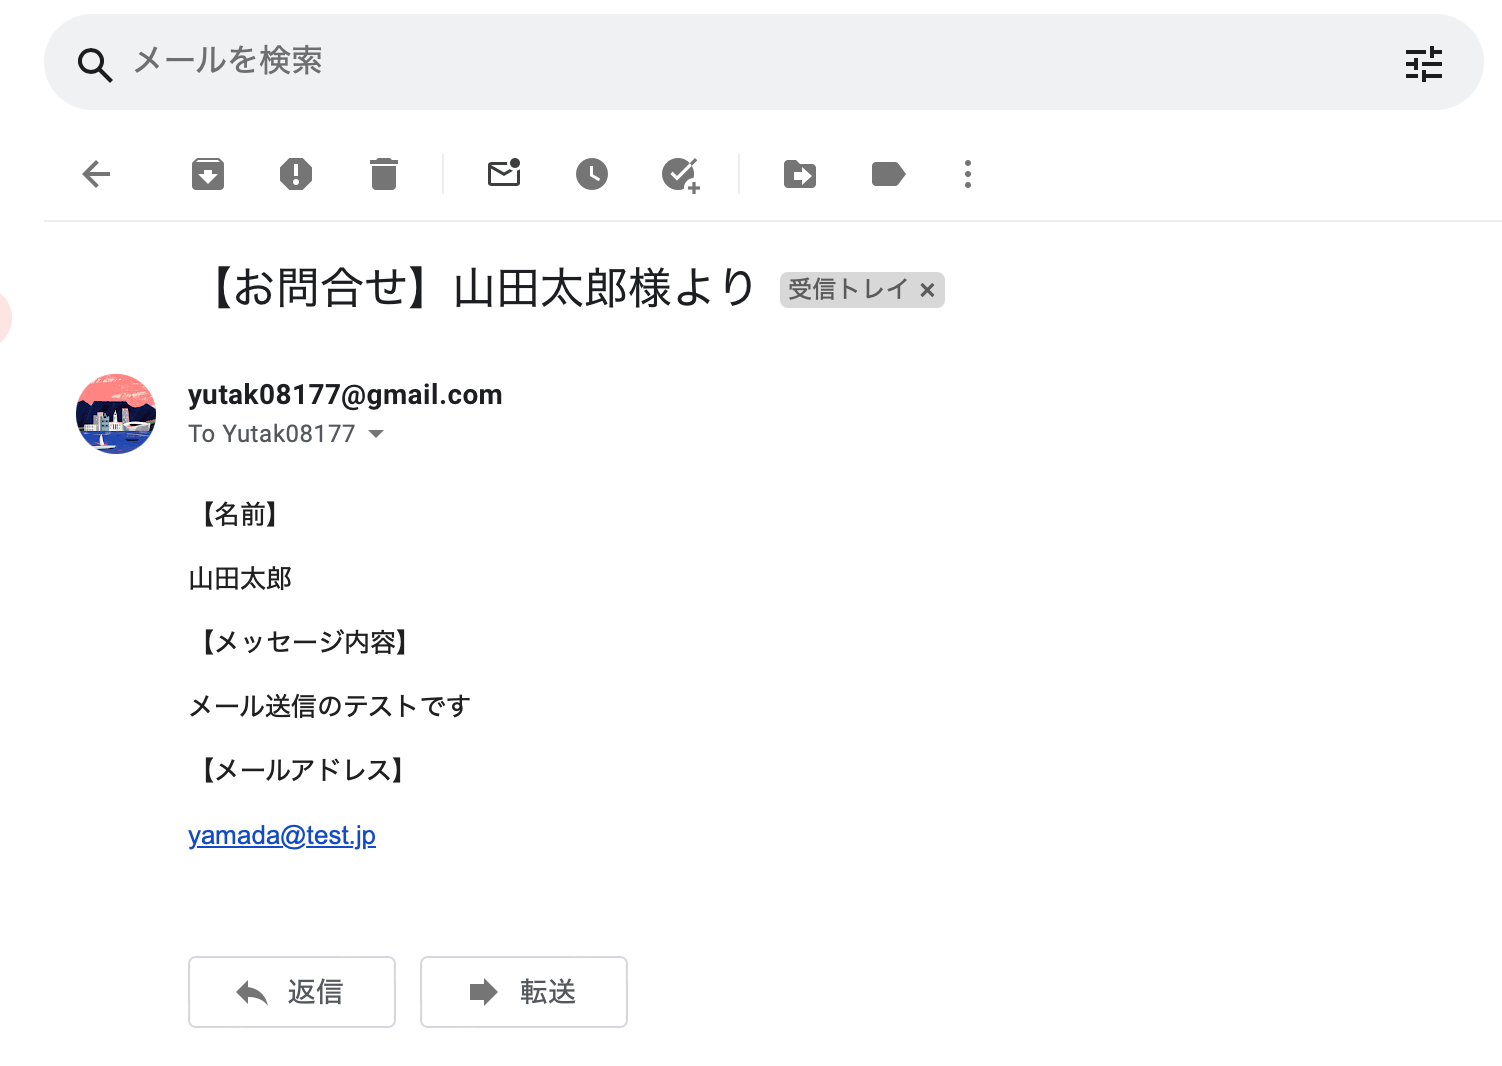
・実際にメールが送られる
使用する技術
・Nextjs:13.4
・react:18.2.0
・react-bootstrap:^2.9.0
・nodemailer
実装後のディレクトリ構造
gmailApp
|--pages
|  |--_app.js
|  |--_document.js
|  |--api
|  |  |--contact.js
|  |  |--hello.js
|  |--index.js
|--public
|  |--favicon.ico
|  |--next.svg
|  |--vercel.svg
|--styles
|  |--Home.module.css
|  |--globals.css
|--.env
省略
実装
NextJSのインストール
npx create-next-app@latest contact-gmail-app
index.jsを編集
index.js
import Head from "next/head";
import { Button, Form } from "react-bootstrap";
import "bootstrap/dist/css/bootstrap.css";
import dynamic from "next/dynamic";
import { useRef } from "react";
import styles from "./mailForm.module.css";

const DynamicButton = dynamic(() => import("react-bootstrap/Button"), {
    ssr: false,
});

function Home() {
    const nameRef = useRef(null);
    const emailRef = useRef(null);
    const messageRef = useRef(null);

    const handleSubmit = async (e) => {
        e.preventDefault();
        console.log("メール送信");

        let data = {
            name: nameRef.current?.value,
            email: emailRef.current?.value,
            message: messageRef.current?.value,
        };

        await fetch("api/contact", {
            method: "POST",
            headers: {
                Accept: "application/json, text/plain",
                "Content-Type": "application/json",
            },
            body: JSON.stringify(data),
        }).then((res) => {
            if (res.status === 200) console.log("メース送信成功");
        });
    };
    return (
        <div className={styles.formContents}>
            <Head>
                <title>Create Next App</title>
                <meta
                    name="description"
                    content="Generated by create next app"
                />
                <meta
                    name="viewport"
                    content="width=device-width, initial-scale=1"
                />
                <link rel="icon" href="/favicon.ico" />
            </Head>

            <div className="container mt-5">
                <h2 className="mb-3 p-3 text-center">Next.js Gmailアプリ</h2>
                <Form onSubmit={(e) => handleSubmit(e)}>
                    <div className="mb-3">
                        <label htmlFor="">お名前</label>
                        <input
                            type="text"
                            className="form-control"
                            id="name"
                            required
                            ref={nameRef}
                        />
                    </div>
                    <div className="mb-3">
                        <label htmlFor="email">メールアドレス</label>
                        <input
                            type="email"
                            className="form-control"
                            id="name"
                            required
                            ref={emailRef}
                        />
                    </div>
                    <div className="mb-3">
                        <label htmlFor="message">メッセージ</label>
                        <textarea
                            type="message"
                            className="form-control"
                            id="name"
                            required
                            ref={messageRef}
                        />
                    </div>
                    <DynamicButton type="submit" className="btn btn-primary">
                        メール送信
                    </DynamicButton>
                </Form>
            </div>
        </div>
    );
}

export default Home;
説明
React Bootstrapを使ってレイアウトを調整しつつ、フォーム画面を作成。
    const nameRef = useRef(null);
    const emailRef = useRef(null);
    const messageRef = useRef(null);
「お名前」、「メールアドレス」、「メッセージ」の入力フィールドを参照
        let data = {
            name: nameRef.current?.value,
            email: emailRef.current?.value,
            message: messageRef.current?.value,
        };
?(オプショナルチェイニング)を使いnullまたはundefined時にエラー回避
        await fetch("api/contact", {
            method: "POST",
            headers: {
                Accept: "application/json, text/plain", //レスポンスのコンテンツを定義
                "Content-Type": "application/json", // JSON形式のデーターをサーバーに送信
            },
            body: JSON.stringify(data), //dataをJSON形式の文字列に変換
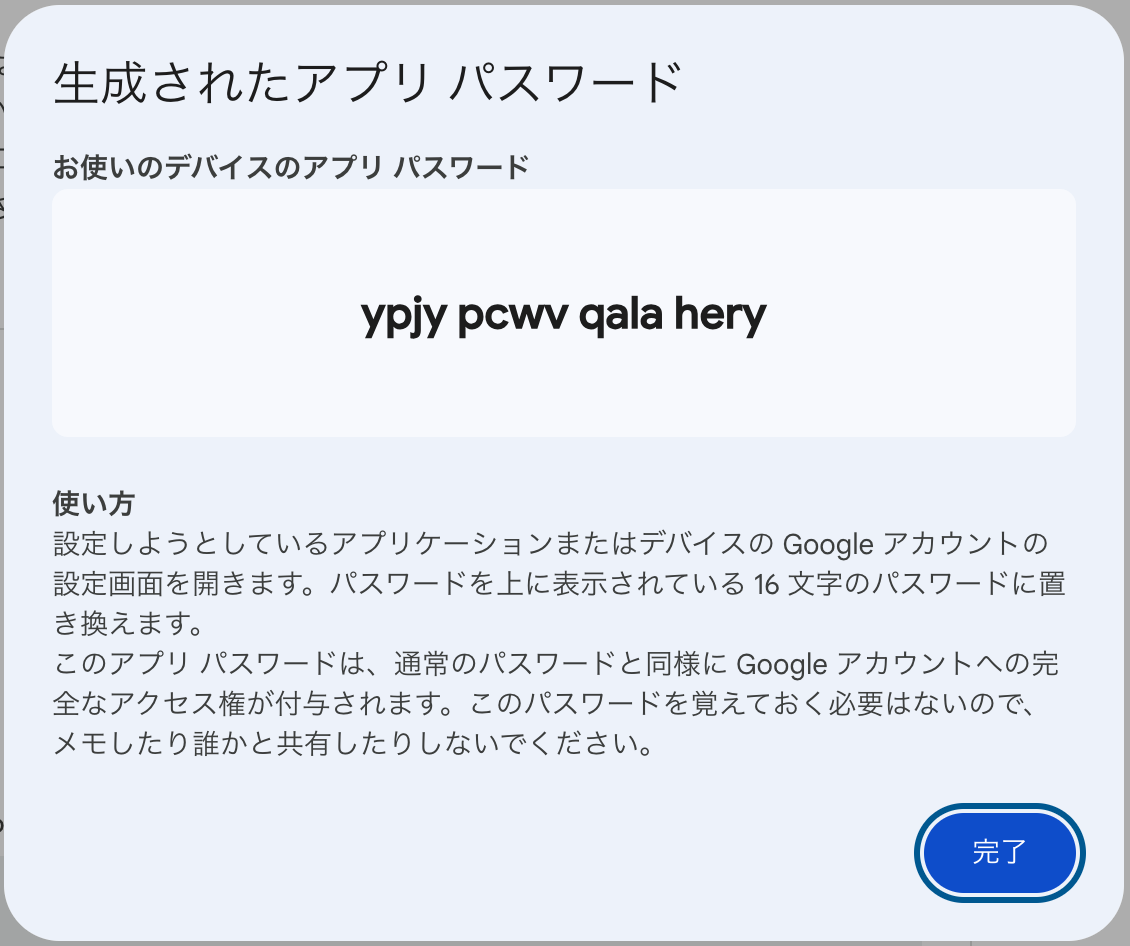
アプリパスワードの作成
Googleアカウントからアプリパスワードを作成する
AppNameを入力する

生成されたアプリパスワードをメモする
.env
GMAILUSER="Yutak08177@gmail.com"
GMAILPASSWORD="ypjypcwvqalahery"
GMAILPASSWORDにメモしたアプリパスワードを割り当てる
.envファイルに貼り付ける
nodemailerのインストール
npm install nodemailer
contact.jsの実装
import { NextApiRequest, NextApiResponse } from "next";
import nodemailer from "nodemailer";

export default function sendGmail(req: NextApiRequest, res: NextApiResponse) {
    const transporter = nodemailer.createTransport({
        host: "smtp.gmail.com",
        port: 587,
        auth: {
            user: process.env.GMAILUSER,
            pass: process.env.GMAILPASSWORD,
        },
    });

    const toHostMailData = {
        from: req.body.email,
        to: "○○○@gmail.com", // 送信先
        subject: `【お問合せ】${req.body.name}様より`, // タイトル
        text: `${req.body.message} Send from ${req.body.email}`,
        html: `
        <p>【名前】</p>
        <p>${req.body.name}</p>
        <p>【メッセージ内容】</p>
        <p>${req.body.message}</p>
        <p>【メールアドレス】</p>
        <p>${req.body.email}</p>
        `,
    };

    transporter.sendMail(toHostMailData, function (err, info) {
        if (err) console.log(err);
        else console.log(info);
    });
}
説明
    const transporter = nodemailer.createTransport({
        host: "smtp.gmail.com", // メールサーバー
        port: 465,
        secure: true, // SSL
        auth: {
            user: process.env.GMAILUSER,
            pass: process.env.GMAILPASSWORD,
        },
    });
hostでメールサーバーを指定。
SMTPサーバーやGmail、Yahooメールなどのサービスもサポートしてる
userとpassには、.envファイルを参照。
    const toHostMailData = {
        from: req.body.email,
        to: "○○○@gmail.com", // 送信先
        subject: `【お問合せ】${req.body.name}様より`, // タイトル
        text: `${req.body.message} Send from ${req.body.email}`,
        html: `
        <p>【名前】</p>
        <p>${req.body.name}</p>
        <p>【メッセージ内容】</p>
        <p>${req.body.message}</p>
        <p>【メールアドレス】</p>
        <p>${req.body.email}</p>
        `,
    };
送信されるメール内容の作成。
    transporter.sendMail(toHostMailData, function (err, info) {
        if (err) console.log(err);
        else console.log(info);
    });
メール送信