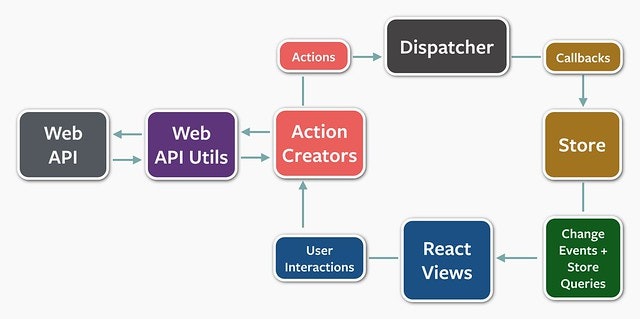
この文書では、React JS Tutorialsのソースコードをコードリーディングすることで、Reduxアーキテクチャのサイクルを一通り確認します。
事前知識
- reactについては公式チュートリアルは完了しているものとします。
準備
node.jsのインストールは完了しているものとします。
React JS Tutorialsのソースコードをダウンロードしてください(※バージョン違いが生じないようにフォークしてあります)。
ダウンロードしたらプロジェクトのルートディレクトリで、
cd 5-redux-react
npm i
npm run dev
します。
そして、localhost:8080をブラウザで開いてください。
コードリーディング
まずsrc/js/client.jsを見てください。ここがアプリケーションのエントリポイントになります。普通のReactアプリケーションと同様に、ReactDOM.render()を呼んでいます。
import React from "react"
import ReactDOM from "react-dom"
import { Provider } from "react-redux"

import Layout from "./components/Layout"
import store from "./store"

const app = document.getElementById('app')

ReactDOM.render(<Provider store={store}>
  <Layout />
</Provider>, app);
Layoutコンポーネントを確認します。src/js/components/Layout.jsを見てください。
import React from "react"
import { connect } from "react-redux"

import { fetchUser } from "../actions/userActions"
import { fetchTweets } from "../actions/tweetsActions"

@connect((store) => {
  return {
    user: store.user.user,
    userFetched: store.user.fetched,
    tweets: store.tweets.tweets,
  };
})
export default class Layout extends React.Component {
  componentWillMount() {
    this.props.dispatch(fetchUser())
  }

  fetchTweets() {
    this.props.dispatch(fetchTweets())
  }

  render() {
    const { user, tweets } = this.props;

    if (!tweets.length) {
      return <button onClick={this.fetchTweets.bind(this)}>load tweets</button>
    }

    const mappedTweets = tweets.map(tweet => <li key={tweet.id}>{tweet.text}</li>)

    return <div>
      <h1>{user.name}</h1>
      <ul>{mappedTweets}</ul>
    </div>
  }
}
画面が表示される時(componentWillMount)にユーザーを取得し、画面に表示しています。この動作に沿って説明をしていきます。
src/js/components/Layout.jsの15行目を見てください。
  componentWillMount() {
    this.props.dispatch(fetchUser())
  }
propsのdispatchを呼んでいますね。
ここでpropsにdispatchがあると言うのは、このコンポーネントへconnectしているからです。connectは、7行目にあります。
@connect((store) => {
  return {
    user: store.user.user,
    userFetched: store.user.fetched,
    tweets: store.tweets.tweets,
  };
})
export default class Layout extends React.Component {
@はDecoratorといって、コード上「次」にある要素に対して、影響を及ぼすことができる機能です。今回のコード例では、これは「次」にあるLayoutコンポーネントに対するconnectの記述です。connectすることで、Reactコンポーネントにthis.props.dispatchが生えて、dispatchできるようになります。
src/js/components/Layout.jsの15行目に戻りましょう。
componentWillMount() {
  this.props.dispatch(fetchUser())
}
ここではfetchUser()というActionをdispatchしています。
このdispatchの結果、ユーザーの情報が読み込まれて画面が更新されることになるわけです。ここではその流れを追っていきます。
src/js/actions/userActions.jsを見てください。
1行目にfetchUser()があります。ここはFETCH_USER_FULFILLEDというタイプのアクションを作成しています。またpayloadにユーザーのデータが入っています。これがdispatchされているわけです。
dipatchされると、それをreducerが処理し、storeを変更します。
src/js/reducers/userReducer.jsを見てください。
19行目がFETCH_USER_FULFILLEDを処理するreducerです。
      case "FETCH_USER_FULFILLED": {
        return {
          ...state,
          fetching: false,
          fetched: true,
          user: action.payload,
        }
      }
reducerが何をやっているかと言うと、stateを変更します。
...state,で現在のstateを展開し、fetching,fetched,userを変更して、returnします。returnされた結果が新しいstateになります。
ここでいうstateというのはアプリケーション全体におけるただ一つのstateです。アプリケーション内のstateを全てまとめて一元管理するのがreduxの考え方です。
reactの感覚でいうとstateは個々のコンポーネントにあるもののように思われますが、それとは違うので考え方の切り替えが必要です。
さて、こうして変更されたstateは画面に反映されなければなりませんが、それはどのようにされるのでしょうか。再度、Layoutコンポーネントを確認します。src/js/components/Layout.jsの7行目を見てください。
@connect((store) => {
  return {
    user: store.user.user,
    userFetched: store.user.fetched,
    tweets: store.tweets.tweets,
  };
})
export default class Layout extends React.Component {
connectが、reduxのstateと画面のpropsの紐付けを行います。returnされた要素が画面のpropsとして渡されます。
stateが更新されると、reduxは以前のstateと比較を行い、更新されている部分のデータを使っている画面コンポーネントについて再描画を行います。
ここまででアクションの発行から画面の更新までの流れを一通り確認できました。
