はじめに
- 11月に入り、Angular v9.0.0-rc.0が出たことで
@angular/google-mapsが利用できるようになりました!!👏 - せっかくなので今回は
Ionicと@angular/google-mapsを使って地図アプリを作ってみようかと思います。 -
@angular/google-mapsの使い方に関してはすでにAngular Material に追加された google-maps を使ってみたの方で記事まとめられているので参考にしてみてください。
事前準備
Angular CLI, Ionic, Cordova をインストールしておきます。
npm install -g @angular/cli
npm i -g ionic cordova
プロジェクトの作成
ionic start map-sample
実行すると利用するFWを聞かれるので、Angularを選択します。
? Framework: (Use arrow keys)
❯ Angular | https://angular.io
  React   | https://reactjs.org
テンプレート聞かれるので、Tabsを選択します
? Starter template:
❯ tabs         | A starting project with a simple tabbed interface
  sidemenu     | A starting project with a side menu with navigation in the content area
  blank        | A blank starter project
  my-first-app | An example application that builds a camera with gallery
  conference   | A kitchen-sink application that shows off all Ionic has to offer
そうすると自動でIonicの環境構築が始まるので終了するまでちょっと待ちます。
終わったらディレクトリ移動して、いったん実行してみます!!
cd ./map-sample
ionic serve
この画面が表示されたらOKです。

実装
必要になるモジュールをインストールしちゃいましょう。
まずは@angular/google-mapsインストールして、必要な設定を行います。
npm install @angular/google-maps
<!doctype html>
<head>
  ...
  <script src="https://maps.googleapis.com/maps/api/js?key=YOUR_API_KEY">
  </script>
</head>
※google map を使うためにはAPI Keyが必要になるので、こちらを参考にkey取得して、上記index.htmlのYOUR_API_KEYの部分を置き換えてください。
@angular/google-mapsでは、マップの表示、マーカーの表示、インフォウィンドウの表示ができますが、周辺施設の検索やルートの作成はできないので、それを利用可能にするには@types/googlemapsが必要になります。
これも事前にインストールしておきます。
npm install @types/googlemaps
tsconfig.app.jsonのtypesにgooglemapsを追加します。
{
  "extends": "./tsconfig.json",
  "compilerOptions": {
    "outDir": "./out-tsc/app",
    "types": ["googlemaps"]  // 追加
  },
  "include": [
    "src/**/*.ts"
  ],
  "exclude": [
    "src/test.ts",
    "src/**/*.spec.ts"
  ]
}
いったん地図が表示できるか確認してみます。
※template生成時にデフォルトで作成されるファイルをそのまま利用していくのでファイル名とか適当ですが、気になる方は適宜お好みの名前に直して進めてください。
tab1.module.tsファイルにGoogleMapsModuleをインポートします。
import { IonicModule } from '@ionic/angular';
import { RouterModule } from '@angular/router';
import { NgModule } from '@angular/core';
import { CommonModule } from '@angular/common';
import { FormsModule } from '@angular/forms';
import { Tab1Page } from './tab1.page';
import { GoogleMapsModule } from '@angular/google-maps'; // 追加

@NgModule({
  imports: [
    IonicModule,
    CommonModule,
    FormsModule,
    RouterModule.forChild([{ path: '', component: Tab1Page }]),
    GoogleMapsModule // 追加
  ],
  declarations: [Tab1Page]
})
export class Tab1PageModule {}
tab1.page.htmlでマップの表示してみます。
<ion-header>
  <ion-toolbar>
    <ion-title>
      Tab One
    </ion-title>
  </ion-toolbar>
</ion-header>

<ion-content>
  <google-map></google-map>
</ion-content>
これで再度ionic serveしてみて、下のように地図が表示されれば正しく設定できています。
もし表示できない場合はどこかで設定間違えている可能性あるので、見直してみてください。

後はどんどん実装していきましょう!
地点検索を実装してみる
地点の検索ではgoogle.maps.Geocoderのgeocodeを使います。
サービスクラスにgeocodeの呼び出しを実装していきます。
まずはサービスクラスを作成します。
ng g s services/map
以下の2つの関数を追加します。
  geocode(
    request: google.maps.GeocoderRequest
  ): Promise<google.maps.GeocoderResult> {
    const geocoder = new google.maps.Geocoder();
    return new Promise((resolve, reject) => {
      geocoder.geocode(request, (result, status) => {
        if (this.geocodeResultCheck(status)) {
          resolve(result[0]);
        } else {
          reject(status);
        }
      });
    });
  }

  private geocodeResultCheck(status: google.maps.GeocoderStatus): boolean {
    if (status === google.maps.GeocoderStatus.OK) {
      return true;
    } else if (status === google.maps.GeocoderStatus.ERROR) {
      alert('接続に失敗しました。再度やり直してください。');
    } else if (status === google.maps.GeocoderStatus.INVALID_REQUEST) {
      alert('リクエストが無効です。');
    } else if (status === google.maps.GeocoderStatus.OVER_QUERY_LIMIT) {
      alert('時間をおいて再度やり直してください。');
    } else if (status === google.maps.GeocoderStatus.REQUEST_DENIED) {
      alert('Mapの利用が許可されていません。');
    } else if (status === google.maps.GeocoderStatus.UNKNOWN_ERROR) {
      alert('サーバーエラーが発生しました。再度やり直してください。');
    } else if (status === google.maps.GeocoderStatus.ZERO_RESULTS) {
      alert('見つかりませんでした。検索キーワードに誤字や脱字がないかご確認ください。地名や郵便番号を追加してみてください。');
    }
    return false;
  }
geocode(google.maps.GeocoderRequest)では地点のリクエストを受け取って、その地点の検索結果を返すようになっています。
geocodeResultCheck(status)は検索できなかった場合の処理を適当に書いています。
それができたら今度はcomponent側で結果の表示を実装します!
tab1.modules.tsにGoogleMapsModuleを追加します。
import { IonicModule } from '@ionic/angular';
import { RouterModule } from '@angular/router';
import { NgModule } from '@angular/core';
import { CommonModule } from '@angular/common';
import { FormsModule } from '@angular/forms';
import { Tab1Page } from './tab1.page';
import { GoogleMapsModule } from '@angular/google-maps'; // 追加

@NgModule({
  imports: [
    IonicModule,
    CommonModule,
    FormsModule,
    RouterModule.forChild([{ path: '', component: Tab1Page }]),
    GoogleMapsModule // 追加
  ],
  declarations: [Tab1Page]
})
export class Tab1PageModule {}
次にhtmlに必要なものを書いていきます。
マップとinputと検索用ボタンがあればOKかと思います。
<ion-header>
  <ion-toolbar>
    <ion-title>
      Tab One
    </ion-title>
  </ion-toolbar>
</ion-header>

<ion-content>
  <input type="text" placeholder="マップを検索する" [(ngModel)]="value" />
  <button (click)="geocode()">検索</button>
  <google-map></google-map>
</ion-content>
最後に処理書いていきます!
ボタンが押されたらinputに入力されている値でgeocodeを呼び出すでOKなので、以下のように書いておきます。
import { Component, ViewChild } from '@angular/core';
import { GoogleMap } from '@angular/google-maps';
import { MapService } from '../services/map.service';

@Component({
  selector: 'app-tab1',
  templateUrl: 'tab1.page.html',
  styleUrls: ['tab1.page.scss']
})
export class Tab1Page {
  @ViewChild(GoogleMap, { static: false }) map!: GoogleMap;
  value = '';
  constructor(private mapService: MapService) {}

  geocode() {
    this.mapService
      .geocode({ address: this.value })
      .then(result => {
        this.map.center = result.geometry.location;
      })
      .catch(() => {
        console.log('geocode 失敗');
      });
  }
}
これで実行してみて、適当な地名を検索すると、その地域の地図が表示できるかと思います👏
周辺施設検索を実装してみる
周辺施設の検索では、google.maps.places.PlacesServiceのnearbySearchまたは、textSearch、findPlaceFromQueryなどが利用できます。
今回はnearbySearchを使って実装していきます。
サービスクラスにnearbySearchの呼び出しを実装していきます。
PlaceServiceを利用するには、index.htmlの設定に&libraries=placesを追加する必要があります。
なので事前にindex.htmlを編集しておきます。
<!doctype html>
<head>
  ...
  <script src="https://maps.googleapis.com/maps/api/js?key=YOUR_API_KEY&libraries=places">
  </script>
</head>
以下の2つの関数を追加します。
  nearbySearch(
    service: google.maps.places.PlacesService,
    request: google.maps.places.PlaceSearchRequest
  ): Promise<google.maps.places.PlaceResult[]> {
    return new Promise((resolve, reject) => {
      service.nearbySearch(request, (results, status) => {
        if (this.nearbySearchResultCheck(status)) {
          resolve(results);
        } else {
          reject(status);
        }
      });
    });
  }

  private nearbySearchResultCheck(
    status: google.maps.places.PlacesServiceStatus
  ): boolean {
    if (status === google.maps.places.PlacesServiceStatus.OK) {
      return true;
    } else if (status === google.maps.places.PlacesServiceStatus.NOT_FOUND) {
      alert('お探しの周辺施設が見つかりませんでした。');
    } else if (
      status === google.maps.places.PlacesServiceStatus.UNKNOWN_ERROR
    ) {
      alert('サーバーエラーが発生しました。再度やり直してください。');
    } else if (
      status === google.maps.places.PlacesServiceStatus.INVALID_REQUEST
    ) {
      alert('リクエストが無効です。');
    } else if (
      status === google.maps.places.PlacesServiceStatus.OVER_QUERY_LIMIT
    ) {
      alert('時間をおいて再度やり直してください。');
    } else if (
      status === google.maps.places.PlacesServiceStatus.REQUEST_DENIED
    ) {
      alert('Mapの利用が許可されていません。');
    } else if (status === google.maps.places.PlacesServiceStatus.ZERO_RESULTS) {
      alert('お探しの周辺施設が見つかりませんでした。');
    }
    return false;
  }
あとは表示側の実装を行います!
さっきはtab1に実装したので、次はtab2に実装していきます。
こちらも先ほどの地点検索と同様に、tab2.modules.tsにGoogleMapsModuleを追加しておきます。
import { IonicModule } from '@ionic/angular';
import { RouterModule } from '@angular/router';
import { NgModule } from '@angular/core';
import { CommonModule } from '@angular/common';
import { FormsModule } from '@angular/forms';
import { Tab1Page } from './tab1.page';
import { GoogleMapsModule } from '@angular/google-maps'; // 追加

@NgModule({
  imports: [
    IonicModule,
    CommonModule,
    FormsModule,
    RouterModule.forChild([{ path: '', component: Tab1Page }]),
    GoogleMapsModule // 追加
  ],
  declarations: [Tab1Page]
})
export class Tab1PageModule {}
検索結果のお店の名前を一覧表示します。
<ion-header>
  <ion-toolbar>
    <ion-title>
      Tab Two
    </ion-title>
  </ion-toolbar>
</ion-header>

<ion-content>
  <input type="text" placeholder="周辺施設を検索する" [(ngModel)]="value" />
  <button (click)="search()">検索</button>
  <google-map></google-map>
  <div *ngFor="let result of results">
    {{ result.name}}
  </div>
</ion-content>
import { Component, ViewChild } from '@angular/core';
import { GoogleMap } from '@angular/google-maps';
import { MapService } from '../services/map.service';

@Component({
  selector: 'app-tab2',
  templateUrl: 'tab2.page.html',
  styleUrls: ['tab2.page.scss']
})
export class Tab2Page {
  @ViewChild(GoogleMap, { static: false }) map!: GoogleMap;
  value = '';
  results: google.maps.places.PlaceResult[];
  constructor(private mapService: MapService) {}

  search() {
    this.mapService
      .geocode({ address: this.value })
      .then(result => {
        this.map.center = result.geometry.location;
        this.nearbySearch(result.geometry.location);
      })
      .catch(() => {
        console.log('geocode 失敗');
      });
  }

  private nearbySearch(latLng: google.maps.LatLng): void {
    const placeService = new google.maps.places.PlacesService(
      this.map.data.getMap()
    );
    const request: google.maps.places.PlaceSearchRequest = {
      location: latLng,
      radius: 50000,
      keyword: `${this.value} コーヒー`
    };
    this.mapService
      .nearbySearch(placeService, request)
      .then(results => {
        this.results = results;
      })
      .catch(() => {
        console.log('nearbySearch 失敗');
      });
  }
}
周辺施設の検索にはlocation情報(緯度経度の情報)が必要なので、検索ボタンが押下されたらまずその地点を検索します。
その結果を利用してnearbySearchを実行します。
ちなみにPlaceSearchRequestではtypeとして検索ジャンルの絞り込みを行うことができますが、あまりにもジャンルが多すぎて使いづらいので個人的にはkeywordをそのまま使って検索する方が使いやすいかと思います。
今回は「コーヒー」で絞り込んでいます。
その部分を動的に変更できるようにすれば、「場所の名称」 + 「カテゴリ情報」でいい感じに検索できます。
普段google map使う時と同じような検索になるのではないかと思います。
ios,android アプリとして実行してみる
ネイティブアプリとして実行したい場合には、以下のコマンドを実行することでファイルが出来上がります。
ionic cordova build ios --prod
ionic cordova build android --prod
私の環境だと、ionic cordova build ios --prodの初期実行時には必ず失敗してしまうんですよね。。。
こんなエラーが出てしまいます。
** ARCHIVE FAILED **

xcodebuild: Command failed with exit code 65
[ERROR] An error occurred while running subprocess cordova.

        cordova build ios exited with exit code 65.

        Re-running this command with the --verbose flag may provide more information.
もし同様のエラーが出るようであれば、まず実行した後に出来上がるconfig.xmlのwidgetのidを編集します。
<widget id="jp.test.map" version="0.0.1" xmlns="http://www.w3.org/ns/widgets" xmlns:cdv="http://cordova.apache.org/ns/1.0">
デフォルトだと、id="io.ionic.starter"みたいな設定だと思うんですが、それを変更します。
その後、xcode立ち上げて、以下のTeamの部分を正しいアカウントに設定します。
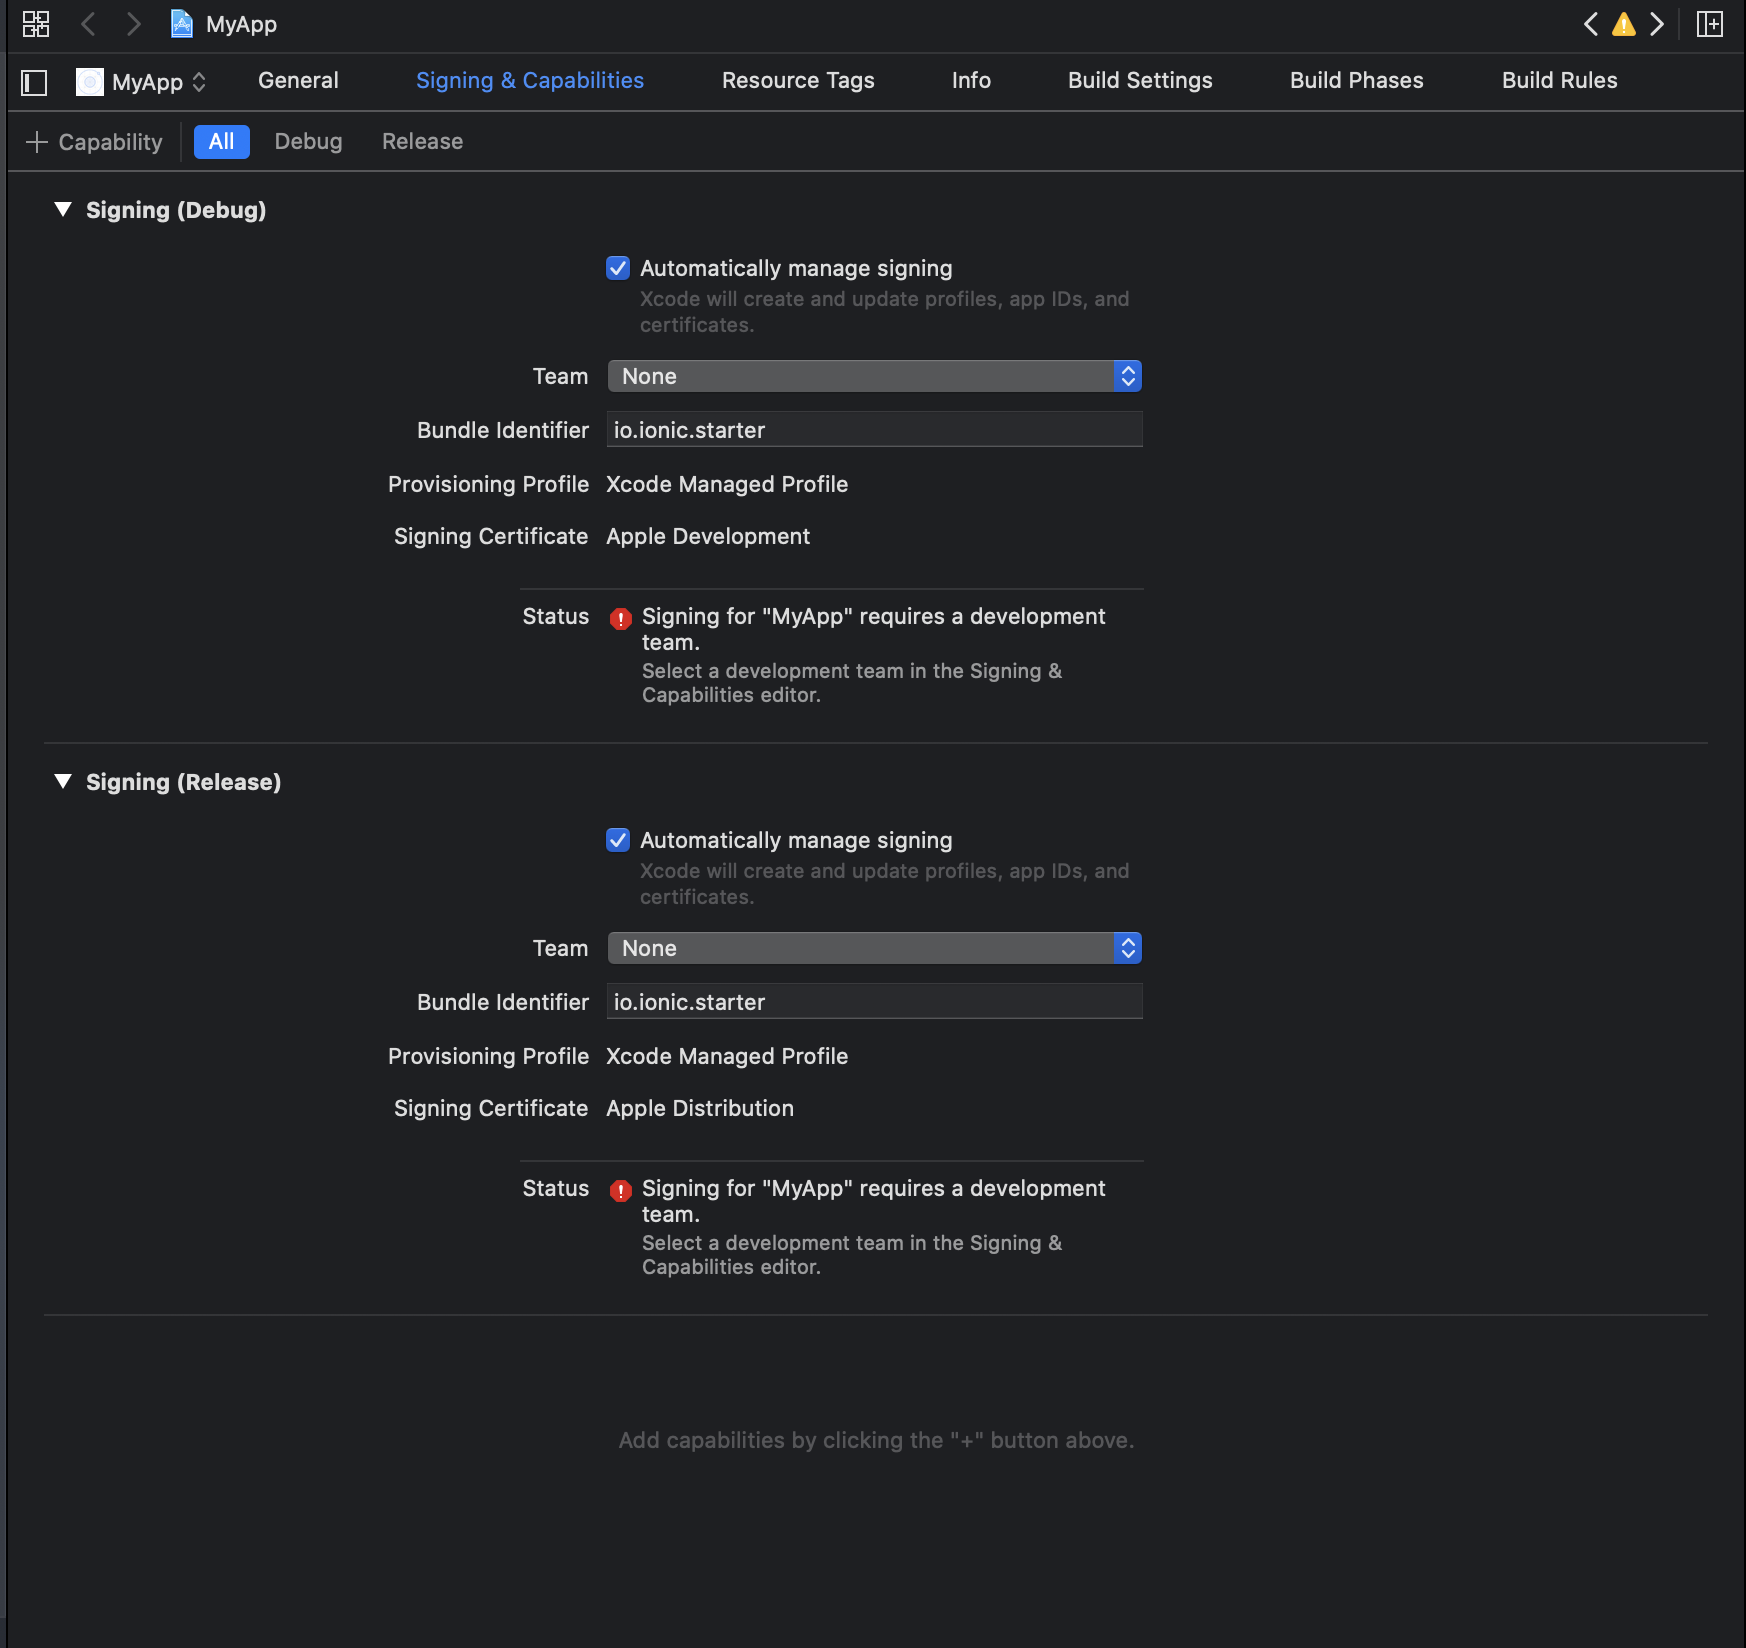
それができたら再度ビルド実行すればエラーも吐き出されずに完了できるかと思います。
一応私の環境ではこれで実行できました!
Androidアプリも同様に失敗してしまいましたが、こちらの記事をみながら対応したらできました!
これでXcodeやらAndroid studio からエミュレータ起動して動作確認などもできるかと思います!
おわり
というわけで、今回は簡単な地図アプリを作ってみました!
iosとかandroidのネイティブアプリ開発の知識が全然なくてもアプリ作れるのは楽しくていいですね〜
今回のソースもgitにあげているのでよかったら参考にしてみてください!