はじめに
GitLabのジョブ実行環境はGitLab Runnerを使用して構築します。
Linux環境やDockerを使用した記事は多いのですが、Windows環境にGitLab Runnerをインストールして、Windows環境でジョブを実行する記事があまりなかったので共有します。
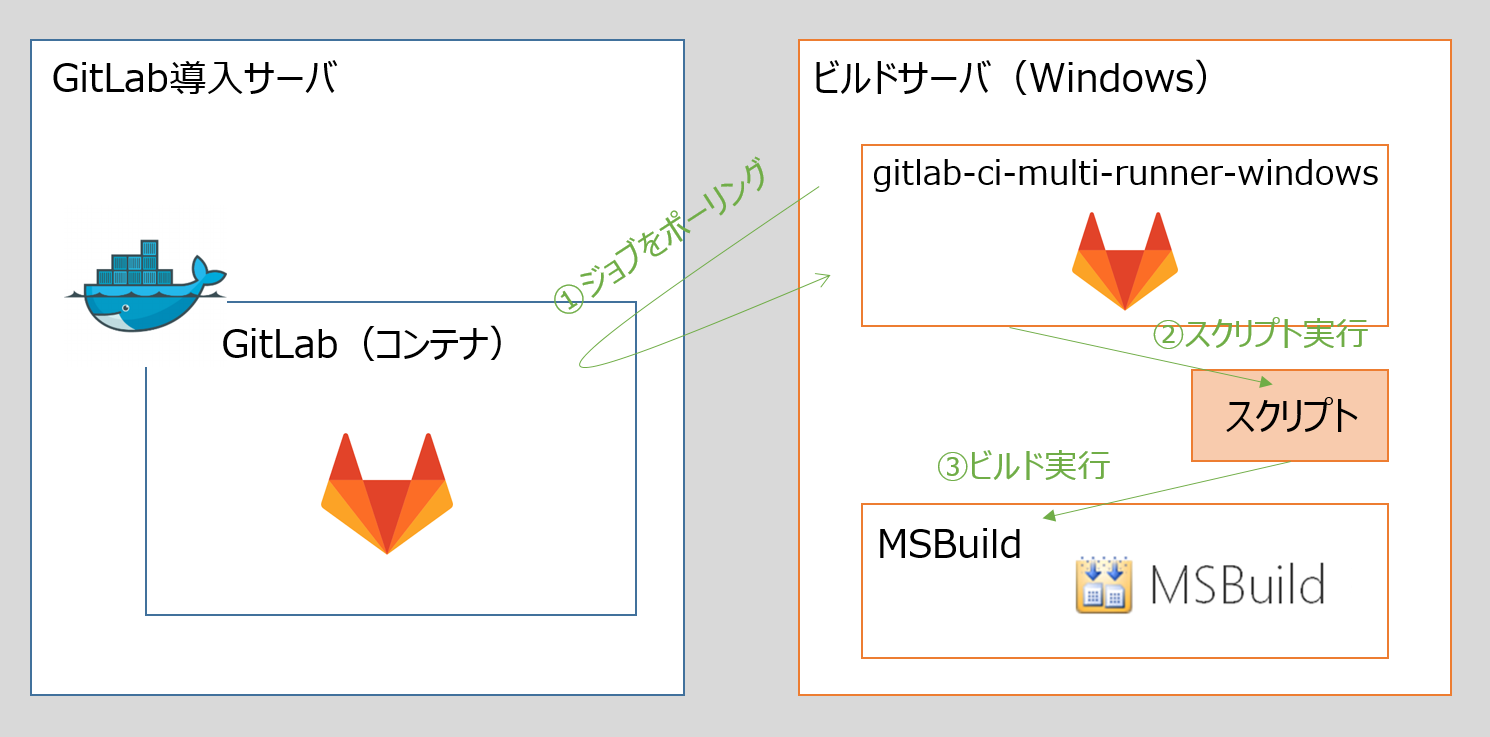
作成する環境
今回はC#アプリケーションをビルドする環境を例として、Windowsのジョブ実行環境を構築します。
概要説明
1.ジョブをポーリング
Windows用のGItLab Runnerである gitlab-ci-multi-runner-windows を使用して、GitLabのジョブをポーリングします。
2.スクリプト実行
ポーリングの結果、実行可能なジョブが見つかった場合、ジョブの内容(.gitlab-ci.ymlに書かれたジョブ定義)に従ってスクリプトを実行します。
3.ビルド実行
MSBuild でソリューション(.sln)のビルドを実行します。
環境構築
インストール資産のダウンロード
下記ツールをWindowsサーバへダウンロードします。
| ツール | ファイル名 | ダウンロードURL |
|---|---|---|
| Microsoft Build Tools 2015 | BuildTools_Full.exe | https://www.microsoft.com/ja-JP/download/details.aspx?id=48159 |
| Git | Git-2.14.2-64-bit.exe | https://git-scm.com/download/win |
| gitlab-ci-multi-runner-windows | gitlab-ci-multi-runner-windows-amd64.exe | https://gitlab-ci-multi-runner-downloads.s3.amazonaws.com/latest/binaries/gitlab-ci-multi-runner-windows-amd64.exe |
Microsoft Build Tools 2015のインストール
1.BuildTools_Full.exeを実行し、インストールをクリックします。
2.セットアップが完了したことを確認して閉じるをクリックします。
Gitのインストール
1.Git-2.14.2-64-bit.exeを実行し、画面の内容にしたがってインストールを行います。全てデフォルトのままでも特に問題ありません。
gitlab-ci-multi-runner-windowsのインストール
1.gitlab-ci-multi-runner-windows-amd64.exeを任意の場所に配置します。
例: C:/gitlab-runner/gitlab-ci-multi-runner-windows-amd64.exe
GitLab RunnerをGitLabに登録
1.下記のコマンドを実行し、GitLab Runnerの登録を実行します。
C:/gitlab-runner/gitlab-ci-multi-runner-windows-amd64.exe register
2.登録時に必要な情報を対話形式で入力します。
| 質問内容 | 説明 | 入力例 |
|---|---|---|
| Please enter the gitlab-ci coordinator URL (e.g. https://gitlab.com/): | GitLab Runnerを登録するGitLabのURL | http://gitlab.sample.test.local |
| Please enter the gitlab-ci token for this runner: | GitLab CI Runnerのトークン | 01234567890123456789 |
| Please enter the gitlab-ci description for this runner: | GitLab Runnerの説明 | C# Build Server |
| Please enter the gitlab-ci tags for this runner (comma separated): | GitLab Runnerが実行できるジョブのタグ | C# |
| Whether to run untagged builds [true/false]: | タグがつけられていないジョブを実行するかどうか | false |
| Whether to lock Runner to current project [true/false]: | GitLab Runnerを現在GitLabにあるプロジェクトのみで使用するかどうか | false |
| Please enter the executor: parallels, shell, ssh, ...(略) | GitLab Runnerのタイプ | shell |
3.下記コマンドを実行し、GitLab Runnerのユーザ登録を行います。
C:/gitlab-runner/gitlab-ci-multi-runner-windows-amd64.exe install --password [ログイン中のWindowsユーザのパスワード]
4.下記コマンドを実行し、GitLab Runnerを開始します。
C:/gitlab-runner/gitlab-runner/gitlab-ci-multi-runner-windows-amd64.exe start`
5.GitLabにRunnerが登録され、ポーリングができていることを確認します。
プロジェクトの作成と資産の登録
1.GitLabで新しいプロジェクトを作成します。
2.作成したプロジェクトをクローンしてソリューションを追加します。今回はVisual Studioで作成できるConsoleApplicationのソリューションを例として追加します。
3..gitlab-ci.yml を下記の内容で追加します。
variables:
  MSBuildEXE: "C:/Program Files (x86)/MSBuild/14.0/Bin/MSBuild.exe"

stages:
  - build

msbuild:
  stage: build
  tags:
    - C#
  script:
    - chcp 65001
    - '"%MSBuildEXE%" ConsoleApplication.sln'
  artifacts:
    paths:
      - ConsoleApplication/bin/
4.変更をコミットし、GitLabにプッシュを行います。
5.プッシュをトリガーにCIのパイプラインが走り出し、ビルドが自動で実施されます。
