はじめに
某日...
サーバーサイドEng「Swagger.yaml?あぁ、使ってるけど、springfox使ってコードから生成するんだよ。」
androidEngのワイ(あっれ?思ってたのと違うぞ…?)「おっ、そうなんすねー」
ってことがありました。以前swagger.yaml->androidライブラリをやったことのある経験から、swagger.yamlから作っと方が早いんじゃね?思いました。ので、ちょっとやってみました。
開発環境
- PC: Mac
- IDE: IntelliJ Ultimate
- framework: Spring-boot-starter
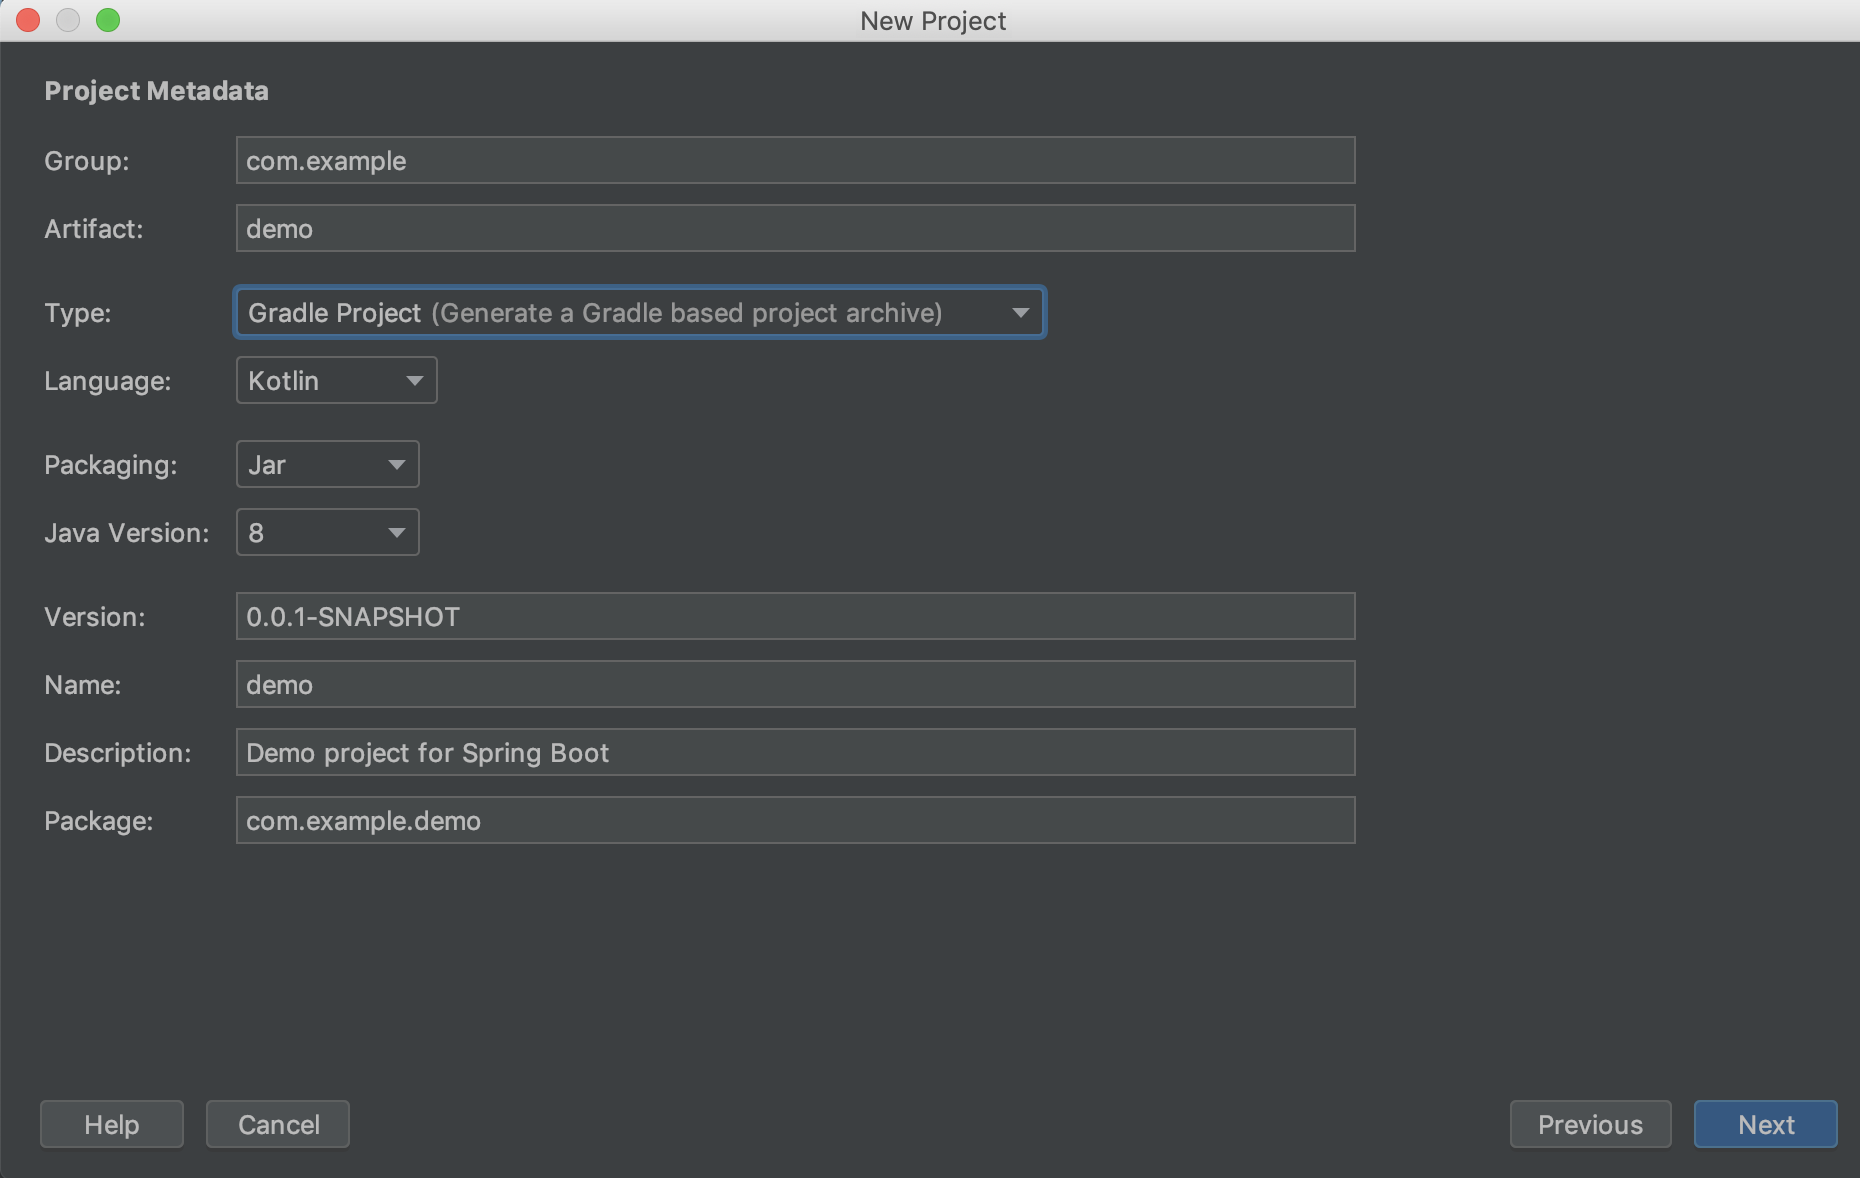
新規プロジェクトを作る
今回は以下の設定で作りました。
- Language: Kotlin
- GradleProject
- Web: Spring Web Starter
- Spring Cloud Tracing->Sleuth
手順
- File->New Projectを選択
- Spling initializerを選択→Next
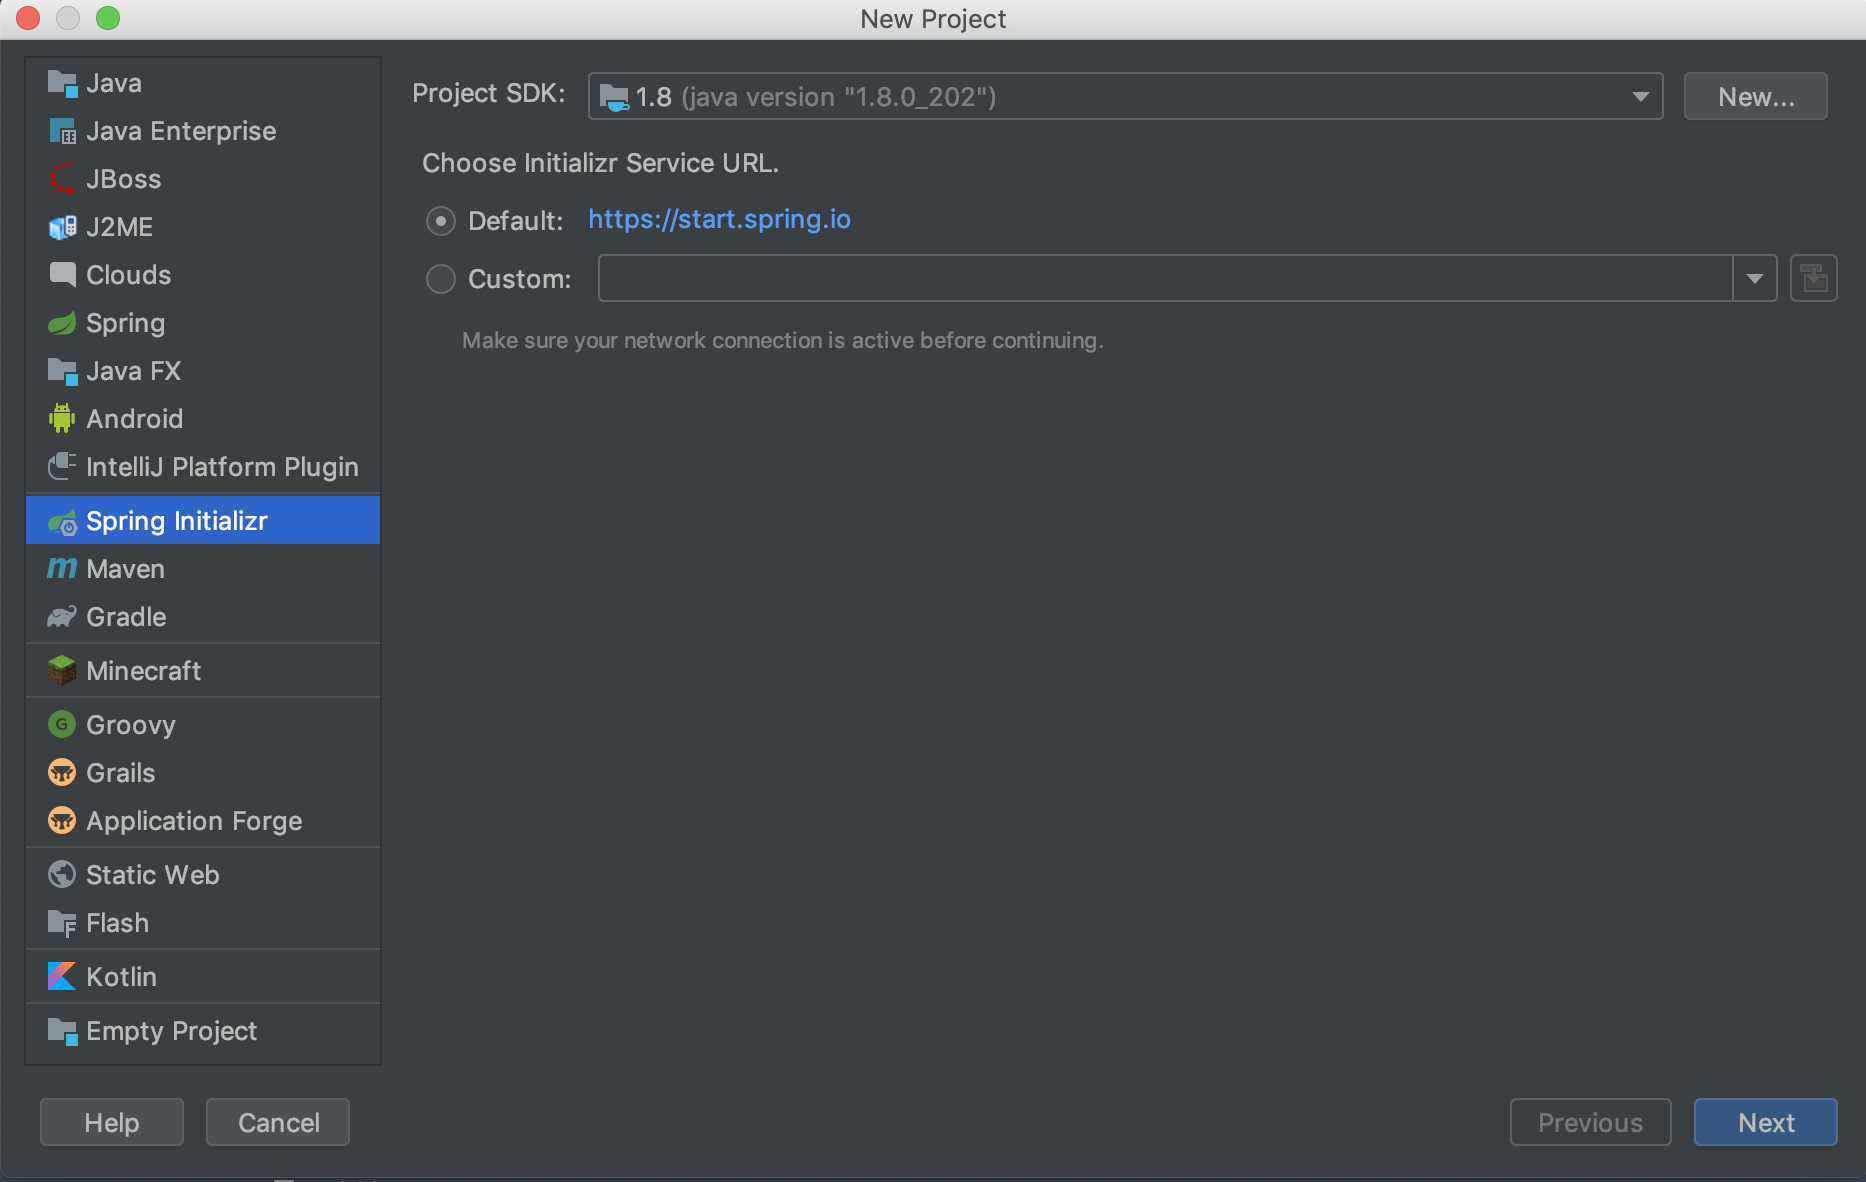
- Type: GradleProject 、 Language:Kotlinを選択(Javaでも可)
- Web->Spring Web Starterを選択

- Spring Cloud Tracing->Sleuthを選択

あとはNext連打でFinish
一旦Gradleの同期が走るのでしばし待つ。その間にSwagger側の作業を進める
Swagger.yamlを作る
- swaggerEditorを使ってswagger.yamlを書く
今回はサンプルで以下のswagger.yamlを作成
swagger: "2.0"
info:
  version: 1.0.0
  title: "sample"
  description: "sample"
host: sample.co.jp
tags:
  - name: exp
    description: "いぐざんぷる"

paths:
  /{id}/example:
    get:
      summary: "example"
      description: "example"
      operationId: getExample
      tags:
        - exp
      parameters:
      - $ref: '#/parameters/id'
      - $ref: '#/parameters/query1'
      responses:
        200:
          description: OK
          schema:
            $ref: '#/definitions/SomeResponse'

definitions:
  SomeResponse:
    description: "なんかれすぽんす"
    type: object
    required:
      - SomeData
    properties:
      someData:
        $ref: '#/definitions/SomeData'

  SomeData:
    type: object
    description: "なんかでーた"
    properties:
      someInt:
        type: integer
      someStr:
        type: string
      someDate:
        type: string
        format: date

parameters:
  id:
    name: id
    in: path
    type: string
    description: "id"
    required: true
  query1:
    name: query1
    in: query
    type: integer
    description: "なんかそれっぽいクエリ"
書き終えたらFile->Save as YAMLで保存。
Swagger-codegenを使ってライブラリを作る
codegenを作る
- swagger-codegen(v2系)をクローンしてくる
-
mvn clean packageを実行して、swagger-codegen-cli.jarを生成 - 生成されると
modules/swagger-codegen-cli/target/swagger-codegen-cli.jarに吐き出される
待っている間に次の作業を進めておく
swagger用の設定ファイルを書く
↓こんな感じ。
{
  "groupId" : "jp.co.some.api",
  "artifactId" : "some-api",
  "artifactVersion" : "1.0.0",
  "invokerPackage" : "jp.co.some.api",
  "modelPackage" : "jp.co.some.api.model",
  "apiPackage" : "jp.co.some.api.api",
  "configPackage" : "jjp.co.some.api.configuration",
  "useTags" : true,
  "interfaceOnly" : true,
  "useBeanValidation" : true,
  "serializableModel" : true,
  "java8" : true,
  "dateLibrary" : "java8"
}
- useTags->APIをタグごとにまとめるか。APIがタグごとにまとまって整理されるのでほぼ必須
- interfaceOnly->必須。今回はInterfaceだけがほしいので。
- useBeanValidation->任意。なんかうまく動いてない可能性もある
- serializableModel->任意。モデルクラスがserializeableを継承するようになる
ライブラリを作る
-
swagger-codegen-cli.jar、swagger.yaml,spring-config.jsonを同一ディレクトリに置いた状態で次のコマンドを実行 -
java -jar swagger-codegen-cli2.jar generate -l spring -c spring-config.json -i swagger.yaml -o ./spring-apis -
spring-apisに諸々吐き出される。 -
そのあと
pom.xmlを開き、以下のように修正する(これは生成したJarをライブラリとして認識させるため?に必要)
                <artifactId>spring-boot-maven-plugin</artifactId>
                <executions>
                    <execution>
+                     <id>repackage</id>
                        <goals>
                            <goal>repackage</goal>
                        </goals>
+                       <configuration>
+                         <classifier>exec</classifier>
+                       </configuration>
                    </execution>
                </executions>
            </plugin>
- 保存したら
spring-apisディレクトリ内でmvn clean package installを実行。これでローカルのMavenレポジトリにAPIのInterfaceが格納される(もちろん、deployコマンドにすれば社内のMavenレポジトリとかにもあげられるのでよしなに。)
ライブラリを取り込む
- プロジェクトルートの
build.gradle.ktsを開き以下のように修正(repositoriesの修正はlocalのmavenRepositoryに合わせているので、社内のMavenRepositoryとかを使う場合は適宜変更する)
repositories {
    mavenCentral()
+    mavenLocal()
}

dependencies {
    implementation("org.springframework.boot:spring-boot-starter-web")
    implementation("com.fasterxml.jackson.module:jackson-module-kotlin")
    implementation("org.jetbrains.kotlin:kotlin-reflect")
    implementation("org.jetbrains.kotlin:kotlin-stdlib-jdk8")
    implementation("org.springframework.cloud:spring-cloud-starter-sleuth")
    testImplementation("org.springframework.boot:spring-boot-starter-test")

+    implementation("jp.co.some.api:some-api:1.0.0")
}
GradleSyncする
APIを実装する
-
ExpApiというInterfaceが生成されているので、Controllerクラスにそれを継承させ、メソッドを実装すればおしまい
@RestController
class ExpApiImpl constructor(/* 別クラスが必要であれば@Autowired等でInjectionする */) : ExpApi {

    override fun getExample(id: String?, query1: Int): ResponseEntity<SomeResponse> {
        /* SomeResponseになんやかんやしてデータを突っ込む */
        return ResponseEntity.ok(SomeResponse)
    }
}
終わりに
完走した感想ですが、圧倒的に楽でした。モデルの生成もコードで書かなくていいし、@RequestMappingやらの定義もいちいち気にして書かなくていいし、とにかく必要最小限の作業だけでAPIができるのはかなり魅力的です。
加えて、このAPI仕様を使う側のライブラリもSwagger.yamlから生成すれば仕様違いによるミスがそもそもなくなるし、コードを書く手間も省けるのでかなりお得感でした。
ちょっと残念なところは、最近の流行り?のSpring Reactive Webには対応してない?かもしれない?というところでした(Springにわかなのでよくわがんね)
では、よきSwaggerライフを!