はじめに
みなさん、テスト書いてますか?もちろん書いてますよね?
えっ?書いてない!?
そんなのが許されるのは小学生までですよ?(このネタ通じるのって30代前後ではと思いつつ。。。
はい、そんなわけで小学生以下の私が中学生になるため、頑張ってテストコード書いたというネタです。
今回は自分がGooglePlayに公開してるアプリ「らくでん」のKotlin99%リプレースを行ったので、その過程で書いたテストコードのお話です。
新たな知見が貯まったら逐次更新
前提なあれこれ
- アーキテクチャ:CleanArchitecture
- DB関係:Realm
- DI:Dagger2
- その他:RxJava2
Spekを使おう
今回はSpekで実装しました。
Spekの特徴は何と言っても公式でも仕様フレームワークと言ってるほどに、仕様書チックにテストコードがかけるところが良い。
あとKotlinで書かれてる点もプラス。
論より証拠でトップページに書かれてるサンプルを見てもらえれば雰囲気が伝わるかと。
class SimpleTest : Spek({
    describe("a calculator") {
        val calculator = SampleCalculator()

        it("should return the result of adding the first number to the second number") {
            val sum = calculator.sum(2, 4)
            assertEquals(6, sum)
        }

        it("should return the result of subtracting the second number from the first number") {
            val subtract = calculator.subtract(4, 2)
            assertEquals(2, subtract)
        }
    }
})
構文がわからなくても、なんとなくなんのテストをしたいのか感じとれるのではないでしょうか。
準備
SpekとJUnitPlatformとMockitoとkotlin-testを追加する
appのbuild.gradleに以下を追加
dependencies {
    testImplementation 'org.jetbrains.spek:spek-api:1.1.5'
    testImplementation 'org.jetbrains.spek:spek-junit-platform-engine:1.1.5'
    testImplementation 'org.mockito:mockito-core:+'
    testImplementation 'org.junit.platform:junit-platform-runner:1.1.0'
    testImplementation "org.jetbrains.kotlin:kotlin-reflect:+"
    testImplementation "org.jetbrains.kotlin:kotlin-test:+"
    testImplementation "org.jetbrains.kotlin:kotlin-test-junit:+"

}
projectのbuild.gradleに以下を追加
buildscript {
    dependencies {
        classpath 'org.junit.platform:junit-platform-gradle-plugin:1.0.0'
    }
}

allprojects {
    repositories {
        maven { url "http://dl.bintray.com/jetbrains/spek" }
}
app/src/test/resources/mockito-extensionsとディレクトリを掘り、その下にorg.mockito.plugins.MockMakerという名前のファイルを作り、中身に以下を記載する
mock-maker-inline
Spekは1.1.5が安定版。2.X系もあるけど、JUnit5が前提となっている&開発版?ようなので、Androidで使う場合は1.X系のJUnit4前提の方を使うのが楽チン
(何も考えず2.X系使ってハマった)
最後のMockMakerの記載は、finalクラスをMock化するために必要な記載。これを書かないとkotlinは基本が継承NGなのでテストしたいクラスにopenの修飾子をつけて回る必要がある。
基本構文のあれこれ
@RunWith(JUnitPlatform::class)
object SampleTest : Spek({
   val calc = Calc()

   describe("Calc Test") {
      beforeGroup { /* describe内の事前処理 */ }
      afterGroup { /* describe内の事後処理 */}
      context(" sum method") {
          beforeGroup { /* context内の事前処理 */ }
          afterGroup { /* context内の事後処理 */}
          given(" condition x>0, y>0") {
              beforeGroup { /* given内の事前処理 */ }
              afterGroup { /* given内の事後処理 */}

              beforeEachTest { /* 各々のitの事前処理 */}
              afterEachTest { /* 各々のitの事前処理 */ }

              on("input x=5,y=7") {
                  it("should be 12") {
                     val expected = 12
                     Assert.Equals(expected,calc.sum(5,7))
                  }
              }
          }
      }
   }
})
アノテーション(@RunWith(JUnitPlatform::class))
JUnitとして実行する?ためのアノテーション。忘れがちだがこれがないと動かない
グルーピング関数(describe,context,given)
- これらは各々のテストをグルーピングし、整理するために使う。
- 必ずしも全部使う必要はない。describeとcontextだけ使う、ということも可能。
- (多分)決まったルールは無いので、プロジェクトごとに実装方針を決める必要がありそう。
- 慣習的にdescribe->context->givenの順でより細かい区分になる?
- テストの実行結果の接頭語にdescribe,context,givenと着く
- これらは以下のように連続して入れ子にすることもできる。ただ、当然わかりにくくなるので使わない方が良い
object SampleTest : Spek({
   describe("describe1") {
      describe(" describe2") {
          describe(" describe3") {
              on("input x=5,y=7") {
                  it("should be 12") {
                     val expected = 12
                     Assert.Equals(expected,Calc.sum(5,7))
                  }
              }
          }
      }
   }
})
共通事前処理、共通事後処理関数(beforeGroup,afterGroup)
- それぞれのbeforeGroup,afterGroup関数が属しているグルーピング関数が実行される前と後に実行される。
- JUnitで言うところの、Setup/TearDownメソッドに近いが、グループごとに実行されるため無駄がなく、また設定の自由度が高い。
- 不要であれば書かなければOK
個別事前処理、個別事後処理関数(beforeEachTest,afterEachTest)
- JUnitで言うところのSetup/TearDownメソッド。各々のテストが実行されるたびに実行される。
- 対象範囲は、beforeEachTest,afterEachTestが書かれたグループ以下に属するitメソッド(多分)
- 下手に多用すると上書きされる可能性がかも(未検証)
テスト実行関数、テスト結果関数(on,it)
- onメソッド内でテストしたいコードを実行する
- itメソッドでAssert関数によるテストの結果をチェックする
- onの中にonメソッドを持つこともできるが、わかりにくくなるので非推奨
- onの中にitメソッドを複数持てるので、同じテスト対象だけど異なる観点で確認したい、といったケースに使えばよりテストが厳密になる(例えばNullチェックと値が想定したものであることという2つの観点)
共通変数
例で言うところのval calc = Calc()にあたるやつ。
色々関数があるので忘れそうだが、あくまでテストを記載しているのは関数の中なので当然どこでも変数を定義できるし、その内部関数で参照することができる。
テストコードを書こう
ここからはひたすらテスト対象とそのテストコードをつらつらとあげていくスタイル
Init関数のテスト
class PhoneNumber(val number: String) {
    init {
        if (number.startsWith(TelephoneNumber.SCHEME)) {
            throw IllegalArgumentException("PhoneNumber does not start with 'tel:'")
        } else if (number.isEmpty()) {
            throw IllegalArgumentException("number must not be Empty")
        } else if ((number.contains(Regex(".*[^0-9#¥+¥*() -]+.*")))) {
            throw IllegalArgumentException("contains illegal char. number = $number")
        }
    }
}
import junit.framework.Assert
import kotlin.test.assertFailsWith
@RunWith(JUnitPlatform::class)
object NumberTest : Spek({
describe("PhoneNumber Test") {
context("effective number") {
on("init method") {
it("should pass init") {
Assert.assertNotNull(PhoneNumber("123456789"))
}
}
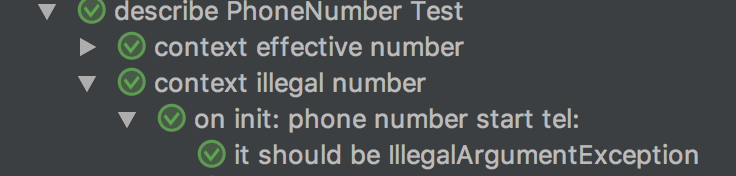
context("illegal number") {
on("init: phone number start tel:") {
it("should be IllegalArgumentException") {
assertFailsWith(IllegalArgumentException::class, { PhoneNumber("tel:123456789") })
}
}
}
}
})
テストしたい事項
- 引数のnumberが正常値ならオブジェクトが生成されてほしい
- 引数のnumberが異常値ならIllegalArgumentExpが返されてほしい
テストコードのポイント
- 正常値の場合はassertNotNullでオブジェクトが生成されたかを確認
- 異常値の場合はassertFailsWithでExceptionが帰ってきてるかを確認
companion objectな関数のテスト
data class TelephoneNumber(val number: String) {
    companion object {
        fun decodeToUTF8TelephoneNumber(number: String) = TelephoneNumber(URLDecoder.decode(number, "UTF-8"))
    }
}
                on("decodeToUTF8PhoneNumber: %2B (+)") {
                    it("should be tel:12344445555+") {
                        val expected = TelephoneNumber("tel:12344445555+")
                        assertEquals(expected, TelephoneNumber.decodeToUTF8TelephoneNumber("tel:12344445555%2B"))
                    }
                }
テストしたい事項
- decodeToUTF8TelephoneNumberで正しくデコードされているか
テストコードのポイント
- そのまんまテストしたいコードを実行する
RxJavaのObserver内の処理のテスト
class PrefixEnable @Inject constructor(
        private val settingDataSource: SettingDataSource,
        executionThreads: ExecutionThreads)
    : IoUseCase<PrefixEnable.Request, PrefixEnable.Response, Throwable>(executionThreads) {
    override fun execute(requestValue: Request): Observable<Response> {
        return settingDataSource.getPrefixEnable().map {
            if (it) {
                Response(requestValue.prefix)
            } else {
                Response(Prefix.generateEmptyPrefix())
            }
        }
    }

    data class Request(val prefix: Prefix) : UseCase.RequestValue
    data class Response(val prefix: Prefix) : UseCase.ResponseValue
}
@RunWith(JUnitPlatform::class)
object ConstraintTest : Spek({
    val executionThreads: ExecutionThreads = object : ExecutionThreads {
        override fun io(): Scheduler = Schedulers.trampoline()
        override fun ui(): Scheduler = Schedulers.trampoline()
    }
    val prefix: Prefix = Mockito.mock(Prefix::class.java)
    val emptyPrefix = EmptyPrefix()
    context("PrefixEnable Test") {
        given("setting true") {
            val settingDataSource: SettingDataSource = Mockito.mock(SettingDataSource::class.java)
            Mockito.`when`(settingDataSource.getPrefixEnable()).then { Observable.just(true) }
            val prefixEnable = PrefixEnable(settingDataSource, executionThreads)
            on("validate") {
                val testObs = TestObserver<PrefixEnable.Response>()
                prefixEnable.execute(PrefixEnable.Request(prefix)).subscribe(testObs)
                it("prefix should be not empty") {
                    testObs.assertNoErrors()
                    testObs.assertValue { it.prefix == prefix }
                }
            }
        }
        given("setting false") {
            val settingDataSource: SettingDataSource = Mockito.mock(SettingDataSource::class.java)
            Mockito.`when`(settingDataSource.getPrefixEnable()).then { Observable.just(false) }
            val prefixEnable = PrefixEnable(settingDataSource, executionThreads)
            on("validate") {
                val testObs = TestObserver<PrefixEnable.Response>()
                prefixEnable.execute(PrefixEnable.Request(prefix)).subscribe(testObs)
                it("prefix should be empty") {
                    testObs.assertNoErrors()
                    testObs.assertValue { it.prefix == EmptyPrefix() }
                }
            }
        }
    }
}
テストしたい要項
-
settingDataSource.getPrefixEnable()がtrueを返した場合、引数のprefixがそのまま返されていること -
settingDataSource.getPrefixEnable()がfalseを返した場合、EmptyPrefixが返されていること
テストコードのポイント
- RxJavaのスケジューラーを
Schedulers.trampoline()にする - Mockitoを使って
settingDataSource.getPrefixEnable()の戻り値を偽装する - その際、
then{ }関数が自由に書けるので便利 - テストとして観測するためのTestObserverを定義する
val testObs = TestObserver<PrefixEnable.Response>()- お目当の処理を実行した後の観測者として、
testObsを指定する -
`prefixEnable.execute(PrefixEnable.Request(prefix)).subscribe(testObs)` - testObs自体にAssert系の関数が生えているので、それらを使って正常・異常をチェックする
testObs.assertValue { it.prefix == EmptyPrefix() }