はじめに
年末に以下を読みまして、 Blockchain に興味を持ちました。
ビットコインとブロックチェーン:暗号通貨を支える技術
そこからあれやこれやあり、 Hyperledger 環境を仕事柄、身近なクラウド環境で環境準備してみました。
OCI 環境のセットアップ
以下を参考に OCI 環境をセットアップします。
チュートリアル : Oracle Cloud Infrastructure を使ってみよう
環境は無料トライアルで十分です。300$ (35,000円) or 30日使えます。
無料で試してみる|Oracle Cloud
(登録時に、クレジットカード番号と、本人確認(SMSで認証コードを受け取る)用の電話番号が必要です。
アカウントをアップグレードしない限りクレジットカードへの課金はされません。)
環境セットアップ概要
以下の流れで、こんな環境をセットアップしました。
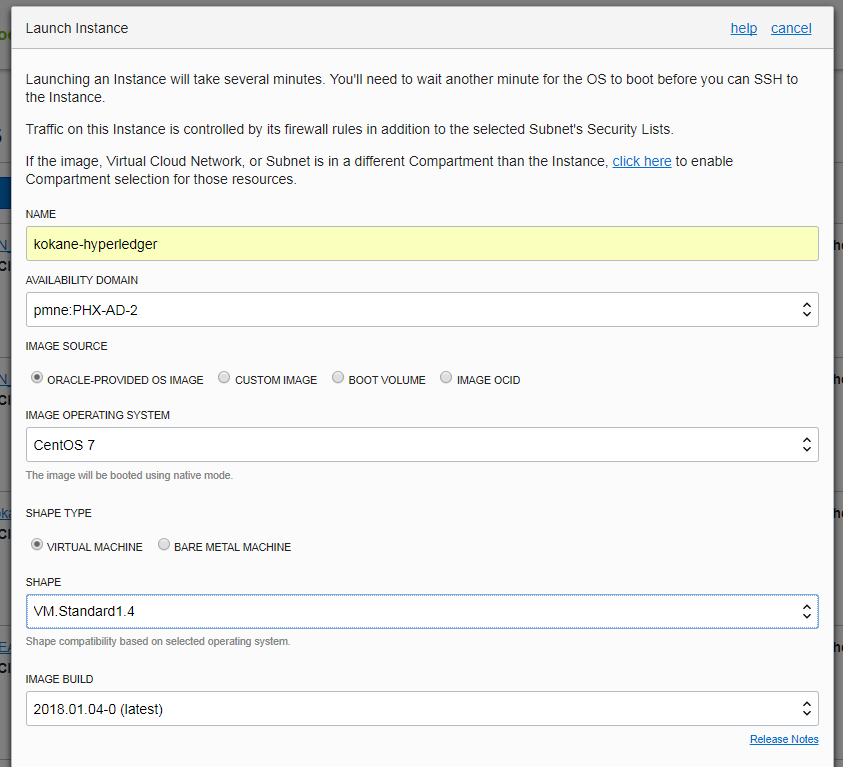
- OS : CentOS 7
- インスタンス : VM.standard.1.4 (環境の都合で 4 OCPU にしましたが standard.1.1 とかでも大丈夫かなと思います。1 OCPU 1時間 8円なので、トライアルを使い切ることはほぼないはずです。)
- ストレージ : 50GB (インスタンスを作るとデフォルトで 50GB アタッチされます)
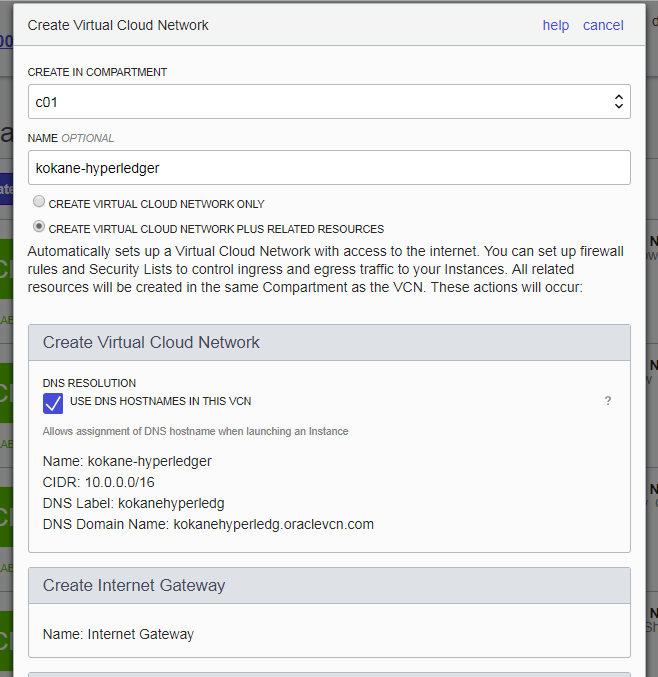
- Networking タブから VCN を作る
"CREATE VIRTUAL CLOUD NETWORK PLUS RELATED RESOURCES" で関連するリソースも一緒に作っちゃうと楽です。

(ネットワークの設定は特に変えなくても ssh は通るようになっています。またインスタンスからインターネットへも
デフォルトで出ることができます)
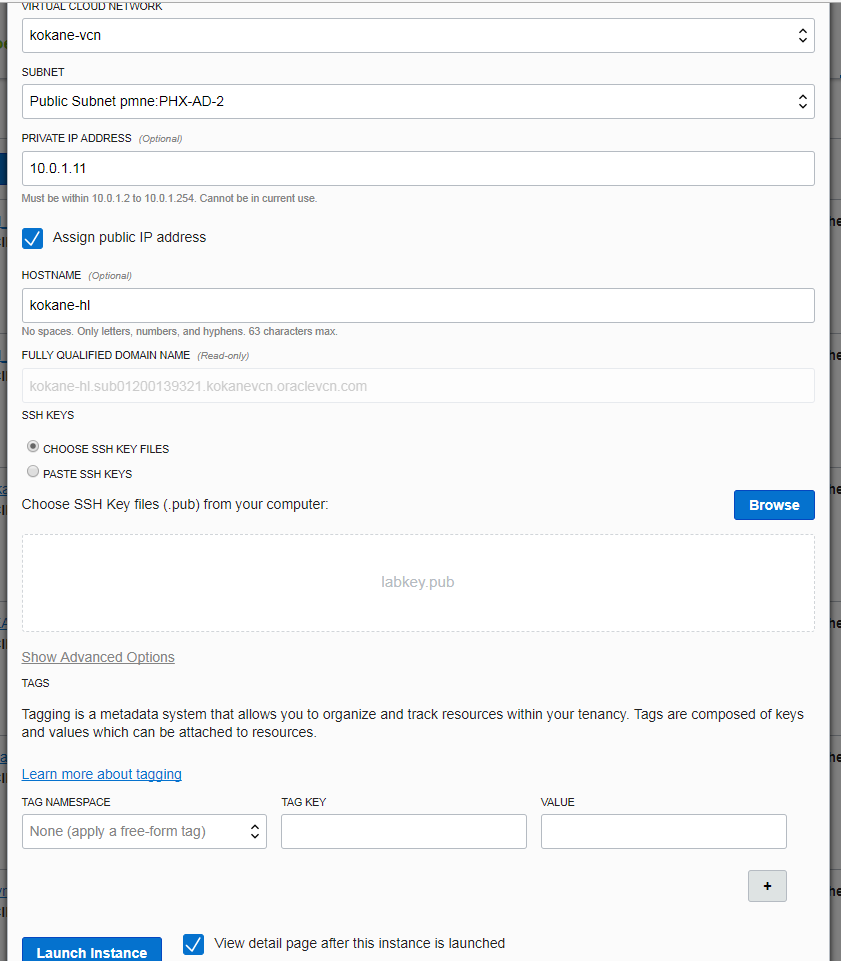
2. インスタンスを作る
こんな感じにしました。


3. opc ユーザーでログイン
アカウントの初期ユーザは opc ユーザです。インスタンス作成時に指定した sshkey を使ってログインします。
opc ユーザから sudo 可能です。
hyperledger 環境のセットアップ
以下ドキュメントに従ってセットアップします。
Welcome to Hyperledger Fabric
Prerequisites
Install cURL
cURL は latest が入っていました。
[opc@kokane-hl ~]$ sudo yum install -y curl
(省略)
Package curl-7.29.0-42.el7_4.1.x86_64 already installed and latest version
Install Docker
以下参考にインストールします。リポジトリ経由でのインストールとしました。
CentOS 用 Docker CE の入手
古いバージョンのアンインストール
特に入っていませんでした。
[opc@kokane-hl ~]$ sudo yum remove docker docker-common docker-selinux docker-engine
Loaded plugins: fastestmirror, langpacks
No Match for argument: dockerdocker-commondocker-selinuxdocker-engine
No Packages marked for removal
yum-utils、device-mapper、lvm2 の更新は必要なし
[opc@kokane-hl ~]$ sudo yum install -y yum-utils device-mapper-persistent-data lvm2
Loaded plugins: fastestmirror, langpacks
Loading mirror speeds from cached hostfile
 * base: mirror.us.oneandone.net
 * epel: dl.fedoraproject.org
 * extras: ftp.usf.edu
 * updates: repos-tx.psychz.net
Package yum-utils-1.1.31-42.el7.noarch already installed and latest version
Package device-mapper-persistent-data-0.7.0-0.1.rc6.el7.x86_64 already installed and latest version
Package 7:lvm2-2.02.171-8.el7.x86_64 already installed and latest version
Nothing to do
stable リポジトリの追加
[opc@kokane-hl ~]$ sudo yum-config-manager --add-repo https://download.docker.co
m/linux/centos/docker-ce.repo
Loaded plugins: fastestmirror, langpacks
adding repo from: https://download.docker.com/linux/centos/docker-ce.repo
grabbing file https://download.docker.com/linux/centos/docker-ce.repo to /etc/yum.repos.d/docker-ce.repo
repo saved to /etc/yum.repos.d/docker-ce.repo
yum パッケージインデックスの更新
お作法みたいなので一応。
[opc@kokane-hl ~]$ sudo yum makecache fast
Loaded plugins: fastestmirror, langpacks
base                                                     | 3.6 kB     00:00
docker-ce-stable                                         | 2.9 kB     00:00
epel/x86_64/metalink                                     |  16 kB     00:00
extras                                                   | 3.4 kB     00:00
updates                                                  | 3.4 kB     00:00
docker-ce-stable/x86_64/primary_db                         |  11 kB   00:00
Loading mirror speeds from cached hostfile
 * base: mirror.us.oneandone.net
 * epel: dl.fedoraproject.org
 * extras: ftp.usf.edu
 * updates: repos-tx.psychz.net
Metadata Cache Created
docker-ce のインストール
[opc@kokane-hl ~]$ sudo yum install -y docker-ce
(省略)
Installed:
  docker-ce.x86_64 0:17.12.0.ce-1.el7.centos

Dependency Installed:
  container-selinux.noarch 2:2.33-1.git86f33cd.el7
  libtool-ltdl.x86_64 0:2.4.2-22.el7_3

Complete!
docker-ce の起動と hello-world (動作確認)
[opc@kokane-hl ~]$ sudo systemctl start docker
[opc@kokane-hl ~]$ sudo docker run hello-world
Unable to find image 'hello-world:latest' locally
latest: Pulling from library/hello-world
ca4f61b1923c: Pull complete
Digest: sha256:66ef312bbac49c39a89aa9bcc3cb4f3c9e7de3788c944158df3ee0176d32b751
Status: Downloaded newer image for hello-world:latest

Hello from Docker!
This message shows that your installation appears to be working correctly.
OPC ユーザを docker グループに追加しておきます。
[opc@kokane-hl ~]$ sudo gpasswd -a opc docker
[opc@kokane-hl ~]$ sudo sytemctl restart docker
Docker Compose のインストール
[opc@kokane-hl ~]$ sudo curl -L https://github.com/docker/compose/releases/download/1.18.0/docker-compose-`uname -s`-`uname -m` -o /usr/local/bin/docker-compose
  % Total    % Received % Xferd  Average Speed   Time    Time     Time  Current
                                 Dload  Upload   Total   Spent    Left  Speed
100   617    0   617    0     0   1297      0 --:--:-- --:--:-- --:--:--  1301
100 8280k  100 8280k    0     0  2729k      0  0:00:03  0:00:03 --:--:-- 3570k
[opc@kokane-hl ~]$ sudo chmod +x /usr/local/bin/docker-compose
[opc@kokane-hl ~]$ docker-compose --version
docker-compose version 1.18.0, build 8dd22a9
Install Go Language
このあたりを参考に。
The Go Programming Language インストールLinux、Mac OS X、FreeBSD tarball
tarball のダウンロード
[opc@kokane-hl ~]$ cd /tmp
[opc@kokane-hl tmp]$ wget https://dl.google.com/go/go1.9.2.linux-amd64.tar.gz
--2018-01-20 04:01:07--  https://dl.google.com/go/go1.9.2.linux-amd64.tar.gz
(省略)
2018-01-20 04:01:11 (26.4 MB/s) - ‘go1.9.2.linux-amd64.tar.gz’ saved [104247844/104247844]
tarball を /usr/local に展開
[opc@kokane-hl tmp]$ sudo tar -C /usr/local -xzf go1.9.2.linux-amd64.tar.gz
PATH 追加
.bash_profile に追加しました。
[opc@kokane-hl ~]$ vi $HOME/.bash_profile
PATH=$PATH:$HOME/.local/bin:$HOME/bin:/usr/local/go/bin
export PATH
[opc@kokane-hl ~]$ source $HOME/.bash_profile
起動確認
[opc@kokane-hl ~]$ go version
go version go1.9.2 linux/amd64
GOPATH 設定
[opc@kokane-hl ~]$ vi $HOME/.bash_profile
export GOPATH=$HOME/go
export PATH=$PATH:$GOPATH/bin
[opc@kokane-hl ~]$ source $HOME/.bash_profile
[opc@kokane-hl ~]$ echo $GOPATH
/home/opc/go
node.js 環境のインストールは省略
アプリケーションを作るところまでは行けなさそうなので、省略
git インストール
Sample Scripts のダウンロードに使いたいので git をインストールしておきます。
git 1.5 使い始める - Gitのインストール
[opc@kokane-hl ~]$ sudo yum install -y git-all
[opc@kokane-hl ~]$ git --version
git version 1.8.3.1
Fabric Samples のダウンロード
[opc@kokane-hl ~]$ mkdir -p $HOME/github.com/hyperledger
[opc@kokane-hl ~]$ cd $HOME/github.com/hyperledger
git clone https://github.com/hyperledger/fabric-samples.git
Cloning into 'fabric-samples'...
remote: Counting objects: 970, done.
remote: Compressing objects: 100% (2/2), done.
remote: Total 970 (delta 0), reused 0 (delta 0), pack-reused 968
Receiving objects: 100% (970/970), 337.53 KiB | 0 bytes/s, done.
Resolving deltas: 100% (383/383), done.
Download Platform-specific Binaries
上記に続いて、docker image 等をダウンロードします。
[opc@kokane-hl local]$ sudo su
[root@kokane-hl local]$ mkdir -p /usr/local/hyperledger
[root@kokane-hl local]$ cd /usr/local/hyperledger
[root@kokane-hl hyperledger]# curl -sSL https://goo.gl/byy2Qj | bash -s 1.0.5
[root@kokane-hl hyperledger]# exit
[opc@kokane-hl bin]$ vi $HOME/.bash_profile
export PATH=$PATH:/usr/local/hyperledger/bin
[opc@kokane-hl bin]$ source $HOME/.bash_profile
docker images で見てみると、 hyperledger fabric の image がずらずらと確認できました。
[root@kokane-hl hyperledger]# docker images
REPOSITORY                     TAG                 IMAGE ID            CREATED             SIZE
hyperledger/fabric-tools       latest              6a8993b718c8        6 weeks ago         1.33GB
hyperledger/fabric-tools       x86_64-1.0.5        6a8993b718c8        6 weeks ago         1.33GB
hyperledger/fabric-couchdb     latest              9a58db2d2723        6 weeks ago         1.5GB
hyperledger/fabric-couchdb     x86_64-1.0.5        9a58db2d2723        6 weeks ago         1.5GB
hyperledger/fabric-kafka       latest              b8c5172bb83c        6 weeks ago         1.29GB
hyperledger/fabric-kafka       x86_64-1.0.5        b8c5172bb83c        6 weeks ago         1.29GB
hyperledger/fabric-zookeeper   latest              68945f4613fc        6 weeks ago         1.32GB
hyperledger/fabric-zookeeper   x86_64-1.0.5        68945f4613fc        6 weeks ago         1.32GB
hyperledger/fabric-orderer     latest              368c78b6f03b        6 weeks ago         151MB
hyperledger/fabric-orderer     x86_64-1.0.5        368c78b6f03b        6 weeks ago         151MB
hyperledger/fabric-peer        latest              c2ab022f0bdb        6 weeks ago         154MB
hyperledger/fabric-peer        x86_64-1.0.5        c2ab022f0bdb        6 weeks ago         154MB
hyperledger/fabric-javaenv     latest              50890cc3f0cd        6 weeks ago         1.41GB
hyperledger/fabric-javaenv     x86_64-1.0.5        50890cc3f0cd        6 weeks ago         1.41GB
hyperledger/fabric-ccenv       latest              33feadb8f7a6        6 weeks ago         1.28GB
hyperledger/fabric-ccenv       x86_64-1.0.5        33feadb8f7a6        6 weeks ago         1.28GB
hyperledger/fabric-ca          latest              002c9089e464        6 weeks ago         238MB
hyperledger/fabric-ca          x86_64-1.0.5        002c9089e464        6 weeks ago         238MB
hello-world                    latest              f2a91732366c        2 months ago        1.85kB
First Network
チュートリアルの手順で、動かしてみます。
Building Your First Network
[opc@kokane-hl ~]$ cd $HOME/github.com/hyperledger/fabric-samples/first-network
[opc@kokane-hl first-network]$ ./byfn.sh -m generate
Generating certs and genesis block for with channel 'mychannel' and CLI timeout of '10'
Continue (y/n)? y
proceeding ...
/usr/local/hyperledger/bin/cryptogen

##########################################################
##### Generate certificates using cryptogen tool #########
##########################################################
org1.example.com
org2.example.com

/usr/local/hyperledger/bin/configtxgen
##########################################################
#########  Generating Orderer Genesis block ##############
##########################################################
2018-01-20 06:51:43.653 GMT [common/configtx/tool] main -> INFO 001 Loading configuration
2018-01-20 06:51:43.682 GMT [common/configtx/tool] doOutputBlock -> INFO 002 Generating genesis block
2018-01-20 06:51:43.684 GMT [common/configtx/tool] doOutputBlock -> INFO 003 Writing genesis block

#################################################################
### Generating channel configuration transaction 'channel.tx' ###
#################################################################
2018-01-20 06:51:43.713 GMT [common/configtx/tool] main -> INFO 001 Loading configuration
2018-01-20 06:51:43.716 GMT [common/configtx/tool] doOutputChannelCreateTx -> INFO 002 Generating new channel configtx
2018-01-20 06:51:43.716 GMT [common/configtx/tool] doOutputChannelCreateTx -> INFO 003 Writing new channel tx

#################################################################
#######    Generating anchor peer update for Org1MSP   ##########
#################################################################
2018-01-20 06:51:43.749 GMT [common/configtx/tool] main -> INFO 001 Loading configuration
2018-01-20 06:51:43.752 GMT [common/configtx/tool] doOutputAnchorPeersUpdate -> INFO 002 Generating anchor peer update
2018-01-20 06:51:43.752 GMT [common/configtx/tool] doOutputAnchorPeersUpdate -> INFO 003 Writing anchor peer update

#################################################################
#######    Generating anchor peer update for Org2MSP   ##########
#################################################################
2018-01-20 06:51:43.780 GMT [common/configtx/tool] main -> INFO 001 Loading configuration
2018-01-20 06:51:43.783 GMT [common/configtx/tool] doOutputAnchorPeersUpdate -> INFO 002 Generating anchor peer update
2018-01-20 06:51:43.783 GMT [common/configtx/tool] doOutputAnchorPeersUpdate -> INFO 003 Writing anchor peer update

[opc@kokane-hl first-network]$ ./byfn.sh -m up
Starting with channel 'mychannel' and CLI timeout of '10'
Continue (y/n)? y
proceeding ...
Creating peer0.org1.example.com ... done
Creating cli ... done
Creating peer0.org1.example.com ...
Creating peer1.org1.example.com ...
Creating orderer.example.com ...
Creating peer1.org2.example.com ...
Creating cli ...

 ____    _____      _      ____    _____
/ ___|  |_   _|    / \    |  _ \  |_   _|
\___ \    | |     / _ \   | |_) |   | |
 ___) |   | |    / ___ \  |  _ <    | |
|____/    |_|   /_/   \_\ |_| \_\   |_|

Build your first network (BYFN) end-to-end test

Channel name : mychannel
Creating channel...
========= All GOOD, BYFN execution completed ===========

(省略)
 _____   _   _   ____
| ____| | \ | | |  _ \
|  _|   |  \| | | | | |
| |___  | |\  | | |_| |
|_____| |_| \_| |____/
まとめ
Docker とか git とか golang とか、開発環境に入っていそうなものが一揃えあればいいので、環境の準備自体は簡単にできそうです。(docker image が整備されたこと、 github に sample が一揃えあることなどにより、随分簡単になったのかなと思います。)
一度環境を作ったので、その他のチュートリアルなど使って、触って見られればと思っています。
開発環境として使うのであれば、以下も便利そうです。
動画コース 「Zero to Blockchain」(Hyperledger Fabric) に、ローカル開発環境を簡単に作れるシェルがあったので試してみた
ただ、実際にデプロイするとなると、どういう環境で動かしていいかいまいちイメージがつかめないので、現実的にはデプロイは以下のようなクラウドサービスを使う方向なのかなと思ったりもします。
Blockchain Cloud Service | Oracle Cloud
Oracle Blockchain Cloud Service ご紹介資料