初めに
以前、BLEビーコンとソラコムAPIを使って、出退勤記録と天気やニュースの読み上げをしてくれるボタンを作成しました。
BLEビーコンとソラコムAPIでつい押してみたくなる出退勤記録ボタンを作る
その記事の中で今後の改善案として、
次は以下の情報を参考にして、稼働情報をslackに反映するようにしたいです。
SORACOM レシピ:IoTで在席状況の自動更新
と書きましたので、本当に作成しました。
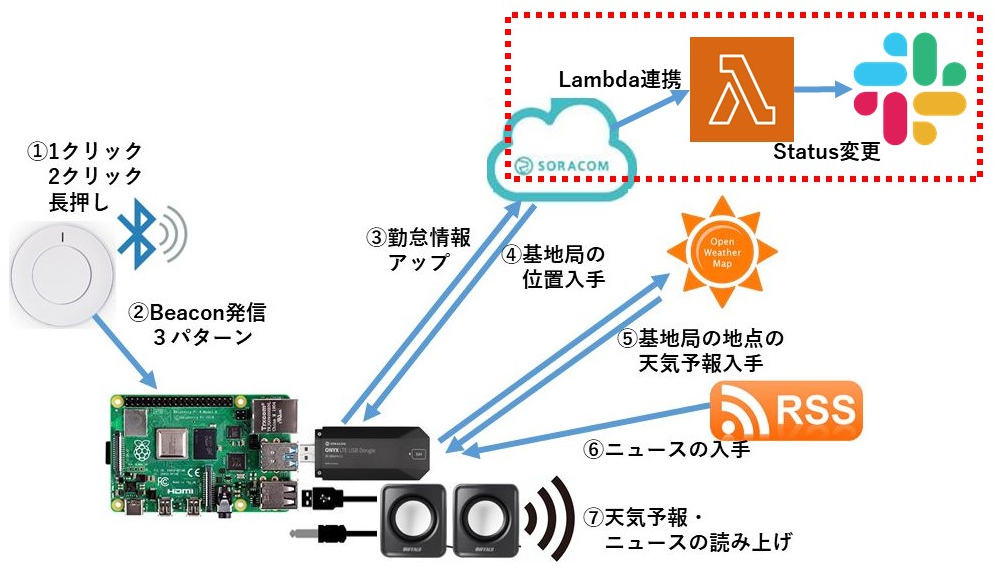
システム構成
システム構成を以下に示します。赤四角の、ソラコム ~ AWS Lambda ~ Slackの経路が、今回追加した箇所です。他の部分は以前の記事を参照してください。
クラウドサービスのセットアップ
各種クラウドサービスの設定は、ほぼ下記の記事の通りです。
SORACOM レシピ:IoTで在席状況の自動更新
ただし操作画面が変わっていますので、こちらの記事でも一通り画面キャプチャを使って説明します。画面は2021年7月末時点のものです。今後もどんどん変わると思いますので、適時読み替えてください。
Slackのセットアップ
Slack アプリを作成し、アクセストークンを発行します。
アプリの作成
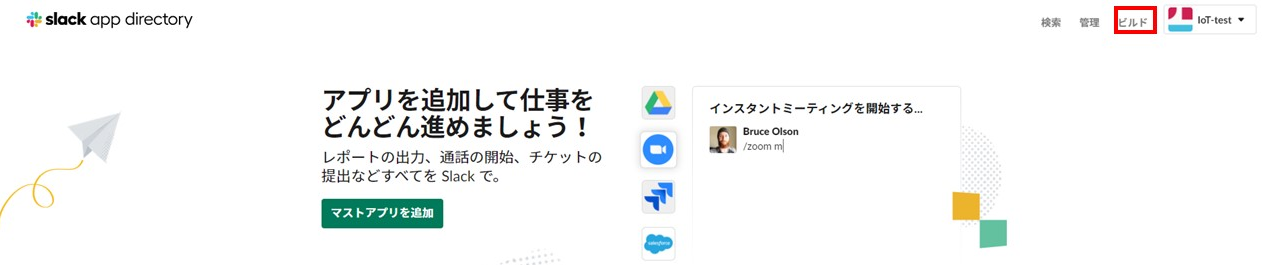
Slack の「App」メニューを開き、右上のAppディレクトリをクリックします。

立ち上がったブラウザ画面の右上の [ビルド] をクリックします。
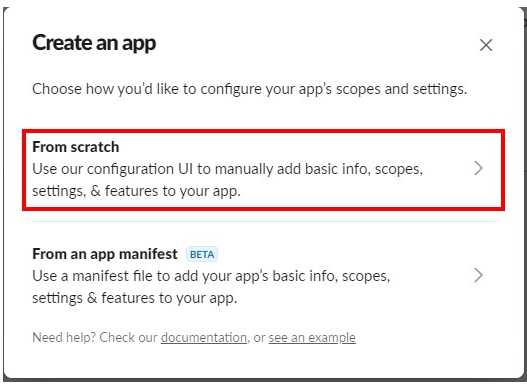
[create an app] をクリックします。

[From scratch]をクリックします。
App Nameに[status changer]、Pick a workspace to develop you app in:に[利用したいワークスペース名]を設定し [Create App] を選択します。

ステータスを更新する権限を付与する
OAuth & Permissions タブへ移動します。
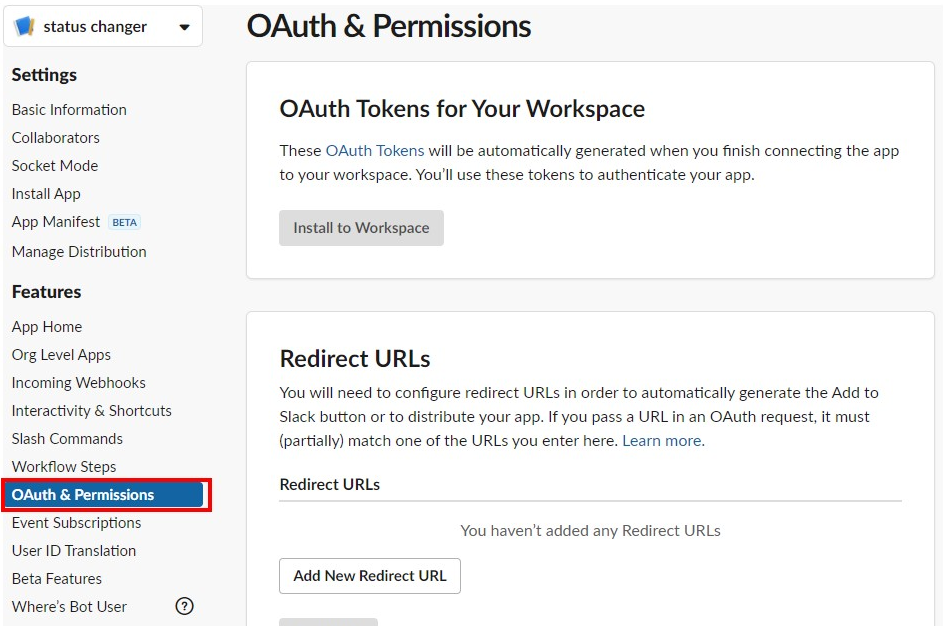
Scopes > User Token Scopes > [Add an OAuth Scope] をクリックしてドロップダウンメニューから users.profile:write 権限を選択します。なお、元のブログでも注意書きがされていますが、権限の範囲が自身の情報なども含まれるため、生成されるトークンの取り扱いには注意してください。

トークンをコピーする
OAuth Tokens for Your Workspaceの [Install to Workspace] をクリックします。
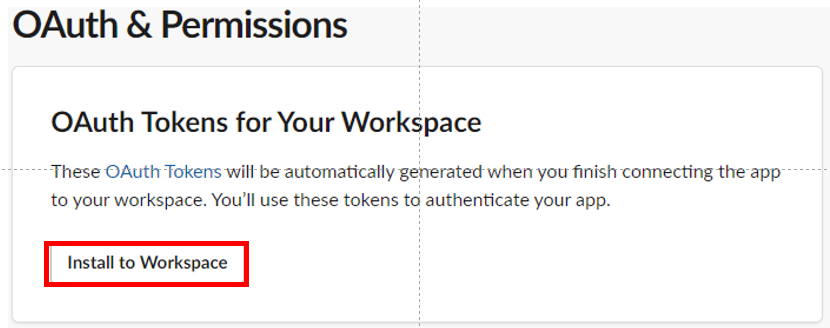
権限がリクエストされたら [許可する] クリックしてください。

User OAuth Token が発行されるので [Copy] をクリックして控えます。先ほども説明したとおり、このTokenは他の人に漏れないように、問題が起きた場合は破棄するようにしてください。

AWS lambdaのセットアップ
Slack のステータスを変更する AWS Lambda を作成します。
AWS Lambda 関数を作成する
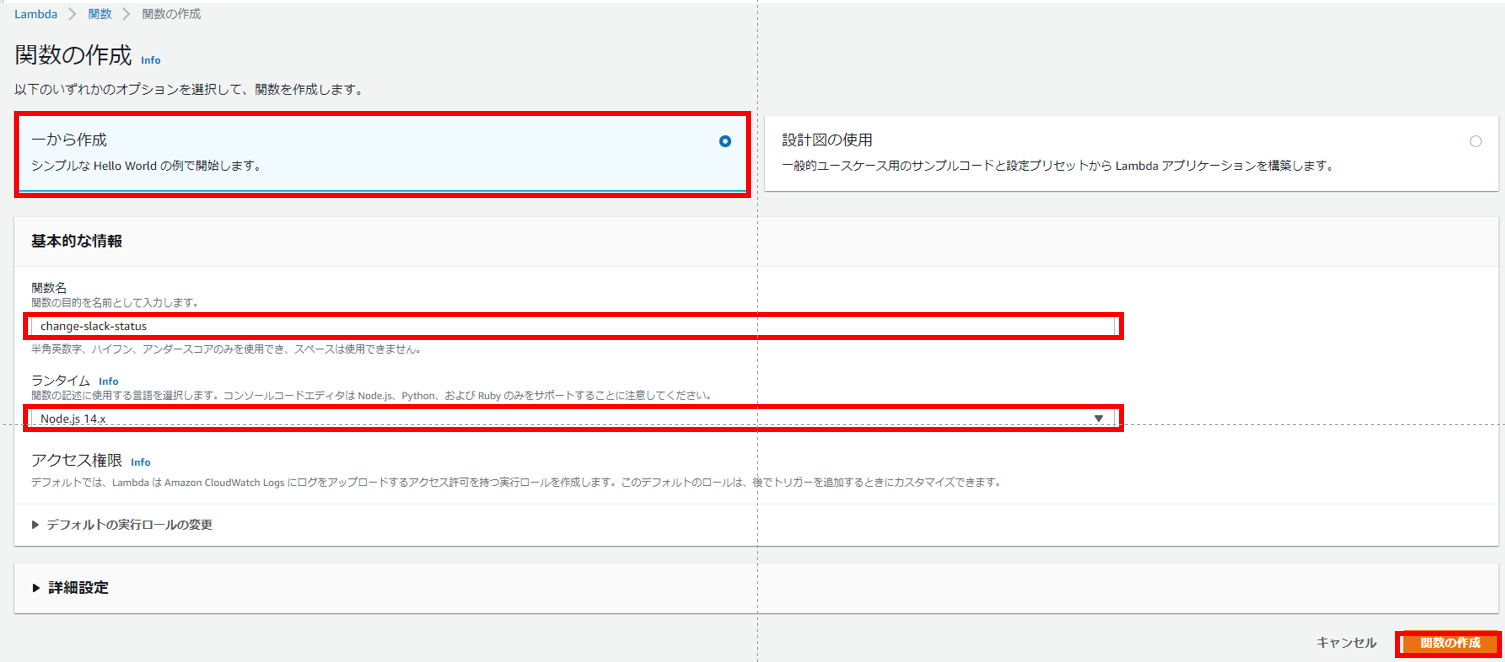
AWS マネジメントコンソールのサービス一覧より Lambda を選択し、[関数の作成] をクリックします。

関数の作成=[1から作成]、関数名=[change-slack-status]、ランタイム=[Node.js 14.x]を指定して、[関数の作成] をクリックします。
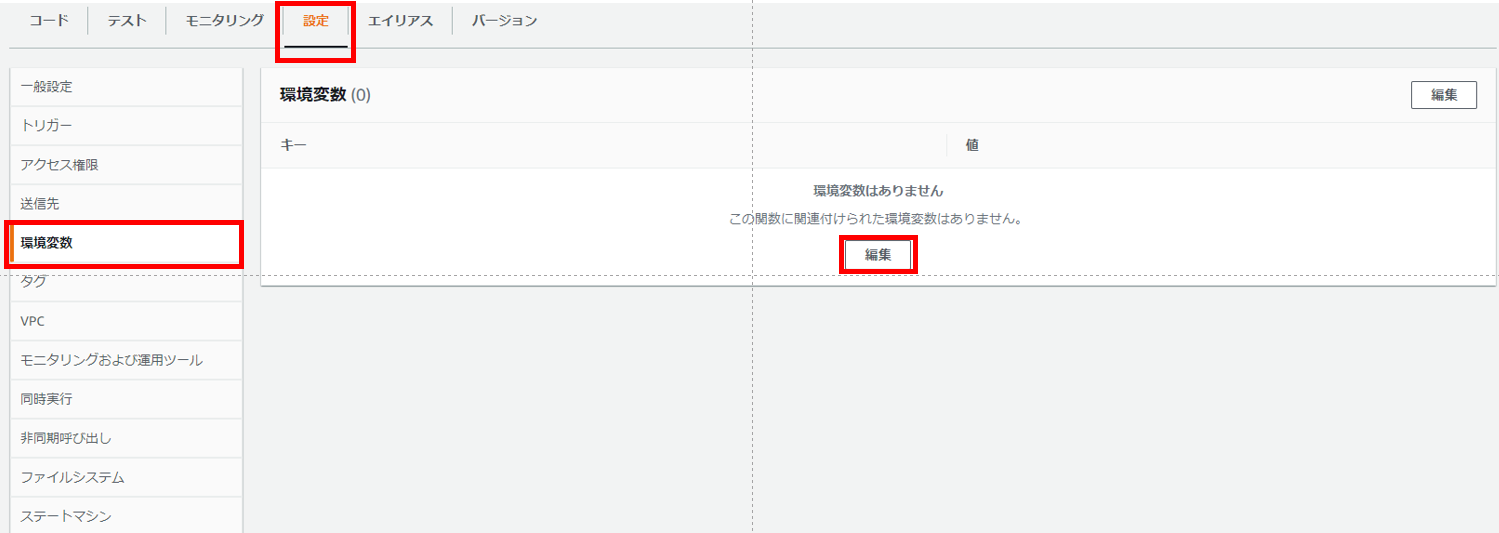
環境変数に Slack のトークンを設定する
設定 > 環境変数 > [編集] をクリックします。
[環境変数の追加] をクリックして各キー=[SLACK_TOKEN]と値=[slackで発行したToken]を設定します。その後、[保存] をクリックします。
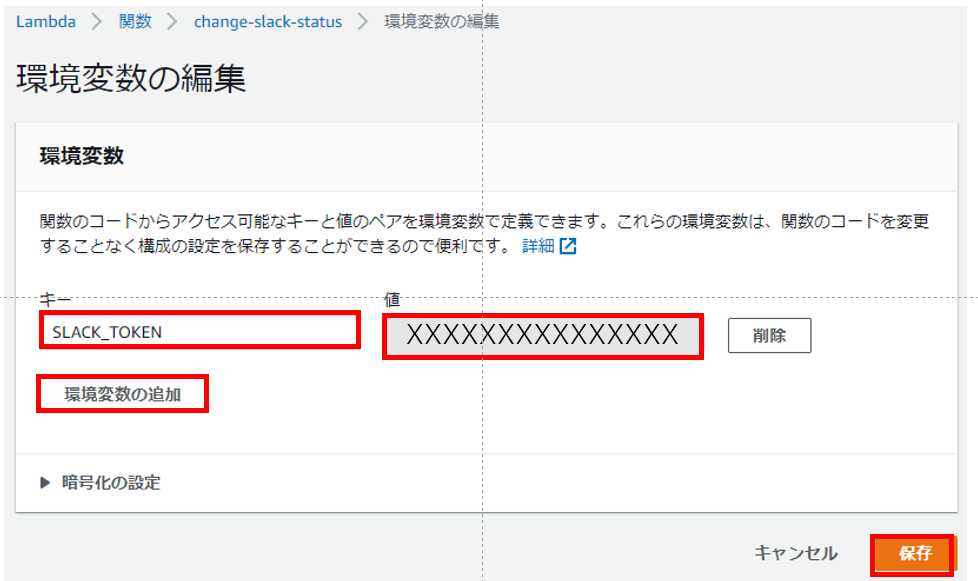
以下のようにキー・値が設定されます。

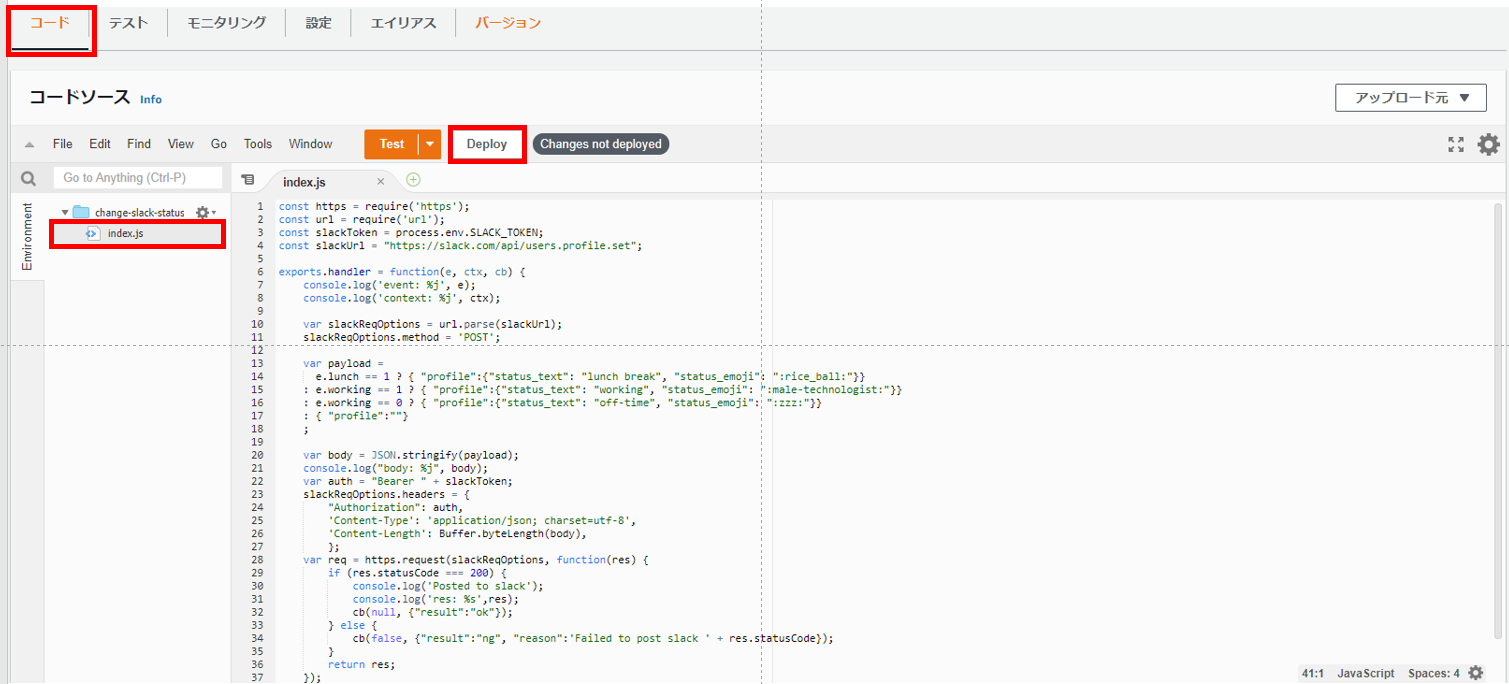
関数のコードを設定する
[コード]を選択し、[index.js]をダブルクリックします。表示されたコードを以下の内容ですべて上書きし、[Deploy]ボタンを押下します。
const https = require('https');
const url = require('url');
const slackToken = process.env.SLACK_TOKEN;
const slackUrl = "https://slack.com/api/users.profile.set";

exports.handler = function(e, ctx, cb) {
    console.log('event: %j', e);
    console.log('context: %j', ctx);
    var slackReqOptions = url.parse(slackUrl);
    slackReqOptions.method = 'POST';
    var payload =
      e.lunch == 1 ? { "profile":{"status_text": "lunch break", "status_emoji": ":rice_ball:"}}
    : e.working == 1 ? { "profile":{"status_text": "working", "status_emoji": ":male-technologist:"}}
    : e.working == 0 ? { "profile":{"status_text": "off-time", "status_emoji": ":zzz:"}}
    : { "profile":""}
    ;
    var body = JSON.stringify(payload);
    console.log("body: %j", body);
    var auth = "Bearer " + slackToken;
    slackReqOptions.headers = {
        "Authorization": auth,
        'Content-Type': 'application/json; charset=utf-8',
        'Content-Length': Buffer.byteLength(body),
        };
    var req = https.request(slackReqOptions, function(res) {
        if (res.statusCode === 200) {
            console.log('Posted to slack');
            console.log('res: %s',res);
            cb(null, {"result":"ok"});
        } else {
            cb(false, {"result":"ng", "reason":'Failed to post slack ' + res.statusCode});
        }
        return res;
    });
    req.write(body);
    req.end();
};
作成した AWS Lambda のテスト
実データの送信前にAWS Lambda 単体でテストします。[テスト]、テンプレート=[hello world]、名前=[status]、イベントドキュメント(下記参照)を入力し、[変更を保存] をクリックします。
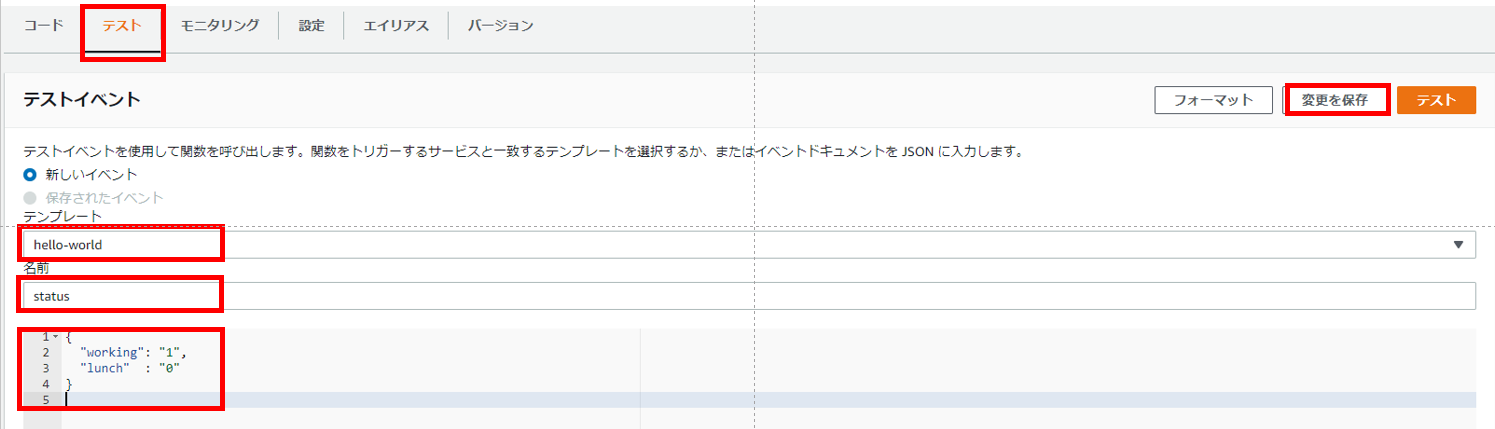
{
  "working": "1",
  "lunch"  : "0"
}
作成したテスト名が選択されていることを確認して、[テスト] をクリックしてください。
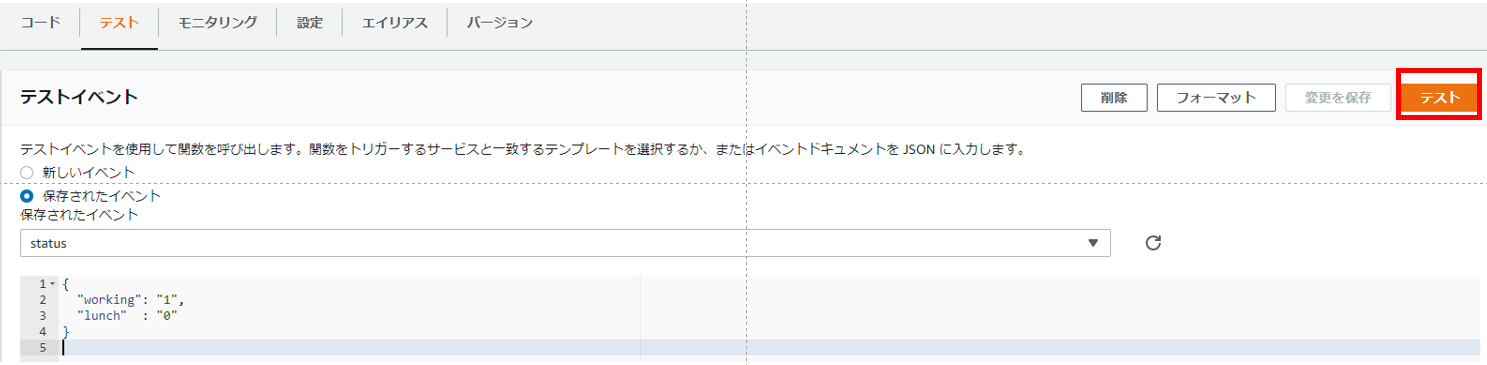
Slack のステータス表示が変更されていたら、テスト成功です。

ほかの条件もテストします。
{
  "working": "1",
  "lunch"  : "1"
}
{
  "working": "0",
  "lunch"  : "0"
}
AWS Lambda の ARN をコピーする
SORACOM Funk から AWS Lambda へ連携できるよう、ARN (Amazon Resource Name) をコピーし、控えておきます。

AWS IAM ユーザーを作成し、認証情報を取得する
SORACOM Funk から AWS Lambda を呼び出すためには、IAM ユーザーの認証情報が必要となるため、IAM ユーザーを作成し、認証情報を取得します。
IAM ポリシーを作成する
IAM ユーザーには AWS のリソース権限である IAM ポリシーを付与します。セキュリティリスクを極小化するために、先ほど作成した Lambda の実行権限だけを持つ IAM ポリシーを作成します。
AWS コンソールより Identity andAccess Management (IAM) メニューを開き、[ポリシー] > [ポリシーを作成] をクリックします。

「サービス」はLambdaを選択、「アクション」は検索ウィンドウに InvokeFunction と入力してそれを選択、「リソース」は[ARN の追加] をクリックして ARN の指定で先ほどコピーした ARN を貼り付けます。
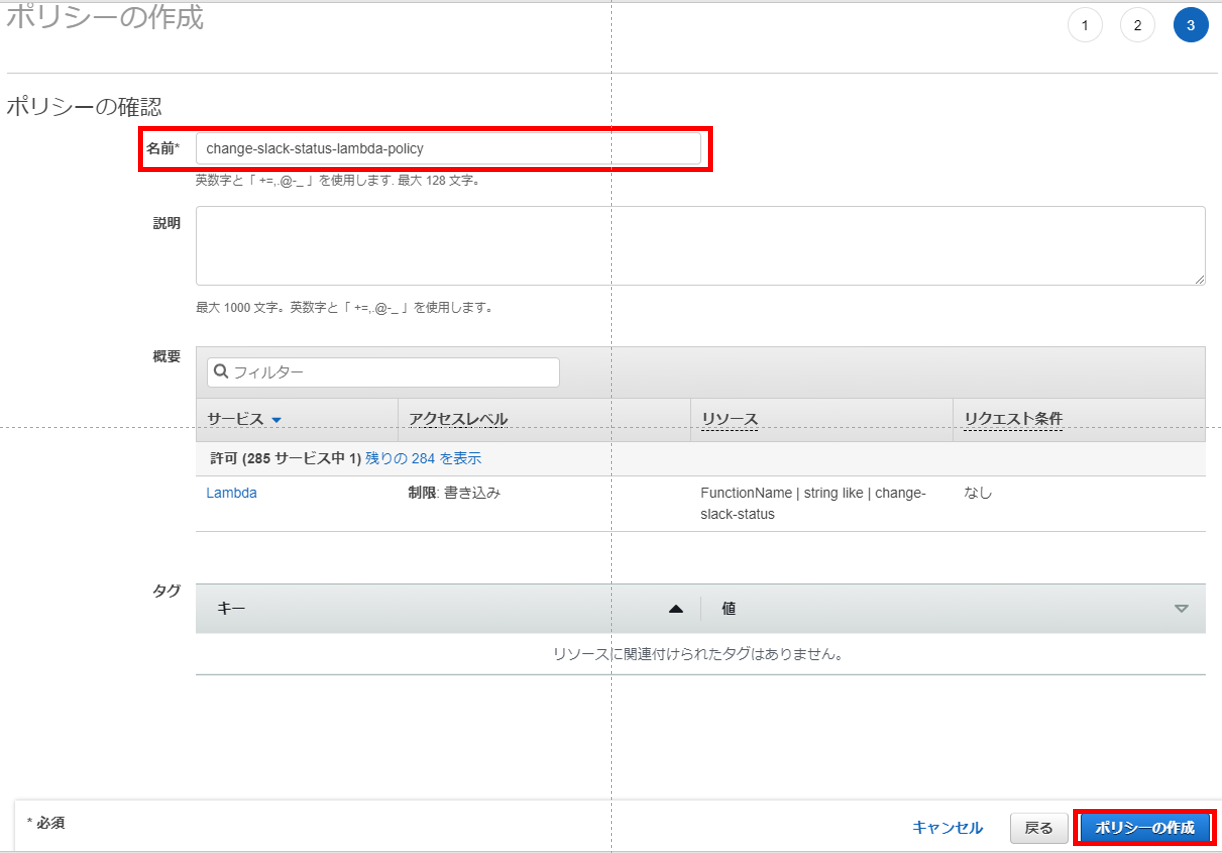
以上の設定が終わったら、[次のステップ:タグ] > [次のステップ:確認] ボタンをクリックします。

ポリシー名を指定して [ポリシーの作成] をクリックします。
IAM ユーザーを作成する
AWS コンソールより Identity andAccess Management (IAM) メニューを開き、[ユーザー] > [ユーザーを追加]をクリックします。

任意のユーザー名を設定し、[プログラムによるアクセス] にチェックを入れ、[次のステップ : アクセス権限] をクリックします。

アクセス許可の設定では、[既存のポリシーを直接アタッチ]を選択したあと、先ほど作成したポリシー名で検索します。ポリシーをチェックして、[次のステップ : タグ] > [次のステップ : 確認] をクリックします。

記載項目を確認して [ユーザーを作成] をクリックします。

IAM 認証情報をコピーする
IAM ユーザーが作成されると、認証情報が発行されます。アクセスキー ID やシークレットアクセスキーを控えておきます。これらは再発行できないので、[.csv のダウンロード] をクリックして csv ファイル形式でダウンロードしておきます。

SORACOM Funkのセットアップ
SORACOM Funk から AWS Lambda を呼び出すための設定をします。
作成したIAMユーザ情報をソラコムの認証情報ストアへ登録する
ユーザーコンソールの右上にあるユーザー名をクリックし [セキュリティ]をクリックします。
[認証情報ストア]> [認証情報を登録]をクリックします。

認証情報として下記の情報を登録します。
- 認証情報ID : slack-status-change-secret
- 概要 : 任意
- 種別 : AWS認証情報
- AWS Access Key ID : 作成したIAM情報を入力
- AWS Secret Access Key : 作成したIAM情報を入力

Soracom Funkの設定をする
ソラコムと通信するSIMグループ画面を選択し、SORACOM Funkの設定をして、[保存]を押します。
- on
- サービス : AWS Lambda
- 関数のARN : AWS Lambda設定時のARN
- 認証情報 : slack-status-change-secret
- 送信データ形式 : JSON

ソフトウェアの更新
今回の変更箇所を下図の赤四角に示します。
今回は変更のあったプログラムのみ、記載します。その他のプログラムは以前の記事を参考にしてください。
BLEビーコンとソラコムAPIでつい押してみたくなる出退勤記録ボタンを作る

working_recorder.py
# !/usr/bin/env python
import sys
import shlex
import subprocess
from datetime import datetime
import requests
import feedparser
import json
import deg_speed
import celllib

# login for soracom
EMAIL = 'XXXXXXXXXX' <- SROACOMログインID
PASS = 'XXXXXXXXXXX' <- SORACOMログインパスワード

# API key for OpenWeatheMap
API_KEY = "XXXXXXXXXXX" <- OpenWeatherMapのAPI Key

CMD_SAY = "/home/pi/workrecorder/atalk-hp.sh -b -s 90"
CMD_SAY2 = "/home/pi/workrecorder/atalk-hp.sh"
da = datetime.now()
default_pos = {"lat":35, "lon":135}

def main():
    if sys.argv[1] == "0":
        start_work()
    elif sys.argv[1] == "1":
        check_lunch()
    else:
        end_work()
    return

def start_work():
    res = celllib.putTagValue("working", "1")
    res = celllib.putTagValue("lunch"  , "0")
    res = celllib.postStatusToSORACOMFunk("1","0")
    api  = celllib.getApiKey(EMAIL, PASS)
    cell = celllib.getCellInfo()
    pos  = celllib.getPosition(api, cell)
    if pos is not None:
        say_weather_today(pos)
    else:
        print("error: can't get position")
        say_weather_today(default_pos)
    return

def end_work():
    res = celllib.putTagValue( "working", "0")
    res = celllib.putTagValue("lunch"  , "0")
    res = celllib.postStatusToSORACOMFunk("0","0")
    api  = celllib.getApiKey(EMAIL, PASS)
    cell = celllib.getCellInfo()
    pos  = celllib.getPosition(api, cell)
    if pos is not None:
        say_weather_tommorrow(pos)
    else:
        print("error: can't get position")
        say_weather_tommorrow(default_pos)
     return

def say_weather_today(pos):
    url = "https://api.openweathermap.org/data/2.5/onecall?lat=%s&lon=%s&appid=%s&units=metric&lang=ja&exclude=hourly" % (pos["lat"], pos["lon"], API_KEY)
    print(url)
    weather_text = u'%sは%sの風、風力%s。%s。天気は%s。降水確率は、%s%です。'
    now_text = u'現在の気温は%s度、湿度%s%で体感温度は、%s度です。'
    temperature_text = u'%sの予想最高気温は、%s度。予想最低気温は、%s度、湿度は、%s%です。'
    try:
        obj = requests.get(url).json()
        c = obj["current"]
        d = obj["daily"]
        #today
        Nt = d[0]["temp"]
        pop = round(d[0]["pop"] * 100)
        wdn = c["wind_deg"]
        wdn = deg_speed.wdeg(wdn)
        wsn = c["wind_speed"]
        (wsn,wsna) = deg_speed.wspeed(wsn)
        today_w = c["weather"][0]["description"]
        today_w_txt = weather_text % (u"今日", wdn, wsn, wsna, today_w, pop)
        today_t_txt = temperature_text % (u"今日", round(Nt["max"], 1), round(Nt["min"], 1), d[0]["humidity"])
        today_n_txt = now_text % (round(c["temp"], 1), c["humidity"], round(c["feels_like"], 1))
        #say
        opening_str = "業務開始時間は、%s時%s分です。今日も、がんばりましょう。" % (da.hour, da.minute)
        weather_str = opening_str + "今日の天気です。" + today_w_txt + ' ' + today_n_txt + ' ' + today_t_txt
        weather_str = weather_str.replace("-", "マイナス")
        text = '''%s '%s' ''' % (CMD_SAY, weather_str)
        print(text)
        proc = subprocess.Popen(shlex.split(text))
        proc.communicate()
    except:
        return False
    return True

def say_weather_tommorrow(pos):
    url = "https://api.openweathermap.org/data/2.5/onecall?lat=%s&lon=%s&appid=%s&units=metric&lang=ja&exclude=hourly" % (pos["lat"], pos["lon"], API_KEY)
    print(url)
    weather_text = u'%sは%sの風、風力%s。%s。天気は%s。降水確率は、%s%です。'
    temperature_text = u'%sの予想最高気温は、%s度。予想最低気温は、%s度、湿度は、%s%です。'
    try:
        obj = requests.get(url).json()
        d = obj["daily"]
        #tommorow
        Nt = d[1]["temp"]
        pop = round(d[1]["pop"] * 100)
        wdt = d[1]["wind_deg"]
        wdt = deg_speed.wdeg(wdt)
        wst = d[1]["wind_speed"]
        (wst,wsna) = deg_speed.wspeed(wst)
        tommorow_w = d[1]["weather"][0]["description"]
        tommorow_w_txt = weather_text % (u"明日", wdt, wst, wsna, tommorow_w, pop)
        tommorow_t_txt = temperature_text % (u"明日", round(Nt["max"], 1), round(Nt["min"], 1), d[1]["humidity"])
        #say
        opening_str = "業務終了時間は、%s時%s分です。今日も、おつかれさまでした。" % (da.hour, da.minute)
        weather_str = opening_str + "明日の天気です。" + tommorow_w_txt + ' ' + tommorow_t_txt
        weather_str = weather_str.replace("-", "マイナス")
        text = '''%s '%s' ''' % (CMD_SAY, weather_str)
        print(text)
        proc = subprocess.Popen(shlex.split(text))
        proc.communicate()
    except:
        return False
    return True

def check_lunch():
    lunch = celllib.getTagValue("lunch")
    if lunch == 0:
        res = celllib.putTagValue("working", "1")
        res = celllib.putTagValue("lunch"  , "1")
        res = celllib.postStatusToSORACOMFunk("1","1")
        say_news()
    else:
        res = celllib.putTagValue("working", "1")
        res = celllib.putTagValue("lunch"  , "0")
        res = celllib.postStatusToSORACOMFunk("1","0")
        say_endlunch()
    return

def say_news():
    RSS_URL = 'https://www.nhk.or.jp/rss/news/cat0.xml'
    d = feedparser.parse(RSS_URL)
    for i, entry in enumerate(d.entries):
        newstime = entry.published_parsed
        newstime = datetime(newstime[0],newstime[1],newstime[2],newstime[3],newstime[4],newstime[5])
        entry.summary = entry.summary.replace(' ' , '')
        if i == 0:
            opening_str = "%s時%s分です。昼休みです。おつかれさまです。" % (da.hour, da.minute)
            text = opening_str + "ニュースです。" + entry.summary
        else:
            text = "次のニュースです。" + entry.summary
        text = CMD_SAY2 + ' '+ text
        if da.timestamp() - newstime.timestamp() <= 172800:
            print(text)
            proc = subprocess.Popen(shlex.split(text))
            proc.communicate()
    return

def say_endlunch():
    opening_str = "%s時%s分です。昼休み終了です。残りもがんばりましょう。" % (da.hour, da.minute)
    text = CMD_SAY + ' ' + opening_str
    print(text)
    proc = subprocess.Popen(shlex.split(text))
    proc.communicate()
    return

### Execute
if __name__ == "__main__":
    main()
celllib.py
# !/usr/bin/env python
import requests

# get API key and token
def getApiKey(email, password):
    headers = {
        'accept': 'application/json',
        'Content-Type': 'application/json',
    }
    data = '{ "email": "' + email + '", "password": "' + password + '" }'
    url = 'https://api.soracom.io/v1/auth'
    try:
        res = requests.post(url, headers=headers, data=data)
        res.raise_for_status()
        return res.json()
    except:
        return None

# get cell ID (use metadata service)
def getCellInfo():
    url = 'http://metadata.soracom.io/v1/subscriber.sessionStatus.cell'
    try:
        res = requests.get(url)
        res.raise_for_status()
        return res.json()
    except:
        return None

# get lat and lot
def getPosition(api, cell):
    if api is None or cell is None:
        return None
    headers = {
        'accept': 'application/json',
        'X-Soracom-API-Key': api['apiKey'],
        'X-Soracom-Token': api['token'],
    }
    params = (
        ('mcc' , cell['mcc']),
        ('mnc' , cell['mnc']),
        ('tac' , cell['tac']),
        ('ecid', cell['eci']),
    )
    url = 'https://api.soracom.io/v1/cell_locations'
    try:
        res = requests.get(url, headers=headers, params=params)
        res.raise_for_status()
        return res.json()
    except:
        return None

# get tags (use metadata service)
def getTagValue(name):
    url = 'http://metadata.soracom.io/v1/subscriber.tags.' + name
    try:
        res = requests.get(url)
        res.raise_for_status()
        return res.json()
    except:
        return None

# put Value to Tags
def putTagValue(name, value):
    if name is None or value is None:
        return None
    headers = {
        'Content-Type': 'application/json',
    }
    data = '[ { "tagName": "' + name + '", "tagValue": "' + value + '" }]'
    url = 'http://metadata.soracom.io/v1/subscriber/tags'
    try:
        res = requests.put(url, headers=headers, data=data)
        res.raise_for_status()
        return res.json()
    except:
        return None

# post JSON to SORACOM Funk
def postStatusToSORACOMFunk(working, lunch):
    if working is None or lunch is None:
        return None
    headers = {
        'Content-Type': 'application/json',
    }
    data = '{"working": "' + working + '", "lunch": "' + lunch + '"}'
    url = 'http://uni.soracom.io/'
    try:
        res = requests.post(url, headers=headers, data=data)
        res.raise_for_status()
        return res.json()
    except:
        return None
プログラム実行
beacon_start.shを実行してください。ラズパイのBLE受信が始まります。
業務開始(ボタン1クリック)
ビーコンボタンを1クリックすると、業務開始時間、励まし、今日の天気予報の順にスピーカーから出力されます。また、Slackのアイコンが、コンピュータに向かっている技術者の絵柄に、Slackのメッセージが"working"に変わります。
昼休み開始(ボタン長押し その1)
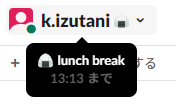
ビーコンボタンを長押しすると、現在時間、いたわり、今日のニュース一覧の順にスピーカーから出力されます。また、Slackのアイコンが、おにぎりの絵柄に、Slackのメッセージが"lunch break"に変わります。
昼休み終了(ボタン長押し その2)
再度ビーコンボタンを長押しすると、現在時間を伝えた後、昼からも仕事を頑張るよう、励ましてくれます。また、Slackのアイコンが、コンピュータに向かっている技術者の絵柄に、Slackのメッセージが"working"に変わります。
業務終了(ボタン2クリック)
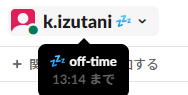
ビーコンボタンを2クリックすると、業務終了時間、いたわり、明日の天気予報の順にスピーカーから出力されます。また、Slackのアイコンが、居眠りの絵柄に、Slackのメッセージが"off-time"に変わります。
プログラムの説明
今回のポイントは、SORACOM FunkへのデータのアップロードとAWS Lambdaの関数部分です。
あらかじめ、
- lunch = 1: 昼食
- working = 1 : 仕事中
- working = 0 : 業務終了
とルールをきめて、SORACOM FunkからAWSへJSONデータを転送しています。
SORACOM Funkへのデータアップロード
具体的な部分は、celllib.pyに記載しています。
下記のように引数からJSONデータを作成し、Unified EndpointにPOSTしています。
Unified Endpointでは自動的にSORACOM Funkにデータを振り分けてくれます。
# post JSON to SORACOM Funk
def postStatusToSORACOMFunk(working, lunch):
    if working is None or lunch is None:
        return None
    headers = {
        'Content-Type': 'application/json',
    }
    data = '{"working": "' + working + '", "lunch": "' + lunch + '"}'
    url = 'http://uni.soracom.io/'
    try:
        res = requests.post(url, headers=headers, data=data)
        res.raise_for_status()
        return res.json()
    except:
        return None
AWS Lambdaのプログラム
肝心の部分は、SlackへPOSTするデータのペイロード作成部分です。
ここで、受け取ったJSONの中身を解析して、各ステータスに応じた、ペイロードを作成しています。
    var payload =
      e.lunch == 1 ? { "profile":{"status_text": "lunch break", "status_emoji": ":rice_ball:"}}
    : e.working == 1 ? { "profile":{"status_text": "working", "status_emoji": ":male-technologist:"}}
    : e.working == 0 ? { "profile":{"status_text": "off-time", "status_emoji": ":zzz:"}}
    : { "profile":""}
    ;
その他
画面のキャプチャーが大量で疲れました。。
その他2
恥ずかしながら後から知ったのですが、現在、Qiitaエンジニアフェスタ2021の期間中だったので、タグを変更しました。