概要
AWS公式のID プール (フェデレーティッドアイデンティティ) の認証フロー の 開発者が認証した ID の認証フロー の 基本的な認証フロー をやります。
拡張認証フロー の方がほとんどのお客様にとって、正しい選択だと書いてありますが、何か上手くいかなかったのでとりあえず基本の方やります。。
環境
- 公式フローだと、
AssumeRoleWithWebIdentityはクライアントからやることになっていますが、面倒くさいので、Lambdaの中で完結させます。 - 独自認証の認証自体はやりません。
※認証できているという前提で、GetOpenIdTokenForDeveloperIdentityからやります。
実際にはGetOpenIdTokenForDeveloperIdentityの前に独自認証の処理が必要です。 - Lambdaのロールには
FullAccessをつけます。
※GetOpenIdTokenForDeveloperIdentityを実行するためにはクレデンシャルが必要です。(当たり前っちゃー当たり前)
なので、ローカルからいきなりGetOpenIdTokenForDeveloperIdentityを実行しようとしても怒られます。
準備
CognitoIDプールを作成する
- Cognitoの"フェデレーティッドアイデンティティ"のページを開く
- "新しい ID プールの作成"ボタンを押す
- ↓にチェックいれて(それ以外は適当でOK(認証しないので))、"プールの作成"

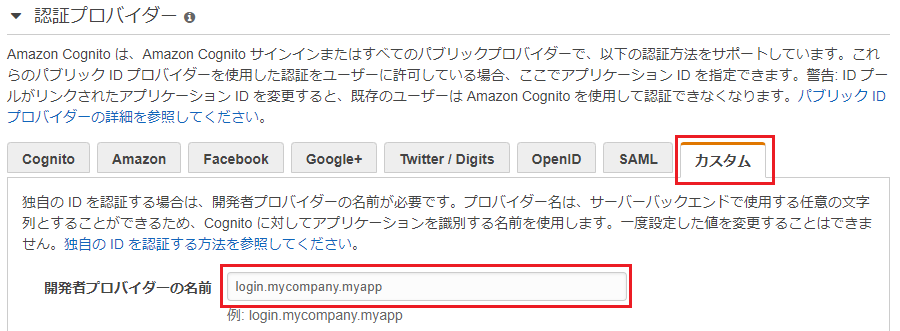
- 認証プロバイダを下記で設定 ※開発者プロバイダの名前は任意で良い

- あとはとにかく次へ行ってCognitoIDプールが作成する。
Lambdaの実装
下記のコードをLambdaにコピペしてください。
Lambda
import json
import boto3

def lambda_handler(event, context):

    # 事前にここに独自認証の処理を行う(要件に合わせて自分で実装)

    client = boto3.client('cognito-identity')
    # reponseのTokenにはIDトークンが入る
    # ※備考
    # "iss": "https://cognito-identity.amazonaws.com" になる。
    # ユーザプールで発行した場合の"iss"は"https://cognito-idp.ap-northeast-1.amazonaws.com/ap-northeast-1_xxxxxxxx(ユーザプールID名)"になる
    response = \
        client.get_open_id_token_for_developer_identity(IdentityPoolId='ap-northeast-1:xxxxxxxx-xxxx-xxxx-xxxx-xxxxxxxxxxxx', # プールID の IDプールのID
        Logins={'login.mycompany.myapp': 'test_user'},
        # { 認証プロバイダ > カスタム > 開発者プロバイダーの名前 で登録した開発プロバイダーの名前: 独自認証したユーザID }
    )

    client2 = boto3.client('sts')
    ret = client2.assume_role_with_web_identity(
        RoleArn='arn:aws:iam::xxxxxxxxxxxx:role/service-role/lambda_role',
        RoleSessionName='boto',
        WebIdentityToken=response['Token'],
    )
    print(f"assumeRoleWithWebIdentity:{ret}")

    return {'statusCode': 200, 'body': json.dumps('Hello from Lambda!')}
実際にクレデンシャルを発行してみる
Lambdaを実行させるだけです。
ログに下記が表示されます。
- AccessKey
- SceretAccessKey
- SessionToken
注意事項
一時クレデンシャルを使ったリクエストの注意
STSの実行権限付与
Lambdaを実行しているロールにSTSの権限を付与する必要があるので、該当ロールの
"信頼関係" > "信頼関係の編集"
で表示されるポリシーの中身に注意すること
{
  "Version": "2012-10-17",
  "Statement": [
    {
      "Effect": "Allow",
      "Principal": {
        "Service": "lambda.amazonaws.com",
        "Federated": "cognito-identity.amazonaws.com" // ここ大事
      },
      "Action": [
        "sts:AssumeRole",
        "sts:AssumeRoleWithWebIdentity" // ここ大事
      ]
    }
  ]
}
参考
-
AWS公式のID プール (フェデレーティッドアイデンティティ) の認証フロー の
開発者が認証した ID の認証フローの基本的な認証フロー