目的
- 表示の高速化
- リクエストを減らし通信コストを減らす(1につながる)
背景
Gulp → Webpackに移行したあと、ビルドの時間は減り、ファイルの重さも60MB→3MBに減らせましたが表示速度に大きな効果はありませんでした![]()
つまりユーザー体験にはいい影響をもたらすことができませんでしたorz
次なるうち手として、最も効果があったのはブラウザにキャッシュをとっておくことでしたのでその方法を共有します![]()
使用しているツール
- AngularJS (Ver 1.7.2)
- webopack (Ver 4.12.1)
- workbox-webpack-plugin (Ver 3.6.3)
workboxを使用するメリット
- キャッシュ戦略はconfig書くだけでOK
- 既存のコードに付け加えることがほぼない(serviceworkerファイルのregisterとBroadCastを受け取る部分ぐらい)
- 目に見えて速さが体感できる
- ちゃんとキャッシュで返せているかlogを出してくれる
workboxを使用するデメリット
- webpack-dev-serverのHotModuleReplacementが効かなくなる時がある(古いキャッシュが表示される)
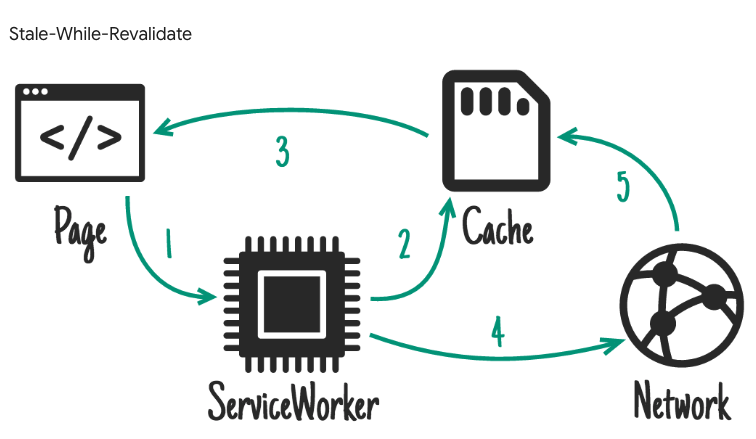
Stale-While-Revalidateとは
キャッシュをとっておく一方で、返すデータの鮮度も気にかけておく必要のあるデータにぴったりです![]()
https://developers.google.com/web/tools/workbox/modules/workbox-strategies
ざっくりいうと、キャッシュがあれば利用し、一方でserviceworkerが裏でfetchをしてデータを検証し更新します![]()
データの差分をheaderやcontent-lengthなど任意で選ぶこともできるようです![]()
ただ、書き換えたあと、一度古いデータでpageは反映されているので、pageを更新しないといけません。
AngularJSの場合、ui-viewを使用していれば、$state.reload()で再度、serviceworkerが更新したデータを反映する事ができました![]()
要は、状態を更新すればよいと思うのですが、既存のデータの取得方法がばらばらだったりする場合、再度データを取り直すcontrollerのメソッドを特定するのが難しい場合もあるので$state.reload()が簡単だと思います![]()
キャッシュを使う流れ
- ユーザーがページに訪れる
- キャッシュ対象のURLであれば、serviceworkerがキャッシュデータを渡す
- 画面が反映される
- cacheのhandlerが「staleWhileRevalidate」であればserviceworkerがデータをbackgroundでfetchする
- 2で渡したデータと5のデータで相違があれば、serviceworkerがcachestorageを更新する
- 5が終了したタイミングでserviceworkerからworkboxで設定したchannel名が発火する
- 発火したBroadcastChannelから、発火したことを受け取る
- 画面を更新($state.reset)をして画面が更新される
webpackの設定
公式ドキュメントどおり
で大丈夫でした![]()
// Inside of webpack.config.js:
const {GenerateSW} = require('workbox-webpack-plugin');

module.exports = {
  // Other webpack config...
  plugins: [
    // Other plugins...
    new GenerateSW({
      option: 'value',
    })
  ]
};
ただし、結構コンフィグが膨らんでいくので自分はファイルを別にして、下記のように分離しました![]()
// Inside of webpack.config.js:
const {GenerateSW} = require('workbox-webpack-plugin');
const workboxConfig = require('./workbox-config.ts');

module.exports = {
  // Other webpack config...
  plugins: [
    // Other plugins...
    new GenerateSW(workboxConfig)
  ]
};
module.exports = {
  // Write config here
};
sw.ts(or js)ファイルの作成
実はworkboxだけではserviceworkerを生成できず(できればいいのに)
生成するためのファイルを別で書く必要があります。そのファイル名はなんでもいいのですが
自分はsw.tsファイルを作成しました。
webpackのビルドに巻き込まれればどこでも良いと思います![]()
const NODE_ENV = process.env.NODE_ENV // devかprodか判断
const hour = 1000 * 60 * 60 // ms

if ('serviceWorker' in navigator) {

  const sw = navigator.serviceWorker;

  sw.register('/service-worker.js').then(registration => { // service-worker.jsの設定のserviceworkerを生成
    // 1時間にserviceworker自体を強制的に更新させる
    setInterval(() => {
      registration.update();
    }, 1 * hour);

        // dev環境の時のみlogを表示
    if (NODE_ENV === 'development') {
      sw.ready.catch(console.error.bind(console));
    }
  });

}
公式ドキュメントにも載っております![]()
runtimecacheを使用する
runtimecacheとはURLをフルパスか正規表現でひっかっけてキャッシュをとる方法です。
そして、クロスドメインでのリクエストの場合はcacheableResponseを設定しないと、キャッシュを使ってくれません![]()
- 例
const day = 60 * 60 * 24; // 60seconds * 60minutes * 24hours

module.exports = {
  skipWaiting: true,
  clientsClaim: true,
  runtimeCaching: [
    {
      urlPattern: /.*api\/hoges$/, // http://localhost:8080/hoges
      handler: 'staleWhileRevalidate',
      options: {
        cacheName: 'hoge-list',
        broadcastUpdate: {
          channelName: "hoge-list"
        },
        expiration: {
          maxAgeSeconds: 1 * day
        }
      }
    },
    {
      urlPattern: /^https:\/\/fonts\.gstatic\.com.*\.(png|jpg|jpeg|gif|woff2).*/, // http://www.google-analytics.com/analytics.js
      handler: 'cacheFirst',
      options: {
        cacheName: 'analytics-file',
        cacheableResponse: { //クロスドメインはこれを指定しないとキャッシュを使用してくれない
          statuses: [0, 200, 307] // 307 => redirect status
        },
        expiration: { // 有効期限
          maxAgeSeconds: 4 * 30 * day
        }
      }
    },
  ]
};
CRUDが発生するような新鮮重視→staleWhileRevalidateかnetworkFirstで![]()
fontや画像など、変化することがなさそうなデータ→expirationが長めのcacheFirst
というかんじで最初は極端に分けてみました![]()
ServiceWorkerでデータ更新をうけとる設定
下記のように、ServiceWorkerがデータを更新完了すると更新を受け取ることができます![]()
それにはbroadcastUpdateでchannelNameを設定します![]()
module.exports = {
  // Other workbox config
  runtimeCaching: [
    {
      urlPattern: /.*api\/hoges$/, // http://localhost:8080/api/hoges
      handler: 'staleWhileRevalidate',
      options: {
        cacheName: 'hoge-list',
        broadcastUpdate: { // 設定していれば、更新を受け取れる
          channelName: "hoge-list"
        },
        expiration: {
          maxAgeSeconds: 1 * day
        }
      }
    }
  ]
};
見方としては、handerがstaleWhileRevalidateで設定しているので
まずはserviceworkerがキャッシュをもっていれば、キャッシュを渡すと同時に、裏ではfetchを走らせます。
※ DevToolのネットワークタブでserviceworkerがキャッシュを返しつつ同時にfetchも走らせている様子↓

fetchで得られたデータはブラウザのCache Storageに保存されます![]()
その書き換え後、BroadcastChannelに更新がうけとれる・・・
という流れになっています![]()
ちなみにBroadcastUpdateの公式ドキュメントはこちらです![]()
下記のようなeventデータが取得できるようになります
{
  type: 'CACHE_UPDATED',
  meta: 'workbox-broadcast-cache-update',
  payload: {
    cacheName: 'the-cache-name',
    updatedUrl: 'https://example.com/'
  }
}
ServiceWokerデータ更新後のデータを反映
やることは3つあります
- BroadcastChannelを受け取るserviceを作成
- runファイルに1で作成したserviceを召喚
- テストを書く
staleWhileRevalidateで、データの古さがトレードオフにならないように、broadcastUpdateの設定は不可欠という考えのもと、テストも追加しておきました。
テストはなくてもいいですが、ユーザー体験に直結するところなので、自分は書くようにしました![]()
BroadcastChannelを受け取るserviceを作成
const workboxConfig = require('./workbox-config');
import { StateService } from '@uirouter/core';

export class UpdateChannelService {

  /** @ngInject */
  constructor(private $state: StateService) {}

  getAllChannel(): string[] {
    const channelNames: string[] = [];
    const broadcastObject = workboxConfig.runtimeCaching.filter(obj => obj.options.broadcastUpdate);
    broadcastObject.map(obj => { channelNames.push(obj.options.broadcastUpdate.channelName) });
    return channelNames;
  }

  listen(): void {
    const allchannels: string[] = this.getAllChannel();
    allchannels.map(channelName => {
      const updatechannel = new BroadcastChannel(channelName);
      updatechannel.addEventListener('message', async (event) => {
        this.$state.reload();
      });
    });
  }
}
getAllChannelでworkboxに設定されているchannelNamesを取得
listenでBroadcastからデータ更新の連絡を待ち
更新があれば、this.$state.reload();で更新させています
ui-viewが全部更新されるので画面が一瞬ちらつくのですが、更新箇所のみ更新できればもっといいのですが・・・![]()
runファイルに記述
これをrunファイルに設定記述すれば、毎回ページに訪れるたびに待機できます
/** @ngInject */
export function runBlock(UpdateChannelService) {
  // Other logic

  UpdateChannelService.listen();
}
テストを書く
使用しているテストに合わせてかければいいと思います![]()
jestを使用しているので、それのテスト方法です。
今回は個数が等しくなれば、設定漏れがないだろうとテストを書きました![]()
const workboxConfig = require('./workbox-config.ts');

describe('workbox-configのテスト',() => {

  describe('staleWhileRevalidateが設定されている箇所に、broadcastUpdateが設定されている', () => {
    test('staleWhileRevalidateの設定個数 と channelNameの設定個数が 等しい', () => {
      const channelNames = [];
      workboxConfig.runtimeCaching.map(obj => {
        if (obj.handler === 'staleWhileRevalidate') {
          channelNames.push(obj.options.broadcastUpdate.channelName);
        }
      });
      const result = workboxConfig.runtimeCaching.filter(obj=> obj.handler === 'staleWhileRevalidate')
      expect(result.length).toBe(channelNames.length);
    })
  });
});
もっとわかりやすい記事を書けるようにがんばります![]()