目次
はじめに
前回、MacでCML2(Cisco Modeling Labs)を動かすまででCMLの実行環境を構築しました。
今回はこのCML上でCSR1000Vを起動させて外部ネットワークと接続し、RESTCONFでアクセスするために必要な設定とアクセス方法をご紹介します。
構成
CML2環境を外部ネットワークと接続する方法は、
- NAT方式:CML内ノードのIPアドレスをCMLホストのIPアドレスにNATして外部ネットワークと通信
- BRIDGE方式:CML内ノードをL2接続でローカルネットワークに接続し外部ネットワークと通信
が代表的なようですが、今回はBRIDGE方式を採用しました。
参考:CMLを始めよう!(11.外部ネットワーク接続)
今回は最低限の設定しか行わないので、以下のような構成にしました。
今回の検証環境のセグメントは192.168.3.0/24を利用しており、アサインするIPアドレスは、
- CSR1000V GigabitEthernet1 : 192.168.3.40
- デフォルトゲートウェイ : 192.168.3.1
とします。
CSR1000Vの設定
CSR1000Vが起動したら以下の設定を投入します。
hostname testRT
username admin privilege 15 secret cisco
!
aaa new-model
!
aaa authentication login default local
aaa authorization exec default local
!
restconf
!
interface GigabitEthernet1
 ip address 192.168.3.40 255.255.255.0
 no shutdown
!
ip route 0.0.0.0 0.0.0.0 192.168.3.1
!
ip http secure-server
最後のip http secure-serverでのWebUI有効化が、今回restconfでアクセスする際に必要になります。
※脆弱性が発見された場合のセキュリティホールにもなり得るので、むやみに有効化しないようにしましょう。
設定変更後 show コマンド確認
show ip interface brief
testRT#show ip interface brief
Interface              IP-Address      OK? Method Status                Protocol
GigabitEthernet1       192.168.3.40    YES manual up                    up
GigabitEthernet2       unassigned      YES unset  administratively down down
GigabitEthernet3       unassigned      YES unset  administratively down down
GigabitEthernet4       unassigned      YES unset  administratively down down
show ip route
Gateway of last resort is 192.168.3.1 to network 0.0.0.0

S*    0.0.0.0/0 [1/0] via 192.168.3.1
      192.168.3.0/24 is variably subnetted, 3 subnets, 2 masks
C        192.168.3.0/24 is directly connected, GigabitEthernet1
S        192.168.3.1/32 [254/0] via 192.168.3.1, GigabitEthernet1
L        192.168.3.40/32 is directly connected, GigabitEthernet1
show ip http server status
HTTP server status: Disabled
HTTP server port: 80
HTTP server active supplementary listener ports: 21111
HTTP server authentication method: enable
HTTP server auth-retry 0 time-window 0
HTTP server digest algorithm: md5
HTTP server access class: 0
HTTP server IPv4 access class: None
HTTP server IPv6 access class: None
HTTP server base path:
HTTP File Upload status: Disabled
HTTP server upload path:
HTTP server help root:
Maximum number of concurrent server connections allowed: 300
Maximum number of secondary server connections allowed: 50
Server idle time-out: 180 seconds
Server life time-out: 180 seconds
Server session idle time-out: 600 seconds
Maximum number of requests allowed on a connection: 25
Server linger time : 60 seconds
HTTP server active session modules: ALL
HTTP secure server capability: Present
HTTP secure server status: Enabled
HTTP secure server port: 443
HTTP secure server ciphersuite:  rsa-aes-cbc-sha2 rsa-aes-gcm-sha2
        dhe-aes-cbc-sha2 dhe-aes-gcm-sha2 ecdhe-rsa-aes-cbc-sha2
        ecdhe-rsa-aes-gcm-sha2 ecdhe-ecdsa-aes-gcm-sha2
HTTP secure server TLS version:  TLSv1.2 TLSv1.1
HTTP secure server client authentication: Disabled
HTTP secure server PIV authentication: Disabled
HTTP secure server PIV authorization only: Disabled
HTTP secure server trustpoint: TP-self-signed-2276197724
HTTP secure server peer validation trustpoint:
HTTP secure server ECDHE curve: secp256r1
HTTP secure server active session modules: ALL
curlでCSR1000Vの情報を取得を行う
CSR1000Vの設定変更が完了したらrestconf経由でCSR1000Vにアクセスしてみます。
まずhttps://192.168.3.40/.well-known/host-metaにアクセスし、ホストに関するメタデータを取得してみます。
RESTCONF に対応している機器は、このURIにGETリクエストを送信することで、その機器のRESTCONFアクセス先が確認できます。
参考:RESTCONF の URI 確認と設定の作り方
curl -k -u admin:cisco -H 'Accept: application/yang-data+json' 'https://192.168.3.40/.well-known/host-meta'
設定変更後すぐにこちらを実行したところ、エラーページの応答はあったのですが期待していた出力ではありませんでした。
$ curl -k -u admin:cisco -H 'Accept: application/yang-data+json' 'https://192.168.3.40/.well-known/host-meta'

<!--
 *------------------------------------------------------------------
 * Copyright (c) 2020 by Cisco Systems, Inc.
 * All rights reserved.
 *------------------------------------------------------------------
 *-->

<!DOCTYPE html>
<html>
<head>
<title>Error</title>
<style>
    body {
        width: 35em;
        margin: 0 auto;
        font-family: Tahoma, Verdana, Arial, sans-serif;
    }
</style>
</head>
<body>
<h1>An error occurred.</h1>
<p>Sorry, the page you are looking for is currently unavailable.<br/>
Please try again later.</p>
<p>If you are the system administrator of this resource then you should check
the <a href="http://nginx.org/r/error_log">error log</a> for details.</p>
<p><em>Faithfully yours, OpenResty.</em></p>
</body>
</html>
しかし時間をあけて約40分後に改めて実行してみたところ、無事にアクセスすることができました。(結構時間かかりました)
$ curl -k -u admin:cisco -H 'Accept: application/yang-data+json' 'https://192.168.3.40/.well-known/host-meta'
<XRD xmlns='http://docs.oasis-open.org/ns/xri/xrd-1.0'>
    <Link rel='restconf' href='/restconf'/>
</XRD>
続いてインターフェイス情報を取得してみます。
$ curl -k -s -u admin:cisco -H 'Accept: application/yang-data+json' 'https://192.168.3.40/restconf/data/ietf-interfaces:interfaces'
{
  "ietf-interfaces:interfaces": {
    "interface": [
      {
        "name": "GigabitEthernet1",
        "type": "iana-if-type:ethernetCsmacd",
        "enabled": true,
        "ietf-ip:ipv4": {
          "address": [
            {
              "ip": "192.168.3.40",
              "netmask": "255.255.255.0"
            }
          ]
        },
        "ietf-ip:ipv6": {
        }
      },
      {
        "name": "GigabitEthernet2",
        "type": "iana-if-type:ethernetCsmacd",
        "enabled": false,
        "ietf-ip:ipv4": {
        },
        "ietf-ip:ipv6": {
        }
      },
      {
        "name": "GigabitEthernet3",
        "type": "iana-if-type:ethernetCsmacd",
        "enabled": false,
        "ietf-ip:ipv4": {
        },
        "ietf-ip:ipv6": {
        }
      },
      {
        "name": "GigabitEthernet4",
        "type": "iana-if-type:ethernetCsmacd",
        "enabled": false,
        "ietf-ip:ipv4": {
        },
        "ietf-ip:ipv6": {
        }
      }
    ]
  }
}
無事にデータを取得できているようです。
今回はGETメソッドのみの確認でしたが、POST/PUT/PATCHメソッドによる設定変更も可能なようです。
PostmanでCSR1000Vにアクセスする
PostmanはWebAPI開発用のツールです。
Postmanを使うと簡単にAPIリクエストを送信し、レスポンスが取得できます。
Postmanはこちらからダウンロードすることができます。
Postman API Platform
先ほどのインターフェイスの情報取得を今度はPostmanを使って実行してみます。
Postman設定
Params
設定なし
Authorization
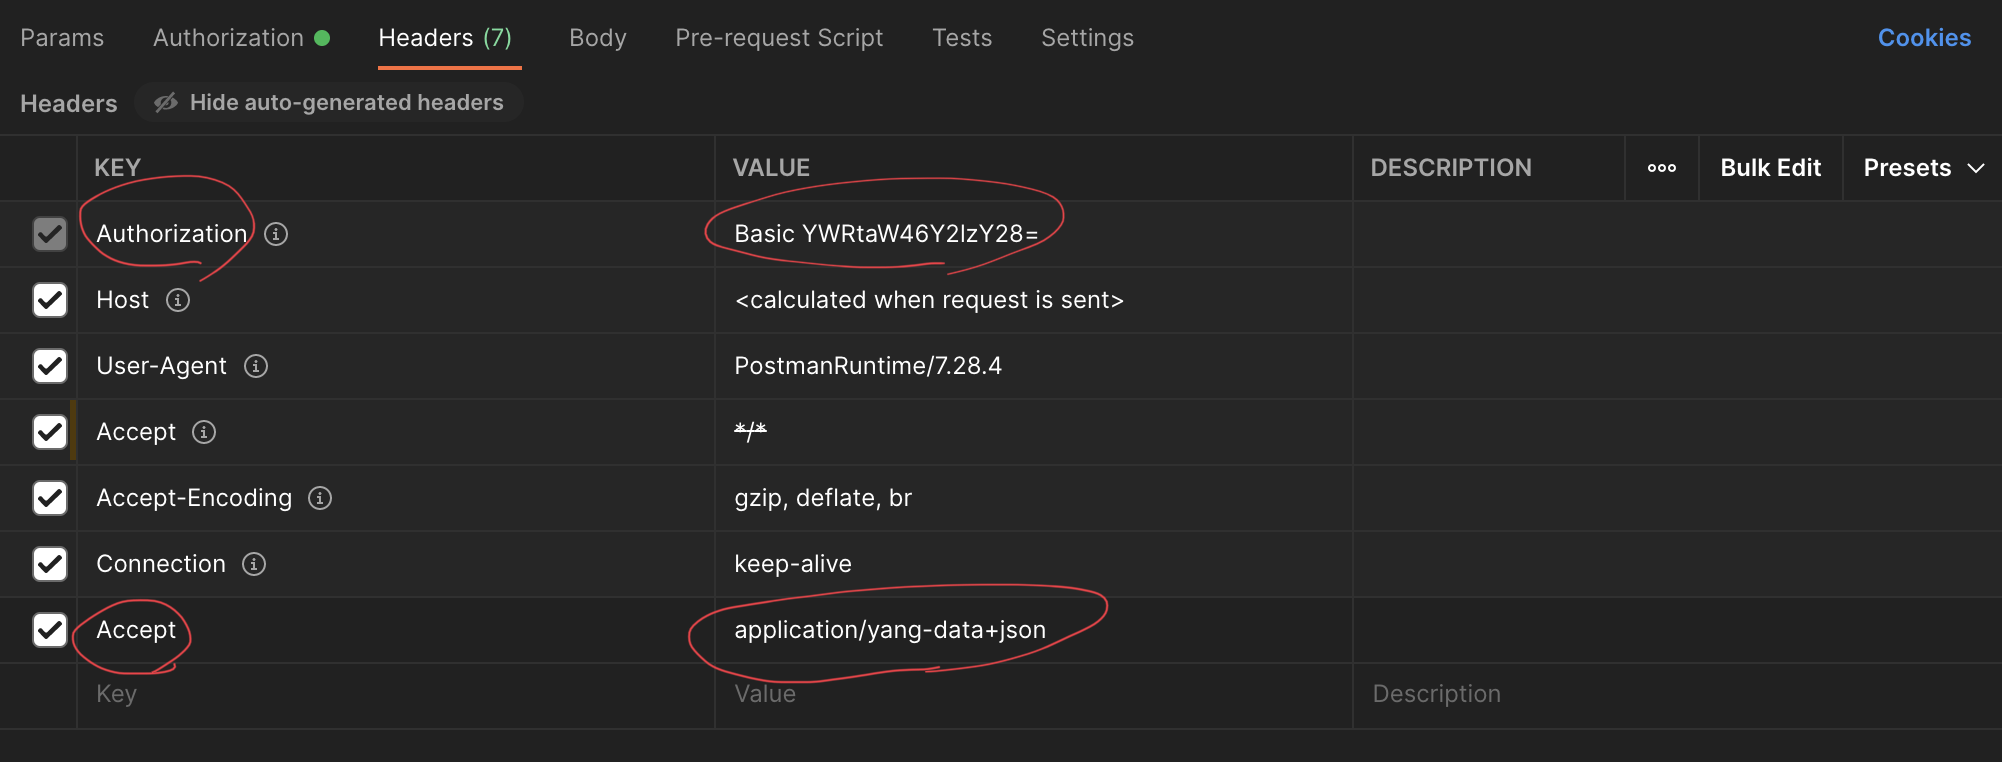
Basic Auth を選択し、 アクセス先機器で作成した Username/Password を入力。
Headers
Authorization はBasic Authの設定が完了していれば自動入力されます。
Accept: application/yang-data+json の設定を追加します。
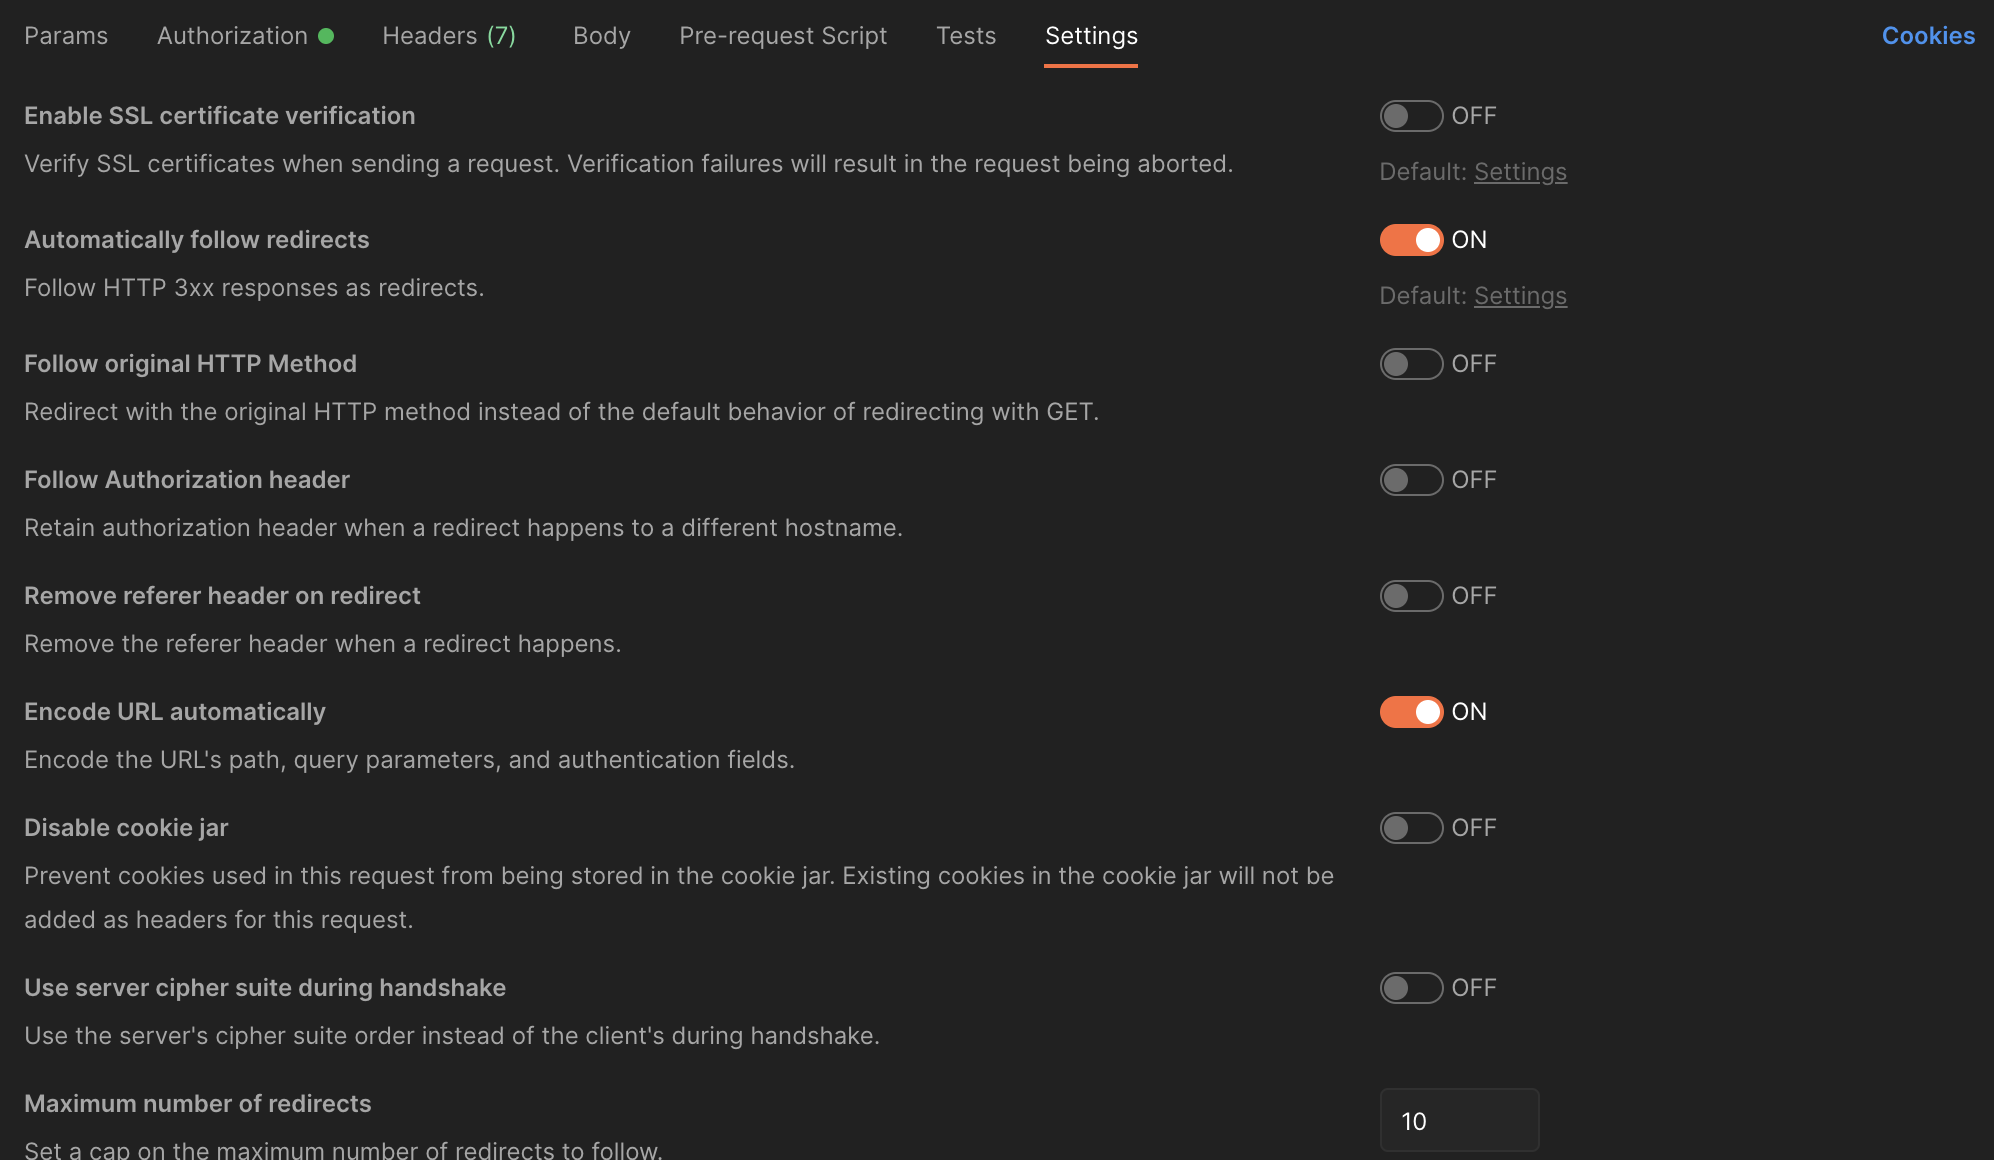
Settings
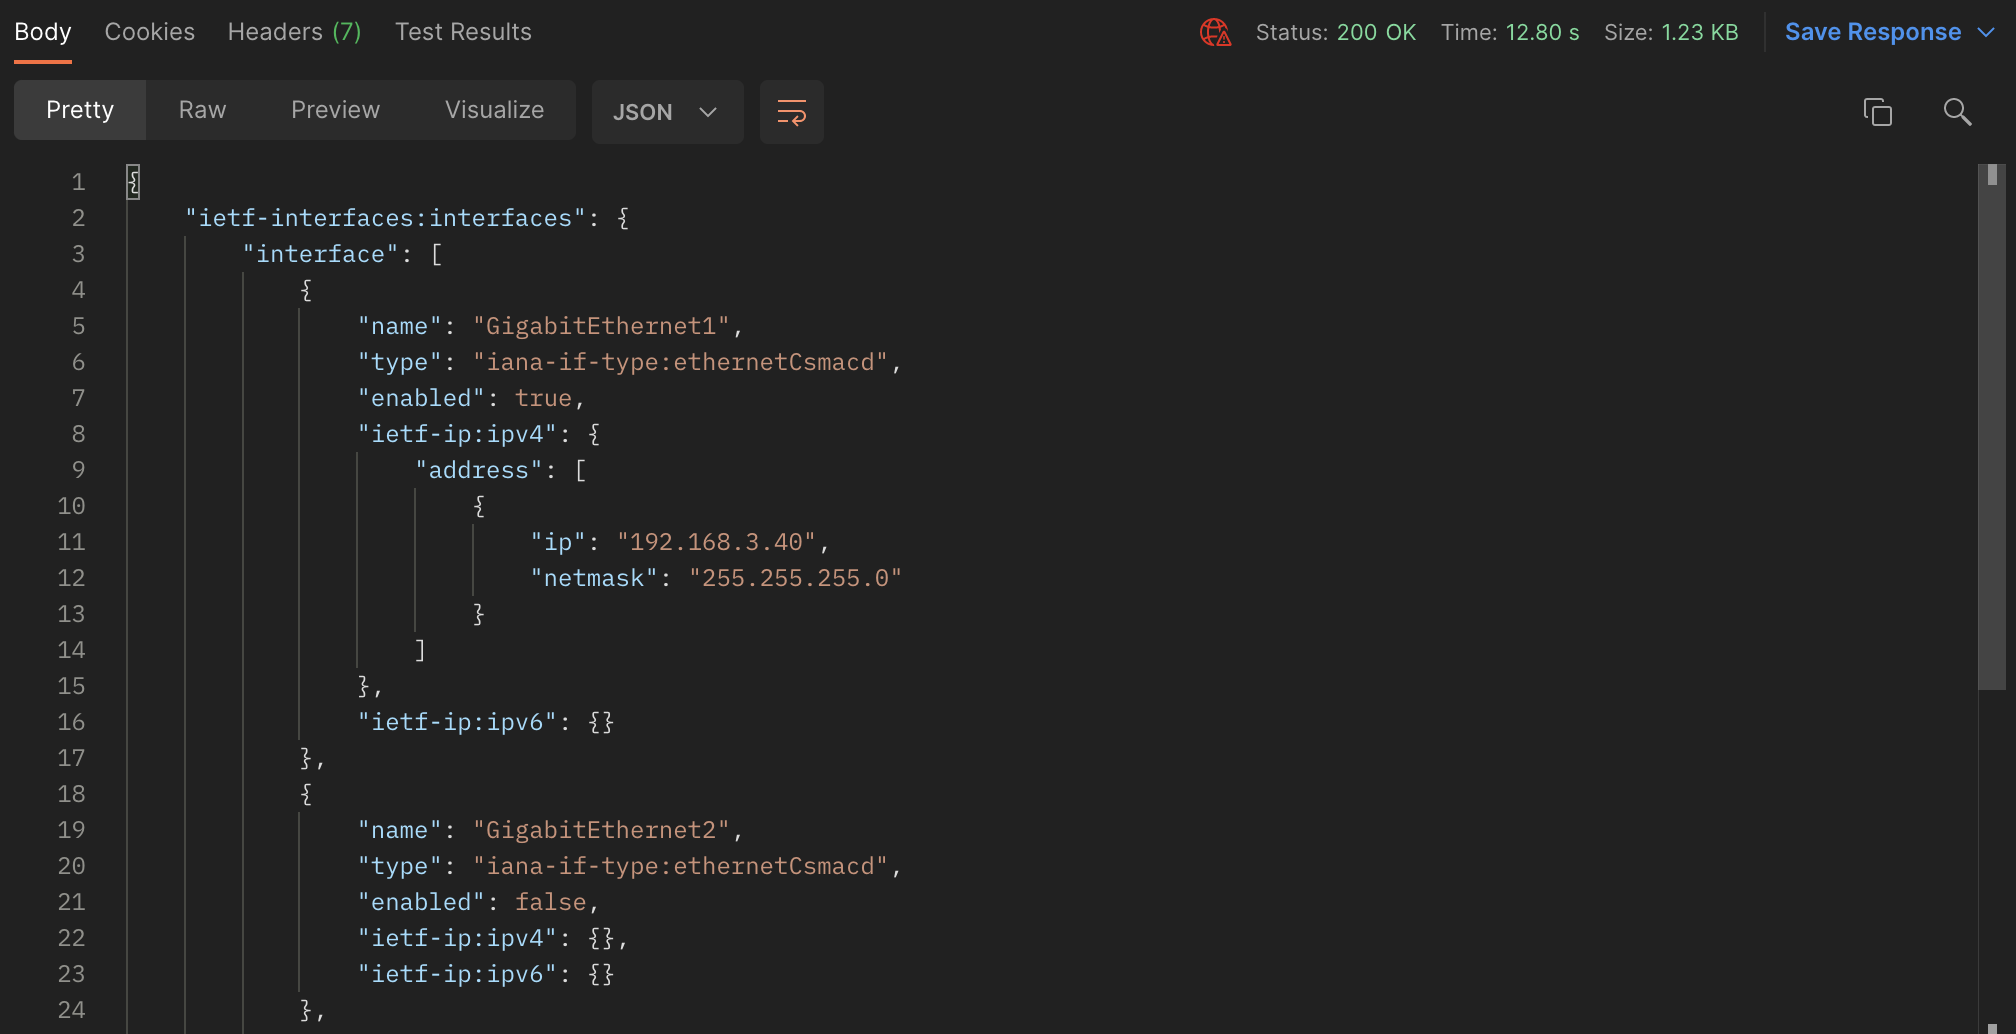
実行結果
Send を実行して上手くいくと以下のように結果が出力されます。
curlリクエストからPostmanリクエストに変換
ちなみにcurlリクエストからPostmanリクエストに変換することも可能です。
curlでは正常に動作したのに、Postmanからだと上手くいかない場合(Postman側の設定に自信がない場合)は試してみると良いかもしれません。


