Yolov3を使った物体検出
ディープラーニングによる物体検出の手法の一つとしてYOLO(You Only Look Once)という手法があります。
Darknetというフレームワーク上で実装されており、インストール、使い方が簡単でおすすめです。
YOLOを使った物体検出の例はこちら。

YOLOv3 - YouTube
https://youtu.be/MPU2HistivI
YOLOのネットワーク
YOLOは合計53層の畳み込み層で構成されています。
最近になってv3が公開されて、v2と比べて検出速度は遅くなったものの検出位置、物体の種類ともに精度が大幅に向上しています。
自分のパソコンの1060では15fps程度出ています。
対象とする人
猫が見たい。
動画から、ほしい物体だけを切り出してみたい。
ROSをインストールしている。
環境
OS:Ubuntu 16.04
GPU:GTX1060
ROS:kinetic
必要なパッケージのインストール
sudo apt install ros-kinetic-opencv3 ros-kinetic-cvbridge ros-kinetic-darknet-ros-msgs ros-kinetic-video-stream-opencv
ROSのdarknetをインストール
cd ~/catkin_ws/src #適宜自分のワークスペースに変更
git clone --recursive https://github.com/leggedrobotics/darknet_ros.git #--recursive重要です。忘れるとmake時に怒られます。
cd ..
catkin_make
次は画像を切り取るプログラムをダウンロード
git clone https://github.com/inuex3/cat_getter.git ~/catkin_ws/src
cd ~/catkin_ws/src/cat_getter/script/
chmod +x cat_getter.py #権限付与
このパッケージの中にはcat_getter.pyというプログラムが入っています。
# !/usr/bin/env python
# -*- coding: utf-8 -*-

import rospy
from sensor_msgs.msg import Image,CameraInfo
from cv_bridge import CvBridge, CvBridgeError
import numpy as np
from darknet_ros_msgs.msg import BoundingBoxes,BoundingBox
import cv2

class Publishsers():
    def __init__(self):
        # Publisherを作成
        self.publisher = rospy.Publisher('/neko', Image, queue_size = 1)
        # messageの型を作成
        self.image = Image()
        self.image_cropped = Image()

    def make_msg(self, Image, detection_data):
	#opencvに変換
	bridge = CvBridge()
   	try:
   	     self.image = bridge.imgmsg_to_cv2(Image, desired_encoding='bgr8')
             self.rows, self.cols = self.image.shape[:2]
             self.image_cropped = np.zeros((self.rows,self.cols, 3), np.uint8)
        except:
              pass
        for i in detection_data.bounding_boxes:
                if i.Class == "cat":
                           try:
                                   self.detected_area = self.image[i.ymin:i.ymax, i.xmin:i.xmax]
                                   self.image_cropped[i.ymin:i.ymax, i.xmin:i.xmax] = self.detected_area
                           except:
                                   pass
	self.image_cropped = bridge.cv2_to_imgmsg(self.image_cropped, encoding='bgr8')
	#Time stamp付与
	self.image_cropped.header.stamp = rospy.Time.now()

    def send_msg(self):
        # messageを送信
        self.publisher.publish(self.image_cropped)

class Subscribe_publishers():
    def __init__(self, pub):
        self.cat_subscriber = rospy.Subscriber('/camera/image_raw', Image, self.cat_callback, queue_size = 1)
        self.detection_subscriber =rospy.Subscriber("/darknet_ros/bounding_boxes", BoundingBoxes, self.bounding_boxes_callback)
	self.pub = pub
        self.cat_image = Image()

    def cat_callback(self, Image):
        #cat imageを保存
        self.cat_image = Image

    def bounding_boxes_callback(self, detection_data):
        self.pub.make_msg(self.cat_image,detection_data)
        self.pub.send_msg()

def main():
    rospy.init_node('cat_getter')

    pub = Publishsers()
    sub = Subscribe_publishers(pub)

    rospy.spin()

if __name__ == '__main__':
    main()
このプログラムにより画像の中から猫を切り出します。
まず必要なモジュールをimportします。
import rospy
from sensor_msgs.msg import Image,CameraInfo
from cv_bridge import CvBridge, CvBridgeError#ROSのメッセージ⇔opencvの変換
import numpy as np
from darknet_ros_msgs.msg import BoundingBoxes,BoundingBox
import cv2
Publisherを定義します。
class Publishsers():
    def __init__(self):
        # Publisherを作成
        self.publisher = rospy.Publisher('/neko', Image, queue_size = 1)
        # messageの型を作成
        self.image = Image()
        self.image_cropped = Image()
コンストラクタ関数の中で、画像を受け取るメッセージの型を作ります。
image:受け取ったRGB画像
image_cropped:切り出した画像
def make_msg(self, Image, detection_data):
    #opencvに変換
	bridge = CvBridge()
   	try:
   	     self.image = bridge.imgmsg_to_cv2(Image, desired_encoding='bgr8')
             self.rows, self.cols = self.image.shape[:2]
             self.image_cropped = np.zeros((self.rows,self.cols, 3), np.uint8)#空画像生成
        except:
              pass
        for i in detection_data.bounding_boxes:#検出データをチェックする。
                if i.Class == "cat":
                           try:
                                   self.detected_area = self.image[i.ymin:i.ymax, i.xmin:i.xmax] #検出位置の切り出し
                                   self.image_cropped[i.ymin:i.ymax, i.xmin:i.xmax] = self.detected_area #image_croppedの上に検出位置を重ねる。
                           except:
                                   pass
	self.image_cropped = bridge.cv2_to_imgmsg(self.image_cropped, encoding='bgr8')
	#Time stamp付与
	self.image_cropped.header.stamp = rospy.Time.now()

    def send_msg(self):
        # messageを送信
        self.publisher.publish(self.image_cropped)
make_msg関数の中では検出データを使って画像を処理しています。
cvBridgeでopencvの画像に変換し、self.imageの中に格納します。
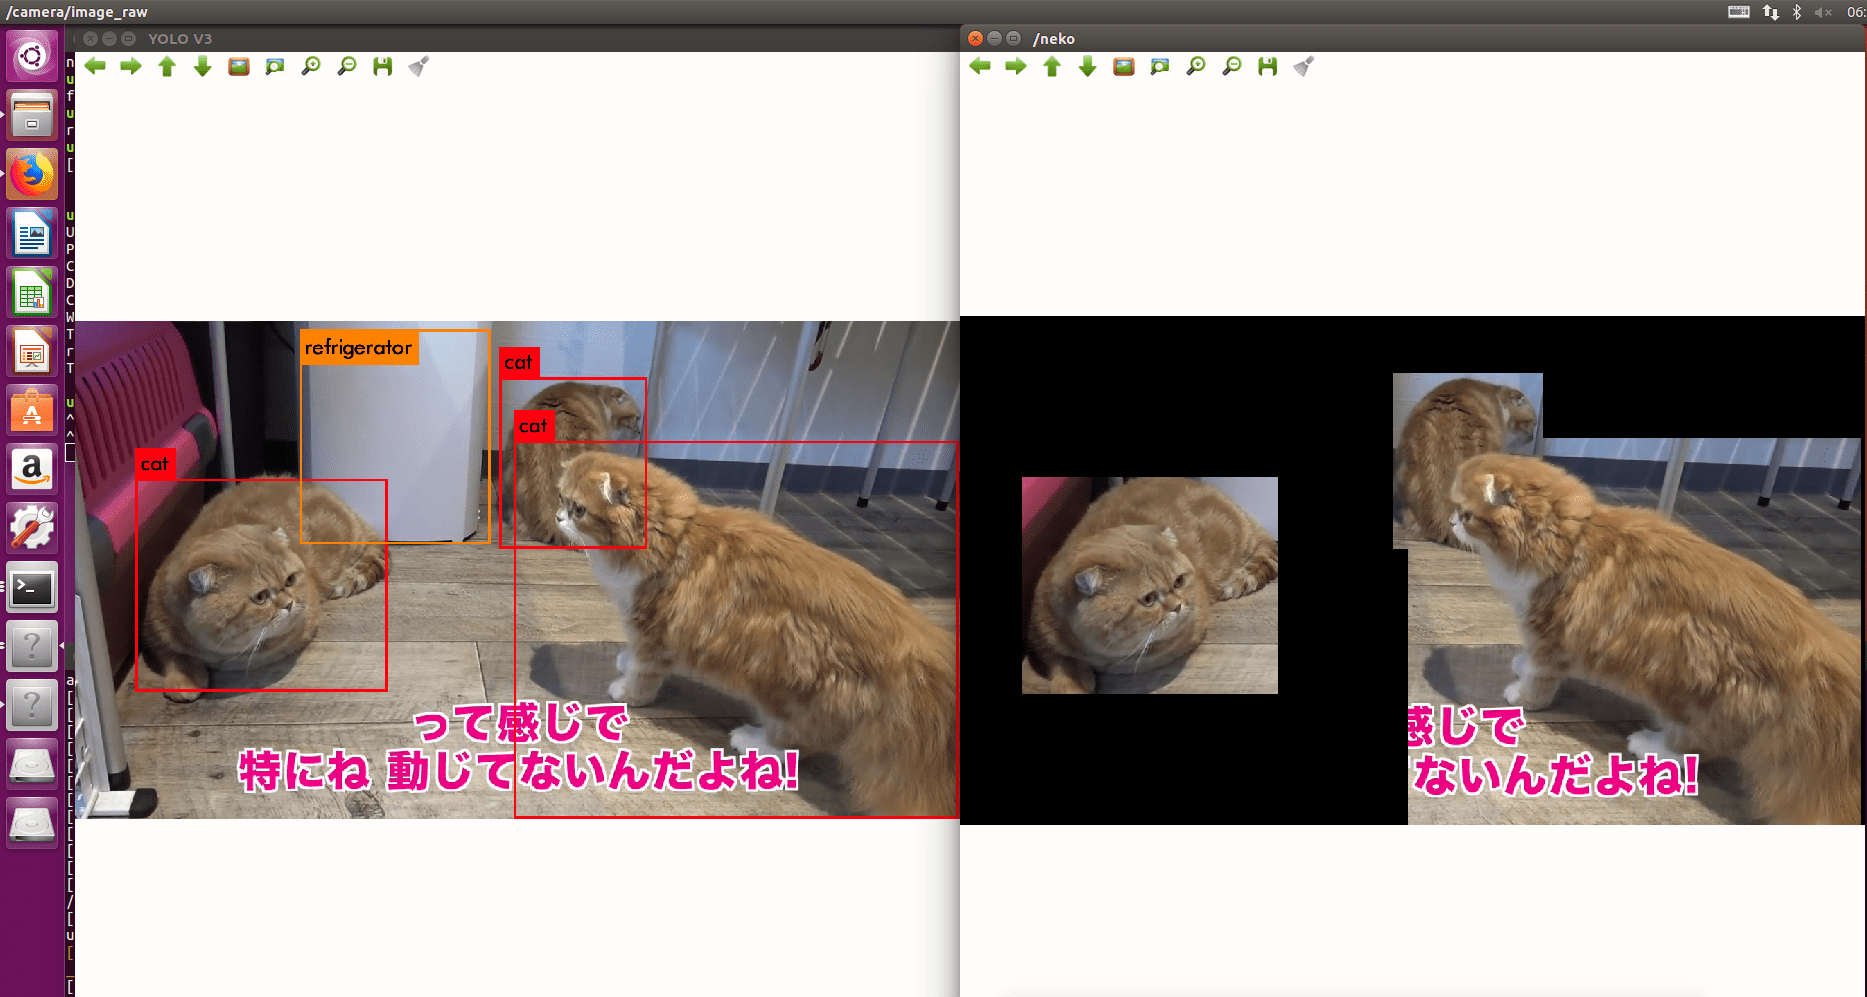
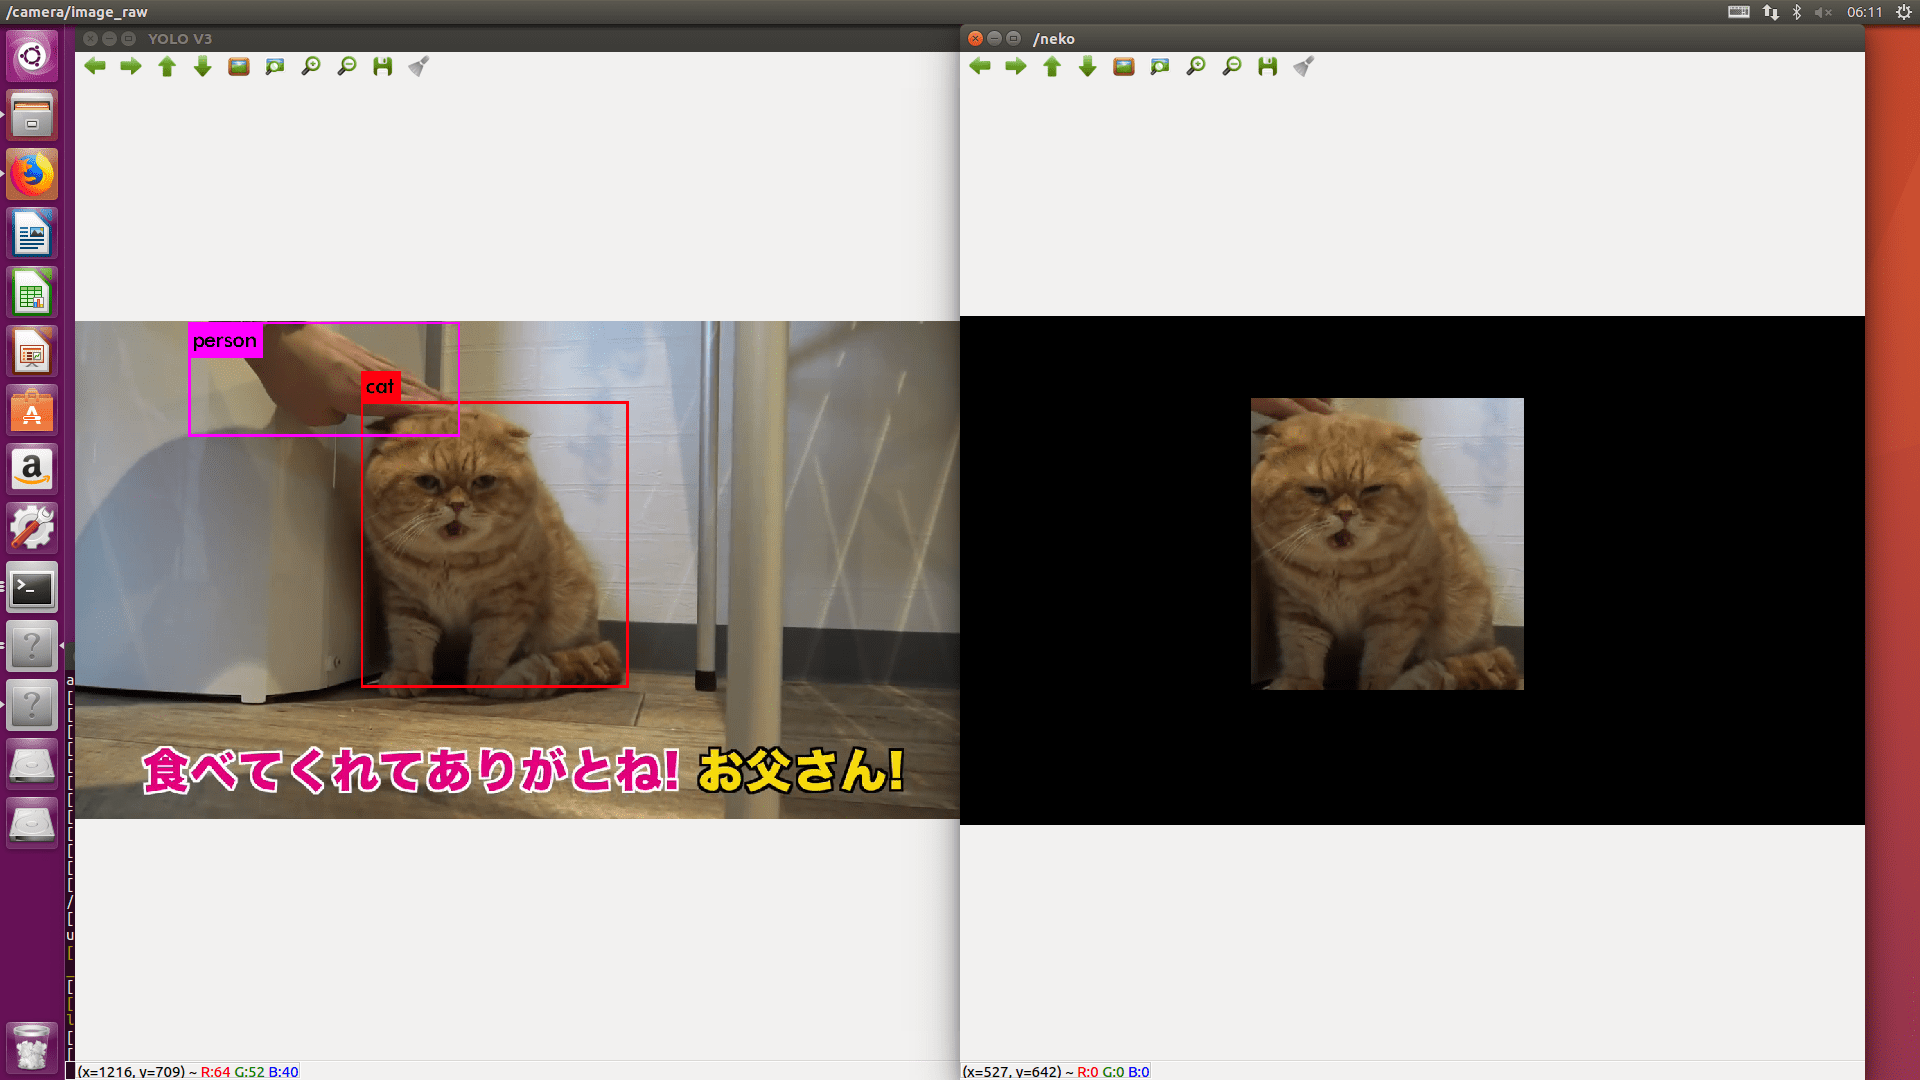
そしてself.image_croppedに黒色の画像を生成し、検出データの中から、Classがcatの検出位置を取り出し、黒色の画像に重ねていきます。
class Subscribe_publishers():
    def __init__(self, pub):
        self.cat_subscriber = rospy.Subscriber('/camera/image_raw', Image, self.cat_callback, queue_size = 1)
        self.detection_subscriber =rospy.Subscriber("/darknet_ros/bounding_boxes", BoundingBoxes, self.bounding_boxes_callback)
	self.pub = pub
        self.cat_image = Image()

    def cat_callback(self, Image):
        #cat imageを保存
        self.cat_image = Image

    def bounding_boxes_callback(self, detection_data):
        self.pub.make_msg(self.cat_image,detection_data)
        self.pub.send_msg()
cat_subscriberでrgb画像に画像を保存し、detection_subscriberが検出データをsubscribeしたとき画像の切り出しを行い、publishします。
実際に動かしてみます。
動画をmp4などの形式で保存してください。
そしてcat_getterのlaunchファイルの以下の行を書き換えます。
<arg name="video_stream_provider" value="yourmovie.mp4" />
valueの中を再生するmp4ファイルのパスに書き換えてください。
次にdarknet_rosのコンフィグを設定します。
cd ~/catkin_ws/src/
gedit darknet_ros/darket_ros/config/ros.yaml
camera_readingのところを
camera_reading:
    topic: /camera/rgb/image_raw
から
camera_reading:
    topic: /camera/image_raw
に変更してください。
そしてプログラム起動
ターミナル1
roslaunch darknet_ros yolo_v3.launch
ターミナル2
roslaunch cat_getter cat_getter.launch
ターミナル3
rosrun cat_getter cat_getter.py
image_viewを使って見てみましょう。
rosrun image_view image_view image:=/neko
この動画で実験させていただきました。

hikakinさんありがとうございます。
【感動】まるおともふこがパパ&ママと再会!ママ美人、パパが伝説級だったw【家族再会】
https://youtu.be/Yn57JWZN_vI
猫だけを楽しめる。
猫だけが切り出せました。
darknetはrosのパッケージが使いやすい形で公開されています。
このように遊んでみることもできるので、一度試してはいかがでしょう。
参考にしたサイト
YOLOv3 - YouTube
https://youtu.be/MPU2HistivI
GitHub - leggedrobotics/darknet_ros: YOLO ROS: Real-Time Object Detection for ROS
https://github.com/leggedrobotics/darknet_ros
ROS のプログラムテンプレート - Qiita
https://qiita.com/MENDY/items/e842e3c3ad7fe98c12a0
【感動】まるおともふこがパパ&ママと再会!ママ美人、パパが伝説級だったw【家族再会】 - YouTube
https://youtu.be/Yn57JWZN_vI

