本記事について
- Spring bootを使ってDB接続Webアプリを開発する
- 参考資料: 参考にしたのは以下のサイト
- source: https://github.com/koh1/springwebdbsample.git
Spring projectの作成
環境
- eclipse Photon Release (4.8)
- STS 3.9.7.RELEASE
- MySQL
Project
Eclipseにて、New -> Spring Starter Projectから以下の条件で作成する
- Spring Boot 2.1.1
- Java 8
- Dependencies
- JDBC, MySQL, Thymleaf, Web
DB準備
- Docker使ってMySQLを起動
- database作成
DB準備
$ docker run --name mysql -e MYSQL_ROOT_PASSWORD=mysql -d -p 3306:3306 mysql
$ mysql -u root -p
Enter password:
...
mysql> create database springwebdbsample default character set utf8;
Query OK, 1 row affected, 1 warning (0.05 sec)

mysql> create table springwebdbsample.footballers (id int auto_increment, name varchar(256), nationality varchar(128), index(id));
Query OK, 0 rows affected (0.17 sec)

mysql> show columns from footballers;
+-------------+--------------+------+-----+---------+----------------+
| Field       | Type         | Null | Key | Default | Extra          |
+-------------+--------------+------+-----+---------+----------------+
| id          | int(11)      | NO   | MUL | NULL    | auto_increment |
| name        | varchar(256) | YES  |     | NULL    |                |
| nationality | varchar(128) | YES  |     | NULL    |                |
+-------------+--------------+------+-----+---------+----------------+
3 rows in set (0.01 sec)

mysql> insert into footballers(name, nationality) values('andres iniesta', 'spain');
Query OK, 1 row affected (0.05 sec)
DB接続情報設定
resources配下のapplication.propertiesに以下の設定を施す。
application.properties
spring.jpa.hibernate.ddl-auto=create
spring.datasource.url=jdbc:mysql://localhost:3306/springwebdbsample
spring.datasource.username=root
spring.datasource.password=mysql
Thymleaf Template作成
DB selectの結果をTableに表示するためのTemplate index.htmlを resources/templates配下に作成する。
index.html
<html>
<head>
  <meta charset="utf-8" />
  <title>spring web+db sample</title>
</head>

<body>
<table>
<thead><th>#</th><th>name</th><th>nationality</th></thead>
<tbody th:each="footballer : ${footballers}">
  <tr>
    <td th:text="${footballer.get('id')}" />
    <td th:text="${footballer.get('name')}" />
    <td th:text="${footballer.get('nationality')}" />
  </tr>
</tbody>
</table>
</body>
</html>
Controller作成
Requestを処理するためのController IndexController.javaを作成する。
-
@Controllerannotationを付与したClassを作成 - APIたるMethodには
@RequestMappingannotationを付与 - DBアクセスにはJdbcTemplateを用い、JdbcTemplateは
@Autowiredにより、Injectする -
JdbcTemplate.queryForList(query)を用いてDB Queryを発行 -
Model modelにQuery結果をセット - template名
"index"を返す
IndexController.java
@Controller
public class IndexController {

  @Autowired
  JdbcTemplate jdbcTemplate;

  @RequestMapping("/")
  public String index(Model model) {
    List<Map<String, Object>> list;
    list = jdbcTemplate.queryForList("select * from footballers");
    model.addAttribute("footballers", list);

    return "index";
  }
}
実行
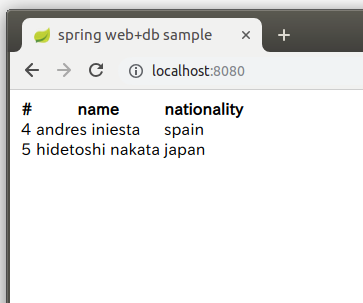
- Webアプリにアクセスし、DBから取得した結果を得る
