はじめに
Tauriで簡単なエディタを作ったので、セットアップから開発までの流れをまとめました。
成果物
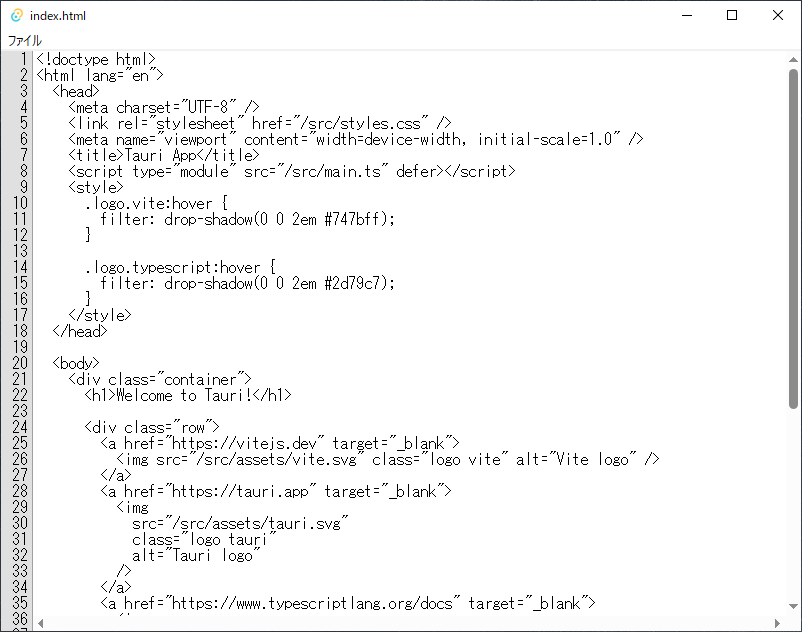
フロントエンドはTypescriptとHTMLで作りました。
また、開発にはVSCodeを使用しました。
セットアップ
まずはプロジェクトのひな形を作成します。
$ npm create tauri-app
✔ Project name · Tauri-Editor
✔ Package name · tauri-editor
✔ Choose which language to use for your frontend · TypeScript / JavaScript - (pnpm, yarn, npm, bun)
✔ Choose your package manager · npm
✔ Choose your UI template · Vanilla
✔ Choose your UI flavor · TypeScript

Template created! To get started run:
  cd Tauri-Editor
  npm install
  npm run tauri dev
指定のパッケージをインストールします。
$ cd Tauri-Editor
$ npm install

added 14 packages, and audited 15 packages in 10s

5 packages are looking for funding
  run `npm fund` for details

found 0 vulnerabilities
リンターとフォーマッターの導入
TypescriptのリンターにESLint、フォーマッターにPrettierを導入します。
Rust用にはrust-analyzerを使います。
必要なパッケージをインストールします。
$ npm install --save-dev eslint @typescript-eslint/eslint-plugin @typescript-eslint/parser eslint-config-prettier
ESLintの設定を追加します。
{
    "extends": [
        "eslint:recommended",
        "plugin:@typescript-eslint/recommended",
        "prettier"
    ],
    "env": {
        "browser": true,
        "node": true
    },
    "plugins": ["@typescript-eslint"],
    "parser": "@typescript-eslint/parser",
    "rules": {
        "semi": "error"
    }
}
npm run lintでESLintが実行されるようにします。
  "scripts": {
   ..
+   "lint": "eslint src/**/*.ts",
    "tauri": "tauri",
  }
VSCodeの以下の拡張機能をインストールします。
VSCodeの設定を追記します。
これでコード保存時にフォーマッターが整形してくれます。
{
    "editor.formatOnSave": true,
    "[typescript]": {
        "editor.defaultFormatter": "esbenp.prettier-vscode"
    },
    "[rust]": {
        "editor.defaultFormatter": "rust-lang.rust-analyzer"
    }
}
レイアウトの修正
ウィンドウ全体にテキストエリアが表示されるようにします。
body {
  margin: 0;
  padding: 0;
}

.container {
  display: flex;
  height: 100vh;
}

.editor {
  width: 100%;
  height: 100vh;
  padding-top: 0px;
  padding-bottom: 0px;
  padding-left: 4px;
  font-family: monospace;
  font-size: large;
  box-sizing: border-box;
  display: block;
  resize: none;
  border: none;
  outline: none;
  white-space: pre;
  overflow:scroll;
}
<!doctype html>
<html lang="en">
  <head>
    <meta charset="UTF-8" />
    <link rel="stylesheet" href="/src/styles.css" />
    <meta name="viewport" content="width=device-width, initial-scale=1.0" />
    <title>Tauri Editor</title>
    <script type="module" src="/src/main.ts" defer></script>
  </head>
  <body>
    <div class="container">
      <textarea id="editor" class="editor" spellcheck="false"></textarea>
    </div>
  </body>
</html>
ウィンドウテーマとタイトルを設定します。
  "tauri": {
    "windows": [
      {
+       "theme": "Light",
        "fullscreen": false,
        "resizable": true,
-       "title": "tauri-editor",
+       "title": "Tauri Editor",
        "width": 800,
        "height": 600
      }
    ]
  }
実行すると以下のウィンドウが表示されます。

メニューの追加
ウィンドウにメニューを追加します。
ファイル内に開く、保存、閉じるの3つの項目を追加します。
CustomMenuItem::new関数の第1引数がメニューID、第2引数が画面上に表示される文字列です。
メニューIDでクリック時にどの項目をクリックしたかを識別します。
use tauri::{CustomMenuItem, Menu, Submenu};

fn main() {
    let open_menu = CustomMenuItem::new("open", "開く");
    let save_menu = CustomMenuItem::new("save", "保存");
    let close_menu = CustomMenuItem::new("close", "閉じる");
    let file_menu = Submenu::new(
        "ファイル",
        Menu::new()
            .add_item(open_menu)
            .add_item(save_menu)
            .add_item(close_menu),
    );
    tauri::Builder::default()
        .menu(Menu::new().add_submenu(file_menu))
        .run(tauri::generate_context!())
        .expect("error while running tauri application");
}
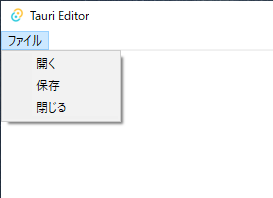
メニューが表示されるようになりました。
ですが、イベント処理を実装してないのでクリックしても何も起きません。
ファイルを読み込む
TauriのAPIを使用してファイルを読み込む処理を実装します。
tauri.conf.jsonに使用するAPIを追記します。
これを追記しないとAPI呼出し時にエラーが発生します。
  "tauri": {
    "allowlist": {
+     "window": {
+       "setTitle": true
+     },
+     "fs": {
+       "readFile": true,
+     },
+     "dialog": {
+       "open": true,
+     }
メニュー項目をクリックした際のイベント処理を実装します。
event.menu_item_id()でクリックしたメニュー項目のIDを取得します。
event.window().emitでフロント側にイベントを通知できます。
第1引数がイベント名、第2引数がパラメータです。
    tauri::Builder::default()
        .menu(Menu::new().add_submenu(file_menu))
+       .on_menu_event(|event| match event.menu_item_id() {
+           "open" => {
+               event.window().emit("open", {}).unwrap();
+           }
+           _ => {}
+       })
フロントエンド側の処理を追加します。
import { fs } from "@tauri-apps/api";

// ファイルパス
let filePath: string | null = null;
// 画面の要素
const editor = <HTMLTextAreaElement>document.querySelector("#editor")!;
editor.focus();
appWindow.setTitle("無題");
// ダイアログオプション
const dialogOption = {
  filters: [
    {
      extensions: ["txt"],
      name: "テキストファイル",
    },
    {
      extensions: ["*"],
      name: "全てのファイル",
    },
  ],
};
// イベントを設定
appWindow.listen("open", async () => {
  const result = await dialog.open(dialogOption);
  if (typeof result == "string") {
    filePath = result;
    editor.value = await fs.readTextFile(filePath);
    editor.selectionStart = editor.selectionEnd = 0;
    appWindow.setTitle(filePath.replace(/^.*\\/, ""));
  }
});
appWindow.listenでイベントを設定できます。
今回実装したopenイベントは以下の処理を行っています。
- 開くダイアログでファイルを選択する
- 選択したファイルをオープンしてテキストエリアに設定する
- 選択したファイル名をウィンドウタイトルに設定する
ファイルを保存する
次にファイルを保存する処理を実装します。
tauri.conf.jsonに使用するAPIを追記します。
  "tauri": {
    "allowlist": {
      "window": {
        "setTitle": true
      },
      "fs": {
        "readFile": true,
+       "writeFile": true
      },
      "dialog": {
        "open": true,
+       "save": true
      },
    tauri::Builder::default()
        .menu(Menu::new().add_submenu(file_menu))
        .on_menu_event(|event| match event.menu_item_id() {
            "open" => {
                event.window().emit("open", {}).unwrap();
            }
+           "save" => {
+               event.window().emit("save", {}).unwrap();
+           }
appWindow.listen("save", async () => {
  if (filePath == null) {
    // 名前を付けて保存
    const result = await dialog.save(dialogOption);
    if (typeof result == "string") {
      filePath = result;
      await fs.writeTextFile(filePath, editor.value);
      appWindow.setTitle(filePath.replace(/^.*\\/, ""));
    }
  } else {
    // 上書き保存
    await fs.writeTextFile(filePath, editor.value);
  }
});
名前を付けて保存の場合、保存ダイアログで保存先のパスを設定します。
そのパスにエディタの内容を書き込み、ウィンドウタイトルにファイル名を設定します。
上書き保存の場合は既存のパスにエディタの内容を書き込みます。
閉じる
close関数でウィンドウを閉じることができます。
        .on_menu_event(|event| match event.menu_item_id() {
            "open" => {
                event.window().emit("open", {}).unwrap();
            }
            "save" => {
                event.window().emit("save", {}).unwrap();
            }
+           "close" => {
+               event.window().close().unwrap();
+           }
行番号を表示
このままではシンプルすぎるので、もう少しエディタっぽい機能を追加します。
画面に行番号を表示させるようにします。
    <div class="container">
+     <div id="line_number" class="line_number"></div>
      <textarea id="editor" class="editor"></textarea>
    </div>
+.line_number {
+ line-height: 1;
+ border-right: 1px solid #a0a0a0;
+ background-color: #e0e0e0;
+ overflow: hidden;
+ padding-top: 0px;
+ padding-bottom: 0px;
+ padding-left: 4px;
+ padding-right: 4px;
+}
行番号が表示されるようにイベントを実装します。
const editor = <HTMLTextAreaElement>document.querySelector("#editor")!;
+const lineNumArea = <HTMLElement>document.querySelector("#line_number")!;
...
+editor.addEventListener("input", (e: Event) => {
+ const content = (e.target as HTMLInputElement).value;
+ lineNumArea.innerHTML = toHtml(content);
+});
+function toHtml(text: string): string {
+ const lines = text.split("\n");
+ return lines.map((_, idx) => `<div>${pad(idx + 1)}</div>`).join("");
+}
+function pad(num: number): string {
+ return String(num).padStart(3).replace(/ /g, " ");
+}
エディタに文字列が入力されたらイベントを発生させます。
現在の行数分だけ行番号を右寄せで表示させます。
htmlでは半角スペースでは空白にならないので、 という特殊な記号に置き換えています。
また、高さが合うようにエディタと同じフォントを設定します。
const editor = <HTMLTextAreaElement>document.querySelector("#editor")!;
const lineNumArea = <HTMLElement>document.querySelector("#line_number")!;
+// フォントを設定
+const style = getComputedStyle(editor);
+lineNumArea.style.fontFamily = style.fontFamily;
+lineNumArea.style.fontSize = style.fontSize;
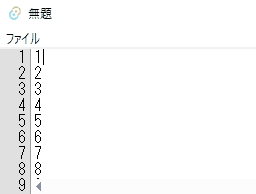
リアルタイムに行番号が表示されるようになりました。
高さの調整
エディタのスクロールに合わせて行番号も連動させるようにします。
+editor.addEventListener("scroll", () => {
+  lineNumArea.scrollTop = editor.scrollTop;
+});
editor.addEventListener("input", (e: Event) => {
  const content = (e.target as HTMLInputElement).value;
  lineNumArea.innerHTML = toHtml(content);
});
これで行番号もスクロールできるようになりましたが、末尾までスクロールすると行番号がずれてしまいます。
これは行番号とエディタの高さが異なっているのが原因です。
実はエディタ側がスクロールバーの高さ分だけ長くなっています。
なので、行番号側にもスクロールバーの高さを加算する必要があります。
// フォントを設定
const style = getComputedStyle(editor);
lineNumArea.style.fontFamily = style.fontFamily;
lineNumArea.style.fontSize = style.fontSize;
+// スクロールバーの高さ分のパディングを設定する
+const scrollBarHeight = editor.offsetHeight - editor.clientHeight;
+lineNumArea.style.paddingBottom = `${scrollBarHeight}px`;
これで行番号が正常に連動するようになりました。

参考文献