概要
おつかれさまです!
前回はNextAuth.jsでログイン機能を実装しました。
今回はRailsのAPIと連携し、アカウント情報をDBに保存するような実装をまとめていきます!
実装方針
- Rails側にUserモデルを作成
- ルーティングの設定
- コントローラとリクエスト時の処理を実装
- CORSの設定
- Next側でログイン後にリクエストを送るように実装
- Rails側でデータの確認
Rails側にUserモデルを作成
まずNext側でどのようにアカウント情報を保持しているかというと、下記のcallbacksのバリューであるsignIn()フックを実行したときにコールバックで変数を保持できるようにできます。
今回はprovider、uid、name、emailをDB側に登録できるように設定していきます。
const handler = NextAuth({
	secret: process.env.NEXTAUTH_SECRET,
	providers: [
		GoogleProvider({
			clientId: process.env.GOOGLE_CLIENT_ID ?? '',
			clientSecret: process.env.GOOGLE_CLIENT_SECRET ?? '',
		}),
	],
	callbacks: {
		async signIn({ user, account }) {
			const provider = account?.provider;
			const uid = user?.id;
			const name = user?.name;
			const email = user?.email;
		},
モデルの生成コマンドを実行し、マイグレーションファイルに追加します。
rails g model User
class CreateUsers < ActiveRecord::Migration[7.0]
  def change
    create_table :users do |t|
      t.string "provider", null: false
      t.string "uid", null: false
      t.string "name", null: false
      t.string "email", null: false
      t.timestamps
    end
  end
end
マイグレーションを実行します。
rails db:migrate
ルーティングの設定
ルーティングを設定します。:providerにすることによって、今後Google以外のログインにも対応できるようにしています。
Rails.application.routes.draw do
  post 'auth/:provider/callback', to: 'api/v1/users#create'
end
コントローラとリクエスト時の処理を実装
コントローラを作成します。
rails g controller Api::V1::users
createアクションに処理を書いていきます。
find_or_create_byを使って、新規レコードであれば保存し、既に存在しているのであればインスタンスを返すようにしています。
module Api
  module V1
    class Api::V1::UsersController < ApplicationController
      def create
        # 条件に該当するデータがあればそれを返す。なければ新規作成
        user = User.find_or_create_by(provider: params[:provider], uid: params[:uid], name: params[:name], email: params[:email])
        if user
          head :ok
        else
          render json: { error: "ログインに失敗しました" }, status: :unprocessable_entity
        end
      rescue StandardError => e
        render json: { error: e.message }, status: :internal_server_error
      end
    end
  end
end
CORSの設定
CORSについてはこの記事がわかりやすかったです。
今回のケースだと、Next.jsのURL(http://localhost:3000)とRailsのURL(http://localhost:3001)は別々のアプリケーションであるため、この2つの通信を許可する作業をしていきます。
Gemfileにrack-corsを追加してbundle installします。
その後、cors.rbがコメントアウトになっている部分を外し設定します。
# for CORS
gem "rack-cors"
# frozen_string_literal: true
# Be sure to restart your server when you modify this file.

# Avoid CORS issues when API is called from the frontend app.
# Handle Cross-Origin Resource Sharing (CORS) in order to accept cross-origin AJAX requests.

# Read more: https://github.com/cyu/rack-cors
Rails.application.config.middleware.insert_before 0, Rack::Cors do
  allow do
    #許可したいURLを設定
    origins "http://localhost:3000"
    resource "*",
      headers: :any,
      methods: [:get, :post, :put, :patch, :delete, :options, :head]
  end
end
Next側でログイン後にリクエストを送るように実装
API側で実装が確認できたので、Next.jsでリクエストの処理を実装していきます。
NEXT_PUBLIC_API_URLでrails側のオリジン(http:/localhost:3001)を設定しています。
import NextAuth from 'next-auth';
import GoogleProvider from 'next-auth/providers/google';
import axios from 'axios';

const apiUrl = process.env.NEXT_PUBLIC_API_URL;

const handler = NextAuth({
	secret: process.env.NEXTAUTH_SECRET,
	providers: [
		GoogleProvider({
			clientId: process.env.GOOGLE_CLIENT_ID ?? '',
			clientSecret: process.env.GOOGLE_CLIENT_SECRET ?? '',
		}),
	],
	callbacks: {
		async signIn({ user, account }) {
			const provider = account?.provider;
			const uid = user?.id;
			const name = user?.name;
			const email = user?.email;
			try {
				const response = await axios.post(
					`${apiUrl}/auth/${provider}/callback`,
					{
						provider,
						uid,
						name,
						email,
					}
				);
				if (response.status === 200) {
					return true;
				} else {
					return false;
				}
			} catch (error) {
				console.log('エラー', error);
				return false;
			}
		},
	},
});
export { handler as GET, handler as POST };
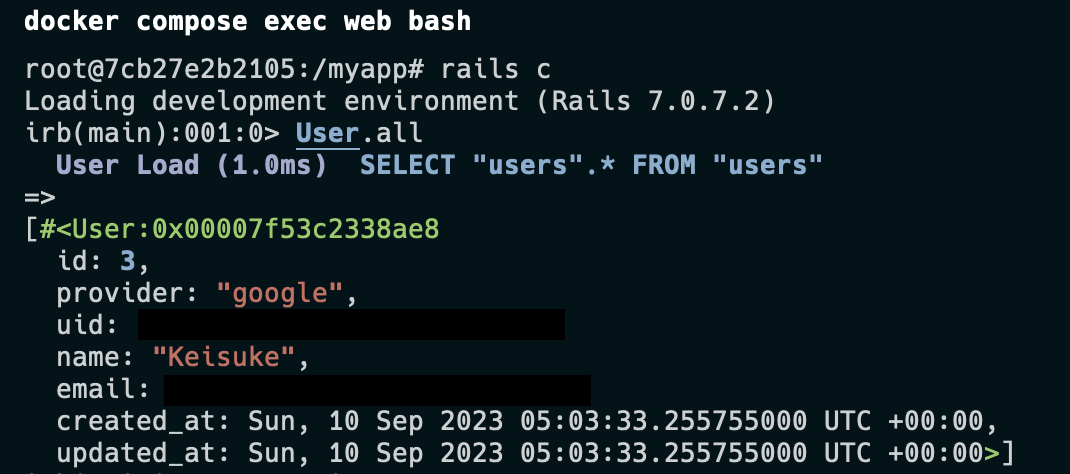
Rails側でデータの確認
まとめ
認証まわりが自信なかったので勉強できてよかったです!
最後まで読んで頂きありがとうございました!
