背景
railsアプリからメールを送信することは簡単にできますが、開発中に送信メールを確認したいときはどうするでしょうか。
今回はrailsアプリ開発中にメールを確認する方法を紹介します。
準備
今回はメール確認の例として、deviseを用いてメール認証が必要なユーザー登録の仕組みを用意します。
deviseインストール
railsアプリケーションがすでに初期化されていたとして、
Gemfileにdeviseを追加し、インストールを行います。
bundle exec rails generate devise:install
bundle exec rails generate devise user
bundle exec rails generate devise:views users
生成したviewを読むように設定します。
Devise.setup do |config|
  # 中略
  config.scoped_views = true
end
モデルでメール認証を有効化します。
class User < ActiveRecord::Base
  devise :database_authenticatable, :registerable, :confirmable,
         :recoverable, :rememberable, :trackable, :validatable
end
メール認証に関する部分のmigrationも変更しておきます。
class DeviseCreateUsers < ActiveRecord::Migration
  def change
    create_table(:users) do |t|
      ## Database authenticatable
      t.string :email,              :null => false, :default => ""
      t.string :encrypted_password, :null => false, :default => ""

      ## Recoverable
      t.string   :reset_password_token
      t.datetime :reset_password_sent_at

      ## Rememberable
      t.datetime :remember_created_at

      ## Trackable
      t.integer  :sign_in_count, :default => 0, :null => false
      t.datetime :current_sign_in_at
      t.datetime :last_sign_in_at
      t.string   :current_sign_in_ip
      t.string   :last_sign_in_ip

      ## Confirmable
      t.string   :confirmation_token
      t.datetime :confirmed_at
      t.datetime :confirmation_sent_at
      t.string   :unconfirmed_email # Only if using reconfirmable

      ## Lockable
      # t.integer  :failed_attempts, :default => 0, :null => false # Only if lock strategy is :failed_attempts
      # t.string   :unlock_token # Only if unlock strategy is :email or :both
      # t.datetime :locked_at


      t.timestamps
    end

    add_index :users, :email,                :unique => true
    add_index :users, :reset_password_token, :unique => true
    # add_index :users, :confirmation_token,   :unique => true
    # add_index :users, :unlock_token,         :unique => true
  end
end
config/environments/development.rbの設定も忘れずに。
config.action_mailer.default_url_options = { host: 'localhost:3000' }
これでrailsサーバーを起動して、http://localhost:3000/users/sign_upにアクセスすればユーザー登録が出来るので、メールが送信されます。

コンソールでの確認
railsサーバーを起動しているコンソールを見てみると、メール送信のログが出力されています。
Sent mail to hoge@email.com (12.1ms)
Date: Wed, 06 Nov 2013 10:05:01 +0900
From: please-change-me-at-config-initializers-devise@example.com
Reply-To: please-change-me-at-config-initializers-devise@example.com
To: hoge@email.com
Message-ID: <527995bddd516_2a4d3fe5d64135c4906e9@MBP.local.mail>
Subject: Confirmation instructions
Mime-Version: 1.0
Content-Type: text/html;
 charset=UTF-8
Content-Transfer-Encoding: 7bit

<p>Welcome hoge@email.com!</p>

<p>You can confirm your account email through the link below:</p>

<p><a href="http://localhost:3000/users/confirmation?confirmation_token=Ewx4qYxPR4Ex9yqySYEJ">Confirm my account</a></p>

   (0.7ms)  commit transaction
Redirected to http://localhost:3000/
Completed 302 Found in 927ms (ActiveRecord: 3.9ms)
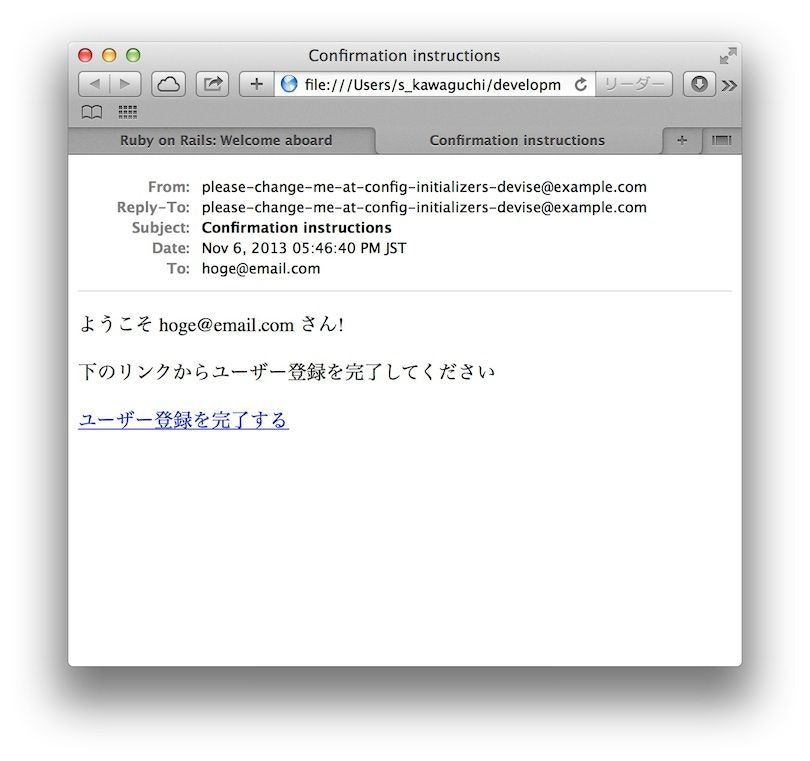
少しメール送信の文面を変更してみましょう。
app/views/users/mailer/confirmaion_instructions.html.erb
<p>ようこそ <%= @email %> さん!</p>

<p>下のリンクからユーザー登録を完了してください</p>

<p><%= link_to 'ユーザー登録を完了する', confirmation_url(@resource, :confirmation_token => @token) %></p>
もう一度メール送信して、コンソールから確認してみると・・・
Sent mail to fuga@email.com (40.4ms)
Date: Wed, 06 Nov 2013 10:09:10 +0900
From: please-change-me-at-config-initializers-devise@example.com
Reply-To: please-change-me-at-config-initializers-devise@example.com
To: fuga@email.com
Message-ID: <527996b6b39fd_2a4d3fe5d7dd27e49078@MBP.local.mail>
Subject: Confirmation instructions
Mime-Version: 1.0
Content-Type: text/html;
 charset=UTF-8
Content-Transfer-Encoding: base64

PHA+44KI44GG44GT44GdIGZ1Z2FAZW1haWwuY29tIOOBleOCkyE8L3A+Cgo8
cD7kuIvjga7jg6rjg7Pjgq/jgYvjgonjg6bjg7zjgrbjg7znmbvpjLLjgpLl
rozkuobjgZfjgabjgY/jgaDjgZXjgYQ8L3A+Cgo8cD48YSBocmVmPSJodHRw
Oi8vbG9jYWxob3N0OjMwMDAvdXNlcnMvY29uZmlybWF0aW9uP2NvbmZpcm1h
dGlvbl90b2tlbj14b2EzeTR2OTlpOExZQ3hycWRvTSI+44Om44O844K244O8
55m76Yyy44KS5a6M5LqG44GZ44KLPC9hPjwvcD4K

   (7.2ms)  commit transaction
Redirected to http://localhost:3000/
Completed 302 Found in 148ms (ActiveRecord: 8.1ms)
エンコードされてしまっているので、confirmation_token付きのリンクを確認できなくなってしまいました。
そもそもメールの内容をコンソールから確認するのは面倒ですね。
letter_opener
一つ目のメール確認方法はletter_openerです。
Gemfileにletter_openerを追加し、インストールします。
group :development do
  gem 'letter_opener'
end
config/environments/development.rbにconfig.action_mailer.delivery_method = :letter_openerの一行を追加します。
  config.action_mailer.default_url_options = { host: 'localhost:3000' }
  config.action_mailer.delivery_method = :letter_opener
これだけでメールが送信されたとき(今回の場合はユーザー登録を行ったとき)にブラウザでメールを確認することが出来ます。
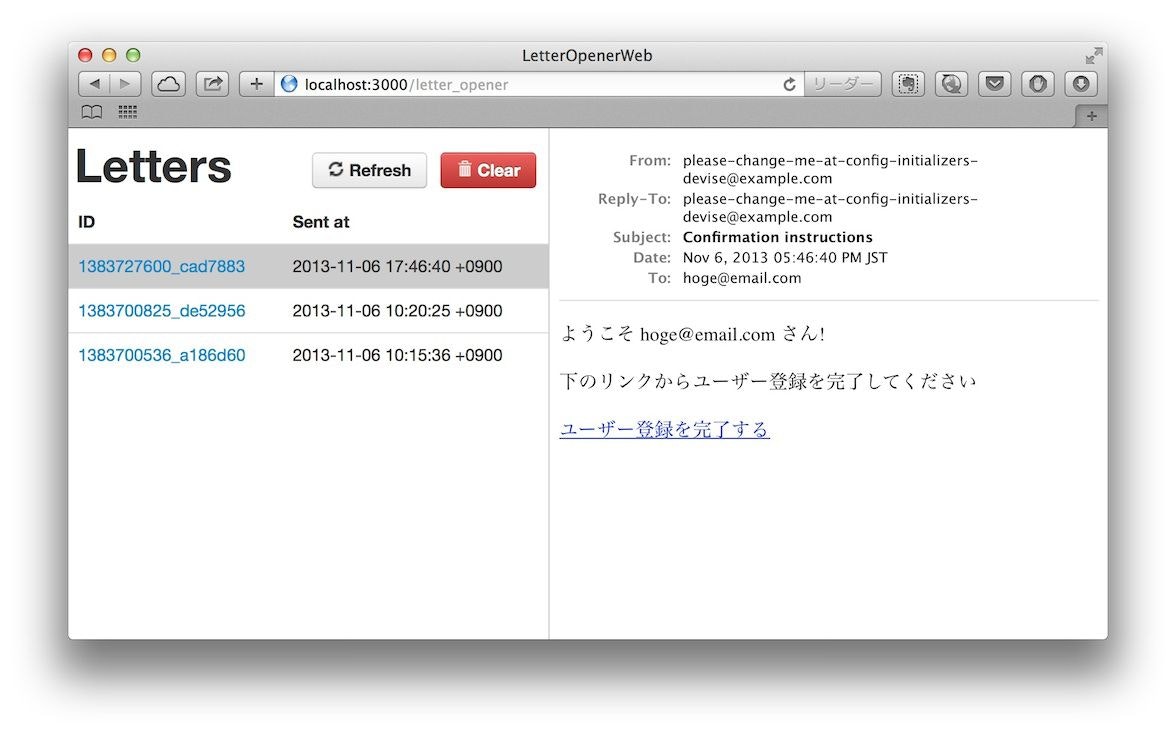
さらにletter_opener_webというgemもあります。
こちらもGemfileに追加し
group :development do
  gem 'letter_opener_web'
end
config/environments/development.rbのconfig.action_mailer.delivery_methodを:letter_opener_webに変更
  config.action_mailer.default_url_options = { host: 'localhost:3000' }
  config.action_mailer.delivery_method = :letter_opener_web
config/routes.rbに/letter_openerでLetterOpenerWeb::Engineをマウントするだけです。
Your::Application.routes.draw do
  devise_for :users

  if Rails.env.development?
    mount LetterOpenerWeb::Engine, at: "/letter_opener"
  end
end
これでhttp://localhost:3000/letter_openerにアクセスすることで送信されたメールを確認することが出来るようになります。
mailcatcher
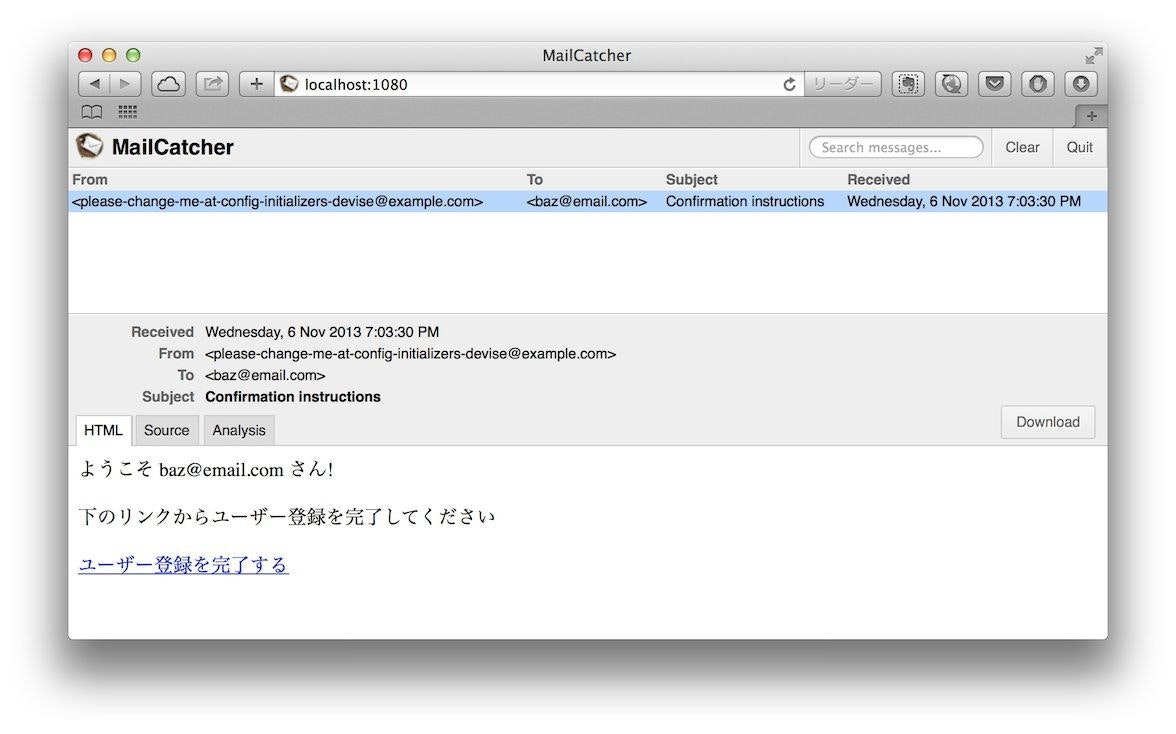
もう一つの方法はmailcatcherです。
先ほどのletter_openerはrailsアプリケーションに組み込みましたが、mailcatcherは単独で動作する開発用のSMTPサーバーです。
gemで配布されており、インストールは簡単です。
gem install mailcatcher
mailcatcherコマンドで起動し、デフォルトではバックグラウンドで起動し、smtp://localhost:1025が使用されます。
起動オプションで適宜変更することも可能です。
Usage: mailcatcher [options]
        --ip IP                      Set the ip address of both servers
        --smtp-ip IP                 Set the ip address of the smtp server
        --smtp-port PORT             Set the port of the smtp server
        --http-ip IP                 Set the ip address of the http server
        --http-port PORT             Set the port address of the http server
        --[no-]growl                 Growl to the local machine when a message arrives
    -f, --foreground                 Run in the foreground
    -b, --browse                     Open web browser
    -v, --verbose                    Be more verbose
    -h, --help                       Display this help information
railsアプリケーションと連携する場合はconfig/environments/development.rbのconfig.action_mailer.smtp_settingsで設定を行います。
  config.action_mailer.delivery_method = :smtp
  config.action_mailer.smtp_settings = { address: 'localhost', port: 1025 }
あとはhttp://localhost:1080にアクセスすればメールを確認することが出来ます。
まとめ
どちらの方法も少しの設定で開発環境でメールを確認出来るようになるので、railsアプリからメールを送信する機能を確認する場合に活用できそうです。