これはScala Advent Calendar 2017の25日目の記事です。
普段はScalaをまったく記述しない私なのですが、サービスインする前にWebシステムの負荷テストを行う際にScala製の負荷テストツールGatlingを使う機会が何度かありました。
httpを使用するシナリオを記述した事はあったのですが、WebSocketを使用したシステムのシナリオを記述する機会があったのでアウトプットしたいと思います。
また、WebSocketを使用したGatlingに関する日本語の情報があまり無かったのでお役に立てれば嬉しいです。
Gatlingとは
GatlingはScala言語で実装された負荷テストツールで、細かなシナリオをScalaで記述したり、負荷テスト実行後の結果をhtmlでレポートしてくれたりととても便利な負荷テストツールです。
環境構築方法などはここでは触れませんので公式ドキュメントを確認してください。
開発環境
以下の環境を使用して動作確認をしました。
- MacOSX ElCapitan
- Scala 2.12.3
- Gatling 2.3
- SBT 1.0
- Node.js v8.9
- npm module
- express
- ws
- body-parser
- express-session
テストシナリオ
Node.jsサーバーへhttpリクエスト、WebSocket通信をする簡易的なシナリオを今回記述してみました。
シナリオではログインAPIを実行しますがログインセッションを使ってモニョモニョする処理は今回は記述していませんので、そこは補完して読み取っていただければと思います。
Gatlingで記述するシナリオは次の通りです。
- ログインAPIへhttpリクエストする
- ログイン成功時はレスポンスjsonとしてログインしたuserIdを返すため受信チェックする
- WebSocket接続する
- WebSocketでtimestampをメッセージとして5回送信する
- Node.jsサーバはtimestampを送り返し、クライアントは受信したかをチェックする
- WebSocketを閉じる
上記のシナリオを30秒間100ユーザーで行います。
Webサーバ側 (Node.js)
httpサーバはexpressを使用しました。
jsonリクエストを処理するためのbody-parserモジュール
ユーザーセッションを管理するexpress-sessionモジュール
WebSocketはwsモジュールを使用しました。
※ express-sessionは使用する意味がありませんでした...。
{
  "name": "load-test-app",
  "version": "1.0.0",
  "description": "load-test-appliation for gatling",
  "main": "index.js",
  "scripts": {
    "test": "echo \"Error: no test specified\" && exit 1"
  },
  "author": "",
  "license": "ISC",
  "dependencies": {
    "body-parser": "^1.18.2",
    "express": "^4.16.2",
    "express-session": "^1.15.6",
    "ws": "^3.3.3"
  }
}
const express = require('express');
const bodyParser = require('body-parser');
const session = require('express-session');
const http = require('http');
const wsServer = require('ws').Server;
const app = express();

app.use(bodyParser.urlencoded({
    extended: true
}));

app.use(bodyParser.json());

// express-session設定
app.use(session({
    secret: 'secretString',
    resave: false,
    saveUninitialized: false,
}));

const webServer = http.createServer(app);
const wss = new wsServer({server: webServer});
// Webサーバー起動
webServer.listen(3000, () => {
    console.log('server listen port 3000');
});

app.post('/api/login', (req, res) => {
	// 認証済み
    if (req.session.user) {
        res.json({msg: 'Authenticated'});
        return;
    }

	// リクエストからuserIdを受取り認証処理
    if (req.body.userId) {
        req.session.user = {
            userId: req.body.userId,
        };
        res.json({userId: req.session.user.userId});
        return;
    }

    res.json({msg: 'LoginFailure'});
});

// WebSocket EventListen
wss.on('connection', (ws, req) => {
    console.log('connect WebSocket');

    ws.on('close', () => {
        console.log('WebSocket close');
    });

    ws.on('message', (message) => {
        console.log('message:', message);

        // 受信したdateをそのままEchoBack
        ws.send(JSON.stringify({date:message}));
    });
});
Node.jsサーバを次のコマンドで起動します
node index.js
Gatlingクライアント
上記Node.jsのサーバーへのシナリオをGatingで管理します。
build.sbt, plugins.sbtは次のように記載しました。
enablePlugins(GatlingPlugin)

scalaVersion := "2.12.3"

scalacOptions := Seq(
  "-encoding", "UTF-8", "-target:jvm-1.8", "-deprecation",
  "-feature", "-unchecked", "-language:implicitConversions", "-language:postfixOps")

libraryDependencies += "io.gatling.highcharts" % "gatling-charts-highcharts" % "2.3.0" % "test"
libraryDependencies += "io.gatling"            % "gatling-test-framework"    % "2.3.0" % "test"
addSbtPlugin("io.gatling" % "gatling-sbt" % "2.2.2")
シナリオを管理する.scalaは次の通りです。
package nodejs

import java.time.{LocalDateTime, ZoneId}

import io.gatling.core.Predef._
import io.gatling.http.Predef._

import scala.concurrent.duration._
import scala.util.Random

class WebSocketSimulation extends Simulation {

  /**
    * ランダムで作成するuserIdの範囲
    */
  val randUserIdRange: Int = 1000000

  val httpConf = http
    .disableWarmUp
    .contentTypeHeader("application/json")

  val scn = scenario("WebSocket")
    .exec(session => {
      session.set("host", "localhost:3000")
    })
    // ログイン - http通信ではhttp()を使用 -
    .exec({
    http("Login")
      .post("http://${host}/api/login")
      .body(StringBody(session => s"""{"userId":"${nextInt()}"}""")).asJSON
  })
    .pause(1)
    // WebSocket通信ではws()を使用する
    .exec(ws("Connect WS").open("ws://${host}"))
    .repeat(5) {
    	// 生成したtimestampを5回WebSocket送信し
    	// Node.jsサーバーからsendされたメッセージ(date)を同期的に受信する。タイムアウトは10秒。受信データは1つ
      exec(
        ws("WS EchoBack")
          .sendText(s"""{"date":"${timeStamp()}"}}""")
          .check(wsListen.within(10 seconds).until(1).jsonPath("$.date"))
      ).pause(2)
    }
    .exec(ws("Close WS").close)

	// 30秒間で100ユーザー生成する
  setUp(scn.inject(rampUsers(100) over (30 seconds)).protocols(httpConf))

  /**
    * get Ramdom UserId
    *
    * @return
    */
  def nextInt() = Random.nextInt(randUserIdRange)

  /**
    * get current timestamp
    *
    * @return
    */
  def timeStamp() = LocalDateTime.now.atZone(ZoneId.systemDefault).toEpochSecond
}
Gatlingではexec()を使用して実行したい内容をセットしますが、http通信ではhttp()をセットし、WebSocket通信ではws()をセットします。
WebSocketのやり取りする場合でもそんなに難しい記述ではないですね。
起動コマンド
Gatlingを実行する前にsbtコマンドを起動します。
$ sbt
sbtが起動したら次のコマンドでgatlingを実行します。
gatling:testOnly nodejs.WebSocketSimulation
以下のコマンドでもシナリオを実行できます。gatling:testは全てのシナリオを実行するコマンドとなります。今回はシナリオが1つなのでtestOnlyを使用するとよいでしょう。
gatling:test
実行結果
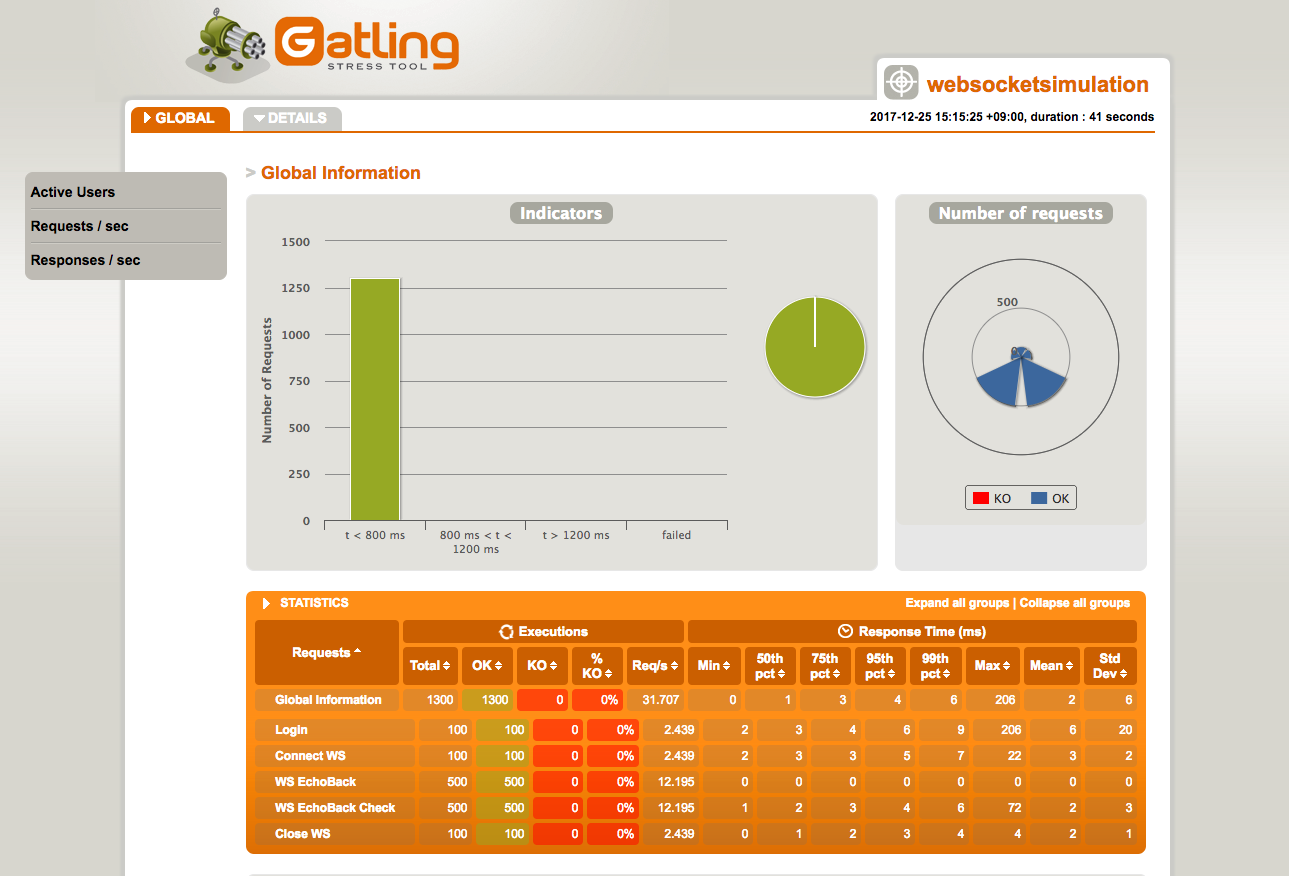
gatlingの実行が終わると、project-root/target/gatlingに次のようなレポートが出力されます。
トータル1300回のリクエストを送信し、シナリオの内容通り成功(OK)しています。失敗が1つでもあるとKOカラムの箇所に失敗回数がレポートされます。細かい数値は割愛します..
まとめ
Gatlingを使用しhttpサーバーのシナリオも、WebSocketを使用したシナリオも、記述がそこまで大きく変わる感じではありませんでした。
Gatlingは細かなシナリオが記述でき、詳細なhtmlレポートも出力してくれるのでとても便利です。
今後、機会があればもっと突っ込んだ内容を記事にしたいと思います。
まとまりがないですが、少しでもお役に立てば嬉しいです!
間違いなどありましたらお手数ですがご連絡くださいませ。
