【Kickstart で CentOS7 自動インストール】
- Kickstart 環境を構築し、CentOS7 を自動インストールする手順をまとめる
◇ 演習環境
- OS: CentOS7
◇ 作業概要
[Server: Kickstart 環境の構築]
- TFTP server セットアップ
- DHCP server セットアップ
- FTP Server セットアップ
- Kickstart 設定 (CentOS7インストール用)
[Client: Kickstart 環境の利用]
- CentOS 自動インストール実行手順
◇ 作業詳細
[Server: Kickstart 環境の構築]
1. TFTP server セットアップ
a. インストール
yum install tftp-server xinetd
b. tftp 設定
/etc/xinetd.d/tftp
@@ -13,2 +13,2 @@
-       server_args             = -s /var/lib/tftpboot
-       disable                 = yes
+       server_args             = -s -v /var/lib/tftpboot
+       disable                 = no
- disable: no を設定し xinetd 経由で tftp を起動
- server_args: -v を追加して /var/log/messages へログ出力させる
c. xinetd 起動
systemctl start xinetd.service
d. xinetd 自動起動設定追加
systemctl enable xinetd.service
e. xinetd 起動確認
systemctl status xinetd.service
- 下記2つが確認出来れば起動完了
- Loaded: loaded (/usr/lib/systemd/system/xinetd.service; enabled; vendor preset: enabled)
- Active: active (running) since 水 2016-05-04 13:08:21 JST; 1 day 7h ago
2. DHCP server セットアップ
a. インストール
yum install dhcp
b. DCHP 設定ファイル編集
/etc/dhcp/dhcpd.conf
@@ -5,0 +6,66 @@
+
+# option definitions common to all supported networks...
+option domain-name "domain.org";
+option domain-name-servers 192.168.100.11;
+
+# Use this to enble / disable dynamic dns updates globally.
+ddns-update-style interim;
+update-static-leases on;
+
+# A slightly different configuration for an internal subnet.
+subnet 192.168.100.0 netmask 255.255.255.0 {
+  range 192.168.100.31 192.168.100.40;
+  option domain-name-servers ns01.domain.org;
+  option domain-name "domain.org";
+  option routers 192.168.100.254;
+  option subnet-mask 255.255.255.0;
+  option broadcast-address 192.168.100.255;
+  default-lease-time 600;
+  max-lease-time 7200;
+  next-server 192.168.100.11;
+  filename "pxeboot/pxelinux.0";
+
+  zone devsys.org. {
+    primary 192.168.100.11;
+  }
+
+  zone 100.168.192.in-addr.arpa. {
+    primary 192.168.100.11;
+  }
+
+}
+
+# Fixed IP addresses can also be specified for hosts.   These addresses
+# should not also be listed as being available for dynamic assignment.
+# Hosts for which fixed IP addresses have been specified can boot using
+# BOOTP or DHCP.   Hosts for which no fixed address is specified can only
+# be booted with DHCP, unless there is an address range on the subnet
+# to which a BOOTP client is connected which has the dynamic-bootp flag
+# set.
+host dev021.domain.org {
+  hardware ethernet 08:00:27:0B:F6:56;
+  fixed-address 192.168.100.21;
+  option host-name "dev021.domain.org" ;
+}
- ddns-update-style: DDNS 設定の有効化。dhcp から割り当てられた IP を BIND と連携させる設定。
- update-static-leases: DDNS の固定IPを BIND へ登録させる設定。
c. dhcpd 起動
systemctl start dhcpd.service
d. dhcpd 自動起動設定追加
systemctl enable dhcpd.service
e. dhcpd 起動確認
systemctl status dhcpd.service
- 下記2つが確認出来れば起動完了
- Loaded: loaded (/usr/lib/systemd/system/dhcpd.service; enabled; vendor preset: enabled)
- Active: active (running) since 水 2016-05-04 13:08:21 JST; 1 day 7h ago
3. FTP server セットアップ
a. インストール
yum install vsftpd ftp
a. xinetd 起動設定ファイルコピー
cp -ip /usr/share/doc/vsftpd-3.0.2/vsftpd.xinetd /etc/xinetd.d/vsftpd
b. xinetd 起動設定ファイル編集
/etc/xinetd.d/vsftpd
@@ -12 +12 @@
-       disable                 = yes
+       disable                 = no
c. vsftpd 設定ファイル編集
/etc/vsftpd/vsftpd.conf
listen=NO
@@ -123 +123 @@
-listen_ipv6=YES
+listen_ipv6=NO
- listen/listen_ipv6: NO を指定してスタンドアローンモードを停止
d. アクセス許可設定追加
/etc/hosts.allow
vsftpd: 192.168.100.0/255.255.255.0
e. vsftpd 自動起動設定確認
systemctl status vsftpd
- xinetd 経由で起動する為、下記の強調表示項目の通り停止状態であることを確認
- Loaded: loaded (/usr/lib/systemd/system/vsftpd.service; disabled; vendor preset: disabled)
- Active: inactive (dead)
f. xinetd 再起動
systemctl restart xinetd.service
g. 接続テスト
ftp localhost
- ローカルユーザで接続できれば設定完了
4. Kickstart 設定 (CentOS7インストール用)
a. インストール
yum install syslinux
b. ブートローダ(syslinux)配置
mkdir -p /var/lib/tftpboot/pxeboot
cp -rip /usr/share/syslinux/* /var/lib/tftpboot/pxeboot/
c. CentOS7 ISO イメージのマウント
mkdir /var/ftp/pub/centos7
mount -t iso9660 -o,ro /var/share/iso/CentOS-7-x86_64-Minimal-1511.iso /var/ftp/pub/centos7
- ISO イメージは SCP 等で事前に転送しておくこと
d. 自動マウント設定追加
vim /etc/fstab
----
/var/share/iso/CentOS-7-x86_64-Minimal-1511.iso /var/ftp/pub/centos7 iso9660 loop,ro,auto 0 0
e. kernel/RAM イメージ配置
mkdir -p /var/lib/tftpboot/pxeboot/images/centos7
cp /var/ftp/pub/centos7/isolinux/{vmlinuz,initrd.img} /var/lib/tftpboot/pxeboot/images/centos7
f. PXE ブート設定ファイル配置ディレクトリ作成
mkdir -p /var/lib/tftpboot/pxeboot/pxelinux.cfg/
g. PXE ブート設定ファイル作成
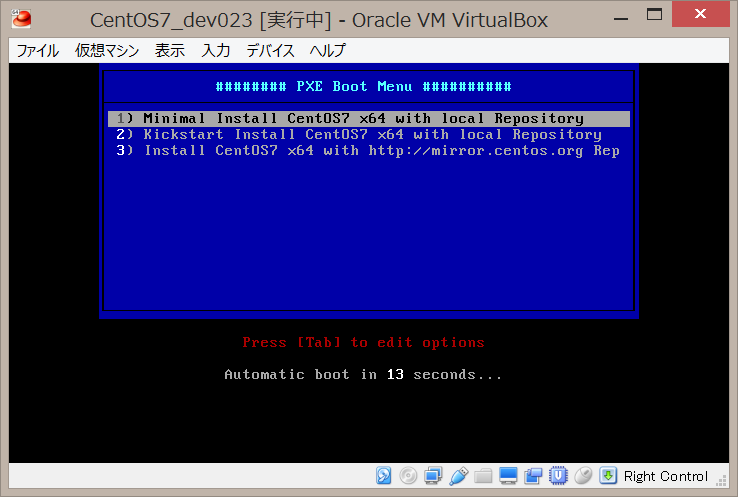
/var/lib/tftpboot/pxeboot/pxelinux.cfg/default
default menu.c32
PROMPT 0
TIMEOUT 300
ONTIMEOUT local

menu title ######## PXE Boot Menu ##########

label 1
menu label ^1) Minimal Install CentOS7 x64 with local Repository
kernel images/centos7/vmlinuz
append initrd=images/centos7/initrd.img inst.repo=ftp://192.168.100.11/pub/centos7

label 2
menu label ^2) Kickstart Install CentOS7 x64 with local Repository
kernel images/centos7/vmlinuz
append initrd=images/centos7/initrd.img inst.repo=ftp://192.168.100.11/pub/centos7 ks=ftp://192.168.100.11/pub/kickstart/centos7.cfg

label 3
menu label ^3) Install CentOS7 x64 with http://mirror.centos.org Repository
kernel centos7/vmlinuz
append initrd=centos7/initrd.img method=http://mirror.centos.org/centos/7/os/x86_64/ devfs=nomount ip=dhcp
h. kickstart ファイル配置用ディレクトリ作成
mkdir /var/ftp/pub/kickstart
i. kickstart 用パスワード生成
- root 等のユーザで使用するパスワードを生成。
- kickstart ファイルの [password] へセットして使用。
- 以下はパスワードに test を指定したケースの実行例
openssl passwd -1
Password:
Verifying - Password:
$1$YvhS0vVw$U2PBsFx48kykRiCiNR8NZ.
i. kickstart ファイル作成
- オプションの詳細は RHEL7インストールマニュアル/23.3. キックスタート構文の参考資料 を参照
- パスワードは下記コマンドで生成可能
/var/ftp/pub/kickstart/centos7.cfg
# version=DEVEL
# System authorization information
auth --enableshadow --passalgo=sha512
# Use network installation
url --url="ftp://192.168.100.11/pub/centos7"
# Use graphical install
# graphical
# Use text mode install
text
# Run the Setup Agent on first boot
firstboot --disable
ignoredisk --only-use=sda
# Keyboard layouts
keyboard --vckeymap=jp --xlayouts='jp'
# System language
lang ja_JP.UTF-8
# SELinux configuration
selinux disabled

# Network information
network  --bootproto=dhcp --device=enp0s3 --ipv6=auto --activate

# Root password
rootpw --iscrypted [password]
# System timezone
timezone Asia/Tokyo --isUtc
user --groups=wheel --name=username --[password] --iscrypted --gecos="username"
# System bootloader configuration
bootloader --append=" crashkernel=auto" --location=mbr --boot-drive=sda
# Partition clearing information
clearpart --all --initlabel --drives=sda
# Disk partitioning information
part /boot --fstype="xfs" --ondisk=sda --size=500
part pv.01 --fstype="lvmpv" --ondisk=sda --size=4096 --maxsize=51200 --grow
volgroup vg_root --pesize=4096 pv.01
logvol swap  --fstype="swap" --size=1024 --name=lv_swap --vgname=vg_root
logvol /  --fstype="xfs" --grow --size=1024 --maxsize=51200 --name=lv_root --vgname=vg_root

%packages
@^minimal
@core
kexec-tools

%end

%addon com_redhat_kdump --enable --reserve-mb='auto'

%end
[Client: Kickstart 環境の利用]
1. CentOS 自動インストール実行手順
a. DHCP への固定IP登録
- 固定IP運用時のみ実施。動的IP運用であれば c. の作業へ進む
- 事前に MAC の確認と IP 確保が必要
/etc/dhcp/dhcpd.conf
host hostname.deomain.org {
  hardware ethernet 08:00:27:0B:F6:56;
  fixed-address 192.168.100.21;
}
b. DHCP へ設定反映
systemctl restart named.service
c. インストール実行
- クライアントをネットワークブートし、下記画面が表示されればOK。
- インストールメニューから任意のモードを選択してインストールを行う