CodeceptJS (オープンソースのE2Eテスト用のツール) を使ってService Centerを操作する処理を試しに書いてみました。
作ったもの
- Service Centerにログイン
- Administrationページを開く
- Licensingページを開く
- TableタグからActive Named UsersとApplication Objectsを抽出してファイルに出力
(CodeceptJSのプラグインStepByStepReportで出力したスクリーンショットを、ezgifでアニメーションGIFに変換したもの)
ソース:https://github.com/jyunji-watanabe/ServiceCenterAutomation
実行方法(コマンド):
npx codeceptjs run tests/licensingInfo_test.js
結果サンプル(ファイル。output/LicensingInfo_yyyyMMdd.txtに出力される):
Active Named Users: 349
Application Objects: 873
Service Centerにログイン
Service Centerに未ログインの状態でアクセスすると、ログイン画面にリダイレクトされるので、その画面でログインする処理を実装します。
ログインはあちこちのページで実行されので、steps_file.jsに実装することにしました。
steps_file.jsについては、CodeceptJSに独自のStep Methodを追加するを参照。
module.exports = function() {
  return actor({

    // Define custom steps here, use 'this' to access default methods of I.
    // It is recommended to place a general 'login' function here.
    login: function(username, password) {
        this.see('Login');
        this.fillField({css: 'label[id$=Username]+input'}, username);
        this.fillField({css: 'label[id$=Password]+input'}, password);
        this.click('Login');
    },
  });
}
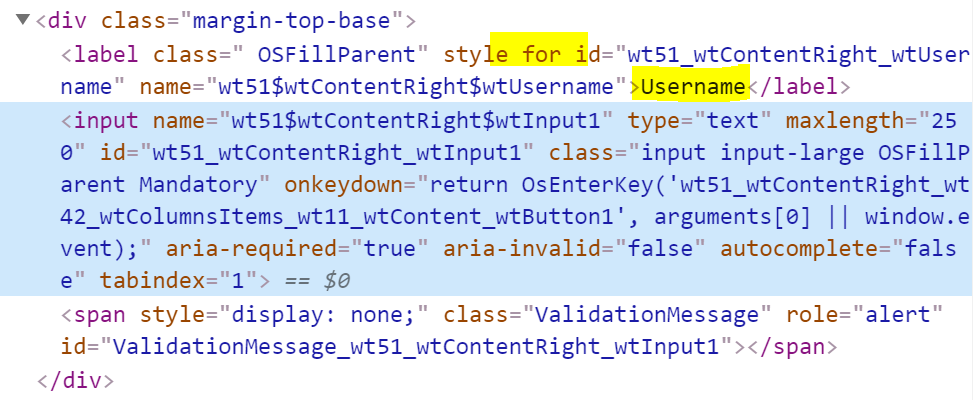
Service Centerのログイン画面では、Labelのforが空であるためか、Username/Passwordのlabelにあいまいにマッチさせる方法が機能しませんでした。
代わりに上記コードの通り、strict locatorの方法でCSSセレクタで指定しています。
(this.fillFieldの部分)
steps_file.jsに上記定義をしておくと、テストコード中から以下のようにI.を介して使えます。
I.login(process.env.ACCOUNT, process.env.PASSWORD);
Menuからページを開く
Service CenterではMenuか2階層になっています。
第1階層は、「.sc-header-menu」というクラスがついていて、第2階層には、「.sc-sub-header」というクラスがついています。
そこで、menu.jsというファイルを作成し、open(第1階層のmenuタイトル, 第2階層のmenuタイトル)で該当ページを開けるようにしました。
const { I } = inject();

module.exports = {
    locators: {
        header: { css: '.sc-header-menu' },
        subHeader: { css: '.sc-sub-header' },
    },
    open(headerTitle, subHeaderTitle) {
        I.click(headerTitle, this.locators.header);
        if (subHeaderTitle)
            I.click(subHeaderTitle, this.locators.subHeader);
    },
}
I.clickは、第1引数でクリックしたいボタンやリンクのタイトルを、第2引数でそのボタンやリンクが所属する上位の要素を指定します。
つまり、
- 第1階層にあるheaderTitleという文字列を持つリンクをクリック
- (subHeaderTitleが指定されていたら) 第2階層にあるsubHeaderTitleという文字列を持つリンクをクリック
という処理です。
利用例(Licensingページを開く)
menu.open('Administration', 'Licensing');
TableタグからActive Named UsersとApplication Objectsを抽出してファイルに出力
Licensingのページには、Tableタグがあり、以下のようになっています。
2列目各セルの上段がFeature名、4列目がその値という構造。
ロケータは「'tr>td:nth-child(2) span.NoWrap' }」(2番めの列にあるNoWrapクラスがついているspanタグ)。
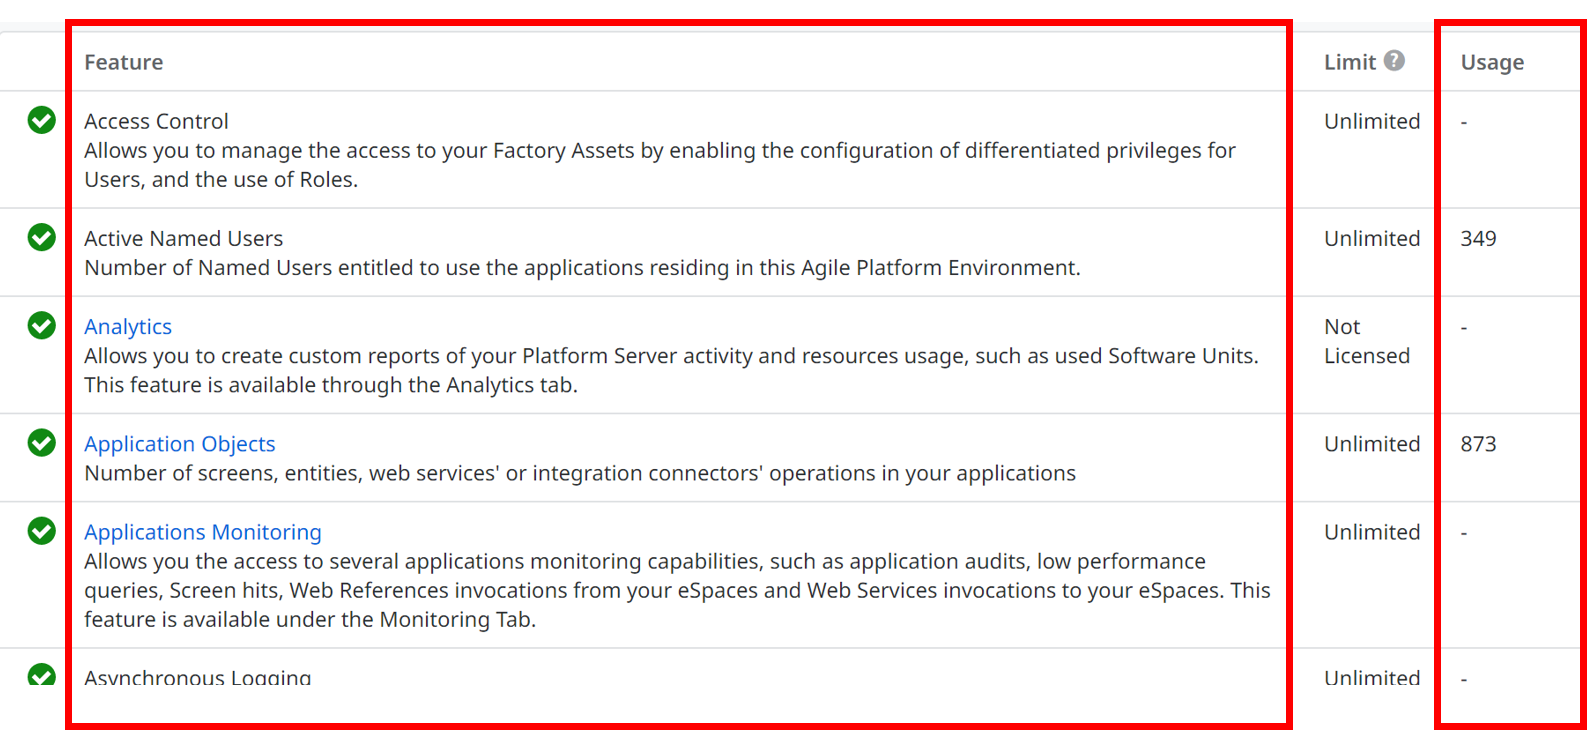
2列目上段のみをfeatureTitles、4列目のみをfeatureValuesに取得。取得した値をループして戻り値(Feature名を指定して対応する値を取れるように)を準備しています。
ページから値を取得するI.grab**の関数は非同期実行されるのでawaitをつけることを忘れずに。従って関数自体もasyncです。
サンプルコード(Licensingページに対するPageObjectとして作成)
const menu = require('../../utilities/menu');  // 「Menuからページを開く
」の処理を参照

const { I } = inject();
module.exports = {
    locators: {
        FeatureTitles: { css: 'tr>td:nth-child(2) span.NoWrap' }, // Title部分はNoWrapクラスがついているため(他に説明部分がある)
        FeatureValues: { css: 'tr>td:nth-child(4) span.NoWrap' }
    },
    open() {
        menu.open('Administration', 'Licensing');
    },
    async getFeatureValueSet() {
        let featureTitles = await I.grabTextFromAll(this.locators.FeatureTitles);
        let featureValues = await I.grabTextFromAll(this.locators.FeatureValues);
        if (featureTitles.length !== featureValues.length)
            throw new Exception("Failed to retrieve OutSystem Features. " +
                                "FeatureTitleCount, FeatureValueCount: " + FeatureTitles.length + ", " + FeatureValues.length);
        let featureTitleValueSet = {};
        for (var i = 0; i < featureTitles.length; i++)
            featureTitleValueSet[featureTitles[i]] = featureValues[i];
        return featureTitleValueSet;
    }
}
用意したコードを利用するテストファイルを作成。
UsernameとPasswordはdotenvモジュールを利用して、.envファイルから取得。
I.writeToFileでファイルを出力していますが、設定ファイル (codecept.conf.js) のhelpersにFileSystem: {}の設定が必要です。
Feature('LicensingInfo');
require('dotenv').config({ path: '.env' });
let utility = require('../utilities/utility.js')
Scenario('Retrieve Active Named Users and Application Objects count', async ({ I, licensingPage }) => {
    I.amOnPage('/');  // Service Centerにアクセス→未ログインなのでログイン画面へ遷移
    I.login(process.env.ACCOUNT, process.env.PASSWORD);
    licensingPage.open();
    let featureTitleValueSet = await licensingPage.getFeatureValueSet();
    let NEWLINE = '\r\n';
    let result = "Active Named Users: " + featureTitleValueSet["Active Named Users"] + NEWLINE +
                 "Application Objects: " + featureTitleValueSet["Application Objects"];
    I.writeToFile("output/LicensingInfo" + utility.getFileSuffix() + ".txt", result);
});