AOPとは
プログラムのふるまいを「アスペクト」と呼ばれる機能単位で記述する。
クラスを横断するような機能を実行ができる。主に使われるのはログの機能等がある
またいくつかの用語がある
用語
・アドバイス(advice)
AOPによって実行されるアクションアドバイスの種類には
Around、Before、Aferなどがある
・ポイントカット(Pointcut)式
実行する場所を式で記述する
・ジョイントポイント(Join point)
常にメソッドの実行を表します。例えば
アドバイス本文でJoinPointを参照すると実行の情報などを取得できる
SpringAOPを試す
以下のことを実施します。
1.Spring AOPを使用したプログラミングを作成する。
※前回のIocコンテナを確認で作成したプログラムを使用します
Spring AOPを追加
pom.xmlを開きdependenciesのタグ内に以下を記述する。
		<dependency>
		<groupId>org.springframework.boot</groupId>
		<artifactId>spring-boot-starter-aop</artifactId>
		</dependency>
アスペクトの作成
@Aspect
このクラスがアスペクトであることを宣言している
LoCコンテナに管理されるように@Componentも使います。
今回使用したポイントカットの指定子は以下の3つを使用
・execution
メソッドがマッチした場合そのメソッドが対象になる
SpringAOPでよく使われる指定子
・within
クラスがマッチした場合クラス内のメソッドが対象になる
・bean
loCコンテナ内のbeanがマッチした場合beanのメソッドが対象になる
package com.example.demo.aspect;

import org.aspectj.lang.JoinPoint;
import org.aspectj.lang.ProceedingJoinPoint;
import org.aspectj.lang.annotation.After;
import org.aspectj.lang.annotation.AfterReturning;
import org.aspectj.lang.annotation.AfterThrowing;
import org.aspectj.lang.annotation.Around;
import org.aspectj.lang.annotation.Aspect;
import org.aspectj.lang.annotation.Before;
import org.springframework.stereotype.Component;

import lombok.extern.slf4j.Slf4j;

@Slf4j
@Aspect
@Component

public class LoggingAspect {

	@Before("execution(String com.example.demo.controller.HomeController.showList(..))")
	public void startLog(JoinPoint jp) {
		log.info("{}:Before処理",jp.getSignature());
	}

	@After("execution(*com.example.demo.controller.HomeController.*(..))")
	public void endLog(JoinPoint jp) {
		log.info("{}:After処理",jp.getSignature());
	}
	@Around("execution(*com.example.demo.*(..))")
	public Object startAndEndLog(ProceedingJoinPoint pjp) throws Throwable{
		log.info("{}:Around全処理",pjp.getSignature());
		Object result = pjp.proceed();
		log.info("{}:Around後処理",pjp.getSignature());

		return result;

	}
	@AfterReturning(pointcut = "within(com.example.demo.controller.*Controller)",returning = "result")
	  public void afterReturning(JoinPoint jp,Object result) {
		log.info("{}:return結果 = {}",jp.getSignature(),result);
	}
	@AfterThrowing(pointcut = "bean(homeController)",throwing = "e")
	public void afterThrowing(JoinPoint jp,Throwable e) {
		log.error("{}:処理中に例外が発生:{}",jp.getSignature(),e.getMessage());
	}
}
確認
ブラウザでhttp://localhost:8080/にアクセスして
@Before、@After、@Around、@AfterReturningがコンソールログに出力されているか確認

ブラウザでhttp://localhost:8080/scopeにアクセスして
@Around、@AfterReturningがコンソールログに出力されているか確認

Spring Securityとは
カスタム要件に合わせて簡単に拡張できる特徴を持つ
例:認識方式を変更、特定のパスをアクセス制御等
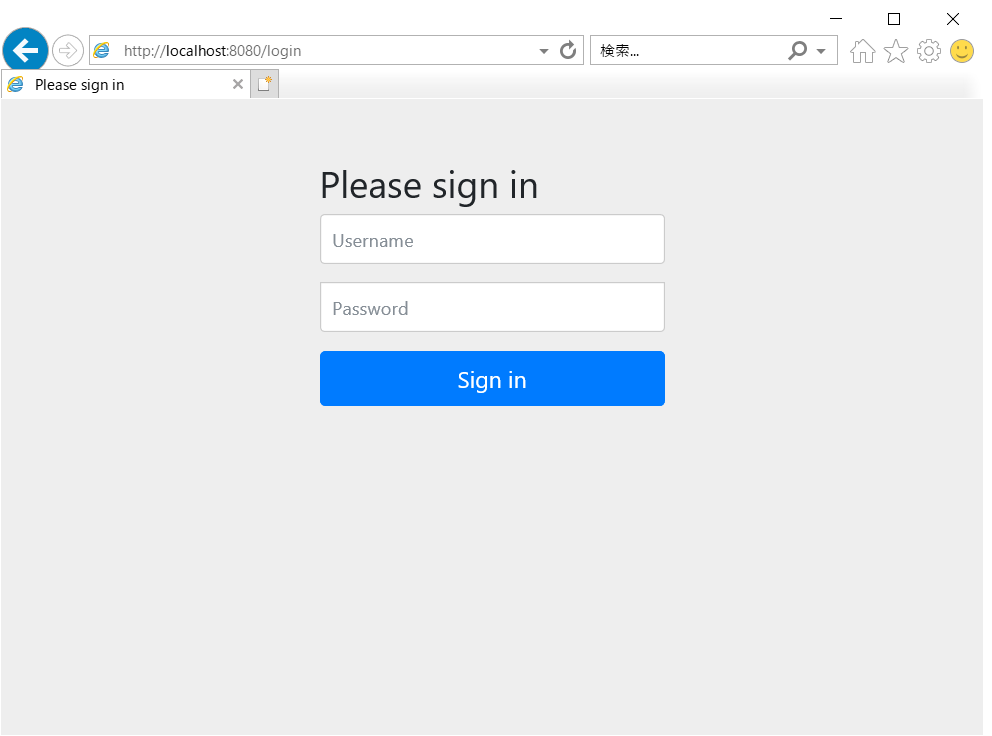
ログイン画面を作成
・標準ログイン画面を表示
・ログアウト機能実装
依存関係
・Spring Boot DevTools
・Spring Security
・Thymeleaf
・Spring Web
セキュリティ作成
セキュリティを設定する場合
WebsecurityConfigurerAdapterを継承してクラスを作成する。
@Configuration、@EnableWebSecurityアノテーションをつける
@EnableWebSecurity
Spring Securityの機能を有効にする。
セキュリティの設定はconfigure(http)とconfigure(auth)メソッドに記載する。
package com.example.demo.config;

import org.springframework.context.annotation.Bean;
import org.springframework.context.annotation.Configuration;
import org.springframework.security.config.annotation.authentication.builders.AuthenticationManagerBuilder;
import org.springframework.security.config.annotation.web.builders.HttpSecurity;
import org.springframework.security.config.annotation.web.configuration.EnableWebSecurity;
import org.springframework.security.config.annotation.web.configuration.WebSecurityConfigurerAdapter;
import org.springframework.security.crypto.bcrypt.BCryptPasswordEncoder;

@Configuration
@EnableWebSecurity
public class SecurityConfig extends WebSecurityConfigurerAdapter{

	@Bean
	public BCryptPasswordEncoder passwordEncoder() {
		return new BCryptPasswordEncoder();
	}
	@Override
	 protected void configure(HttpSecurity http) throws Exception{
		http .authorizeRequests().anyRequest().authenticated().and().formLogin();
	}
	 @Override
	 protected void configure(AuthenticationManagerBuilder auth) throws Exception{
		 auth.inMemoryAuthentication().withUser("user").password(passwordEncoder().encode("password")).authorities("ROLE_USER");
	 }
}
コントローラの作成
package com.example.demo.controller;

import org.springframework.stereotype.Controller;
import org.springframework.web.bind.annotation.GetMapping;

@Controller
public class SecurityController {

	@GetMapping("/")
	public String success() {
		return "success";
	}
}
Thymeleafテンプレートを作成
<!DOCTYPE html>
<html xmlns:th ="www.thymeleaf.org">
<head>
<meta charset="UTF-8">
<title>title</title>
</head>
<body>

	<h2>ログイン成功</h2>
	<a th:href="@{/logout}">ログアウト
	確認メッセージ</a><br>
	<br>
	<form th:action="@{/logout}" method="post">
	<button>ログアウトする</button>
	</form>
</body>
</html>
確認
ブラウザでhttp://localhost:8080/にアクセスしてログインページが表示されることを確認

IDにuser、Passwordにpasswordを入力して「Signin」を押下後ログインできたことを確認

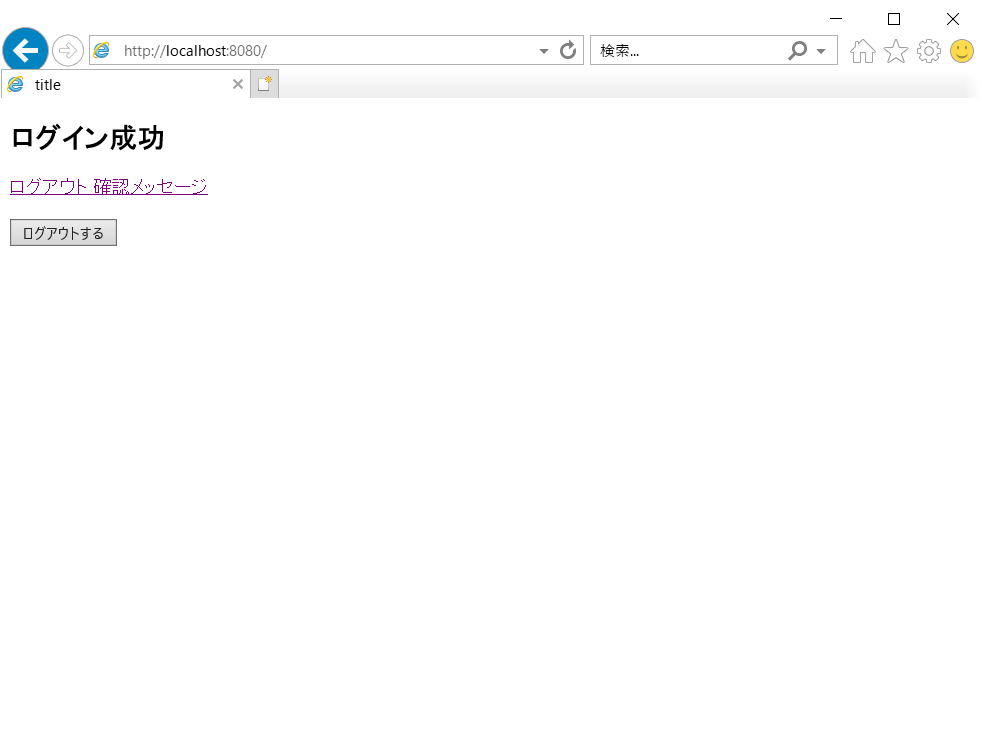
ログアウト確認メッセージを押下後、確認ページが表示されることを確認後「LogOut」を押下してログイン画面が表示されることを確認