検証環境
- Windows10
- Git Bash
- Deployer 6.3.0
EC2にはssh接続可能で、すでに composer と git がインストール済(パスが通っている)前提です。
また、アプリケーションはLaravelで作成されており、リポジトリは github 上にあるものとします。
EC2側での事前準備
Webサーバの停止
正常にデプロイできるまで一旦停止しておきます。
$ sudo systemctl stop httpd
ec2-user の権限調整
apache グループに追加して書込権限を付与しておきます。
(書込権限が無いとデプロイ時に Permission denied エラーになってしまうため)
$ sudo usermod -a -G apache ec2-user

$ sudo chmod 2775 /var/www
$ find /var/www -type d | xargs sudo chmod 2775;
$ find /var/www -type f | xargs sudo chmod 0664;
参考: lostandfound/ec2_www.sh - GitHubGist
known_hostsにgitリポジトリを追加
known_hosts にリポジトリを追加しておきます。
(初回デプロイ時に Are you sure you want to continue connecting (yes/no) と尋ねられると上手くデプロイできないため)
$ git ls-remote git@github.com:your_account/your_repo_name.git
ローカル環境での事前準備
デプロイキーの発行とgithubへの登録
EC2インスタンスがリポジトリからcloneできるようにデプロイキーの生成を行います。
(すでに使用可能な秘密鍵をgithubアカウントに設定している場合、この手順は必須ではありません)
$ ssh-keygen -t rsa -b 4096
$ chmod 400 ~/.ssh/id_rsa
githubのリポジトリ管理画面を開き、
Settings → Deploy Keys →「Add Deploy Key」で公開鍵を登録しておきます。
参考: GithubのDeploy Keysを登録してパスワードなしでアクセスする - Qiita
ssh-agent の起動と秘密鍵の登録
Windows 10 Fall Creator Update 以降であればWindows10にはOpenSSHクライアントが標準で付いており、コマンドプロンプトやPowerShell経由であればサービスを有効化すると ssh-agent が使えるようになります(実行ファイルは C:\Windows\System32\OpenSSH 配下)。
参考: PuTTYを卒業してWindows 10標準のssh client(ベータ)に切り替えた
ただし、Git Bash における ssh 関連実行パスは /usr/bin 配下になっており、上記の手順でサービスを有効化しても使えません。
※ .bash_profile で PATH に C:\Windows\System32\OpenSSH を追加したら秘密鍵のパスフレーズ入力時にコケて無理だった
Git Bash で ssh-agent を自動起動するには .bash_profile と .bash_logout に以下を記述します。
eval `ssh-agent`
// プロセスをキル( exit ではなく直接ウィンドウを閉じるとプロセスが残るので注意)
eval `ssh-agent -k`
参考: git for windows | git bash すると ssh-agent を自動で起動
ssh-agent を自動起動できたら、ssh-add でリポジトリのキーを登録しておきます。
$ ssh-add ~/.ssh/id_rsa
$ ssh-add -l  # 確認
これでEC2インスタンスにログイン後もエージェントフォワーディングによってリポジトリを参照できるようになりました。
参考: ssh agent forwardingを行うサーバー側の要点の備忘録
Deployerのインストール
公式に記載のいずれかの方法でインストールできます。
今回はcurlを使ってWindowsのGit Bash環境にインストールします。
mkdir -p ~/local/bin
cd ~/local/bin

curl -LO https://deployer.org/deployer.phar
mv deployer.phar dep
chmod +x dep
上記に加えて、Laravelのプロジェクト側でも composer require deployer/deployer をやっておくと、デプロイ時の出力に色が付くようになって見やすいです(インストール自体はおそらく必須ではない)。
環境変数の設定
C:\Users\[ユーザ名]\local\bin にパスを通しておきます。
deploy.php の設定
Git Bash でアプリケーションルートへ移動し、dep init を実行します。
表示されるダイアログでは Laravelアプリケーションを選択します。
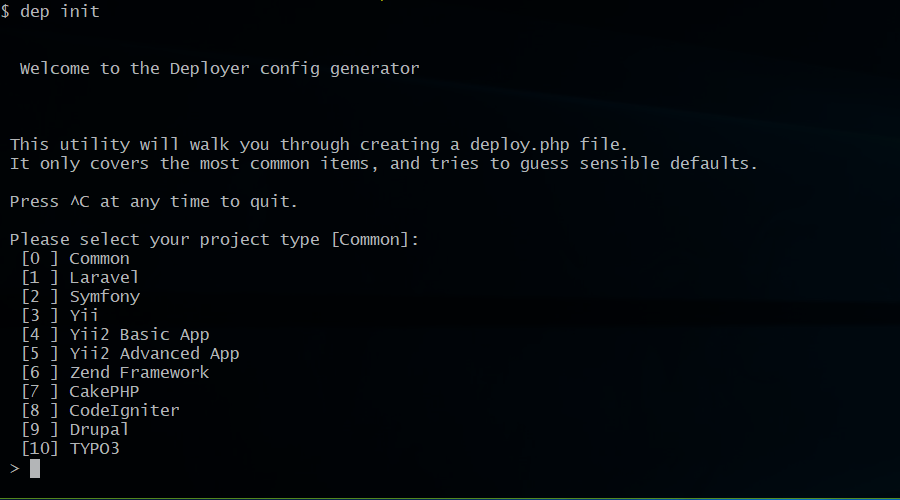
画面に従って進めていくと deploy.php ファイルが作成されます。
内容を以下のように編集します(各設定値は必要に応じて調整してください)。
<?php
namespace Deployer;

require 'recipe/laravel.php';

/**
 * プロジェクト名
 */
set('application', 'your-app-name');

/**
 * プロジェクトのリポジトリ(デプロイ時にEC2上でclone)
 */
set('repository', 'git@github.com:your_account/your_repo_name.git');

/**
 * httpsでgit cloneする場合、パスワード入力のダイアログを表示するかどうか
 *( Windowsクライアントは非対応なのでfalse )
 */
set('git_tty', false);

/**
 * それぞれのリリースバージョンで
 * 共有するファイルとディレクトリの指定
 */
set('shared_files', []);
set('shared_dirs', [
    'storage/app',
    'storage/framework/cache',
    'storage/framework/sessions',
    'storage/framework/views',
    'storage/logs'
]);

/**
 * Webサーバから書込可能なディレクトリの指定
 */
set('writable_dirs', []);

/**
 * ホスト設定
 */
host('your_domain or global IP')
    ->stage('dev')
    ->user('ec2-user')
    ->port(22)
    ->identityFile('~/.ssh/your/ec2/ssh/key')
    ->multiplexing(false)
    ->set('deploy_path', '/var/www/html');

// ->forwardAgent(true) はデフォルトみたいなので不要と思います


/**
 * タスク設定
 */
task('build', function () {
    run('cd {{release_path}} && build');
});

// リリースディレクトリのパーミッション調整
// (clone時にパーミッションが ec2-user:ec2-user となるため)
task('release-permission', function () {
    desc('[release-permission] task starting...');
    run('sudo chown -R apache. {{release_path}}');
    desc('[release-permission] task has been completed.');
});

// 開発環境用の .env を .env.dev というファイル名で作成しておき、デプロイ時に置換する
task('laravel-env', function () {
    desc('[laravel-env] task starting...');

    $stage = get('stage');
    $src = ".env.${stage}";
    $path = get('deploy_path');
    $shared_path = "${path}/shared";

    run("if [ -e $(echo ${shared_path}/.env ) ]; then cp {{release_path}}/${src} ${shared_path}/.env; fi");
    run("cp {{release_path}}/${src} {{release_path}}/.env");

    desc('[laravel-env] Laravel task has been complated.');
});

// マイグレーション
task('laravel-migration', function() {
    desc('[laravel-migration] task starting...');

    // キャッシュでエラーが続いてしまう場合は一旦クリアすると動作します
    // run('/usr/bin/php {{release_path}}/artisan config:clear');

    run('/usr/bin/php {{release_path}}/artisan migrate');
    desc('[laravel-migration] task has been completed.');
});

/**
 * タスク実行タイミングの指定
 */
before('deploy:shared','laravel-env');
before('deploy:symlink', 'release-permission');
after('release-permission', 'laravel-migration');

// [Optional] if deploy fails automatically unlock.
after('deploy:failed', 'deploy:unlock');
{{release_path}} は具体的に言うと {{deploy_path}}/releases/[リリース番号]
つまり /var/www/html/releases/1 のようなパスで展開されます。
デフォルトでは5つのバージョンまでサーバ上に保持するようです。
Deployer - keep_releases
composer.json の修正
シーディングでFactoryを使っている場合、Fatal error: Class 'Faker\Factory' not found のエラーが発生してコケます。composer.json の faker 記述箇所を require-dev から require に移動してこれを回避します。
$ vi composer.json
"require": {
    "fzaninotto/faker": "^1.4",  // こちらへ移動
},
"require-dev": {
    // faker を削除
},
$ composer update
参考: https://github.com/laravel/framework/issues/14130
デプロイの実行
dep deploy [ホスト設定のstage名称] [オプション] でデプロイします。
$ cd /path/to/your/local/project_root
$ dep deploy dev -vvv  # -vvv でデプロイ過程の詳細表示
デプロイ成功のメッセージが表示されればOKです。
エラーが発生した場合は、詳細表示をもとに原因特定して再度デプロイを実行します。
Webサーバの再起動
最後にドキュメントルートを設定してWebサーバを再起動すれば完了です。
$ sudo vi /etc/httpd/conf/httpd.conf
# 下記に変更
DocumentRoot "/var/www/html/current/public"
$ sudo systemctl start httpd