この記事の目的
EC-CUBE4のPurchaseFlowをざっくりと理解することが目的です。
そもそもPurchaseFlowとは?
EC-CUBE4に実装されている、ショッピングカートの計算や受注処理、商品購入の流れ等を制御する仕組みのことをPurchaseFlowと呼びます。
設計自体は、受注明細の集計、ポイント計算、消費税計算、配送料の計算、商品の在庫計算といった多くの必要となるロジックをProsessorやValidatorといった小さなクラスに分けることによって、PurchaseFlowが無かったEC-CUBE2系や3系と比べて再利用や拡張がしやすくなっているようです。
ただ、クラス設計自体はいくぶん複雑になっているため、理解するまでは難しいと感じることが多いと思われます。
スライドで全体像をつかむ
まずは、視覚情報をフルに使えるスライドで全体像を把握しましょう。
2019年2月7日に行われたEC-CUBE東京UG勉強会の資料です。
処理の流れが分かりやすくまとまっているため、PurchaseFlowを理解する最初のステップとしては最適なのではないかと思います。
PurchaseFlowのツリー表示で呼び出される順序を知る
PurchaseFlowは小さなクラスに分割されているため、シンプルな作りですが、複数ファイルにロジックが書かれているため、全体像を把握しづらくなるという欠点があります。
しかし、そういった欠点を補う素晴らしいプルリクエストが届いています。
まだ、本体ソースにマージされていないので、checkoutして使ってみましょう。
$ hub checkout https://github.com/EC-CUBE/ec-cube/pull/4223
※ hubコマンドを使っています。(インストール方法$ brew install hub)
別のやり方でもOKです。
xdebugでPurchaseFlow::dump()の値をデバッグします。
※ xdebugが設定されていなければ、printデバッグでも可です。
src/Eccube/Service/PurchaseFlow/PurchaseFlow.php
の適当な箇所でブレークポイントを張り、チェックしてみます。
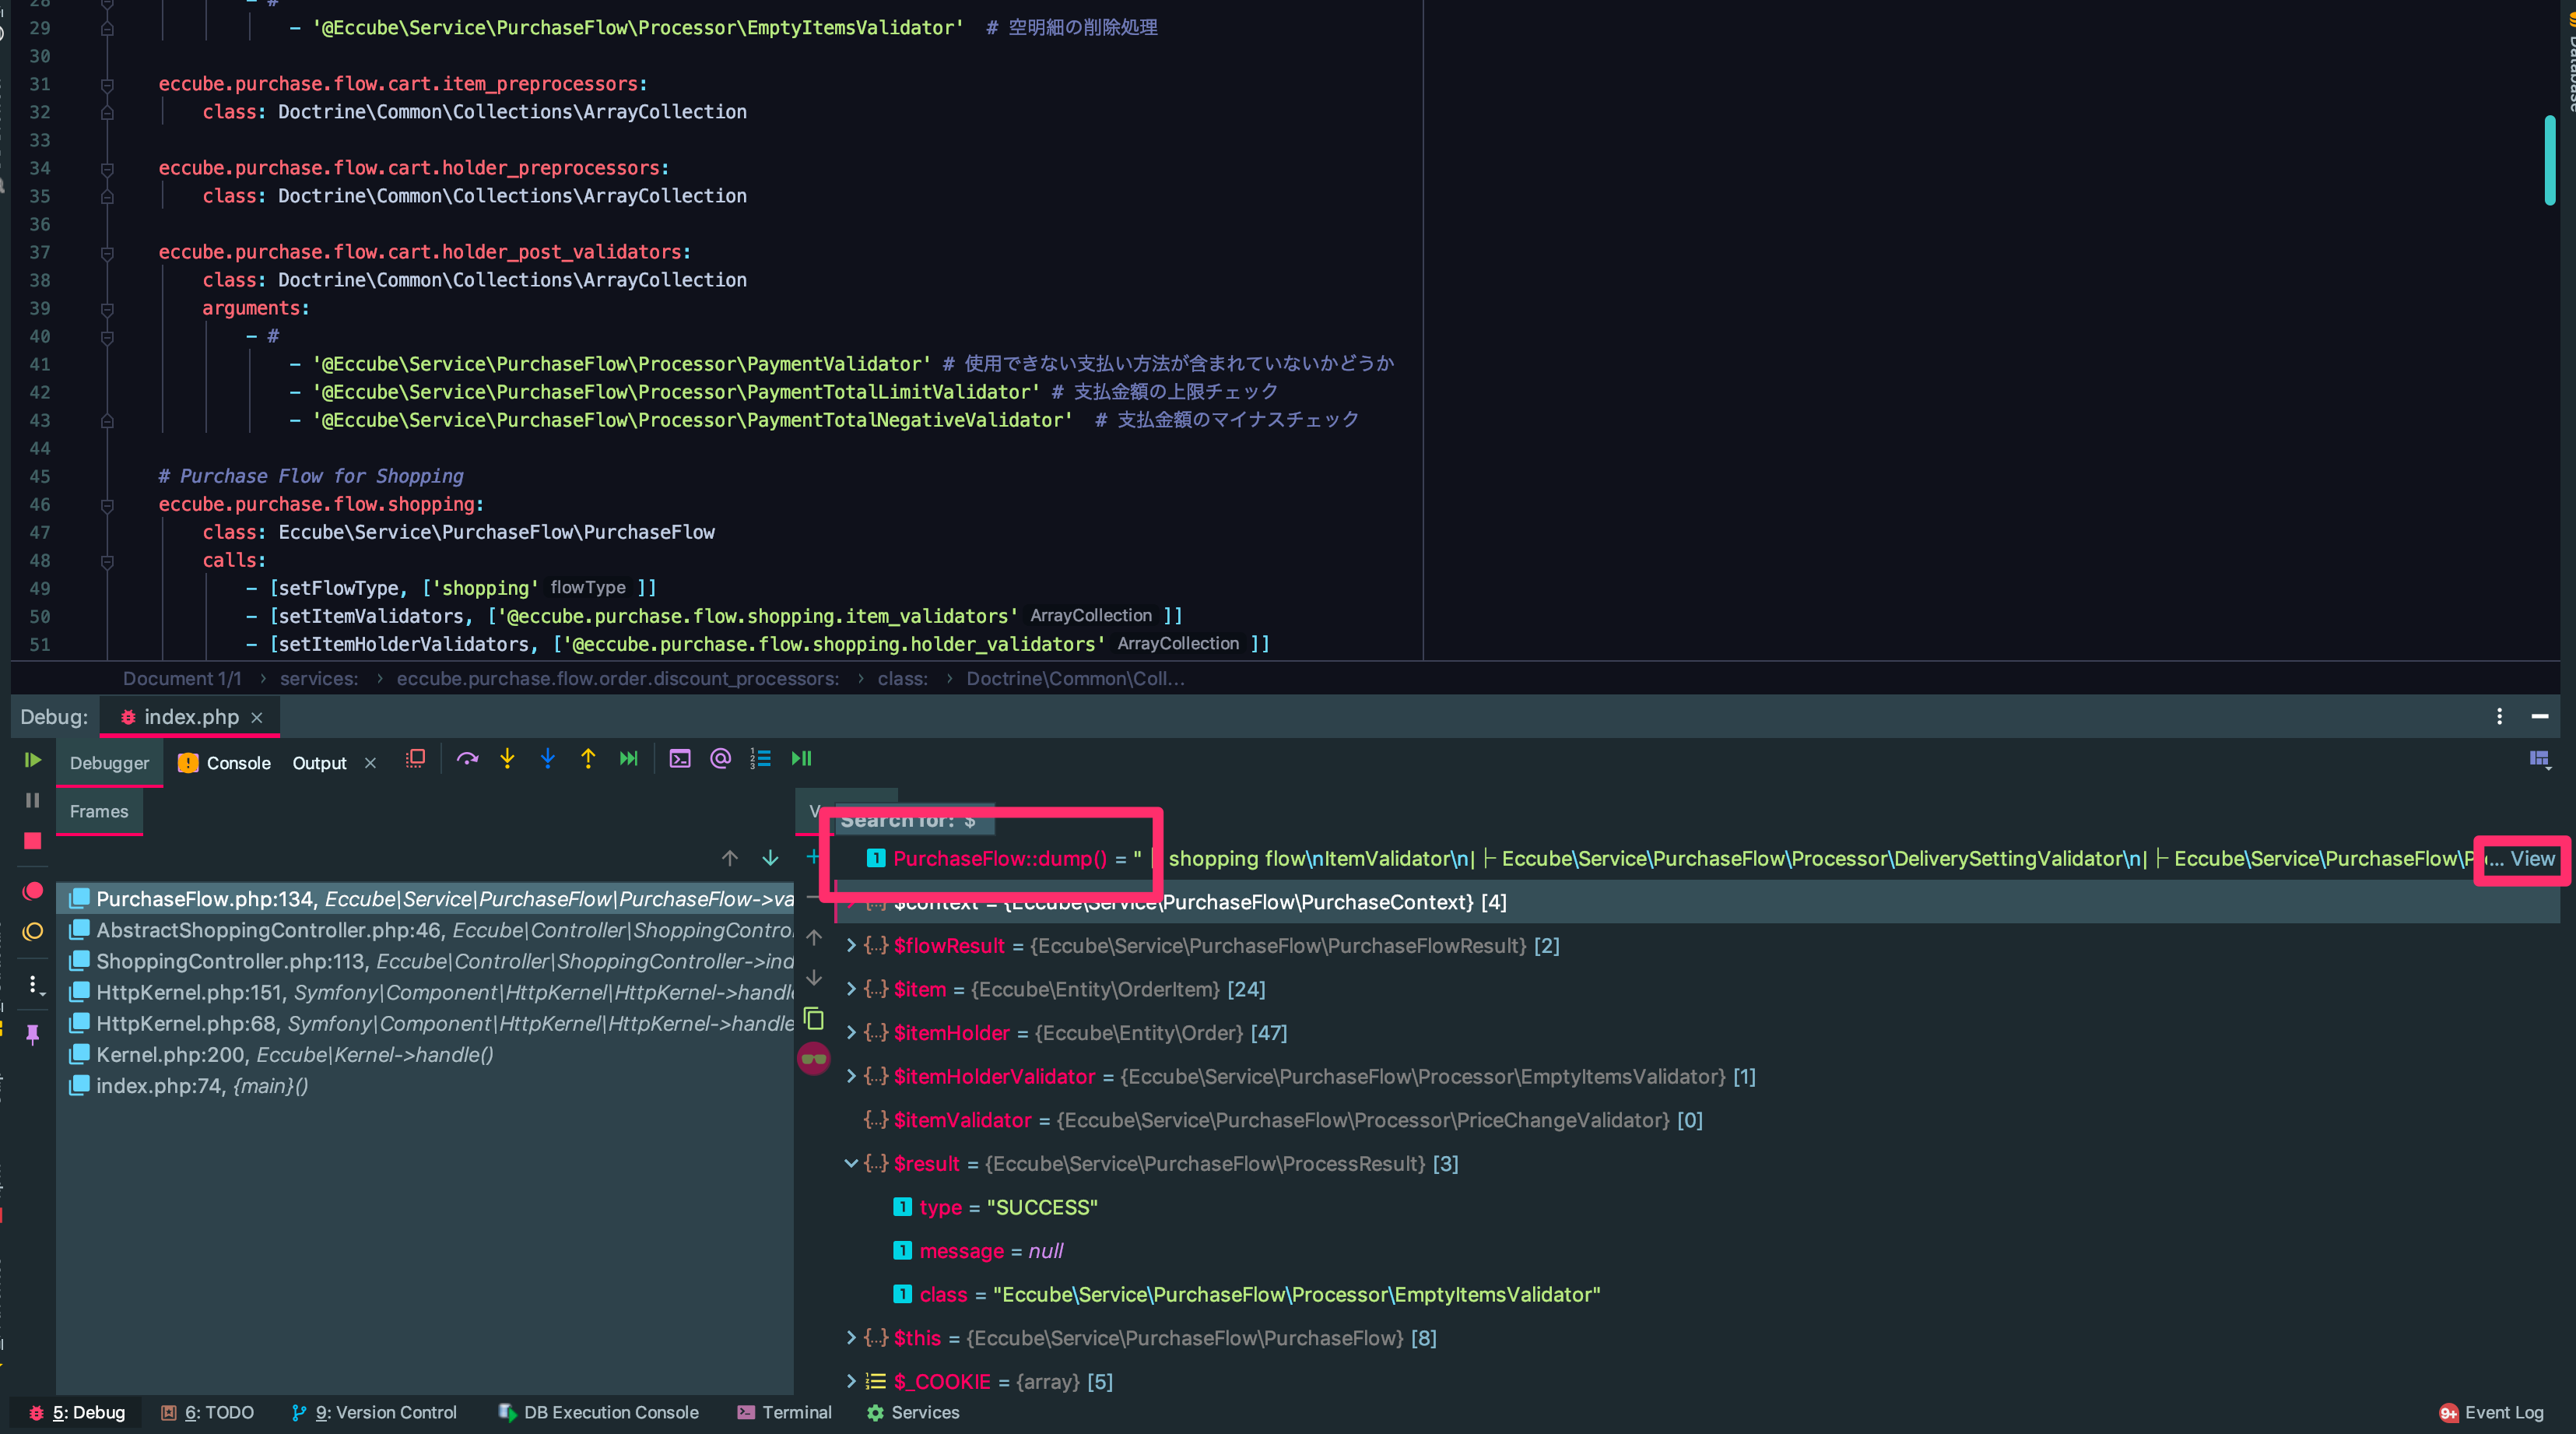
phpstormの場合は赤枠の部分にPurchaseFlow::dump()と入力し、右端viewボタンを押すと以下の画像の様になります。
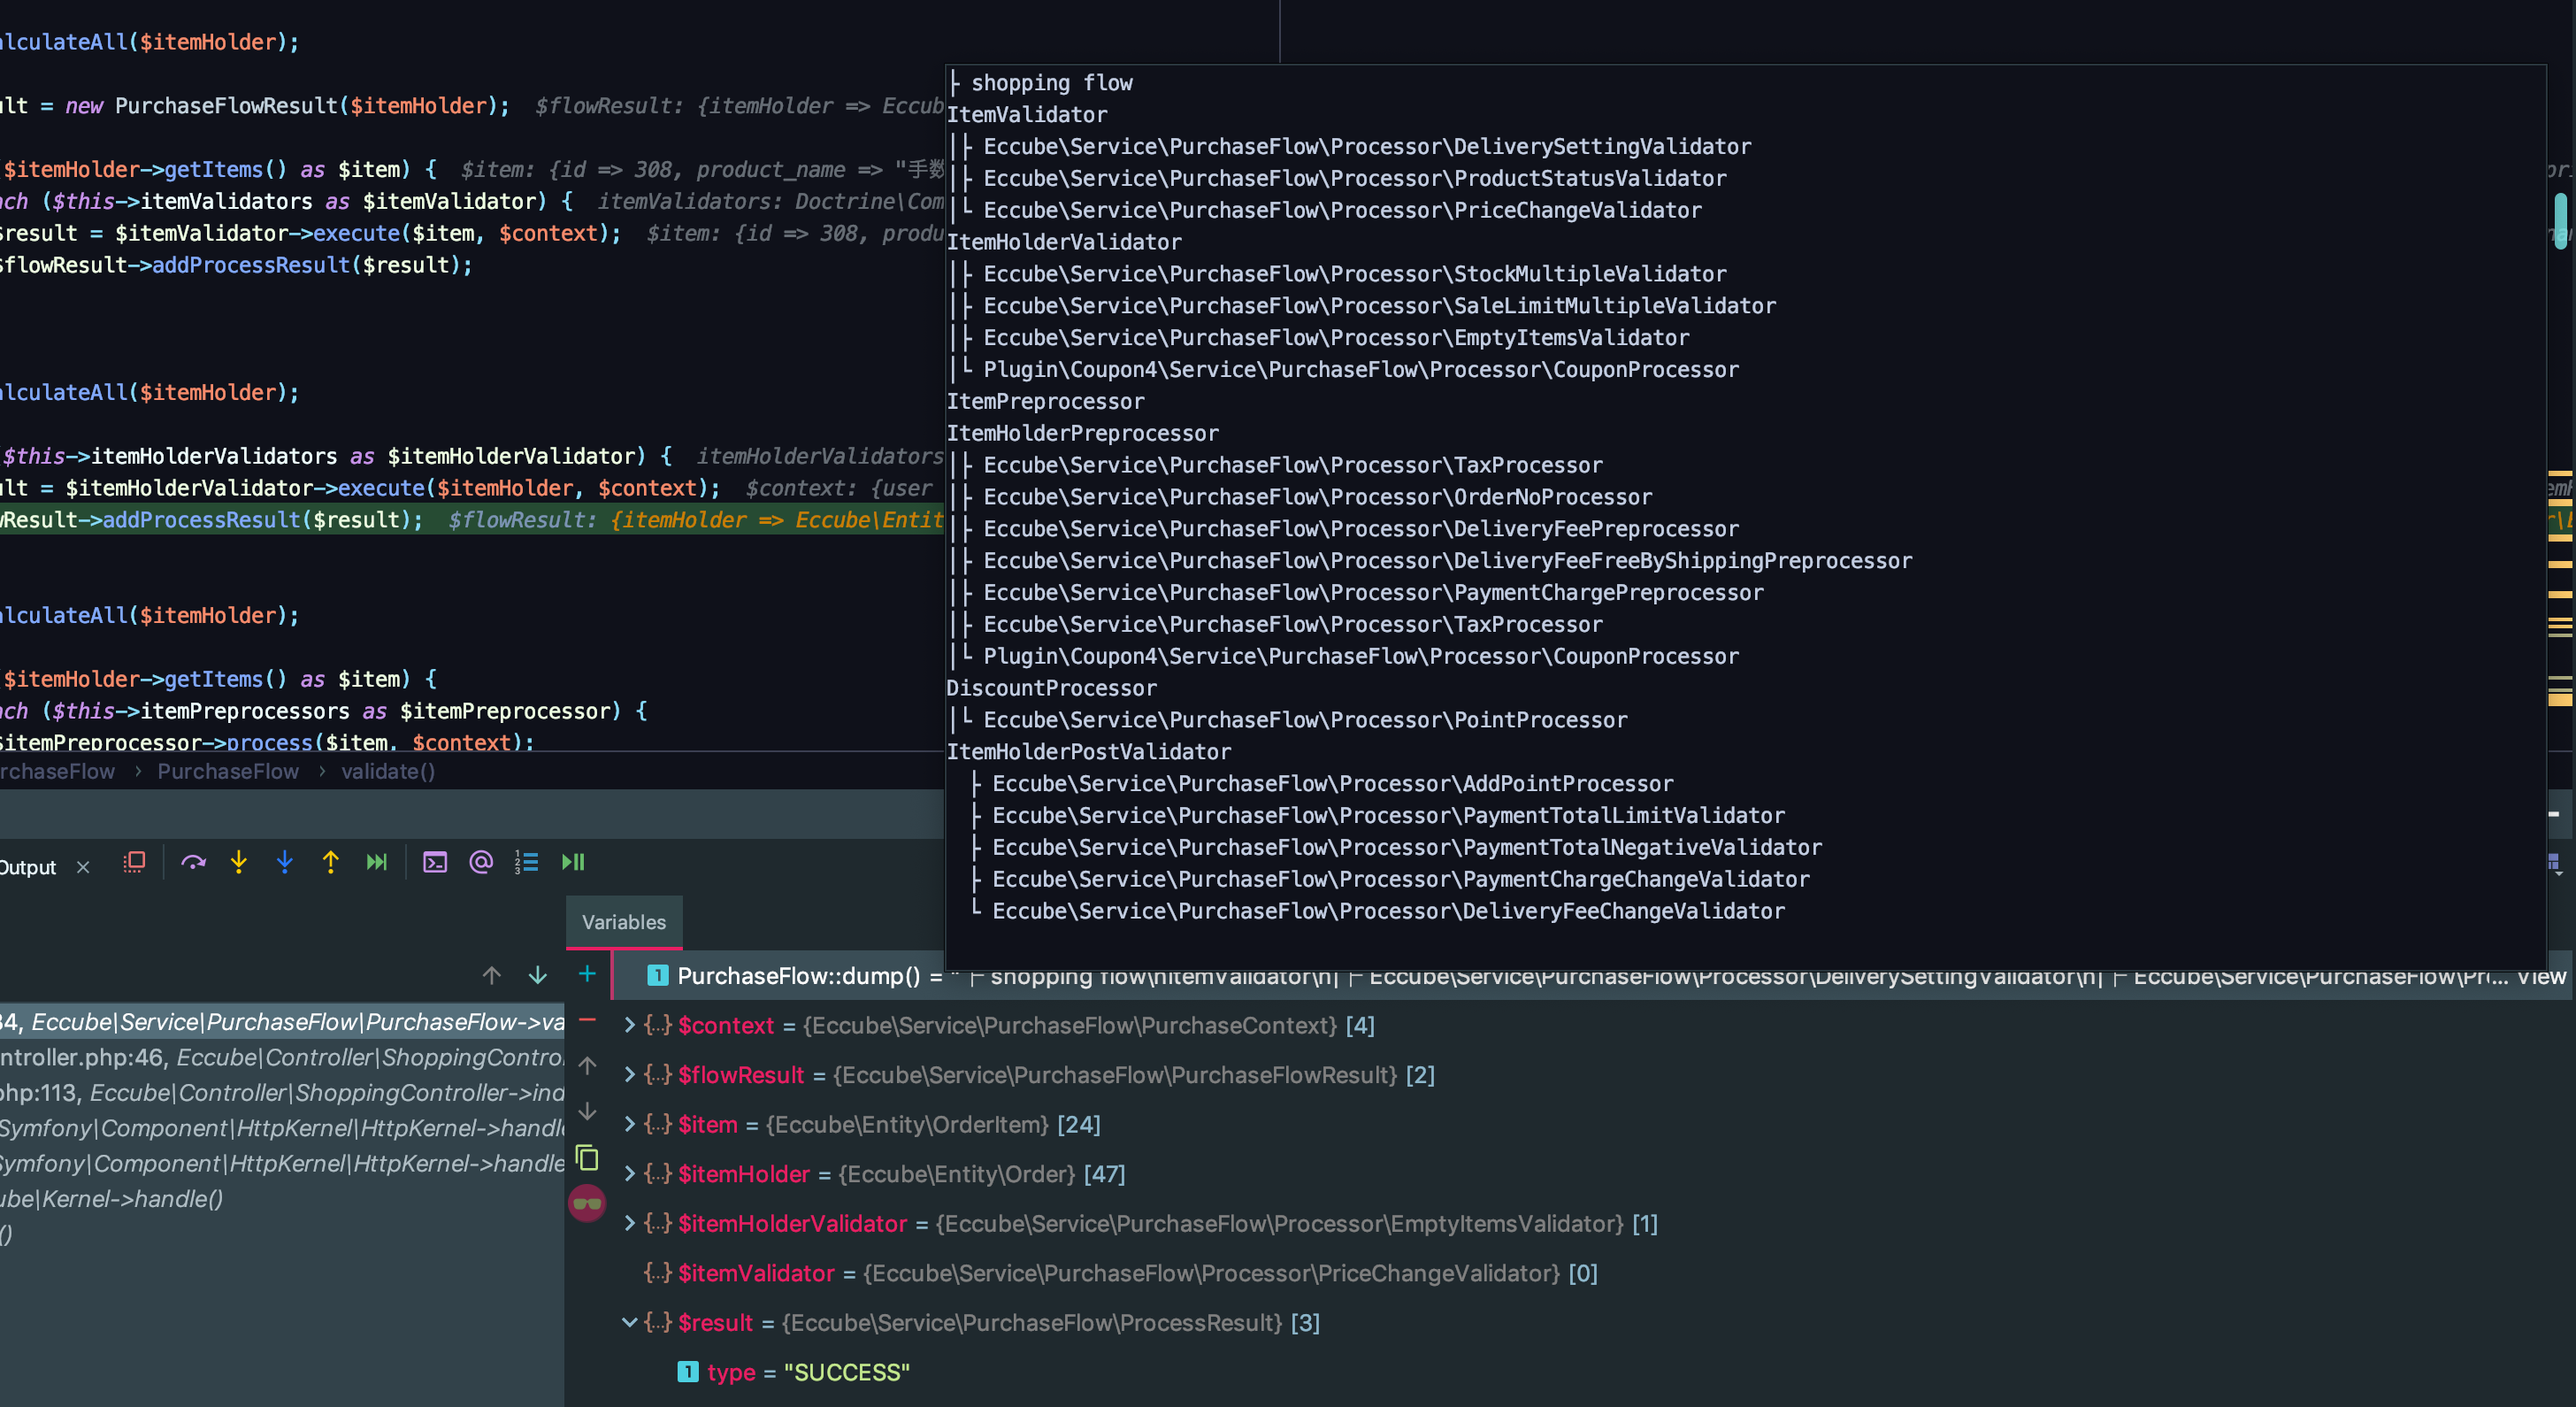
今回は、購入手続き画面に遷移する処理でdumpしました。
その際に実行されるShopping Flowがひと目で分かるようになっています。
├ shopping flow
ItemValidator
│├ Eccube\Service\PurchaseFlow\Processor\DeliverySettingValidator
│├ Eccube\Service\PurchaseFlow\Processor\ProductStatusValidator
│└ Eccube\Service\PurchaseFlow\Processor\PriceChangeValidator
ItemHolderValidator
│├ Eccube\Service\PurchaseFlow\Processor\StockMultipleValidator
│├ Eccube\Service\PurchaseFlow\Processor\SaleLimitMultipleValidator
│├ Eccube\Service\PurchaseFlow\Processor\EmptyItemsValidator
│└ Plugin\Coupon4\Service\PurchaseFlow\Processor\CouponProcessor
ItemPreprocessor
ItemHolderPreprocessor
│├ Eccube\Service\PurchaseFlow\Processor\TaxProcessor
│├ Eccube\Service\PurchaseFlow\Processor\OrderNoProcessor
│├ Eccube\Service\PurchaseFlow\Processor\DeliveryFeePreprocessor
│├ Eccube\Service\PurchaseFlow\Processor\DeliveryFeeFreeByShippingPreprocessor
│├ Eccube\Service\PurchaseFlow\Processor\PaymentChargePreprocessor
│├ Eccube\Service\PurchaseFlow\Processor\TaxProcessor
│└ Plugin\Coupon4\Service\PurchaseFlow\Processor\CouponProcessor
DiscountProcessor
│└ Eccube\Service\PurchaseFlow\Processor\PointProcessor
ItemHolderPostValidator
 ├ Eccube\Service\PurchaseFlow\Processor\AddPointProcessor
 ├ Eccube\Service\PurchaseFlow\Processor\PaymentTotalLimitValidator
 ├ Eccube\Service\PurchaseFlow\Processor\PaymentTotalNegativeValidator
 ├ Eccube\Service\PurchaseFlow\Processor\PaymentChargeChangeValidator
 └ Eccube\Service\PurchaseFlow\Processor\DeliveryFeeChangeValidator
上から順に実行ファイルが文字列で出力されています。
同様のやり方で、CartFlowやOrderFlowも処理の流れをダンプすることができるでしょう。
※ まだ本体にマージされていないため、その点は注意してください。
xdebugで詳細な処理を追う
PurchaseFlowの処理の流れを掴んだら、さらに詳しく内部の処理について知るためにxdebugで処理を追ってみましょう。
prosessorクラスの内部の処理を追うことで、いつ、どこで、どのような処理が呼び出されるのか、その時点でどのようなオブジェクトが存在するのかなどを確認することができます。
ちなみに、設定ファイルは
app/config/eccube/packages/purchaseflow.yaml
のようです。
まとめ
- スライドで全体像をつかむ
- PurchaseFlowのツリー表示で呼び出される順序を知る
- xdebugで詳細な処理を追う
上記三点の流れで、PurchaseFlowの流れをつかめたのではないでしょうか?
また、他にもこんな方法があるよという場合はコメントいただけると助かります。
私もまだまだPurchaseFlowについては十分に理解していないので、今からxdebugで潜って探索してみます。それではまた。