Alibaba Cloud Advent Calendar 2020 22日目の記事になります。
本記事はBuild Your First Serverless Website with Alibaba CloudのTutorialを参考にServerlessのWEBサイトを構築した際の手順紹介となります。今回は中国版アカウントではなく国際版アカウントで構築しました。
■ Disclaimer
本手順は完全性、正確性、有用性、安全性などを保証するものではありません。
本手順に基づき実施した判断および起こした行動によりいかなる問題が発生しても一切責任をおいません。
本手順を利用の際は全て自己責任にてお願いします。
■ Prerequisites
本手順は事前に下記作業を実施しています。
- Ubuntu 20.04.1 LTS(作業端末)の準備 ※WSL2のUbuntu
- git導入済
- nodejs導入済(10.19.0)
- npm導入済(6.14.4)
- Alibaba Cloud コンソールよりRAMユーザ作成
- administratoraccess権限付与
- 検証用途の為、全権限付与
- AccessKeyId/AccessKeySecret取得
- administratoraccess権限付与
- Alibaba Cloud コンソールよりサービスのActive化
- API Gateway
- Function Compute
- Tablestore
■ How it works
OSSに設置した静的ファイルにアクセスすると、API Gatewayを介してFunction Computeと通信し、TableStoreのvisitsTableへ訪問回数を保存するというシンプルな構成となります。
対象リージョンはap-northeast-1です。

OSS : AWSでいうS3です
API Ggteway : AWSでいうAPI Gatewayです
Function Compute : AWSでいうLambdaです
Tablestore : AWSでいうDynamoDBです
■ Let’s Get Started
Install Fun
今回はAlibaba Cloudの公式ツールである「fun」を利用してサーバーレスアプリケーションのリソースを配置するため、Ubuntu 20.04.1 LTS(作業端末)にfunをインストールします。
僕の環境ではsudoが必要でしたが本来はsudo無しでも問題ないかもしれません。
$ whoami
ubuntu
$ sudo npm install @alicloud/fun -g
Get Credentials
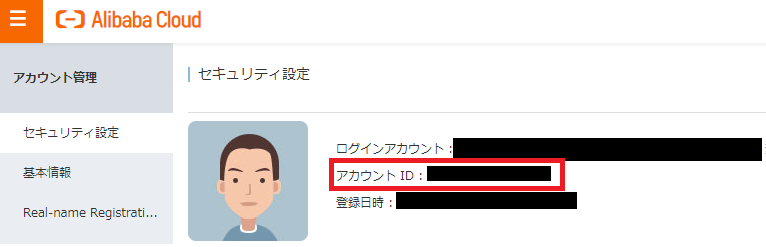
認証情報となる.envファイルをBuildYourServerlessディレクトリ直下に作成します。
AlibabaCloudのアカウントIDについてはAlibaba Cloudコンソールのアカウント管理画面で確認できます。
$ mkdir BuildYourFirstServerlss
$ cd BuildYourFirstServerless

$ cat << EOF > .env
ACCESS_KEY_SECRET=***RAMユーザのAccessKeySecret***
ACCESS_KEY_ID=***RAMユーザのAccessKeyID***
ACCOUNT_ID=***AlibabaCloudのアカウントID****
REGION=ap-northeast-1
EOF
Create the Template
サーバレスのリソースをデプロイするために必要となるYAMLファイル(template.yml)をBuildYourServerlessディレクトリ直下に作成します。
YAMLファイル内のEndpointやTablestoreで利用している
- aboutmepage2020test
- aboutme2020test
についてはユニークである必要がある為、YAMLファイルを作成する場合には別の名前に書き換えてください。
TableNameやリージョンをap-northeast-1以外に変更する場合は対象個所を適宜書き換えてください。
$ cat << 'EOF' > template.yml
ROSTemplateFormatVersion: '2015-09-01'
Transform: 'Aliyun::Serverless-2018-04-03'
Resources:
  aboutmepage2020test:
    Type: 'Aliyun::Serverless::Service'
    Properties:
      Description: 'Function Compute Service for the About Page'
      Policies:
      - AliyunOTSFullAccess
    visits:
      Type: 'Aliyun::Serverless::Function'
      Properties:
        Handler: visits.handler
        Runtime: nodejs8
        CodeUri: './'
        Timeout: 10
        EnvironmentVariables:
          InstanceName: aboutme2020test
          TableName: visitsTable
          Endpoint: https://aboutme2020test.ap-northeast-1.ots.aliyuncs.com

  aboutme2020test:
    Type: 'Aliyun::Serverless::TableStore'
    Properties:
      ClusterType: HYBRID
      Description: 'Table used to store visits'
    visitsTable:
      Type: 'Aliyun::Serverless::TableStore::Table'
      Properties:
        PrimaryKeyList:
        - Name: count_name
          Type: STRING

  aboutmeapi2020test:
    Type: 'Aliyun::Serverless::Api'
    Properties:
      StageName: RELEASE
      DefinitionBody:
        '/visits':
          get:
            x-aliyun-apigateway-api-name: visits_get
            x-aliyun-apigateway-fc:
              arn: acs:fc:::services/${aboutmepage2020test.Arn}/functions/${visits.Arn}/
EOF
Create the Function
Function Computeにデプロイするコードとなるvisits.jsをBuildYourServerlessディレクトリ直下に作成します。
$ cat << 'EOF' > visits.js
const TableStore = require('tablestore')
const Long = TableStore.Long
async function getViewsCount(client) {
    const response = await client.getRow({
        tableName: process.env['TableName'],
        primaryKey: [{ count_name: 'views' }],
        maxVersions: 1,
    })
    return response.row && response.row.primaryKey
        ? response.row.attributes[0].columnValue.toNumber()
        : null
}
exports.handler = function (event, context, callback) {
    (async () => {
        let success = false
        let views = null
        const client = new TableStore.Client({
            accessKeyId: context.credentials.accessKeyId,
            secretAccessKey: context.credentials.accessKeySecret,
            stsToken: context.credentials.securityToken,
            endpoint: `http://${process.env['InstanceName']}.${context.region}.ots.aliyuncs.com`,
            instancename: process.env['InstanceName'],
        })
        do {
            views = await getViewsCount(client) || 0
            const tableName = process.env['TableName']
            const updateOfAttributeColumns = [{ PUT: [{ count: Long.fromNumber(views + 1) }] }]
            const primaryKey = [{ count_name: 'views' }]
            const condition = views
                ? new TableStore.Condition(TableStore.RowExistenceExpectation.IGNORE, new TableStore.SingleColumnCondition('count', Long.fromNumber(views), TableStore.ComparatorType.EQUAL))
                : new TableStore.Condition(TableStore.RowExistenceExpectation.EXPECT_NOT_EXIST, null)
            try {
                await client.updateRow({
                    tableName,
                    condition,
                    primaryKey,
                    updateOfAttributeColumns,
                })
                success = true
            } catch (ex) {
                console.log(ex)
            }
        } while (!success)
        callback(null, { isBase64Encoded: false, statusCode: 200, body: views })
    })()
}
EOF
Deploy
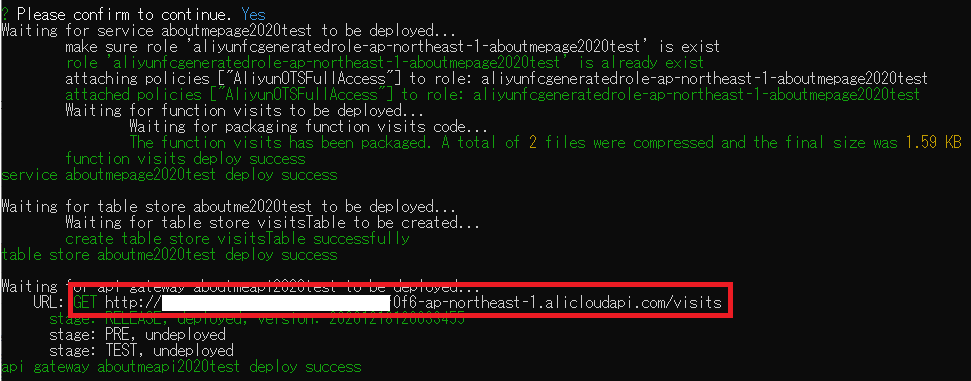
fun deployを実行します。
$ fun deploy

using template: template.yml
using region: ap-northeast-1
using accountId: **************
using accessKeyId: *************
using timeout: 10

Collecting your services information, in order to caculate devlopment changes...

Resources Changes(Beta version! Only FC resources changes will be displayed):

┌─────────────────────┬──────────────────────────────┬────────┬──────────────────────┐
│ Resource            │ ResourceType                 │ Action │ Property             │
├─────────────────────┼──────────────────────────────┼────────┼──────────────────────┤
│ aboutmepage2020test │ Aliyun::Serverless::Service  │ Delete │ Role                 │
├─────────────────────┼──────────────────────────────┼────────┼──────────────────────┤
│ aboutmepage2020test │ Aliyun::Serverless::Service  │ Add    │ Policies             │
├─────────────────────┼──────────────────────────────┼────────┼──────────────────────┤
│                     │                              │        │ CodeUri              │
│ visits              │ Aliyun::Serverless::Function │ Modify ├──────────────────────┤
│                     │                              │        │ EnvironmentVariables │
└─────────────────────┴──────────────────────────────┴────────┴──────────────────────┘

? Please confirm to continue. (Y/n)Yes
デプロイ後に表示される「GET http://****************.ap-northeast-1.alicloudapi.com/visits」は控えておきます。
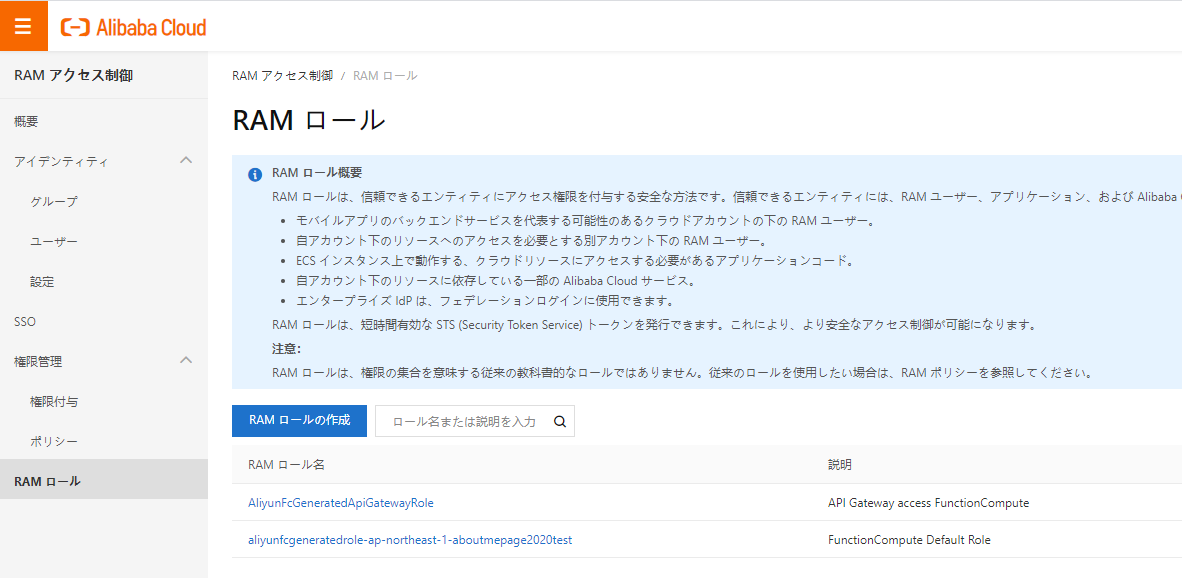
デプロイが正常終了するとAPI Gateway/Function Compute/Tablestoreおよびサービスに紐づくRAMロールが作成されます。
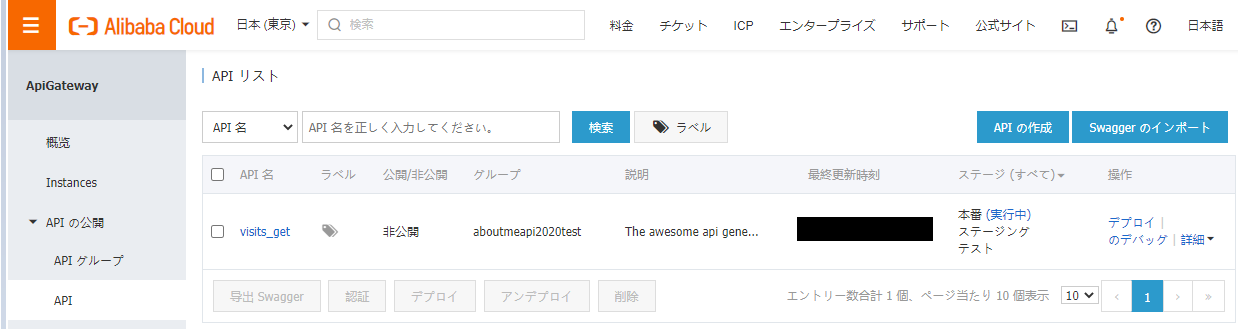
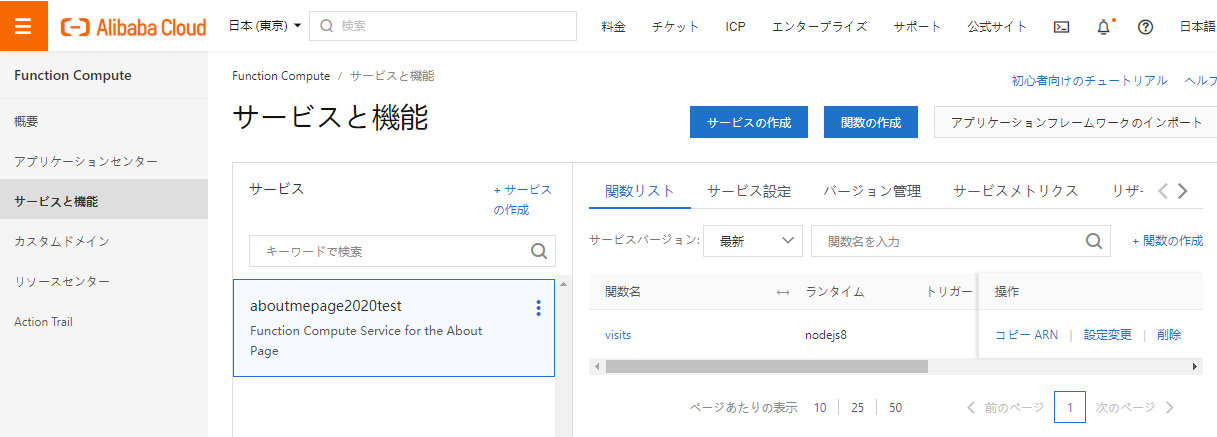
Alibaba CloudコンソールよりAPI GatewayとFunction Compute、Tablestore、RAMロールの設定画面を確認しておきます。
■API Gateway
■Function Compute
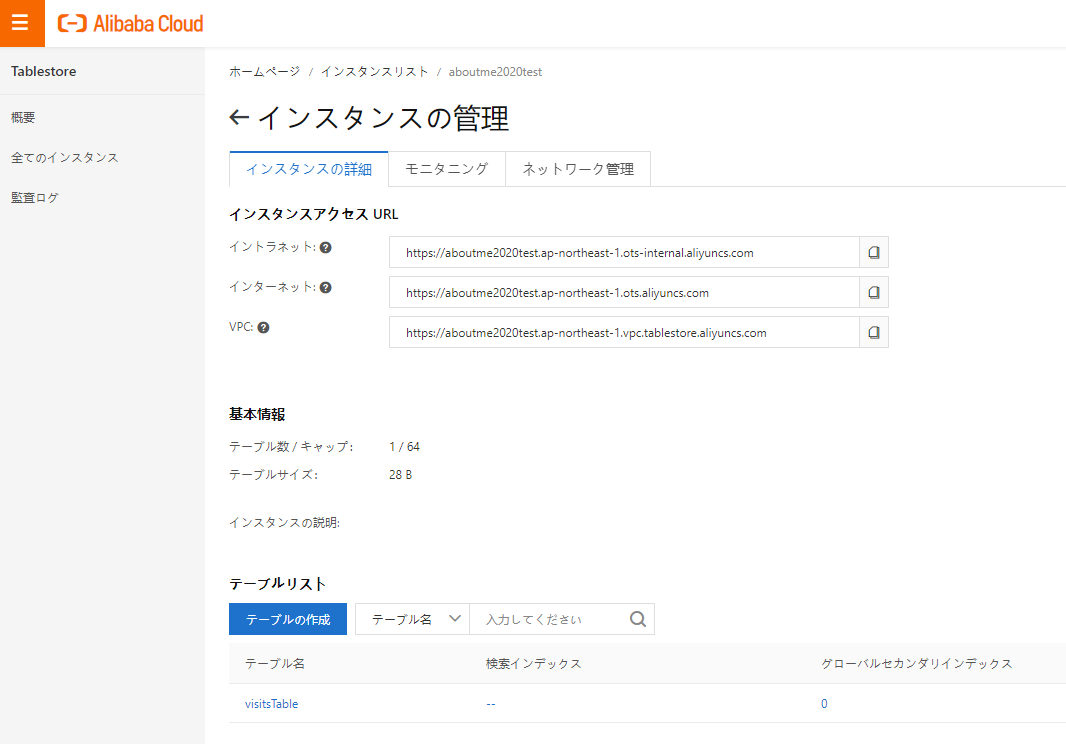
■Tablestore
■RAMロール
Create a Public Bucket
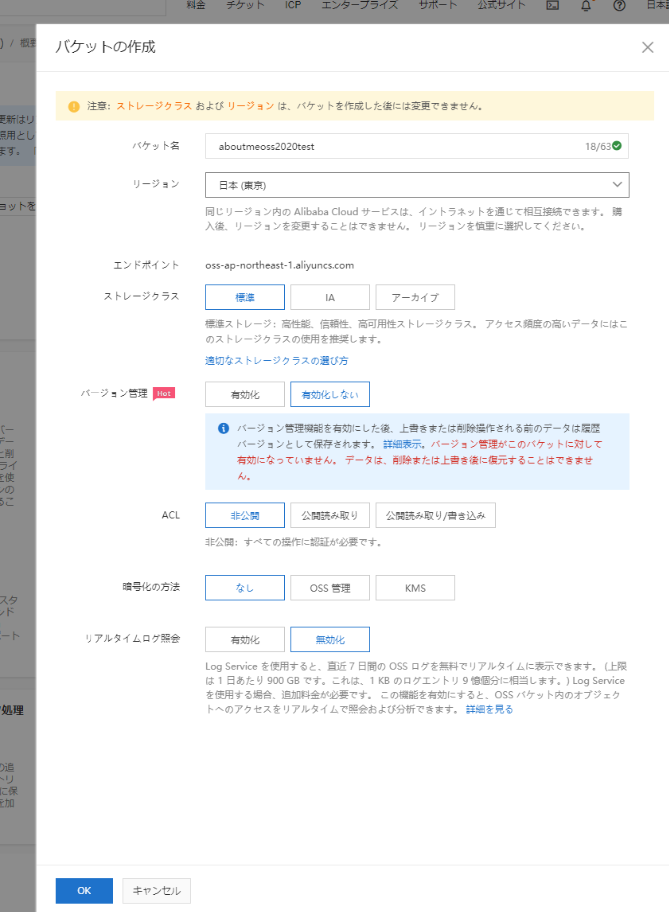
Alibaba Cloud コンソールのOSS画面より「バケットの作成」を行います。
バケット名はユニークである必要がある為、適宜書き換えてください。
作成画面ではバケット名以外はデフォルトのまま【OK】を選択します。
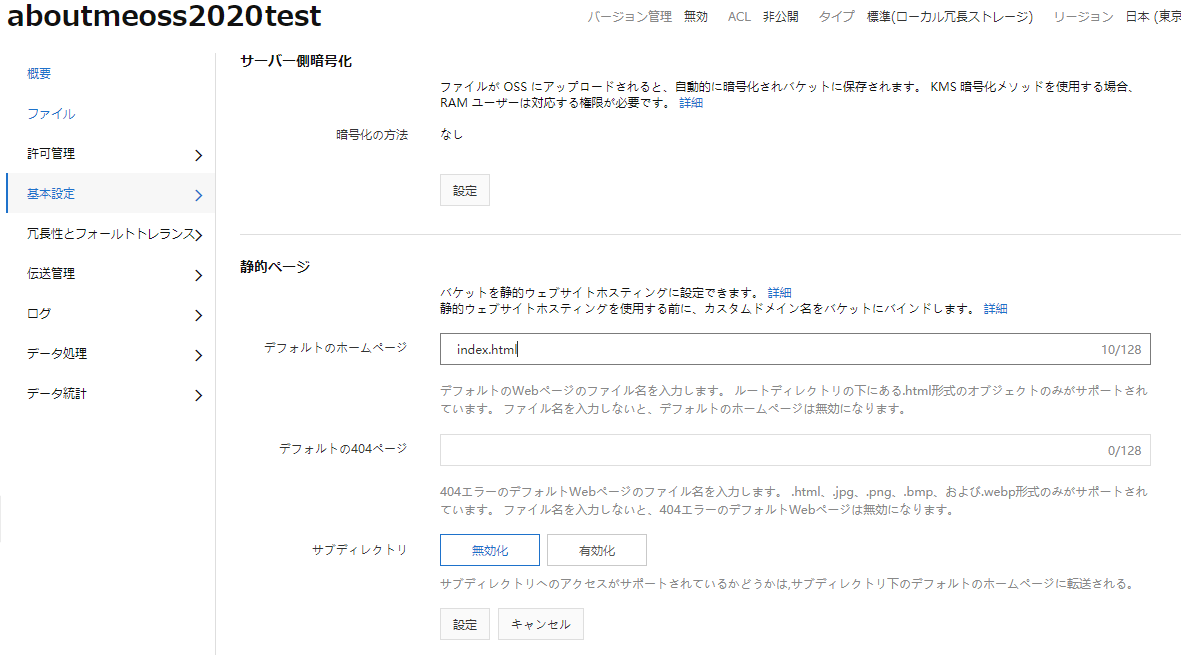
バケット作成後、バケットの「基本設定」に移動します。
静的ページのデフォルトホームページの値に「index.html」を入力の上、【設定】を選択します。
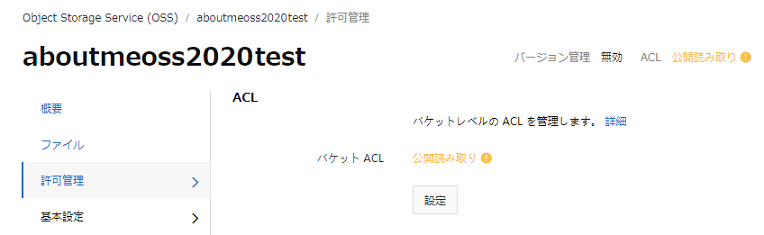
バケットの「許可設定」に移動します。
ACLのバケットACLを「公開読み取り」に変更後、【設定】を選択します。
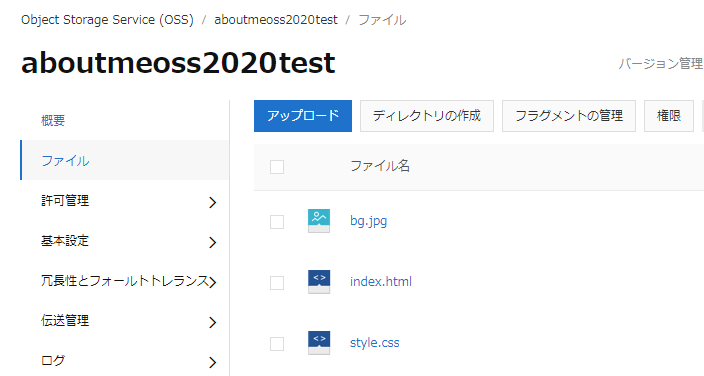
バケットの「ファイル」に移動します。
https://github.com/roura356a/aliyun-serverless-aboutme にある
- index.html
- bg.jpg
- style.css
をダウンロードします。index.htmlについては
const apiUrl = 'API_ENDPOINT_URL_GOES_HERE';
の【API_ENDPOINT_URL_GOES_HERE】の個所を
const apiUrl = 'http://****************.ap-northeast-1.alicloudapi.com/visits';
とfun deploy後に控えたURLに修正の上、OSSにアップロードします。
バケットの「概要」に移動してバケットドメイン名を確認します。
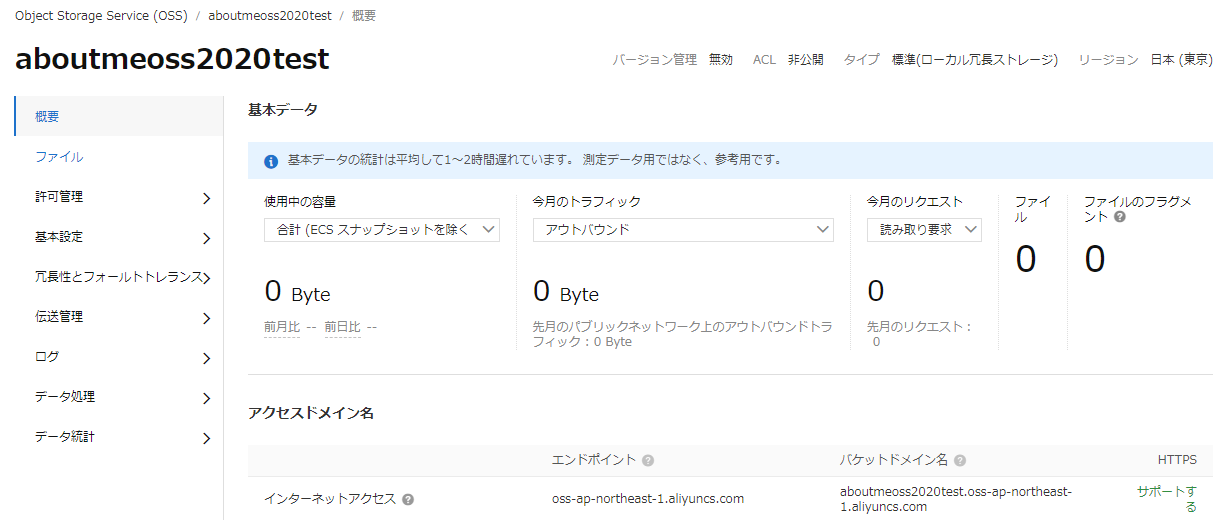
ブラウザより先ほど控えたバケットドメイン名でアクセスすると「AboutMe」のサイトが表示されます。

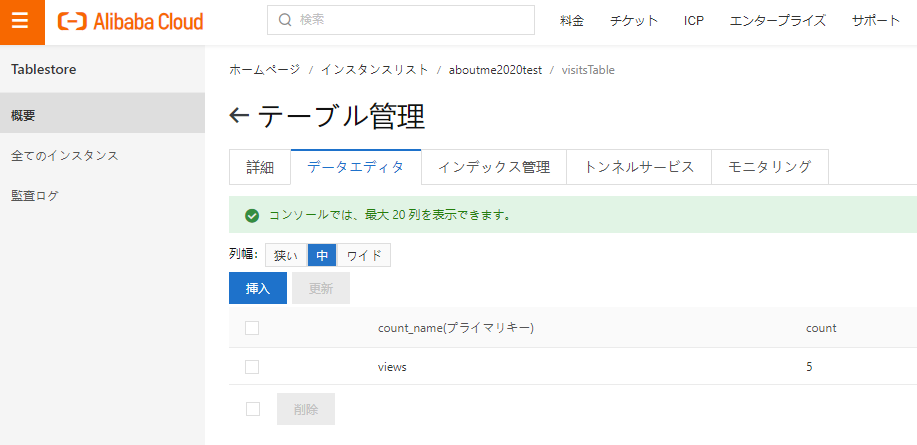
Alibaba CloudコンソールよりTablestoreのvisitsTableを確認するとviews(キー)のcount(値)がアクセスの度に増えているのを確認できます。
■ Conclusion
今回の手順でServerless Webサイトを構築することでAlibaba CloudでServerlessを実装する場合の流れがイメージできるようになりました。
Alibaba CloudのServerless関連の記事が他のクラウドに比べるとまだまだ少ない(2018年の記事が殆ど)なのでぜひ活用して知見を積極的に共有していきましょう。
Enjoy your serverless, #NoOps life!