REST API とは
- APIをインターネットへ公開し、JavaScript等から呼び出すしくみです。
- 呼び出しのパラメータ及び戻り値はJSONが使われる場合が多いです。
API Gateway とは
- AWS Lambda関数をインターネット経由でREST API として呼び出すことができます。
- Amazon API Gateway の概念
この記事の目的
- AWS API Gatewayを経由してLambda関数を呼び出すよう構成します。
- Angularのタイプスクリプトから定義したAPIを呼び出します。
Lambda関数を作成
- 関数を作成します。

- Pythonで作成します。

- 入力イベントをそのまま返却するテストコードにします。
- return の記述はCORS対策です。
[lambda_function.py]
lambda_function.py
import json

def lambda_handler(event, context):

    print("event")
    print(event)

    return_data = event

    return {
        'statusCode': 200,
        'headers': {
            'Access-Control-Allow-Origin': '*'
        },
        'body': json.dumps(return_data)
    }

API Gatewayを作成
- APIを作成します。

- REST API を作成します。

- API名はLambda関数名と合わせておくと分かりやすいです。(別でも可)

API Gatewayを設定
- メソッドの作成を選択します。

- Lambdaプロキシ統合の使用をチェックします。
- Lambda関数名を指定します。

- CORSを有効化します。


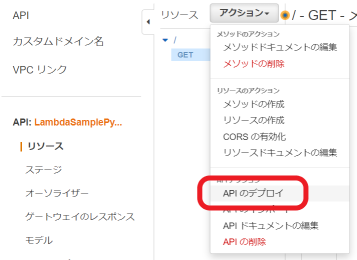
- APIをデプロイします。

APIのURLを取得
- APIをデプロイするとURLが発行されるため、これを取得します。

👇以下は"Angular Material 標準コンポーネント構成"を前提とします。詳細は以下記事参照下さい
API呼び出し処理組み込み
- HttpClientを組み込みます。
[main.component.ts]
main.component.ts
import { HttpClient, HttpHeaders, HttpParams } from '@angular/common/http';

...

export class MainComponent implements OnInit {

  constructor(
    private commonService:CommonService,
    private http: HttpClient,
  ) { }
- API呼び出し処理を記載します。
-
https://xxxxxxxxxx1.execute-api.ap-southeast-1.amazonaws.com/v1の箇所に上記"APIのURLを取得"で取得したURLを記載します。
[main.component.ts]
main.component.ts
  button02Click(){

    let httpHeaders = new HttpHeaders({
      'Content-Type' : 'application/json',
    });
    let get_params = new HttpParams()
      .set("param1","aaa");

    let options = {
      headers: httpHeaders,
      params: get_params,
    };
    const url = "https://xxxxxxxxxx1.execute-api.ap-southeast-1.amazonaws.com/v1";

    this.http.get<any>(url, options).subscribe({
      next:(data) => {
        console.log("OK");
        console.log(data);
      },
      error:(e) =>{
        console.log("NG");
        console.error(e);
      },
      complete: () => {
        console.log("complete");
      }
    })

  }
[main.component.html]
main.component.html
<button mat-raised-button color="primary" (click)="button02Click()">Call Func</button>
動作確認
- ローカルサーバを起動します。
PS C:\home\git\material.angular.github> ng s --o
✔ Browser application bundle generation complete.

Initial Chunk Files   | Names         |  Raw Size
vendor.js             | vendor        |   5.67 MB |
polyfills.js          | polyfills     | 315.34 kB |
styles.css, styles.js | styles        | 285.62 kB |
main.js               | main          |  86.13 kB |
runtime.js            | runtime       |   6.54 kB |

                      | Initial Total |   6.35 MB

Build at: 2022-07-03T03:09:03.507Z - Hash: c139c2d3e9ea05af - Time: 4156ms

Warning: C:\home\git\material.angular.github\src\app\common.service.ts depends on 'buffer'. CommonJS or AMD dependencies can cause optimization bailouts.
For more info see: https://angular.io/guide/build#configuring-commonjs-dependencies

** Angular Live Development Server is listening on localhost:4200, open your browser on http://localhost:4200/ **

√ Compiled successfully.
- "Call Func"をクリックして、コンソールに"OK"と表示されることを確認します。
