1.はじめに
名著、**「ゼロから作るDeep Learning2」**を読んでいます。今回は8章のメモ。
コードの実行はGithubからコード全体をダウンロードし、ch08の中で jupyter notebook にて行っています。
2.Attention
下記は、Seq2seqモデルにおける、Attentionの概要図です。

Decoderの全ての時刻のLSTMとAffineの間にAttentionを挟みます。そして、Encoderの各時刻の隠れベクトル(hs0〜hs4)をまとめたhsを、全てのAttentionへ入力します。
各Attentionでは、LSTMからの入力とhsの類似度(ベクトル積)を計算し、隠れベクトル(hs0〜hs4)の重要度を確率分布で求めます。そして、隠れベクトルをその確率分布で重み付けし合成したものをAffineへ送ります。
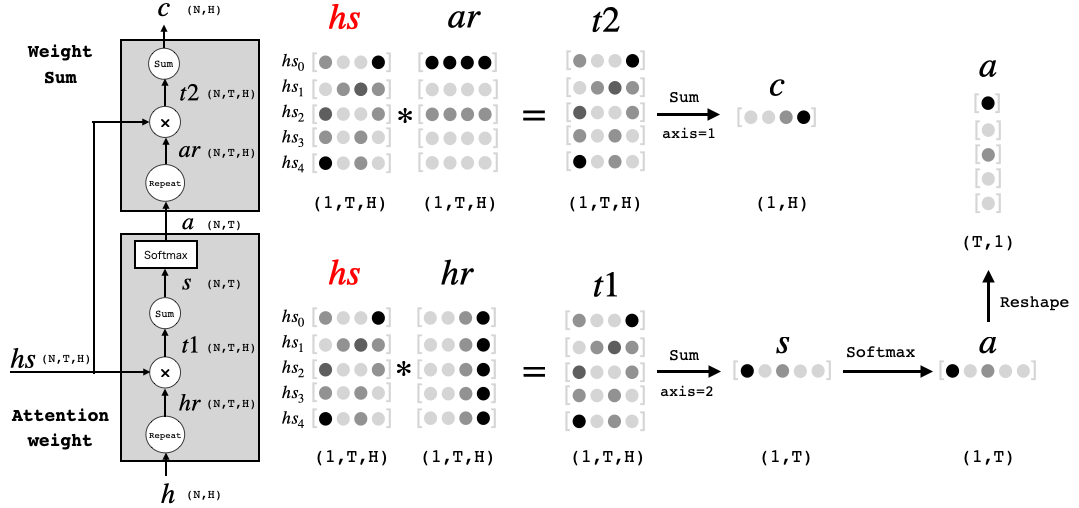
Attentionレイヤ内部の模式図とそこで行われている行列演算イメージ(バッチサイズN=1の場合)です。
まず、Attention_weightの部分です。Encoderのベクトルhs0〜hs4とDecoderのベクトルhの積を求め、それぞれ列方向(axis=2)で足した数値は、2つののベクトルの類似度が高いほど大きくなります。この数値にSoftmaxを通すと、ベクトルhs0〜hs4をどういう重み付けでアテンション(参照)すべきかを表すベクトルaが得られます。
次に、Weight_Sumの部分です。ベクトルhs0〜hs4とベクトルaの積を求め、行方向(axis=1)で足したベクトルCは、アテンション(参照)すべき情報を重み付けして合成(足し算)したベクトルになります。これをAffineへ送ることで、Affineでは従来のLSTMからの情報にプラスして、その時参照すべきEncoder側の情報も得ることが出来るわけです。
ちなみに、x = (N, T, H) の np.sum(x, axis = ?)を計算する場合、axis=0のときはN軸を消すようにsum(バッチ方向の足し算)し、axis=1のときはT軸を消すようにsum(行方向の足し算)し、axis=2のときはH軸を消す様にsum(列方向の足し算)します。
Attention_weight のコードを見てみましょう。
class AttentionWeight:
    def __init__(self):
        self.params, self.grads = [], []
        self.softmax = Softmax()
        self.cache = None

    def forward(self, hs, h):
        N, T, H = hs.shape

        # hrはブロードキャストで使うため、repeatせず次元のみ合わせる
        hr = h.reshape(N, 1, H)  #.repeat(T, axis=1)
        t = hs * hr  # ベクトルの積を取る
        s = np.sum(t, axis=2)  # 列方向の足し算
        a = self.softmax.forward(s)  # 各隠れベクトルの重要度を表す確率分布aを計算
        self.cache = (hs, hr)
        return a

    def backward(self, da):
        hs, hr = self.cache
        N, T, H = hs.shape

        ds = self.softmax.backward(da)
        dt = ds.reshape(N, T, 1).repeat(H, axis=2)  # (N, T, H)に変換
        dhs = dt * hr
        dhr = dt * hs
        dh = np.sum(dhr, axis=1)

        return dhs, dh
順伝播の、t = hs * hr はブロードキャストで計算するので、hrのrepeatはしていません。次に、Weight_sumも見てみましょう。
class WeightSum:
    def __init__(self):
        self.params, self.grads = [], []
        self.cache = None

    def forward(self, hs, a):
        N, T, H = hs.shape

        # arはブロードキャストで使うため、repeatせず次元のみ合わせる
        ar = a.reshape(N, T, 1) #.repeat(T, axis=1)
        t = hs * ar  # ベクトルの積をとる
        c = np.sum(t, axis=1)  # 行方向の足し算
        self.cache = (hs, ar)
        return c

    def backward(self, dc):
        hs, ar = self.cache
        N, T, H = hs.shape
        dt = dc.reshape(N, 1, H).repeat(T, axis=1)
        dar = dt * hs
        dhs = dt * ar
        da = np.sum(dar, axis=2)

        return dhs, da
順伝播の、t = hs * ar はブロードキャストで計算するので、arのrepeatはしていません。この2つのクラスをまとめて、class Attention を構成します。
class Attention:
    def __init__(self):
        self.params, self.grads = [], []
        self.attention_weight_layer = AttentionWeight()
        self.weight_sum_layer = WeightSum()
        self.attention_weight = None

    def forward(self, hs, h):
        a = self.attention_weight_layer.forward(hs, h)
        out = self.weight_sum_layer.forward(hs, a)
        self.attention_weight = a
        return out

    def backward(self, dout):
        dhs0, da = self.weight_sum_layer.backward(dout)
        dhs1, dh = self.attention_weight_layer.backward(da)
        dhs = dhs0 + dhs1
        return dhs, d
さらに、時刻への対応を行うために、class TimeAttention にまとめます。
class TimeAttention:
    def __init__(self):
        self.params, self.grads = [], []
        self.layers = None
        self.attention_weights = None

    def forward(self, hs_enc, hs_dec):
        N, T, H = hs_dec.shape
        out = np.empty_like(hs_dec)
        self.layers = []
        self.attention_weights = []

        for t in range(T):
            layer = Attention()
            out[:, t, :] = layer.forward(hs_enc, hs_dec[:,t,:])
            self.layers.append(layer)
            self.attention_weights.append(layer.attention_weight)

        return out

    def backward(self, dout):
        N, T, H = dout.shape
        dhs_enc = 0
        dhs_dec = np.empty_like(dout)

        for t in range(T):
            layer = self.layers[t]
            dhs, dh = layer.backward(dout[:, t, :])
            dhs_enc += dhs
            dhs_dec[:,t,:] = dh

        return dhs_enc, dhs_dec
それでは、この Attention機構を使った seq2seq のサンプルコード (日付フォーマットの変換) train.py を動かしてみましょう。
import sys
sys.path.append('..')
import numpy as np
import matplotlib.pyplot as plt
from dataset import sequence
from common.optimizer import Adam
from common.trainer import Trainer
from common.util import eval_seq2seq
from attention_seq2seq import AttentionSeq2seq
from ch07.seq2seq import Seq2seq

# データの読み込み
(x_train, t_train), (x_test, t_test) = sequence.load_data('date.txt')
char_to_id, id_to_char = sequence.get_vocab()

# 入力文を反転
x_train, x_test = x_train[:, ::-1], x_test[:, ::-1]

# ハイパーパラメータの設定
vocab_size = len(char_to_id)
wordvec_size = 16
hidden_size = 256
batch_size = 128
max_epoch = 10
max_grad = 5.0

model = AttentionSeq2seq(vocab_size, wordvec_size, hidden_size)
# model = Seq2seq(vocab_size, wordvec_size, hidden_size)
# model = PeekySeq2seq(vocab_size, wordvec_size, hidden_size)

optimizer = Adam()
trainer = Trainer(model, optimizer)

acc_list = []
for epoch in range(max_epoch):
    trainer.fit(x_train, t_train, max_epoch=1,
                batch_size=batch_size, max_grad=max_grad)

    correct_num = 0
    for i in range(len(x_test)):
        question, correct = x_test[[i]], t_test[[i]]
        verbose = i < 10
        correct_num += eval_seq2seq(model, question, correct,
                                    id_to_char, verbose, is_reverse=True)

    acc = float(correct_num) / len(x_test)
    acc_list.append(acc)
    print('val acc %.3f%%' % (acc * 100))

model.save_params()

# グラフの描画
x = np.arange(len(acc_list))
plt.plot(x, acc_list, marker='o')
plt.xlabel('epochs')
plt.ylabel('accuracy')
plt.ylim(-0.05, 1.05)
plt.show()
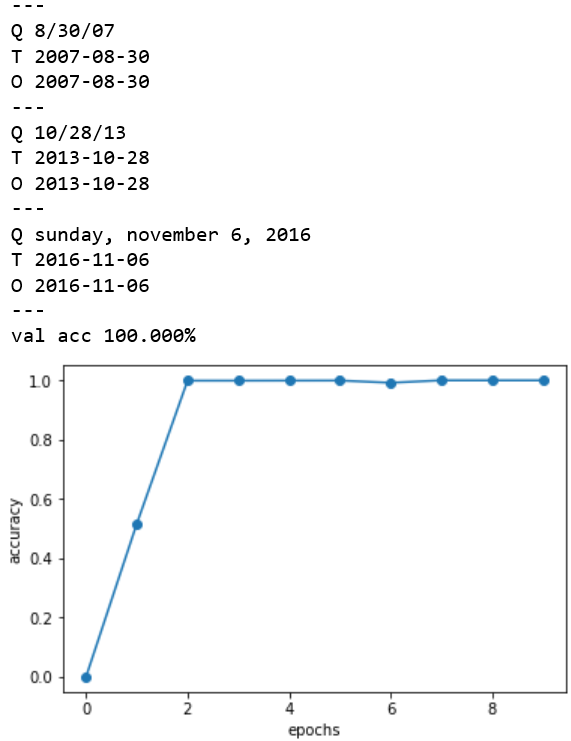
2epoch以降は精度100%です。さすが、Attentionの威力ですね。