はじめてのMacを買ったのが去年の4月、ジーズではじめてiOS触ったのが10月ごろ🍂
iOSとの出会いから早いもので1年以上経過しました(冬眠していた期間も相当ありますが…)😲
ここ一年、せっかく沢山のライブラリやツールを使ったので、iOS開発周りで便利だったものをいくつかピックアップしてご紹介いたします!(実際に全部使っている・いたものに限定してます)
ジーズのアドベントカレンダーといいつつiOSの人限定の記事で申し訳ないですが、これ見てなんかiOSも楽しそうだなって思ってもらえると嬉しいです😊
※記事内のスター数は2018/11/30時点
※いずれもmacOS Mojave 10.14.1(18B75)/Xcode Version 9.3 (9E145)/Swift 4.1で動いたものですが、ライブラリのバージョンはSwiftバージョンに合わせてるので、[使用例]はあくまで参考程度に
ライブラリ
アニメーション
marcosgriselli/ViewAnimator ★4,663
【1行で】
Viewアニメーションのコード記述が簡単になるやつ
【もうちょっと解説】
使いすぎはうざったいですが、本当に必要な箇所で絞って使えば少しリッチになります。もっさりするアニメーションの記述もスッキリ見やすく、非常に使いやすいです。
【サンプル画像】
【使用例】
//例えばセルのアニメーション
let fromAnimation = AnimationType.from(direction: .right, offset: 30.0)
let zoomAnimation = AnimationType.zoom(scale: 0.2)
let rotateAnimation = AnimationType.rotate(angle: CGFloat.pi/6)
UIView.animate(views: collectionView.visibleCells,
               animations: [zoomAnimation, rotateAnimation],
               duration: 0.5)
HeroTransitions/Hero ★15,431
【1行で】
色々なトランジションがつけられるやつ
【もうちょっと解説】
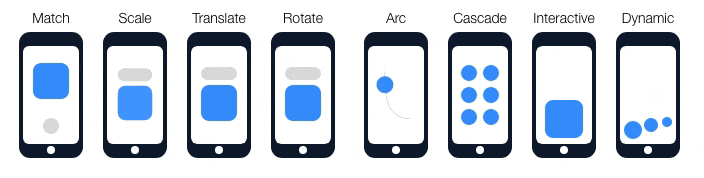
サンプル画像にある「Match」の表現とかは今流行りですね。例えば「Match」とかだと、異なるVC間でidによるパーツの紐づけを行い、トランジションをかける感じになります。最近のAppStoreみたいなアニメーション自力でやるとなると中々骨が折れますが、これだとめちゃシンプルに書けますよね。
【サンプル画像】
【使用例】
  //今回はAViewController⇔BViewControllerで「Match」をやってみます
  override func viewDidLoad() {
    super.viewDidLoad()
    self.aUpperView.hero.id = "upper"
    self.aLowerView.hero.id = "lower"
  }

  @objc override func onTap() {
    let bVC = BViewController()
    bVC.hero.isEnabled = true
    present(bVC, animated: true, completion: nil)
  }
  override func viewDidLoad() {
    super.viewDidLoad()
    self.bUpperView.hero.id = "upper" //aUpperViewはこれだよ
    self.bLowerView.hero.id = "lower" //aLowerViewはこれだよ
  }
MengTo/Spring ★12,760
【1行で】
UIKitのパーツに色々な挙動を簡単に足せるやつ
【もうちょっと解説】
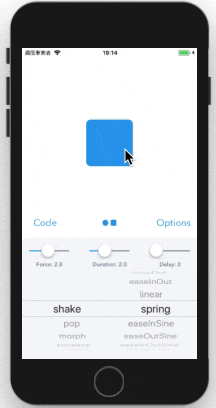
StoryBoardからでもコードからでもボタンやViewに簡単にアニメーションをつけられます。よくあるエラーのぶるぶるってやつも一瞬です。色々なアニメーションの種類もあるし、速さや回数、逆再生などちょっとした調整もすぐできます。
【サンプル画像】
【使用例】
@IBOutlet weak var modalView: SpringView!
//途中略
self.modalView.animation = "shake"
self.modalView.animate()
airbnb/lottie-ios ★15,610
【1行で】
AfterEffectsで作ったアニメーション(JSON)を表示できるやつ
【もうちょっと解説】
AfterEffectsにBodyMovinというプラグインを追加して、JSONを出力してそれをXcode側に取り込みます。出来る表現に限りはありますが、動画などと違ってかなり軽量です。JSONによる単なるアニメーション表示だけでなく、AfterEffectsのレイヤーを指定してUIImageをはめこんだりもできます。
一部の効果は描画できないものもあるので公式サポートをよく読みましょう(Web版とiOS版とで機能に差分があるので注意)。
https://airbnb.io/lottie/supported-features.html
【サンプル画像】

【使用例】
let animationView = LOTAnimationView(name: "json_name")

animationView.frame = CGRect(x: 0, y: 0, width: view.bounds.width, height: view.bounds.height)
animationView.center = self.view.center
animationView.loopAnimation = false
animationView.contentMode = .scaleAspectFit
self.view.addSubview(animationView)

animationView.play{ (finished) in
  self.dismiss(animated: true, completion: nil)
}
色
viccalexander/Chameleon ★11,671
【1行で】
色の扱いを色々簡単にするやつ
【もうちょっと解説】
フラットカラーの取得、背景色から読みやすい文字色を取得、明暗類似色の取得、画像からの平均色を取得、グラデーション設定(中心/縦/横)、HEXカラーのサポートなど、色にまつわる便利な機能が沢山あります。PhotoShopやSketchのパレットをインポートすることも可能です。
【使用例】
//フラットカラー呼び出し
view.backgroundColor = FlatGreen()
//読みやすい文字色を取得
let backgroundColor = self.hoge.backgroundColor
let color = ContrastColor(backgroundColor, true)
//グラデーション
let gradientColors = [.red,.green,.blue]
let gradientColor = GradientColor(.topToBottom, frame, gradientColors)
ローディング
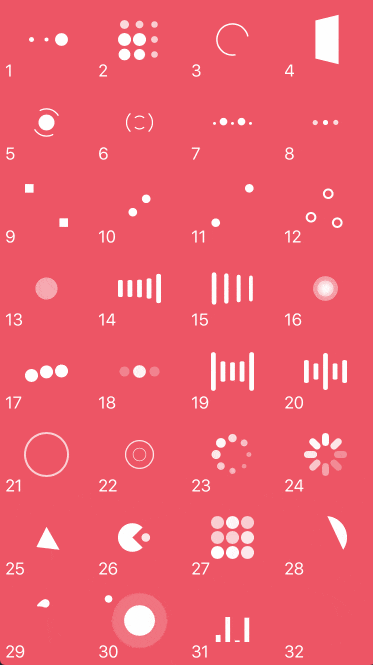
ninjaprox/NVActivityIndicatorView ★7,707
【1行で】
いい感じに読み込み中のぐるぐるを出すやつ。
【もうちょっと解説】
最初から以下の画像のバリエーションのぐるぐる(インディケーター)が使えます。ぐるぐるViewを組み込んだ、自作Viewを作ったりもできますし、「NVActivityIndicatorViewable」でUIブロックしてユーザー操作を受け付けないような状態にしてぐるぐるを出すこともできます。フェードアニメーションつけてスムースな表示も可能。
【サンプル画像】
【使用例】
@IBOutlet weak var indicatorView: NVActivityIndicatorView!
//途中略
indicatorView.startAnimating() //開始
indicatorView.stopAnimating() //終了
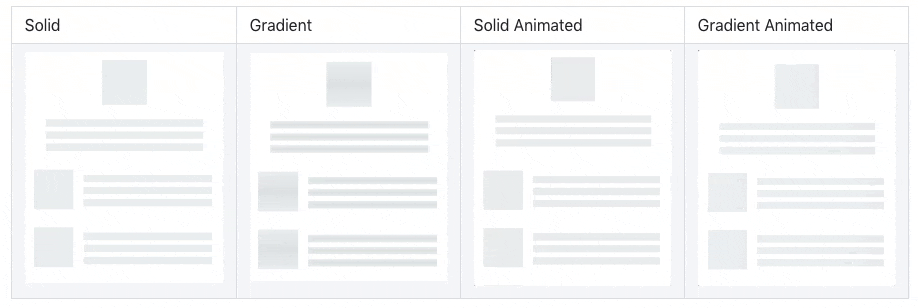
Juanpe/SkeletonView ★6,300
【1行で】
FacebookとかYouTubeみたいなローディング画面
【もうちょっと解説】
ただのローディングだと、「今どんな状態なんだろ...?」「これからどうなるの...?」感があるので、「今ここに表示する情報を読み込んでいるのですよ!」と明示することで、ユーザーは次の操作をイメージしやすくなり、UXの改善につながります。
TableViewで使う場合は、ダミーのセルをいくつか表示のうえ、カスタムセルのawakeFromNibでSkeletonを有効にしておいて、読み込みが終わったらリロード時にSkeletonを無効にして更新すると良いと思います。
【サンプル画像】
【使用例】
@IBOutlet weak var label: UILabel!
//途中略
label.isSkeletonable = true //Skeletonにする
label.isSkeletonable = false //Skeletonやめる
Table/Collection
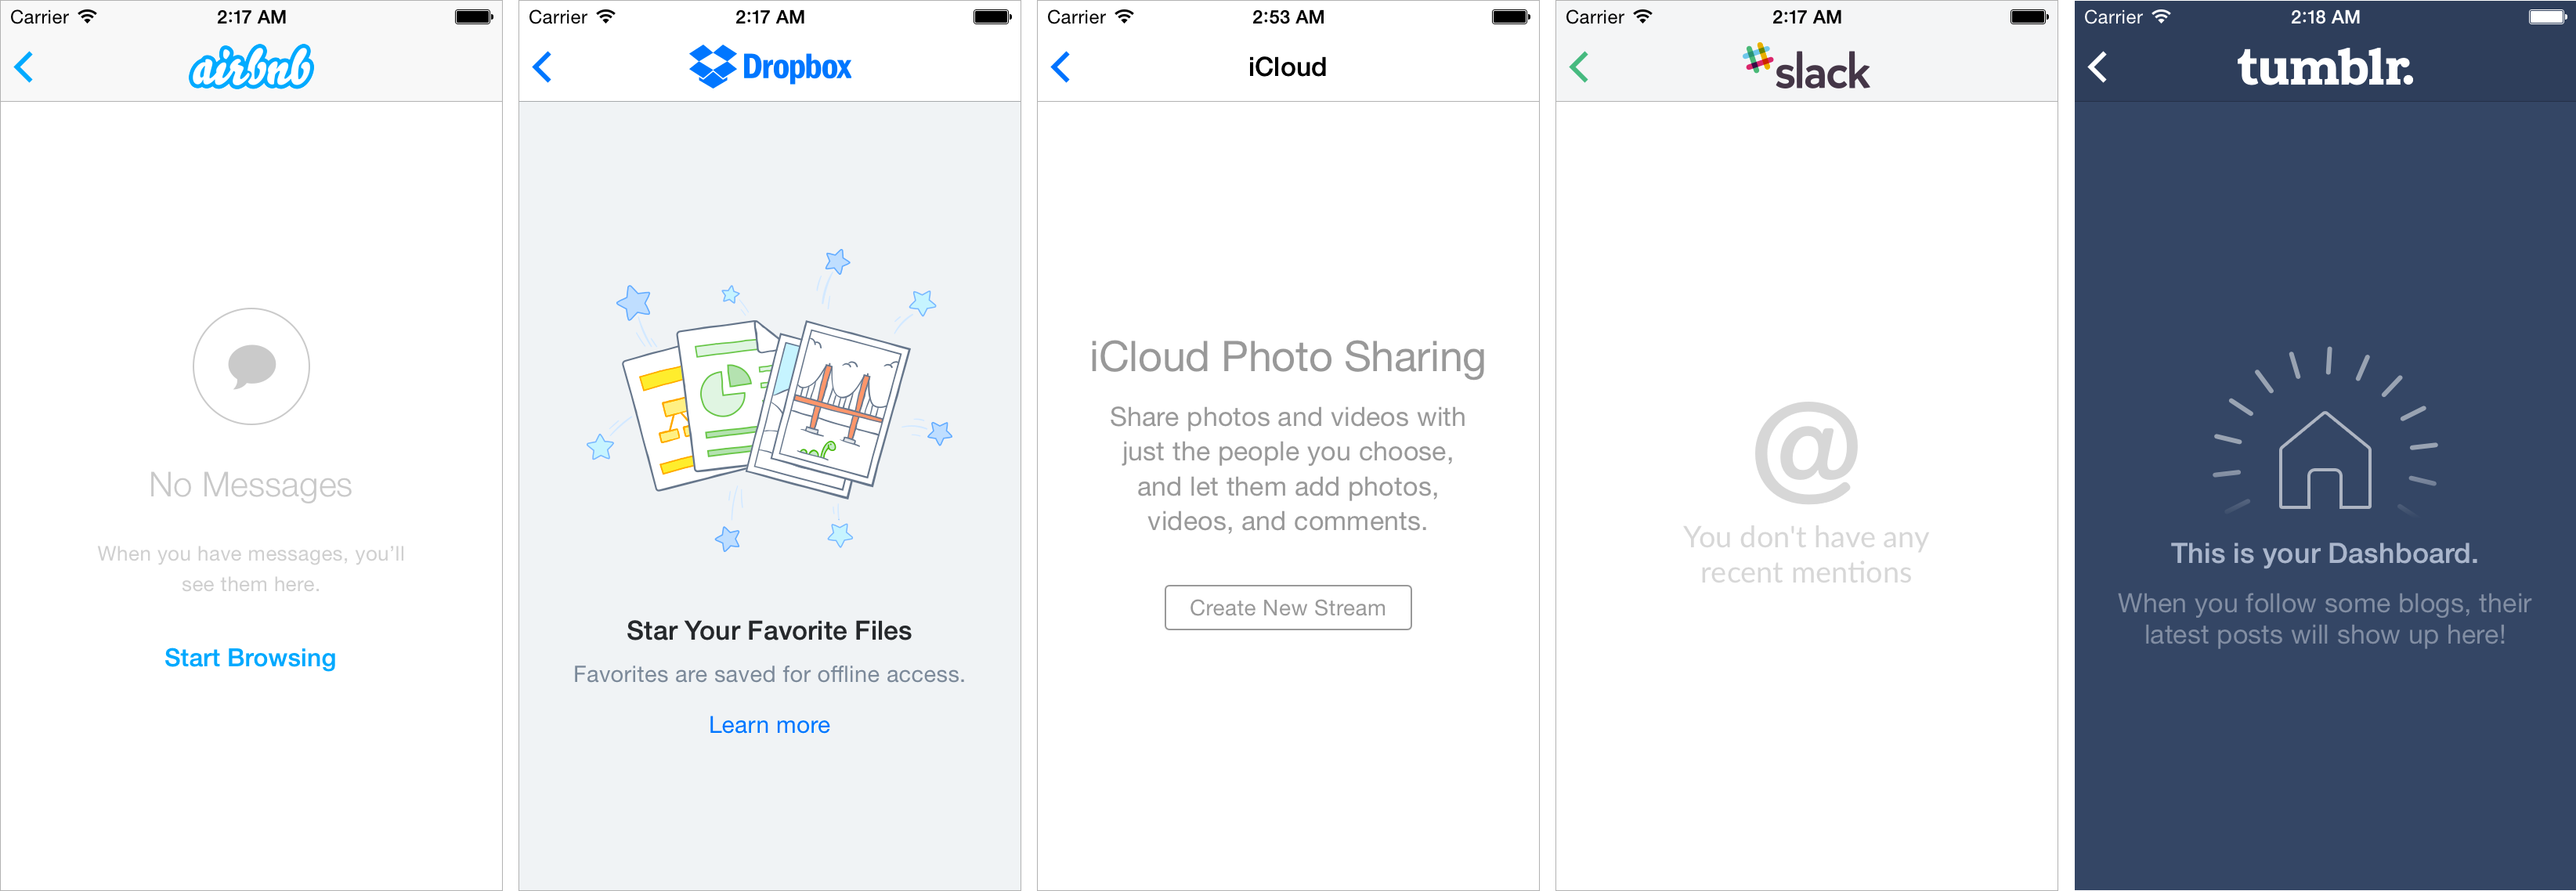
dzenbot/DZNEmptyDataSet ★10,925
【1行で】
いわゆるエンプティステート
【もうちょっと解説】
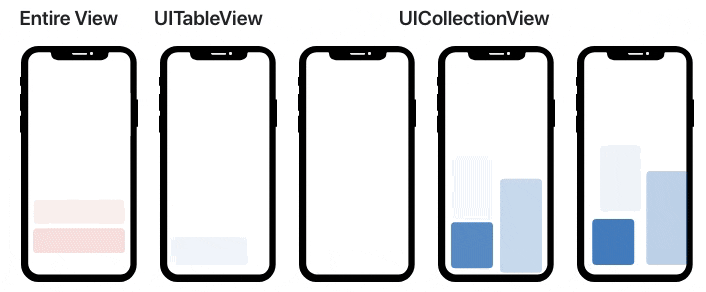
UITableView/UICollectionViewが空だと寂しい。そんなときに、タイトル、説明文、ボタン、画像などを表示できます。「○○が登録されていません 新しく○○を作成してみましょう」というような説明文とボタンを設置しておくことで、「なぜ表示されないのか」「次に何をするのか」が分かりやすくなります。
【サンプル画像】
【使用例】
//途中略
    self.tableView.emptyDataSetSource = self;
    self.tableView.emptyDataSetDelegate = self;
}
//途中略
extension ViewController: DZNEmptyDataSetSource, DZNEmptyDataSetDelegate {
    func image(forEmptyDataSet scrollView: UIScrollView!) -> UIImage! {
        return UIImage(named: "icon-empty")
    }
    func title(forEmptyDataSet scrollView: UIScrollView!) -> NSAttributedString! {
            let text = "○○はありません"
            let font = UIFont.boldSystemFont(ofSize: 18)
            return NSAttributedString(string: text, attributes: [NSAttributedStringKey.font: font,NSAttributedStringKey.foregroundColor: .black)])
        }
    }
    func description(forEmptyDataSet scrollView: UIScrollView!) -> NSAttributedString! {
        let text = "○○を新しく作成してみましょう"
        let font = UIFont.systemFont(ofSize: 14)
        return NSAttributedString(string: text, attributes: [NSAttributedStringKey.font: font,NSAttributedStringKey.foregroundColor: .black])
    }
    func buttonImageForEmptyDataSet(scrollView: UIScrollView!, forState state: UIControlState) -> UIImage! {
        return UIImage(named: "btn-entry")
    }
    func emptyDataSetDidTapButton(scrollView: UIScrollView!) {
        self.doSomething()
    }
}
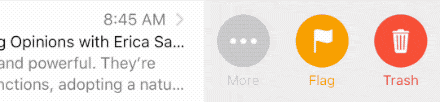
SwipeCellKit/SwipeCellKit ★3,894
【1行で】
スワイプアクションを便利にするやつ。
【もうちょっと解説】
スペース枯渇問題が起きがちなTableViewですが、ユーザーアクションをスワイプにもっていくことで意外とすっきりする場合もあります。スワイプで表示される箇所に好きな画像を入れたり自由度の高い表現をすることが可能です。
そもそも、iOS11からTableViewにスワイプアクションメソッドが追加され、左右への表示や画像の表示もできるのですが、それよりかは幅広い表現を簡単に実現できますし、ハンドリングも簡単です。
【サンプル画像】
【使用例】
 var defaultOptions: SwipeTableOptions  = SwipeTableOptions()
 var isSwipeRightEnabled: Bool = true
 var buttonDisplayMode: ButtonDisplayMode = .titleAndImage
 var buttonStyle: ButtonStyle = .circular
//途中略
 override func tableView(_ tableView: UITableView, cellForRowAt indexPath: IndexPath) -> UITableViewCell {
       let cell = tableView.dequeueReusableCell(withIdentifier: "MailCell") as! OwnCell
       //セルにSwipeCellのdelegateつける
       cell.delegate = self
       return cell
 }
//途中略
extension ViewController: SwipeTableViewCellDelegate {
   func tableView(_ tableView: UITableView, editActionsForRowAt indexPath: IndexPath, for orientation: SwipeActionsOrientation) -> [SwipeAction]? {
       //Swipeアクションを指定(例:右にデリート)
       if orientation == .right {
            let deleteAction = self.deleteAction()//return SwipeAction
            configure(action: deleteAction, with: .trash, alphaFlg: false)
            return [deleteAction]
        }
    }

    func configure(action: SwipeAction, with descriptor: ActionDescriptor, alphaFlg: Bool) {
        action.title = descriptor.title(forDisplayMode: buttonDisplayMode)
        action.image = descriptor.image(forStyle: buttonStyle, displayMode: buttonDisplayMode)
        action.textColor = descriptor.color
        action.backgroundColor = .white)
        action.font = .systemFont(ofSize: 13)
        action.transitionDelegate = ScaleTransition.default
    }

    func tableView(_ tableView: UITableView, editActionsOptionsForRowAt indexPath: IndexPath, for orientation: SwipeActionsOrientation) -> SwipeTableOptions {
        var options = SwipeTableOptions()
        options.expansionStyle = orientation == .left ? .none : .destructive(automaticallyDelete: false)
        options.transitionStyle = defaultOptions.transitionStyle
        switch buttonStyle {
        case .circular:
            options.buttonSpacing = 4
        }
        return options
    }
    func createArchiveDeleteAction() -> SwipeAction {
        return SwipeAction(style: .destructive, title: "削除") { action, indexPath in
        //なんかする
        }
    }
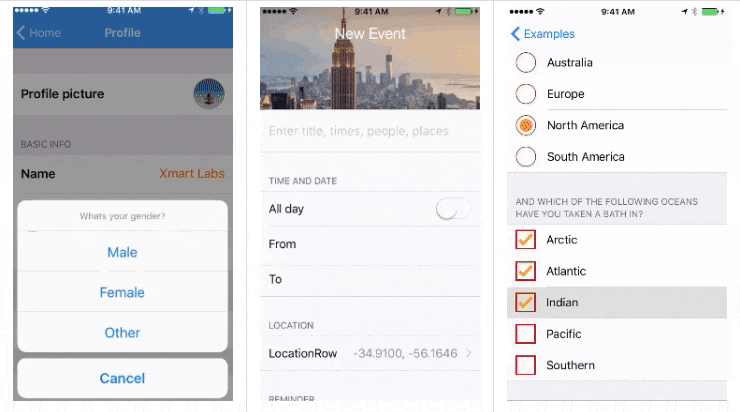
xmartlabs/Eureka ★9,294
【1行で】
TableViewのフォーム作成が簡単なコード記述で可能に
【もうちょっと解説】
テキストフィールド付き、遷移付き、UI switch付き、TableViewのフォーム作成で大体のユースケースを網羅しています。もちろんカスタマイズして独自の複雑なセルをつくることもできます。UIにこだわらないところは、これでサクッと作っちゃいましょう。
【サンプル画像】
【使用例】
func setUpForm(){
  form +++ Section("ProfileSection")
    <<< TextRow(){ row in
        row.title = "氏名"
        row.placeholder = "氏名を入力"
    }
    <<< PhoneRow(){
        $0.title = "電話番号"
        $0.placeholder = "電話番号を入力"
    }
  +++ Section("OrderSection")
    <<< DateRow(){
        $0.title = "受取日"
        $0.value = Date()
    }
}
TabBar
Ramotion/animated-tab-bar ★9,505
【1行で】
TabBarにアニメーションをつける
【もうちょっと解説】
見た目やアニメーションはもちろんですが、RAMAnimatedTabBarControllerを承継したClassを作ったりして、挙動に関しても細かいカスタマイズもできます。RamotionさんのライブラリはかっこいいUI表現が多いので、他のライブラリも見てみると楽しいです。
【サンプル画像】

【使用例】
//バッジ表示
@IBAction func showBadgeHandler(_: AnyObject) {
  self.index += 1
  tabBarItem.badgeValue = "\(index)" |
}

//独自に挙動のロジックを実装
@objc open override func tapHandler(_ gesture: UIGestureRecognizer) {
  //例えば真ん中押したときだけModal出すとか
}
ページャー
xmartlabs/XLPagerTabStrip ★5,573
【1行で】
タブメニューでビューを切り替えるやつ
【もうちょっと解説】
マネーフォワードとかスマニューとかタブ型のメニューは未だ多くのアプリで現役で使われていると思います。XLPagerTabStripは見た目のカスタマイズも簡単で、さくっとタブ型のメニューを組込みたい場合にとても便利。
【サンプル画像】

【使用例】
class ParentViewController: ButtonBarPagerTabStripViewController {
//省略
override func viewControllers(for pagerTabStripController: PagerTabStripViewController) -> [UIViewController] {
  let leftVC = UIStoryboard(name: "Main", bundle: nil).instantiateViewController(withIdentifier: "Left")
  let rightVC = UIStoryboard(name: "Main", bundle: nil).instantiateViewController(withIdentifier: "Right")
  let childViewControllers:[UIViewController] = [leftVC, rightVC ]
        return childViewControllers
}
class ChildLeftViewController: UIViewController, IndicatorInfoProvider {
var itemTitle: IndicatorInfo = "ひだり"
//省略
func indicatorInfo(for pagerTabStripController: PagerTabStripViewController) -> IndicatorInfo {
  return itemTitle
}
画像
SDWebImage ★20,778
【1行で】
外部の画像読み込みに使うやつ
【もうちょっと解説】
画像のキャッシュや非同期での画像のダウンロードをサポートしてくれます。
二強(!?)のうちの1つ、Kingfisherとも比較してみるといいと思います。
Firebase Storage使ってる場合は、FirebaseUI/Storageで。
【使用例】
//外部から通常
normalImageView.sd_setImage(with: URL(string: "https://hogehoge/img.jpg"), placeholderImage: nil)
//Firebase Storageから取得
fbImageView.sd_setImage(with: firebaseStorageRef, placeholderImage: nil)
フォント
thii/FontAwesome.swift ★1,090
【1行で】
Icon Fontをつかいやすくするやつ
【もうちょっと解説】
FontAwesomeKitとか色々あるんですが、こちらはまあまあ直近もメンテされてる印象だったので使ってみました。
【使用例】
//ボタンにアイコン表示
self.nextBtn.titleLabel?.font = UIFont.fontAwesome(ofSize: 20, style: .brands)
self.nextBtn.setTitle(String.fontAwesomeIcon(name: .arrowAltCircleRight), for: .normal)

//ImageViewにアイコン表示
self.imageView.image = UIImage.fontAwesomeIcon(
  name: .handHoldingHeart
  style: brands,
  textColor: .black,
  size: CFSize(width: 200, height: 200)
)
チャット
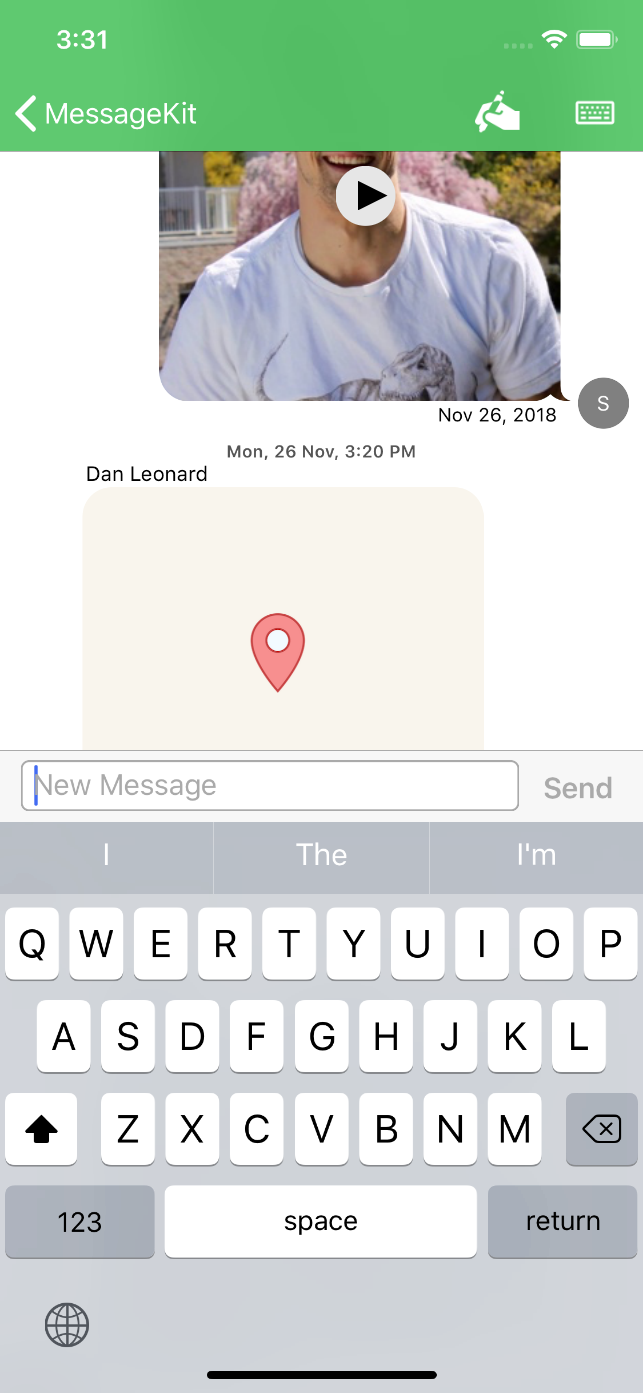
MessageKit/MessageKit ★2,528
【1行で】
チャットを簡単に作るやつ
【もうちょっと解説】
フルスクラッチでチャットを作って死んだ私ですが、個人開発のアプリを最近これに載せ替えました。今年ver1.0を超えて、現在ver2になっています。DEPRECATEDとなったJSQMessagesViewControllerの代替となるであろうライブラリ。ロードマップも公開されてきっちりメンテされている印象。カスタマイズも簡単。
【サンプル画像】
【使用例】
一部だけ切り取ってもわけわからないと思うのでパス
余裕があったら別記事でカスタマイズとかについて書きます
バッジ
cwRichardKim/RKNotificationHub ★2,980
【1行で】
よくあるバッジをいい感じに表示するやつ
【もうちょっと解説】
viewやアイコンの好きなところにバッチ表示することが可能。
【サンプル画像】
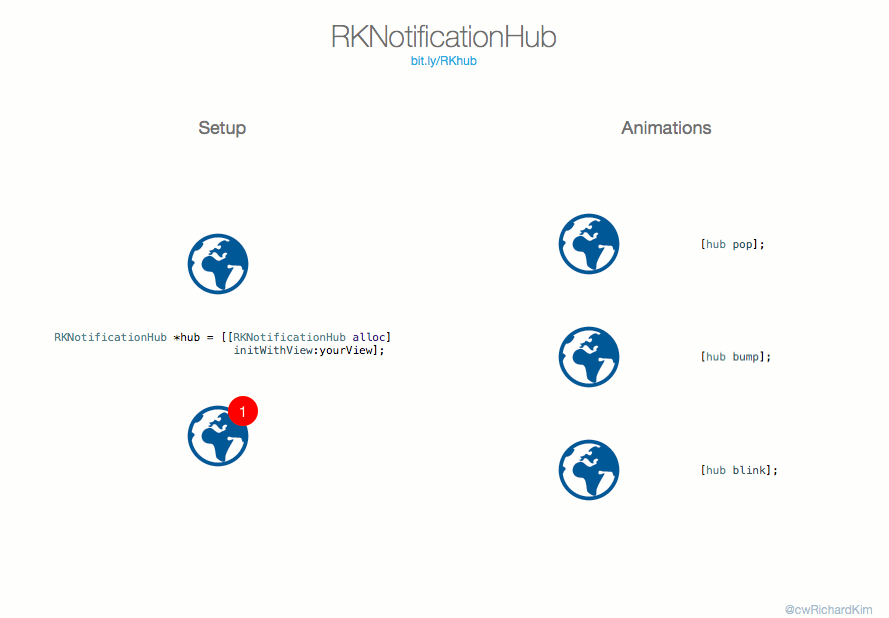
【使用例】
let hub = RKNotificationHub()
let hogeBtn = UIButton()
var count = 0

func setUpHub(){
    self.hub.setView(self.hogeBtn, andCount: Int32(count))
    self.hub.setCircleColor(.red, alpha: 1), label: UIColor.white)
    self.hub.moveCircleBy(x: -5, y: 20)
    self.hub.scaleCircleSize(by: 0.5)
}
デバイス判定
dennisweissmann/DeviceKit ★2,400
【1行で】
デバイス判定をさくっとするやつ
【もうちょっと解説】
端末ごとに処理を分けたい時に便利。7以降だったらHeptic feedback返すけど、そうでなければ違うアクション返すとか、ちょっとしたレイアウトの微調整とか。シュミレーターかつ、この端末バージョンだけといった指定もできます。また、簡単な記述で、バッテリーの残量や低電力モードの状態、スクリーンの明るさなどの切り分けもできます。
【使用例】
let allowedDevices: [Device] = [.iPhone7Plus, .iPhone6sPlus, .simulator(.iPhone7Plus), .simulator(.iPhone6Plus)]
let device = Device()

if device.isOneOf(groupOfAllowedDevices) {
  self.doSomething()//allowedDevicesに対して何かする
}
UserDefaults
SwiftyUserDefaults ★3,553
【1行で】
UserDefaultsを安全に扱いやすくする
【もうちょっと解説】
下記の使用例に記載したように、extentionで好きなだけプロパティを追加して、好きなだけ使ってください。別ファイルで、
生でUserDefaultsを扱うとコードがみずらいですが、まとめて定義しておくことで、非常に安全かつ簡単に扱うことができます。
【使用例】
extension DefaultsKeys {
    static let username = DefaultsKey<String>("username")
    static let launchCount = DefaultsKey<Int>("launchCount")
}
//Defaults[.hoge]がいやな人はこんな感じでまとめておくとか
class Defaults {
    static let shared: Defaults = {
        return Defaults()
    }()

    var username: String {
        get { return Defaults[.username] }
        set(value) { Defaults[.username] = value }
    }

    var launchCount: Int {
        get { return Defaults[.launchCount] }
        set(value) { Defaults[.launchCount] = value }
    }
}
//使ってみる
let username = Defaults.shared.username
Defaults.shared.launchCount = 8
JSON
SwiftyJSON/SwiftyJSON ★17,760
【1行で】
JSONの扱いを簡単にする
【もうちょっと解説】
もはやSwift4からCodableプロパティが使えるので不要説もありますが、一応定番ということで。ということで使用例はQiitaにたくさんある記事を参考にくださいまし(少し疲れた)。
チュートリアル
yukiasai/Gecco ★1,727
【1行で】
チュートリアルが簡単につくれる
【もうちょっと解説】
特定の箇所にスポットライトを作ったオーバーレイのVCを表示して、チュートリアルなどで使えるライブラリ。スポットライト内のタップ判定や、スポットライトのシームレスな変形・移動などもできるので素敵です。
【サンプル画像】

【使用例】
class TutorialViewController: SpotlightViewController {
    //途中省略
    func next(_ labelAnimated: Bool) {
        updateAnnotationView(labelAnimated)
        switch stepIndex {
        case 0:
            spotlightView.appear(Spotlight.RoundedRect(center: CGPoint(x: screenWidth / 2, y: statusBarHeight + 112), size: CGSize(width: screenWidth - 10, height: 100), cornerRadius: 6), duration: 1)
        case 1:
            spotlightView.move(Spotlight.RoundedRect(center: CGPoint(x: screenWidth / 2, y: statusBarHeight + 112), size: CGSize(width: screenWidth - 10, height: 100), cornerRadius: 6), duration: 1)
        case 2:
            spotlightView.move(Spotlight.Oval(center: CGPoint(x: screenWidth - 84, y: statusBarHeight + 20), diameter: 50))
        case 3:
            spotlightView.move(Spotlight.Oval(center: CGPoint(x: screenWidth - 43, y: statusBarHeight + 20), diameter: 50))
        default:
            dismiss(animated: true, completion: nil)
        }
        stepIndex += 1
    }

    func updateAnnotationView(_ animated: Bool) {
        annotationViews.enumerated().forEach { index, view in
            UIView.animate(withDuration: animated ? 0.25 : 0) {
                view.alpha = index == self.stepIndex ? 1 : 0
            }
        }
    }
}

extension TutorialViewController: SpotlightViewControllerDelegate {
    func spotlightViewControllerWillPresent(_ viewController: SpotlightViewController, animated: Bool) {
        next(false)
    }

    func spotlightViewControllerTapped(_ viewController: SpotlightViewController, isInsideSpotlight: Bool) {
        if isInsideSpotlight {
            next(true)
        }
    }

    func spotlightViewControllerWillDismiss(_ viewController: SpotlightViewController, animated: Bool) {
        spotlightView.disappear()
    }
}
ポップアップ
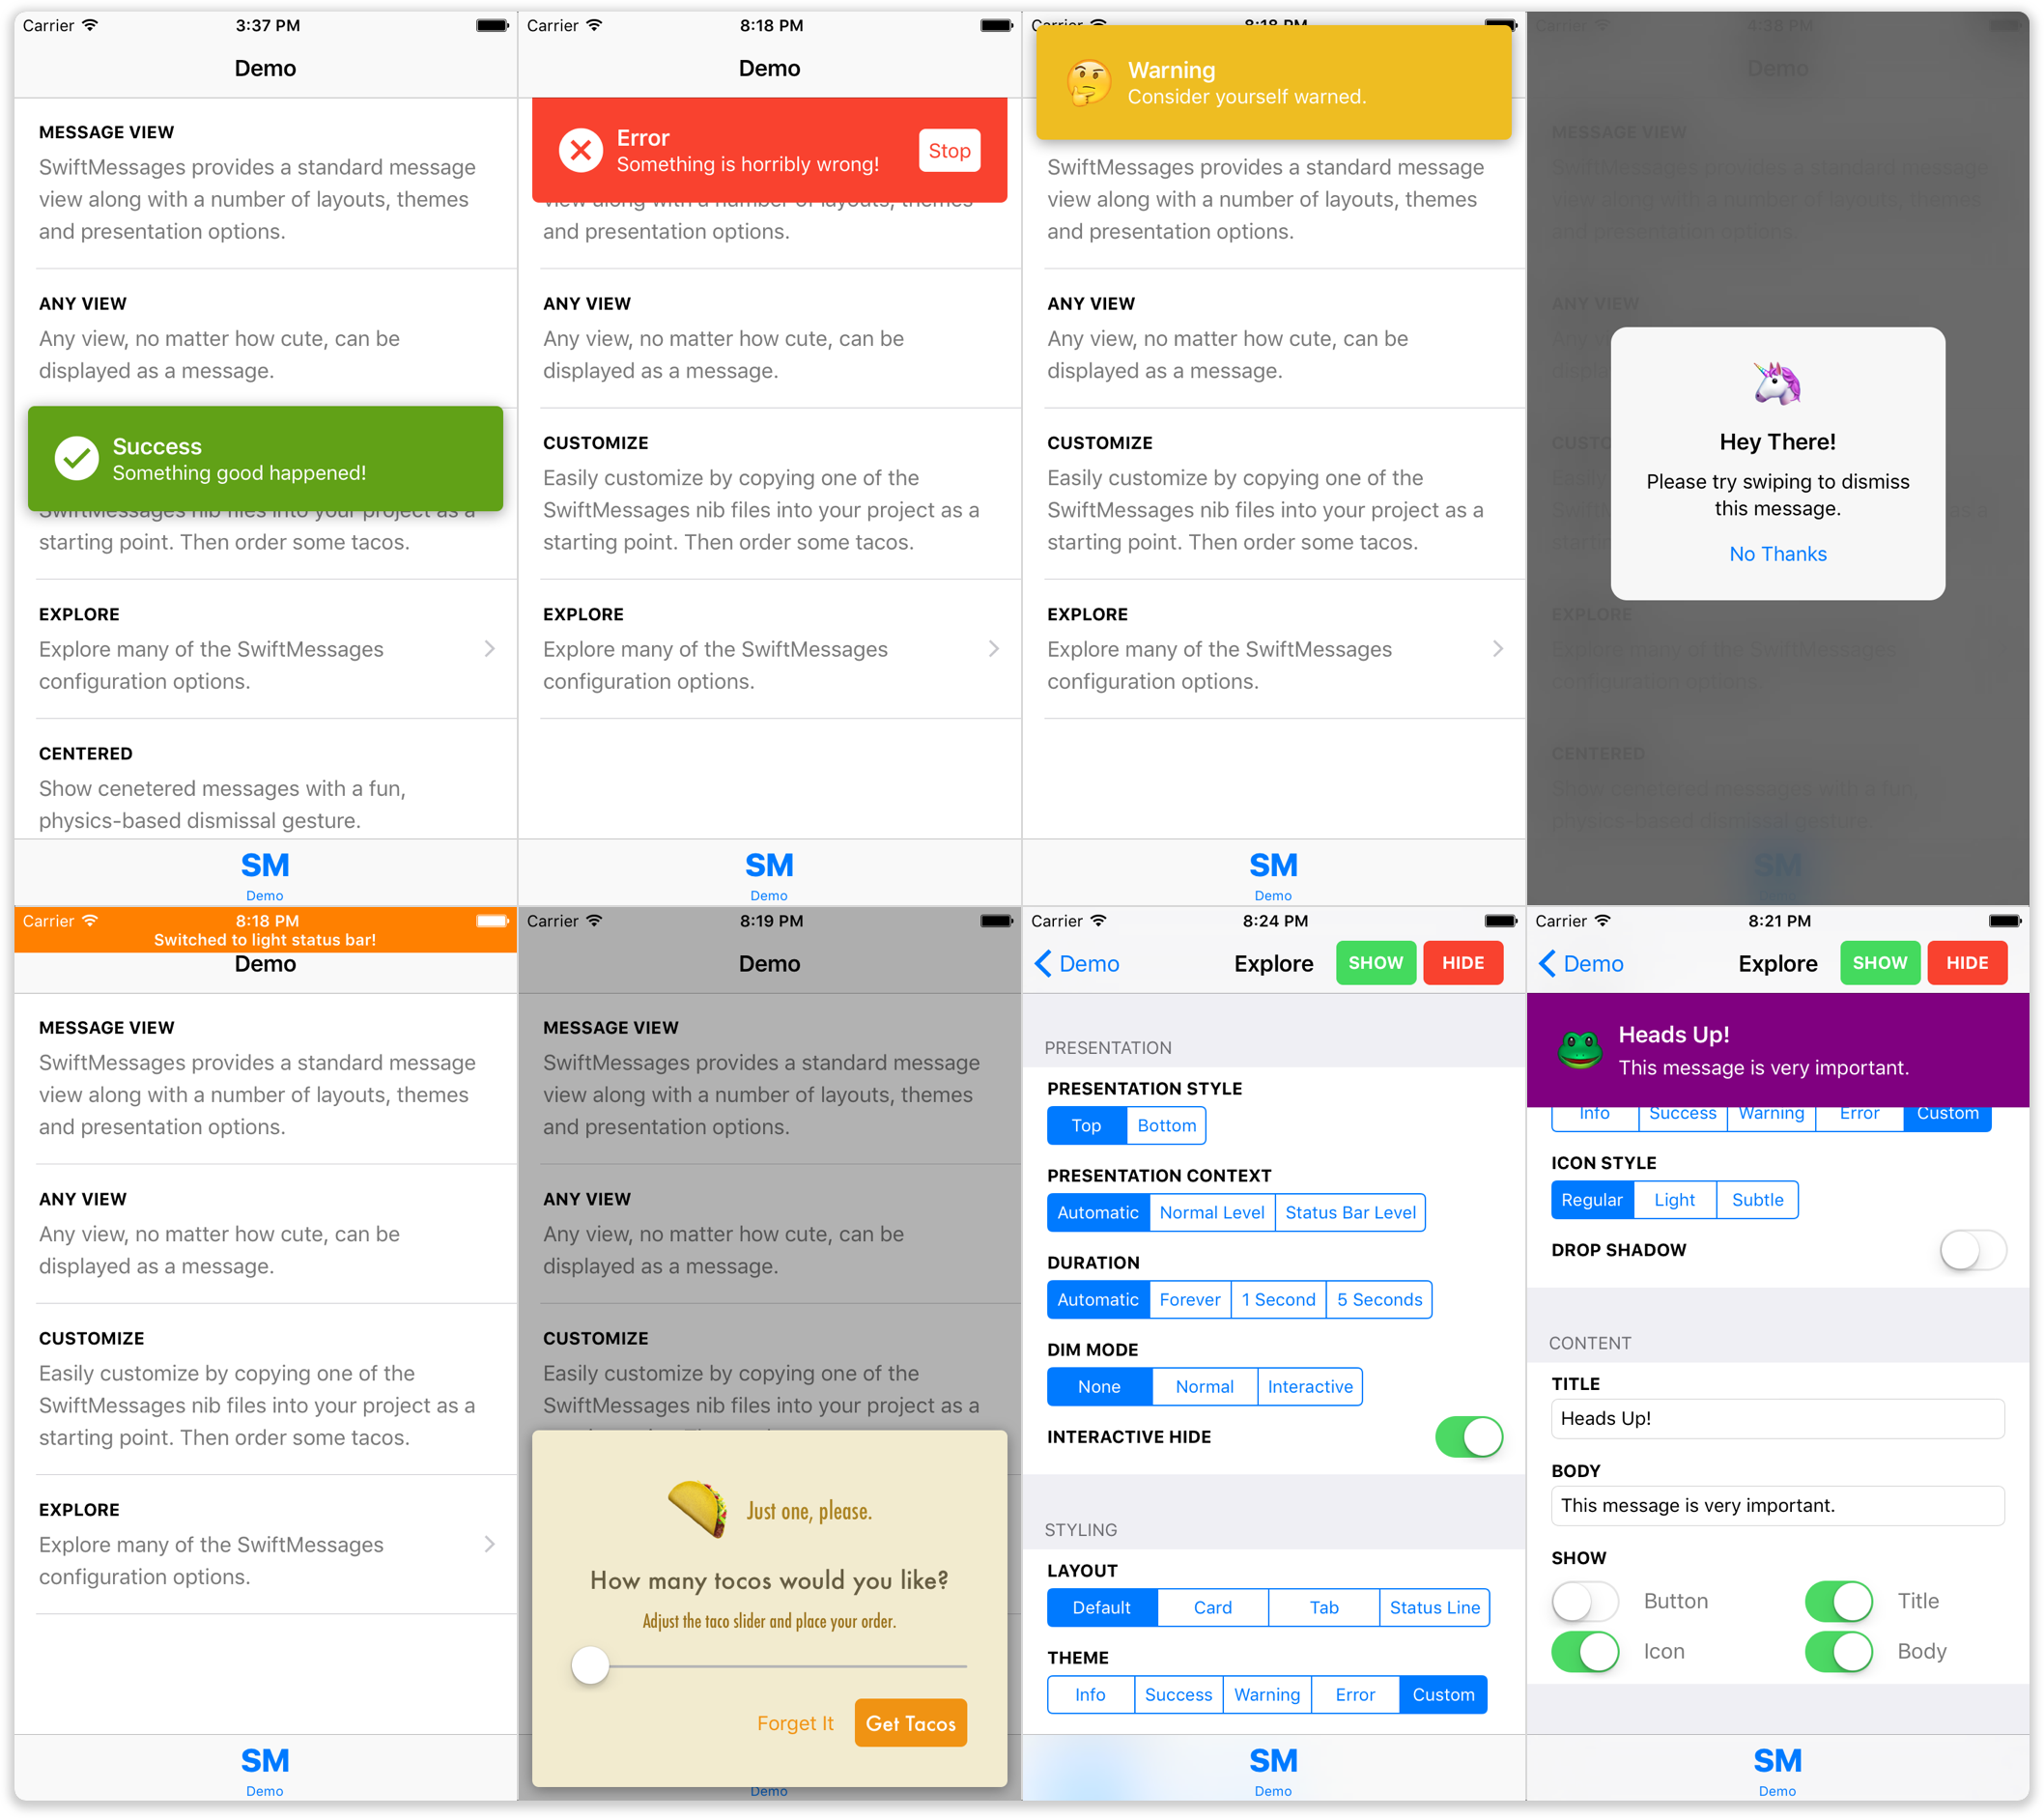
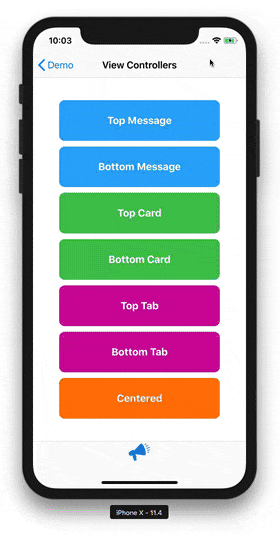
SwiftKickMobile/SwiftMessages ★4,055
【1行で】
アプリ内メッセージやポップアップなどを簡単に
【もうちょっと解説】
スター数の割にはあまり紹介記事を見かけたことがないのですが、これは今もお気に入りのライブラリです。アプリ内メッセージやちょっとしたポップアップで使うVCのpresentを簡単に実現できます。サンプル画像の下の方のSwiftMessagesSegueという機能もStoryBoardいじらずに実現できて非常に使いやすいです。
【サンプル画像】
【使用例】
//中央にメッセージを出す
func centerMessage() {
    let messageView: MessageView = MessageView.viewFromNib(layout: .centeredView)
    messageView.configureBackgroundView(width: 250)
    messageView.configureContent(title: "おはようございます", body: "今日の天気は\(weatherString)です", iconImage: nil, iconText: weatherEmoji, buttonImage: nil, buttonTitle: "閉じる") { _ in
        SwiftMessages.hide()
    }
    messageView.backgroundView.backgroundColor = UIColor.init(white: 0.97, alpha: 1)
    messageView.backgroundView.layer.cornerRadius = 10
    var config = SwiftMessages.defaultConfig
    config.presentationStyle = .center
    config.duration = .forever
    config.dimMode = .blur(style: .dark, alpha: 1, interactive: true)
    config.presentationContext  = .window(windowLevel: UIWindow.Level.statusBar)
    SwiftMessages.show(config: config, view: messageView)
}

//SwiftMessagesSwgueをつかってみる
@IBAction func nextVCBtnTapped(_ sender: Any) {
    let destinationVC = self.storyboard.instantiateViewController(withIdentifier: "next")
    let segue = SwiftMessagesSegue(identifier: "ToFilterStatus", source: self, destination: destinationVC)
    segue.presentationStyle = .center
    segue.configure(layout: .centered)
    segue.messageView.backgroundHeight = CGFloat(300)
    self.prepare(for: segue, sender: nil)
    segue.perform()
}
日付
malcommac/SwiftDate ★4,368
【1行で】
Swiftでの日付の扱いを簡単にするやつ
【もうちょっと解説】
JSでいう「date-fns」的な感じで、煩わしいフォーマット変換や日付計算などが非常に簡単にできます。いつもなら、formatterやらcalendarやら用意したりごにょごにょしがちですが、SwiftDateを入れただけで、書いたコードが非常にすっきりします。
【使用例】
//日付の計算も簡単
let lastChristmas = Date() - 1.year
let aMonthAfter = lastChristmas + 1.month

//コンポーネントの取得も簡単
let year = lastChristmas.year

//文字列⇔日付変換もラクラク
let xmasDate = "2018/12/25".date(format: .custom("yyyy/MM/dd"))
let xmasString = xmasDate.string(custom: "yyyy年M月d日(EEEEE)")

//月初とったり
let beginningOfMonth = Date().dateAtStartOf(.month)
//間隔をとったり
let hours = Date().getInterval(toDate: lastChristmas, component: .hour)
//リージョンかえたり
let inGMT = dateInNY.convertTo(region: Region.UTC)
//他にも比較のメソッドとかよくあるやつは代替あります
タイポ
mac-cain13/R.swift ★5,550
【1行で】
タイポをなくすやつ
【もうちょっと解説】
R.swiftを導入することで文字列指定がなくなり、タイポミスが原因のバグ発生を防ぎます。また、同時にコード補完の恩恵を受けれるという利点もあります。「R」自体はR.generated.swiftにstructでまとめて定義されていて、そこから呼び出すようになっています。重くなったり、ビルドが遅かったりしたので、今はenumとか定数まとめファイルを作ってやってます。
【使用例】
let icon = R.image.profileIcon()
let color = R.color.primaryBackground()
let viewController = SurveyViewController(nib: R.nib.surveyView)
let lightFontTitle = R.font.acmeLight(size: 22)
let welcomeMessage = R.string.localizable.welcomeMessage()
//元はこうだった
let icon = UIImage(named: "profile-icon")
let color = UIColor(named: "primary background")
let viewController = SurveyViewController(nibName: "SurveyView", bundle: nil)
let lightFontTitle = UIFont(name: "Acme-Light", size: 22)
let welcomeMessage = NSLocalizedString("welcome.message", comment: "")
AutoLayout
SnapKit/SnapKit ★13,945
【1行で】
AutoLayoutをコードで簡単に書くやつ
【もうちょっと解説】
NSLayoutConstraintを使ってオートレイアウトの制約をつけると、かなり長いコードになってしまいます。そんなときはこれを使うとスッキリきれいに見やすいコードを書くことができます。類似のものでPureLayoutがあります。
【使用例】
lazy var testView = UIView()

override func viewDidLoad() {
     super.viewDidLoad()

     self.view.addSubview(testView)
     testView.snp.makeConstraints { (make) -> Void in
          make.width.height.equalTo(100)
          make.center.equalTo(self.view)
     }
}
タップ表示
morizotter/TouchVisualizer ★657
【1行で】
タップを表示するやつ
【もうちょっと解説】
デモをするときにどこをタッチしているか分からないと、見ている側も理解しづらい場合もありますよね。ジーズ生はプレゼンやデモが多いと思うので、デモ版ではこれを入れておくと良いかと思います。
【使用例】
func applicationDidFinishLaunching(_ application: UIApplication) {
	var config = Configuration()
	config.color = UIColor.red
	config.showsTimer = false
	config.showsTouchRadius = true
	config.showsLog = false
	config.image = UIImage(named: "circle")
	Visualizer.start(config)
	//カスタムしない場合はVisualizer.start()だけでOK
}
サービス・SDK・ツールなどで便利だったもの
デバック
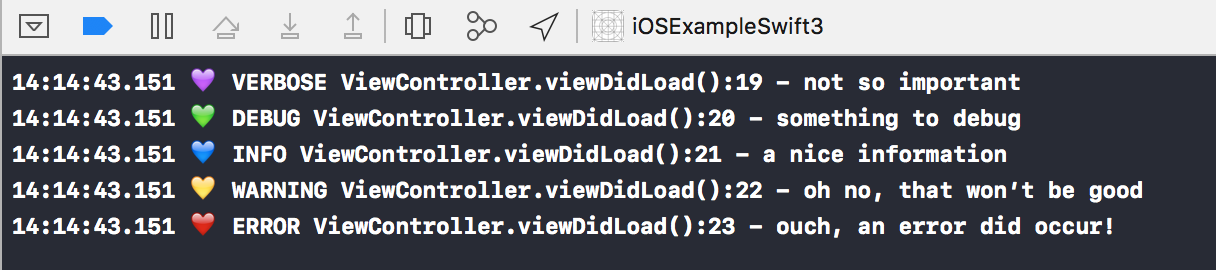
SwiftyBeaver/SwiftyBeaver ★3,940
【1行で】
デバッグログがわかりやすくなる
【もうちょっと解説】
ビルドごとにログを出し分けたり、ログの種別ごとに色を変えたりすることができるので、デバックログの不要な検索の手間が減り、管理しやすくなります。
あまり必要性が分かりませんが、Macにアプリをインストールすれば、専用画面で仕込んだデバックログを眺めることもできます。
【サンプル画像】
【使用例】
let log = SwiftyBeaver.self
let console = ConsoleDestination()//xcodeでログ出力
log.addDestination(console)

log.verbose("not so important")
log.debug("something to debug")
log.info("a nice information")
log.warning("oh no, that won't be good")
log.error("ouch an error did occur!")
ライセンス表記
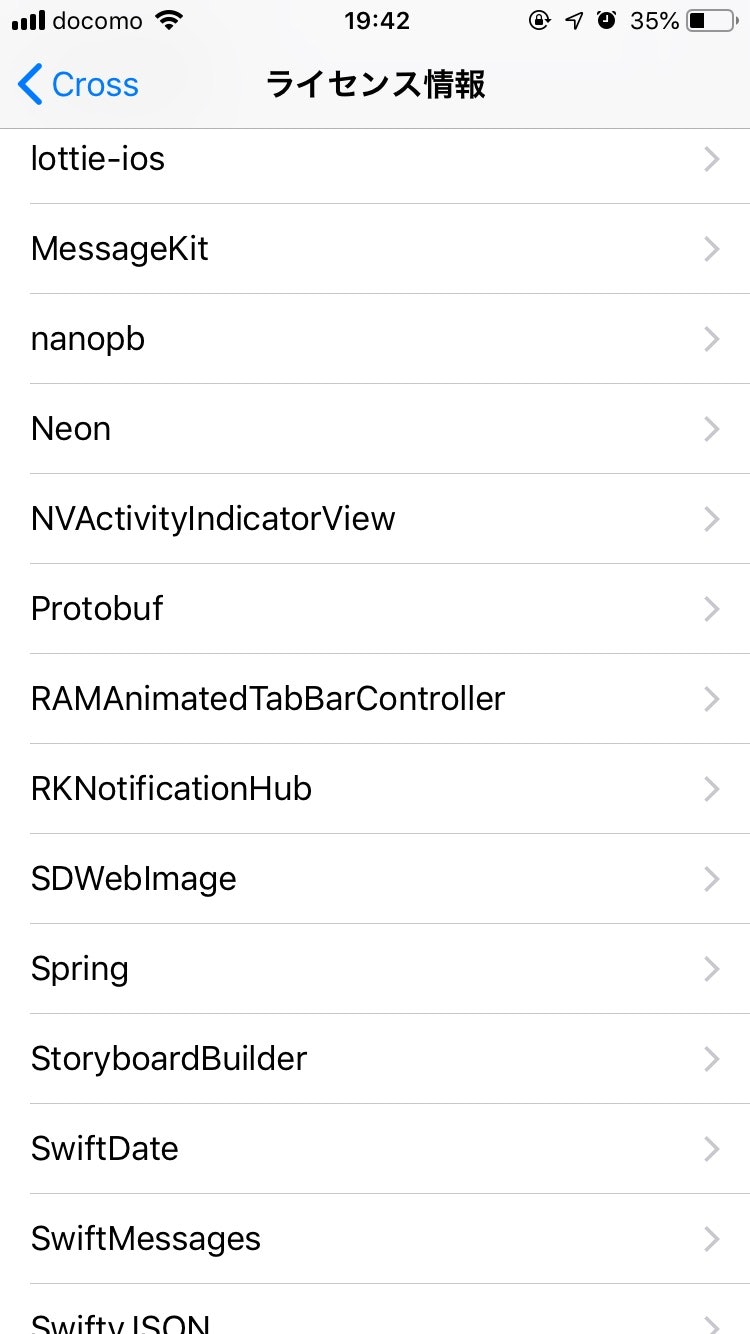
mono0926/LicensePlist ★1,310
【1行で】
設定画面にライブラリ表記をまとめて表示できるやつ
【もうちょっと解説】
自動的に依存ライブラリをiPhoneの設定画面に掲載してくれるツール。CocoaPods/Carthageどちらにも対応してくれています。podでLicense Plistを入れて、Build PhasesにRun Scriptを追記して自動更新に対応させるだけでOK。
【サンプル画像】
【使用例】
こちらについては主に設定の話になるので本家のサイトをご確認くださいませ
https://medium.com/swift-column/license-plist-c0363a008c67
画像作成
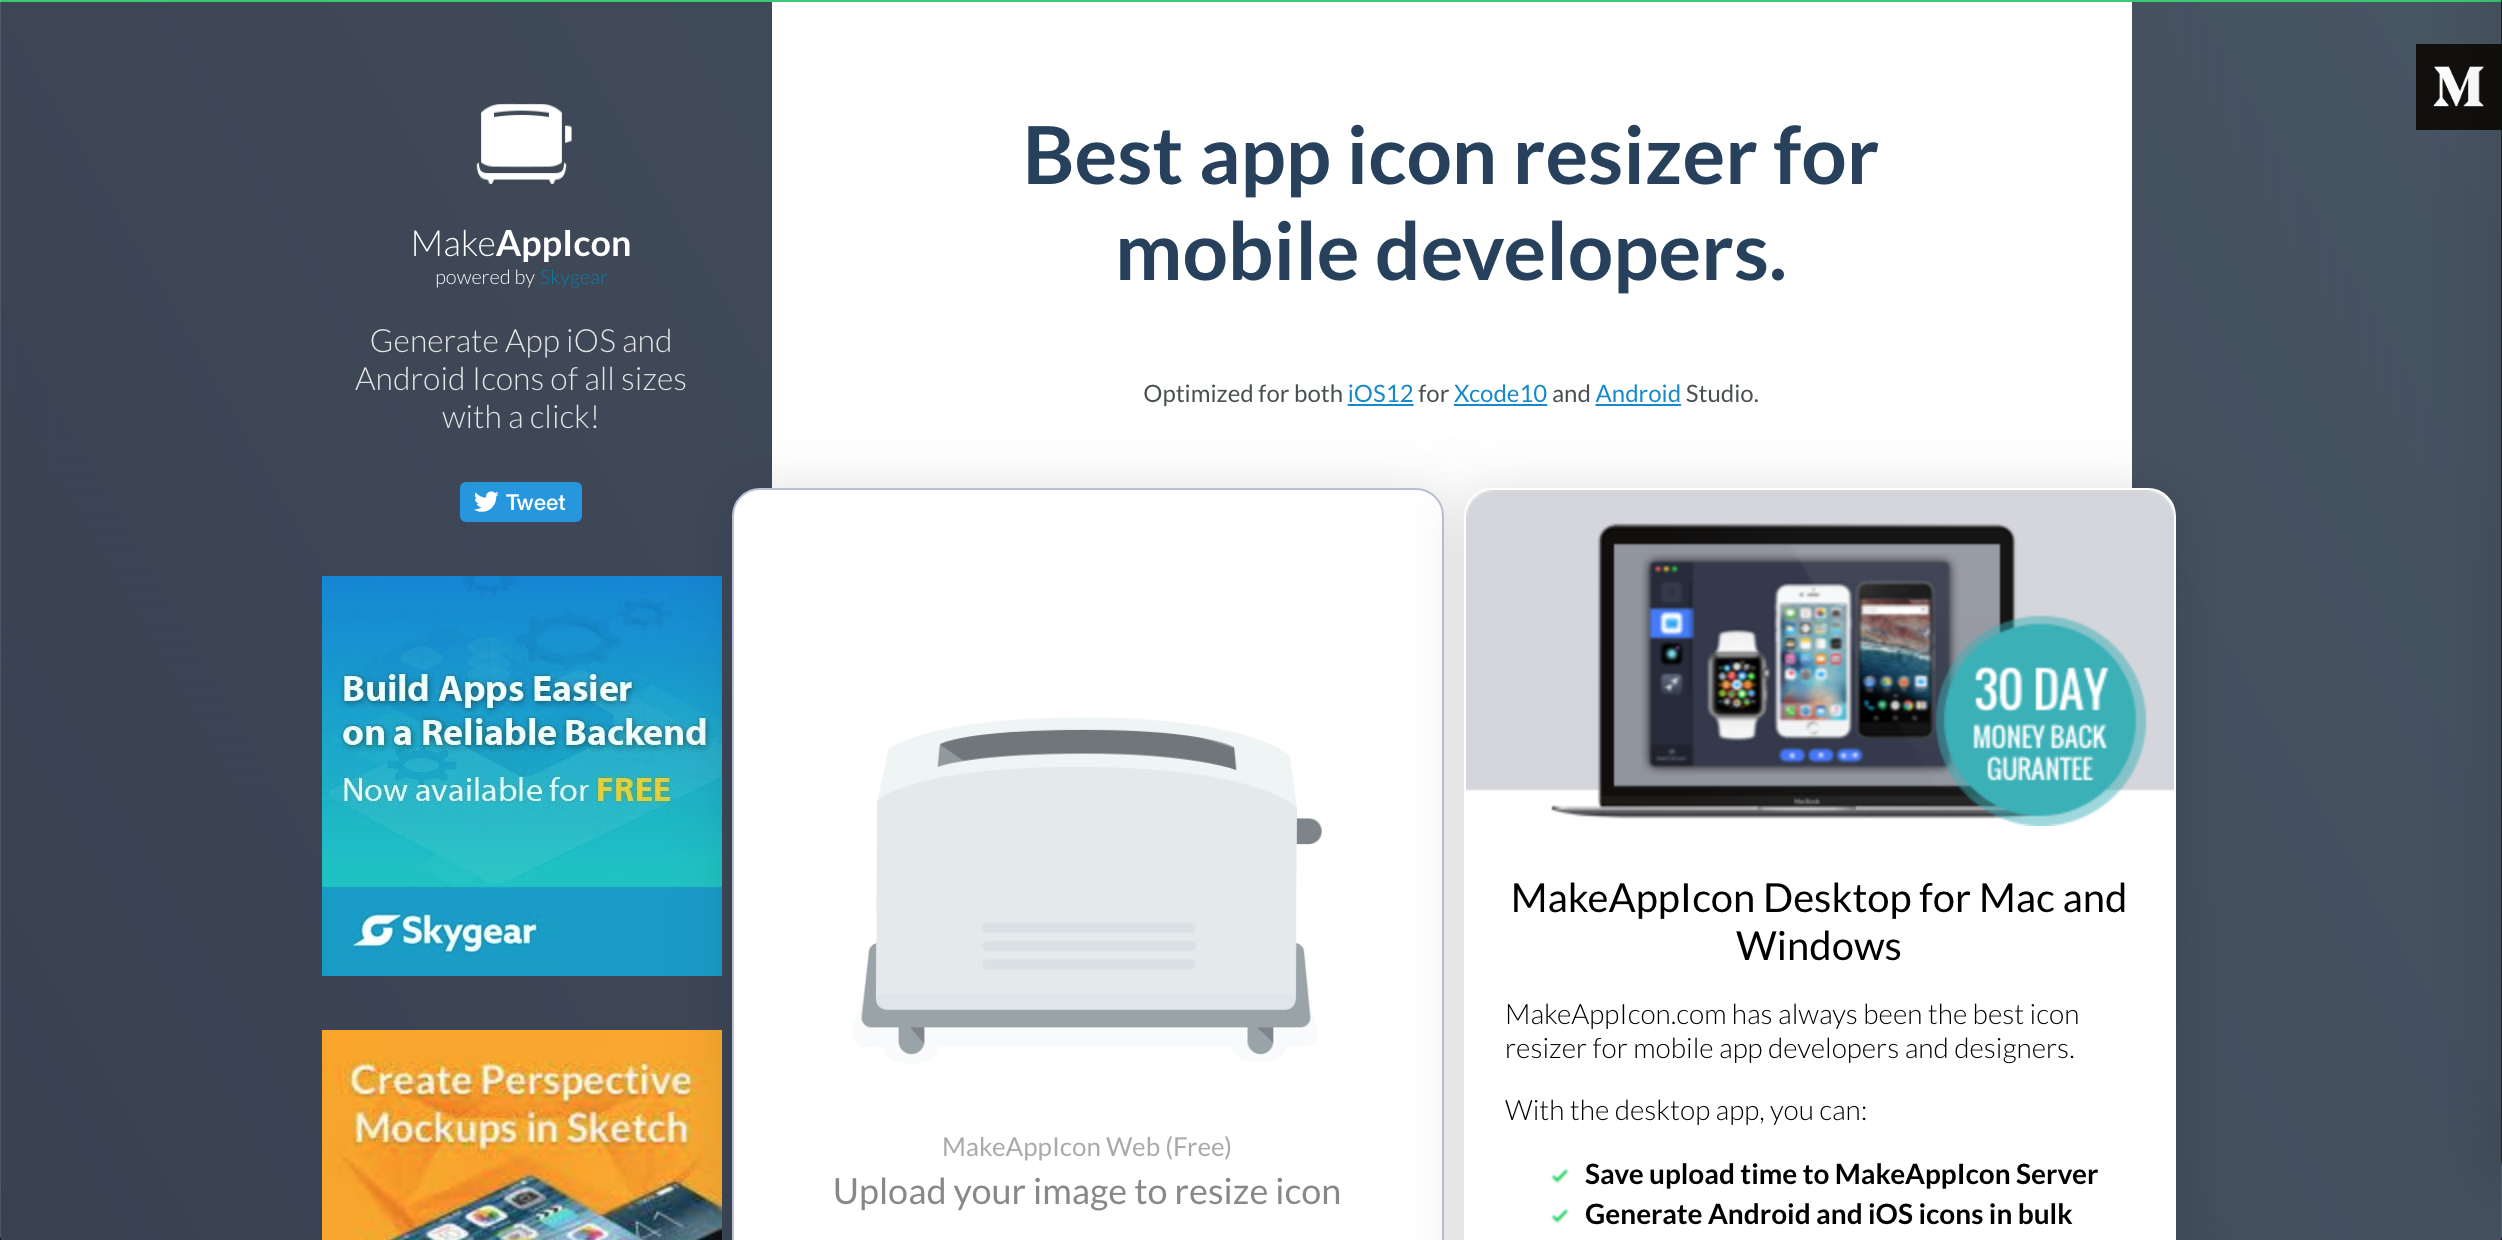
MakeAppIcon
【1行で】
アプリアイコンを自動で作成してくれるやつ
【もうちょっと解説】
1536 x 1536 pixでマスター画像を作成して、トースターが書いてあるところからぶち込むだけで全サイズ作成してくれます。
【サンプル画像】
Icon8
【1行で】
色んなアイコン素材
【もうちょっと解説】
最小サイズのPDFファイルでアイコンをさくっとダウンロードできるのでとても便利です。PDFでSingleScaleにしちゃった方が、画像設定も楽ですよね。有料版にすると、デスクトップアプリから色々探せるようになるので、アイコンが何かと必要になる開発初期やプロトタイプ作成時にはとても助かります。
【サンプル画像】
まとめサイト
raywenderlich/swift-algorithm-club ★18,927
【1行で】
Swiftのアルゴリズムとデータ構造のまとめリポジトリ
【もうちょっと解説】
スタック/キュー/挿入ソート/バイナリ検索/線形探索/マージソート/ボイヤームーアの文字列検索など、主要なアルゴリズムやデータ構造をソースコード付きでまとめてくれている(すぐに試せるPlayGroundもついている!)ので、ジーズの人みたく独学スタイルでSwiftをやる人は基本が終わったらこういったものを合間に試してみるのも良いと思います。
CosmicMind/Material ★10,542
【1行で】
マテリアルデザインのサンプル
【もうちょっと解説】
こういうUIライブラリ使わずにどういう風に作ればいいんだろ??というときにヒントになるので、ちょいちょい使えます。
【サンプル画像】

vsouza/awesome-ios ★28,729
【1行で】
iOSで使えるライブラリやツールをまとめてるやつ
【もうちょっと解説】
カテゴリごとにライブラリやXcodeプラグイン、チュートリアルなどがまとめてあります。これも検索用にブクマしといてもよいと思います。
Human Interface Guidelines
【1行で】
iOSのUIではどんなことに気をつけるべきかのまとめ
【もうちょっと解説】
Appleの公式ドキュメント。2つのボタンが横並びの場合、こういうものを左に置きましょうとか、タップする箇所は44px確保しましょうとか、基本原則について分かりやすくまとめてくれています。Appleのアプリはなぜ使いやすいのかが分かりますよね。本編は英語ですが、例えばこんな感じのことが載っています。
https://developer.apple.com/jp/design/tips/
更新された際は何が変わったのかを見てみると、よりiOS開発の面白みも増してくるのかなと思います。
審査期間
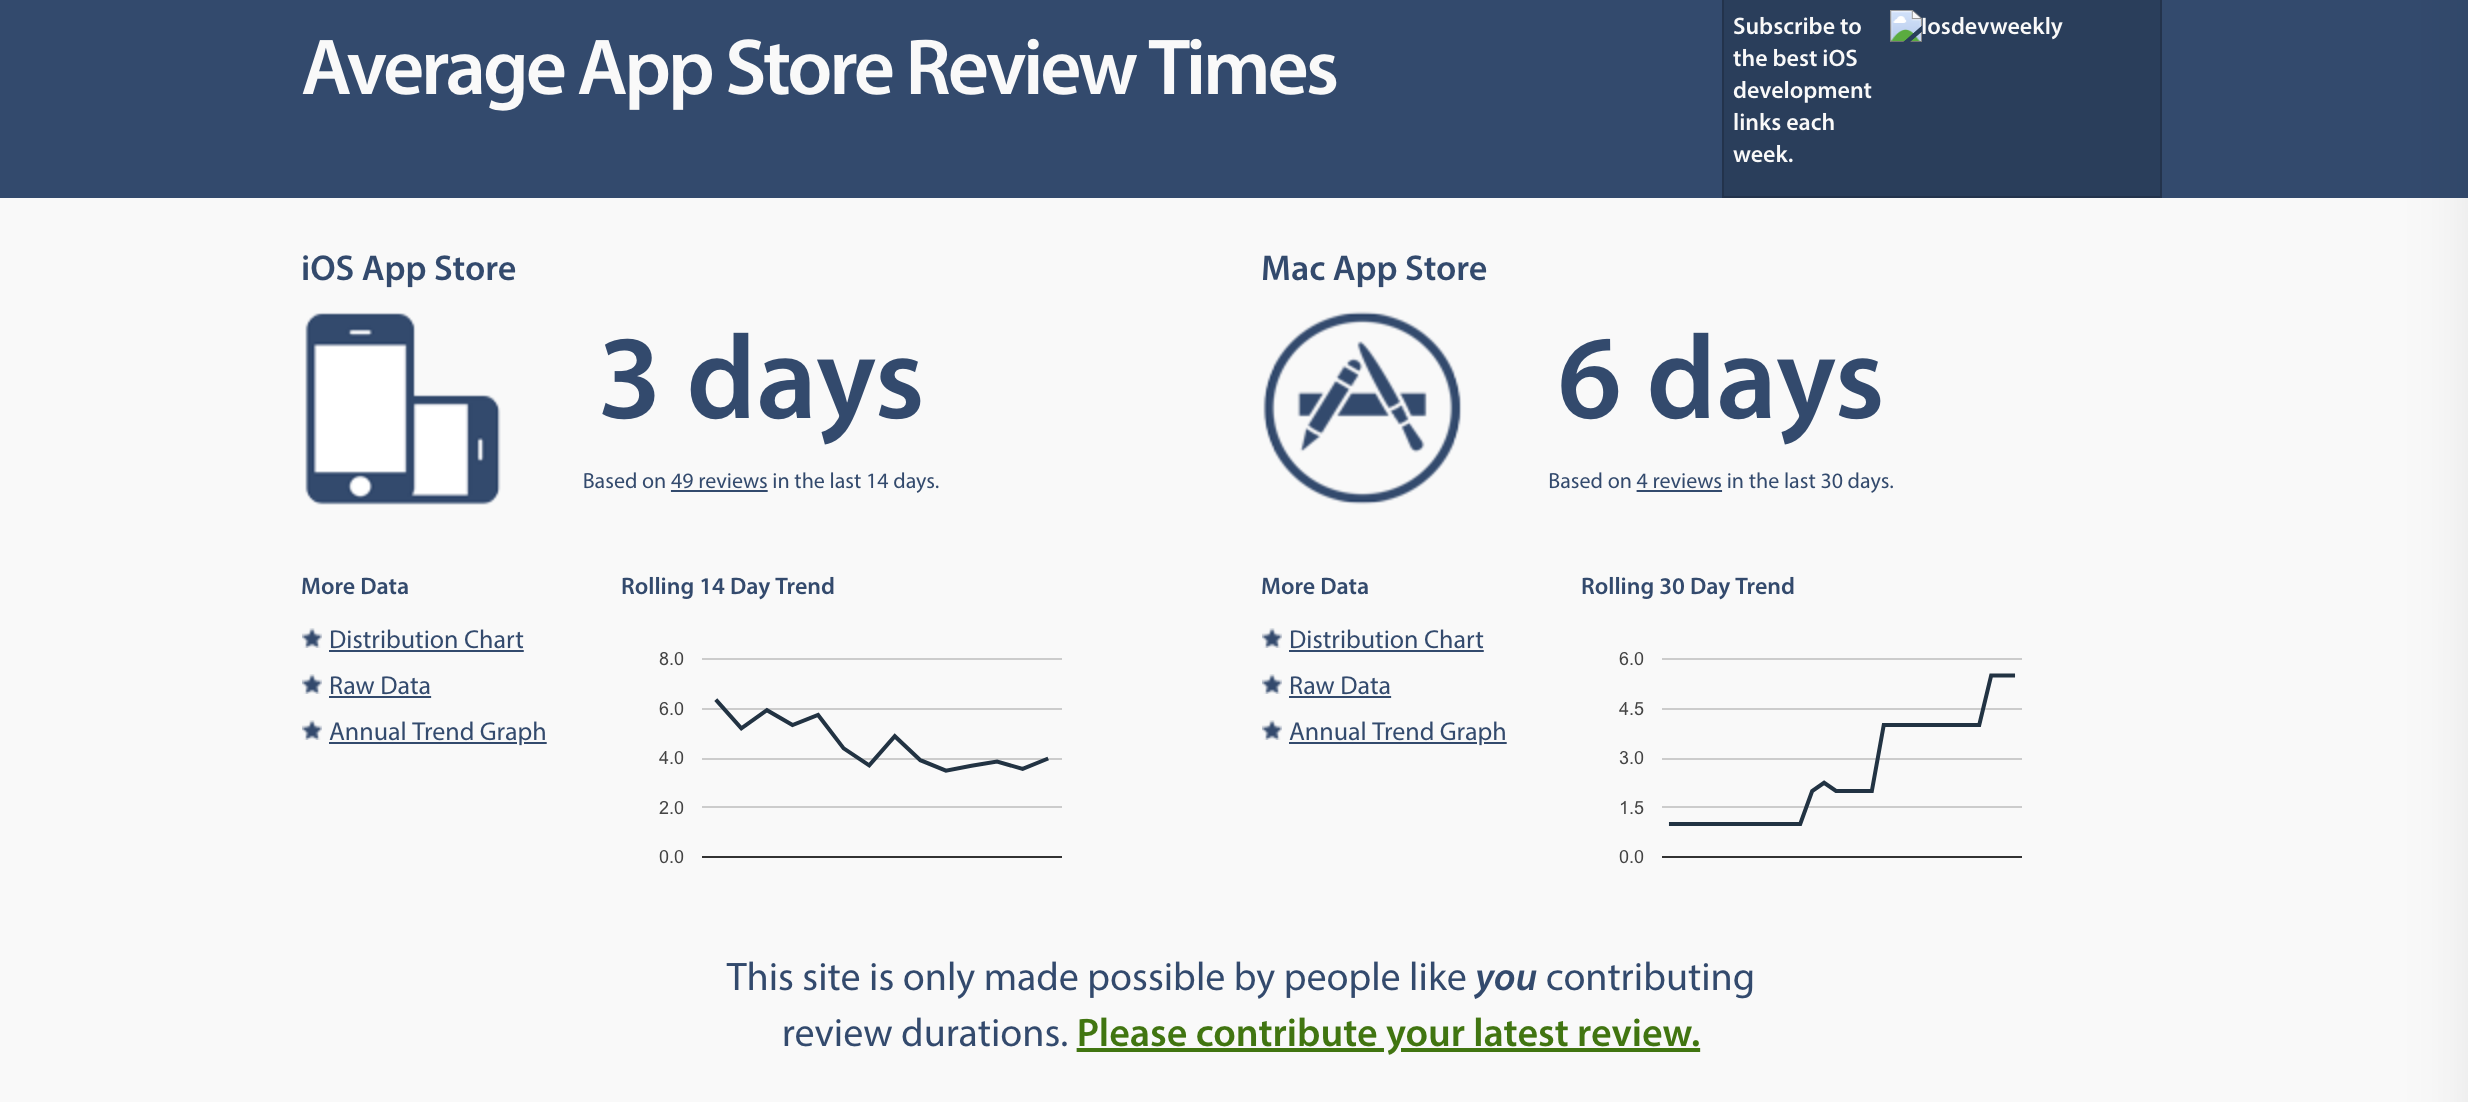
Average App Store Review Times
【1行で】
最近のAppleの審査期間の目安を教えてくれる
【もうちょっと解説】
最近は初回申請以外概ね1営くらいで通ると思うのであまり必要ないかと思いますが、審査期間の目安になるとは思います。たまに大量スパムで審査期間がめちゃくちゃ長く表示されるときがありますが。
【サンプル画像】
分析
Google Analytics
【1行で】
アプリの分析に使うやつ
【もうちょっと解説】
実際アプリを作ったあとはほぼ必須のツールなのではないでしょうか。今、僕のアプリのバックエンドはFirebaseなので、現状はタグマネでFirebase Analyticsのイベントを拾ったりして、すぐにGoogleAnalyticsで主要KPIのレポートを作成できるようにしています。
カスタマーサポート
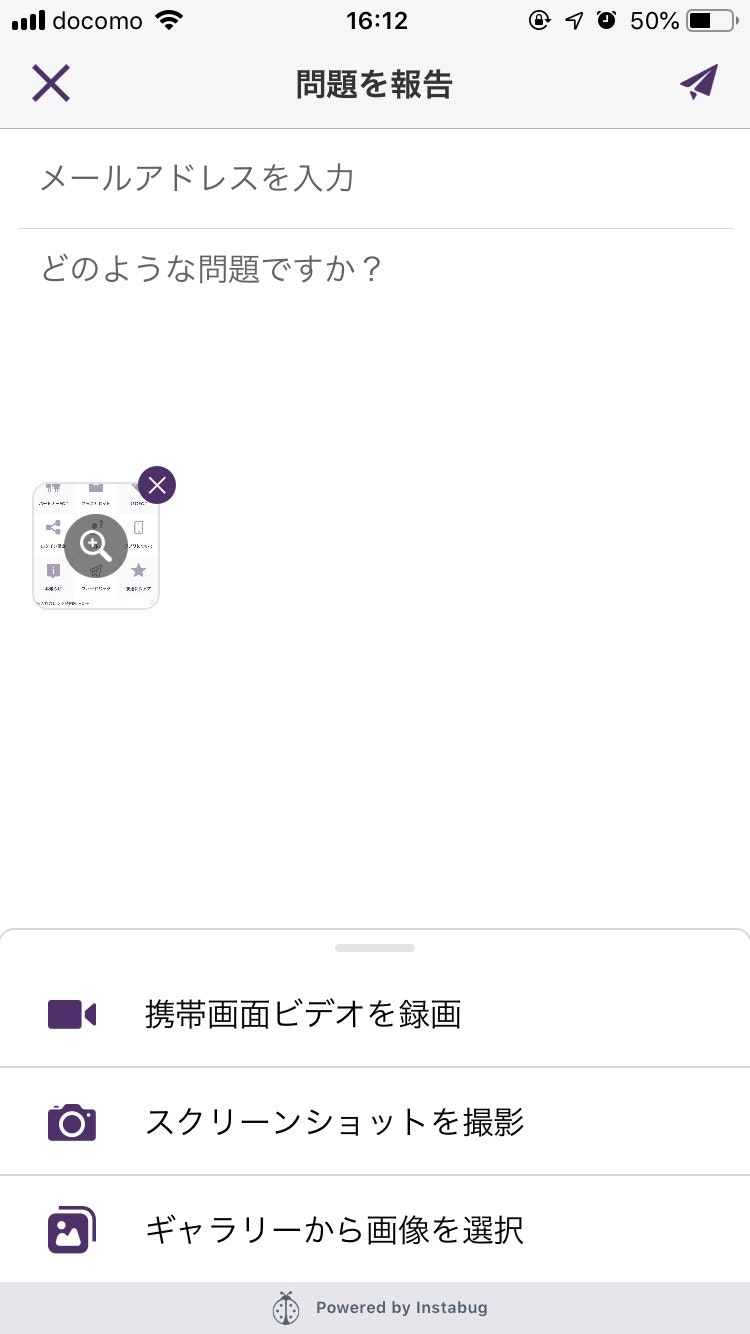
Instabug
【1行で】
バグ報告/問い合わせなどの機能を実装
【もうちょっと解説】
キャプチャを添えたバグ報告や問い合わせ機能をすぐに用意できる。有料版では無料版の機能に加えアンケート(良い結果の人だけレビュー依頼するとか)や、機能リクエスト機能、app内サポートチャット、遷移やView Hierarchieの送信、各種インテグレーションなどとても便利な機能がたくさん使えます。詳しくはリンクから。実装もめちゃくちゃ簡単でヤバい。
【サンプル画像】
【使用例】
    //didFinishLaunchingWithOptionsで色々設定
    private func setupInstaBug() {
        Instabug.start(withToken: "token_here", invocationEvents: [.shake])
        Instabug.tintColor = .blue
        Instabug.setLocale(.japanese)
        Instabug.welcomeMessageMode = IBGWelcomeMessageMode.disabled
        BugReporting.promptOptions = [.feedback, .bug]
        BugReporting.shakingThresholdForiPhone = 2.0
        BugReporting.didDismissHandler = { (dismissType, reportType) in
            self.doSomothing()//閉じたときになんかする
        }
        //こういった感じでデフォルトの文言を変更
        Instabug.setValue("デバイスを振ることでフィードバックをどこからでも呼び出せます", forStringWithKey: kIBGLiveWelcomeMessageContent)
        //レポートする際にデータを添える
        Instabug.willSendReportHandler = { report in
            report.setUserAttribute(hoge, withKey: "hoge")
            return report
        }
    }
    //報告機能を呼び出してみる
    @IBAction func feedBackTappedButton(_ sender: Any) {
        BugReporting.invoke()
    }
CI
CircleCI
【1行で】
いわゆるCI(継続的インテグレーション)サービス
【もうちょっと解説】
「コミットしたら、自動でビルド・テストをしてSlackに通知」「○○ブランチにマージされたらFabricでβ版配信/AppStoreConenctにアップロード」とかができます(後者はFastlaneも登場するので、初めての場合は前者から取り組むといいと思います)。キャッシュも積極的に使って料金を抑えましょう。
ちなみに、Bitriseでも良いと思います(使いやすいGUIもあるので、iOSだけ考えるのであれば、Bitriseの方がはじめてのCIツールとしては良い気がする)。料金体系も違うので、実際にトライアルしてみて、使いやすいか料金的お得に使える方を選んでください。
ABテスト
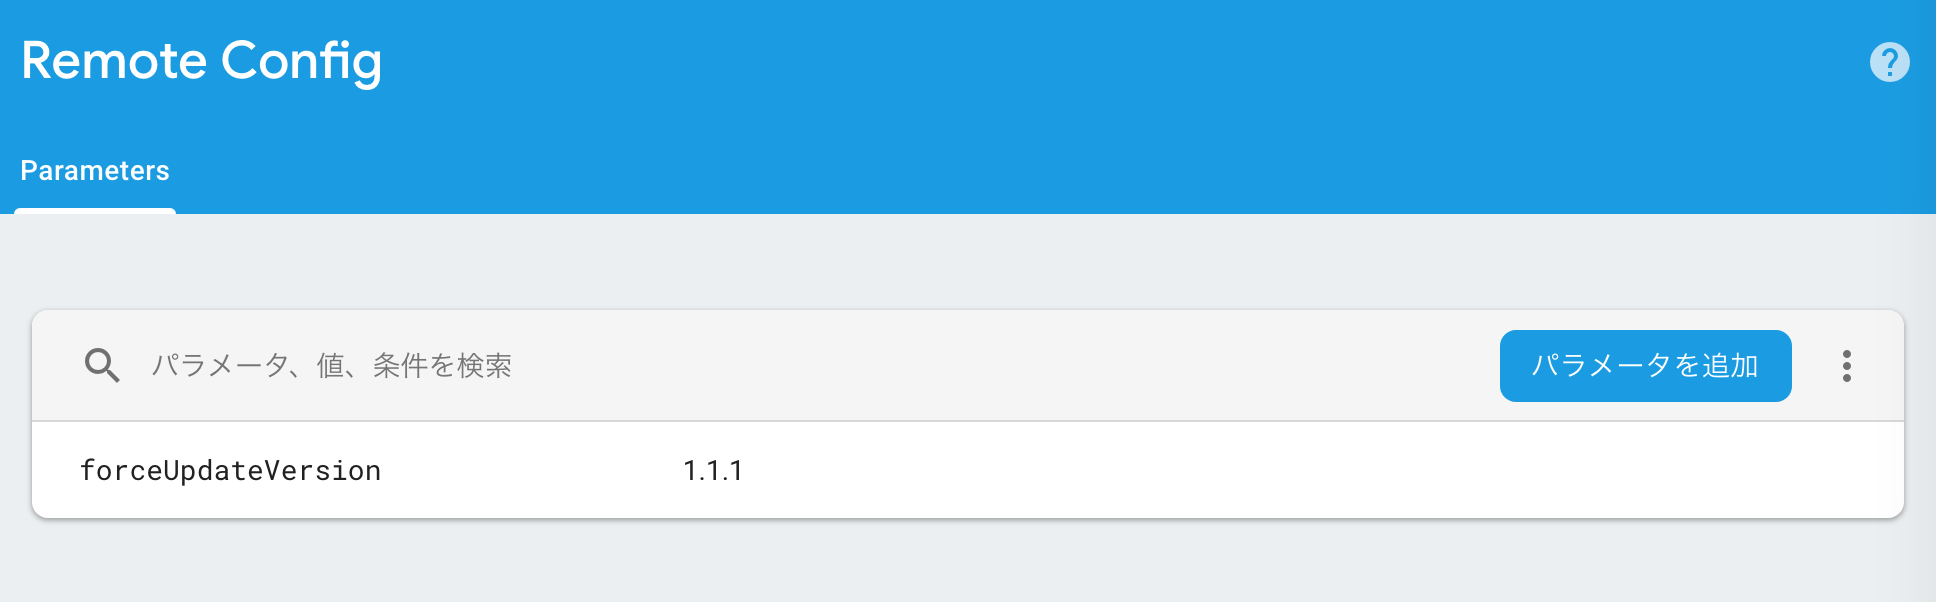
Firebase Remote Config
【1行で】
アプリのアップデートなしでコンソールから更新できるやつ
【もうちょっと解説】
用途としてはABテストだけでなく、強制アップデートバージョンをRemoteConfingで管理したり。リリースバージョンでユーザーに影響が出たら、強制アップデートを取り消せたりするので、とても便利です。最近CloudFunctionsにRemoteConfigトリガができて、リアルタイムで伝播させられるので、色々な使い方ができると思います。ジーズのFirebaseユーザーは是非使ってみてください。
【サンプル画像】