Spring cloud を使用してシンプルなマイクロサービスを構成します。ログインにはOAuth2を使用してGoogleアカウントでログインできるようにします。ソースは https://github.com/jun-1/spring-cloud-microservices
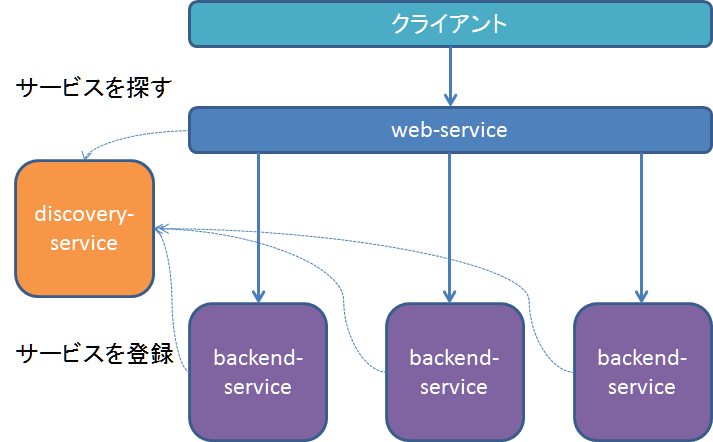
全体構成
ブラウザ等のクライアントとの対話やログイン処理はweb-serviceが行いbackend-serviceに各種機能を要求します。この際discovery-serviceにサービスを登録することで各サービスがお互いを見つけられるようにします。
discovery-seriviceの実装
@EnableEurekaServerアノテーションを付けたspring-bootアプリケーションを作成するだけでサービスレジストリとしてEurekaサーバーが実装できます。
また http://localhost:8761 からステータスを確認できます。
package demo;

import org.springframework.boot.SpringApplication;
import org.springframework.boot.autoconfigure.SpringBootApplication;
import org.springframework.cloud.netflix.eureka.server.EnableEurekaServer;

@EnableEurekaServer
@SpringBootApplication
public class DeiscoveryServiceApplication {

	public static void main(String[] args) {
		SpringApplication.run(DeiscoveryServiceApplication.class, args);
	}
}
ポート番号と自分自身をレジストリに登録しないため設定をします。
eureka:
  client:
    register-with-eureka: false
    fetch-registry: false
server:
  port: 8761
web-serviceの実装
はじめにOAuthで使用するクライアントIDとクライアントシークレットを取得します。
Googleの認証情報作成
https://console.developers.google.com で認証情報を作成します。
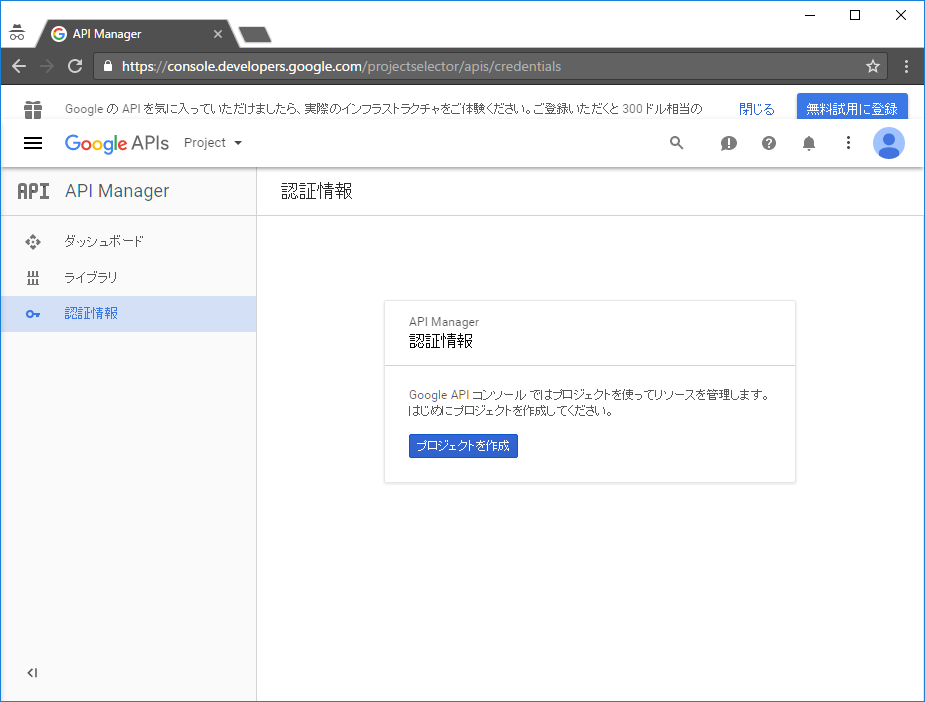
[認証情報]から[プロジェクトを作成]をクリックしプロジェクトを作成します。

OAuthクライアントIDを選択し認証情報を作成します。(OAuth同意画面を作成していない場合は作成しておきます)
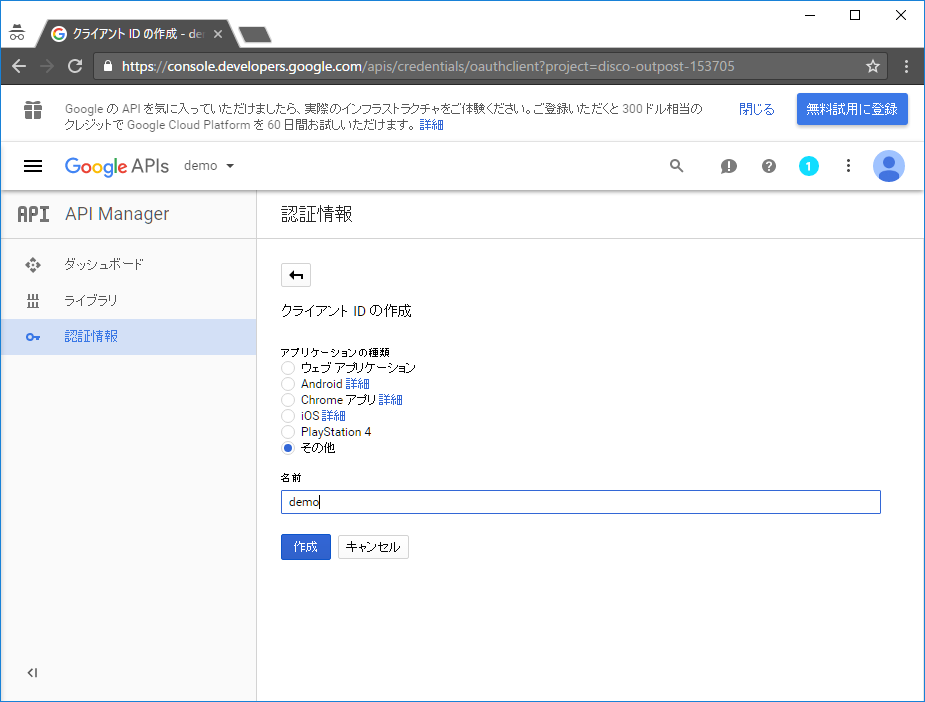
localhostで動かす場合は[その他]を選択して[作成]ボタンをクリックすると、OAuthクライアントのクライアントIDとクライアントシークレットが取得できます。
アプリケーションの実装
web-serviceの役割はクライアントとの対話とログイン、それからbackend-serviceに対するリバースプロキシです。
@EnableZuulProxyをつけることでZuulを使用してCORSと認証の懸念事項を個別に管理することなくリバースプロキシとして動作させることができます。
@EnableOAuth2SsoをつけることでOAuth2に基づくシングルサインオンが実現できます。
package demo;

import org.springframework.boot.SpringApplication;
import org.springframework.boot.autoconfigure.SpringBootApplication;
import org.springframework.boot.autoconfigure.security.oauth2.client.EnableOAuth2Sso;
import org.springframework.cloud.netflix.eureka.EnableEurekaClient;
import org.springframework.cloud.netflix.zuul.EnableZuulProxy;
import org.springframework.security.config.annotation.web.builders.HttpSecurity;
import org.springframework.security.config.annotation.web.configuration.WebSecurityConfigurerAdapter;

@EnableEurekaClient
@EnableZuulProxy
@EnableOAuth2Sso
@SpringBootApplication
public class WebServiceApplication extends WebSecurityConfigurerAdapter{

	public static void main(String[] args) {
		SpringApplication.run(WebServiceApplication.class, args);
	}

	@Override
	protected void configure(HttpSecurity http) throws Exception {
		http.authorizeRequests()
			.antMatchers("/", "index.html").permitAll()
			.anyRequest().authenticated();
	}
}
configure()ではindex.html以外のURLへのアクセスには認証が必要と設定しています。
次はweb-serviceの設定です。
spring:
  application:
    name: web-service
eureka:
  client:
    service-url:
      defaultZone: http://localhost:8761/eureka
zuul:
  ignored-services: '*'
  routes:
    backend-service: 'api/**'
security:
  oauth2:
    resource:
      user-info-uri: https://www.googleapis.com/oauth2/v1/userinfo
    client:
      access-token-uri: https://accounts.google.com/o/oauth2/token
      user-authorization-uri: https://accounts.google.com/o/oauth2/auth
      client-id: ${clientId}
      client-secret: ${clientSecret}
      grant-type: code
      scope: profile
spring.application.nameで設定した名前でEurekaサーバーにサービスが登録されます。
登録先のサーバーはeureka.client.service.url.defaultZoneで指定します。
zuulの設定でapi/**へのリクエストをbackend-serviceに転送するようにしています。
ここでは転送先にEurekaサーバーに登録したサービス名を使用できます。
securityの設定はOAuth2クライアントの設定です。ここで先ほど取得したクライアントIDとクライアントシークレットを使用します。
backend-service
backend-serviceはOAuth2のクライアントでありリソースサーバーとして実装しています。
package demo;

import org.springframework.boot.SpringApplication;
import org.springframework.boot.autoconfigure.SpringBootApplication;
import org.springframework.cloud.netflix.eureka.EnableEurekaClient;
import org.springframework.security.oauth2.config.annotation.web.configuration.EnableOAuth2Client;
import org.springframework.security.oauth2.config.annotation.web.configuration.EnableResourceServer;

@EnableEurekaClient
@EnableOAuth2Client
@EnableResourceServer
@SpringBootApplication
public class BackendServiceApplication {

	public static void main(String[] args) {
		SpringApplication.run(BackendServiceApplication.class, args);
	}
}
以下は'Hello'の文字列を返すだけのコントローラーですが、OAuth2の認証がなければアクセスできないようになります。web-service経由でアクセスした場合はZuul Proxyが認証トークンをリレーしてくれるためweb-serviceでログインしていれば/api/helloで呼び出すことが可能です。
package demo.controller;

import org.springframework.web.bind.annotation.RequestMapping;
import org.springframework.web.bind.annotation.RestController;

@RestController
public class BackendController {

	@RequestMapping("/hello")
	public String hello(){
		return "Hello";
	}
}
また、以下のようにOAuth2RestTemplateを使用すると、他のサービスとRest通信を簡単に行うことができます。
    @Bean
    @LoadBalanced
    public OAuth2RestTemplate oAuth2RestTemplate(OAuth2ProtectedResourceDetails resource, OAuth2ClientContext context){
        return new OAuth2RestTemplate(resource, context);
    }