はじめに
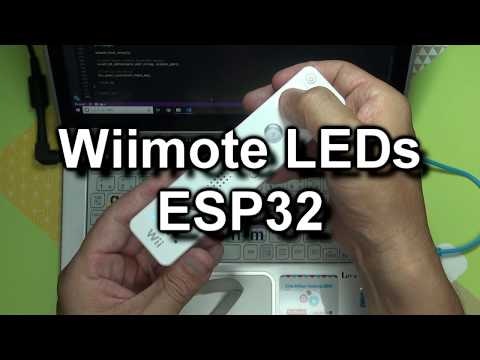
Wiiリモコンには、4つのLEDがあります。ESP32に接続して、Lチカをしてみましょう。
▼YouTubeで見る
開発環境の準備
ESP32の開発環境をWindows10(64bit)のUbuntu上に準備します。
⇒ ESP32 で Hello world! - Ubuntu (Windows Subsystem for Linux)
Bluetoothスタック(BTstack)の準備
Windows10上で、BTStackをgithubから次のフォルダーへクローンします。
C:\workgit\btstack
URL: https://github.com/bluekitchen/btstack.git
wiimote_led_demo.c
BTStackのexampleフォルダに元となるソースコードを配置し、port/esp32/exampleへ展開し、ビルドします。
ソースコードの配置
次のソースコードをBTStackのexampleフォルダ内にwiimote_led_demo.cとして配置します。
wiimote_addr_string = "00-1A-E9-F8-22-52" の値は、接続するWiiリモコンのアドレスに変更してください。
参考:WiiリモコンをESP32で認識してみる(BTstack)#MACアドレスの確認
/*
 * Copyright (C) 2019 jp-96
 *
 * Copyright (C) 2017 BlueKitchen GmbH
 *
 * Redistribution and use in source and binary forms, with or without
 * modification, are permitted provided that the following conditions
 * are met:
 *
 * 1. Redistributions of source code must retain the above copyright
 *    notice, this list of conditions and the following disclaimer.
 * 2. Redistributions in binary form must reproduce the above copyright
 *    notice, this list of conditions and the following disclaimer in the
 *    documentation and/or other materials provided with the distribution.
 * 3. Neither the name of the copyright holders nor the names of
 *    contributors may be used to endorse or promote products derived
 *    from this software without specific prior written permission.
 * 4. Any redistribution, use, or modification is done solely for
 *    personal benefit and not for any commercial purpose or for
 *    monetary gain.
 *
 * THIS SOFTWARE IS PROVIDED BY BLUEKITCHEN GMBH AND CONTRIBUTORS
 * ``AS IS'' AND ANY EXPRESS OR IMPLIED WARRANTIES, INCLUDING, BUT NOT
 * LIMITED TO, THE IMPLIED WARRANTIES OF MERCHANTABILITY AND FITNESS
 * FOR A PARTICULAR PURPOSE ARE DISCLAIMED. IN NO EVENT SHALL MATTHIAS
 * RINGWALD OR CONTRIBUTORS BE LIABLE FOR ANY DIRECT, INDIRECT,
 * INCIDENTAL, SPECIAL, EXEMPLARY, OR CONSEQUENTIAL DAMAGES (INCLUDING,
 * BUT NOT LIMITED TO, PROCUREMENT OF SUBSTITUTE GOODS OR SERVICES; LOSS
 * OF USE, DATA, OR PROFITS; OR BUSINESS INTERRUPTION) HOWEVER CAUSED
 * AND ON ANY THEORY OF LIABILITY, WHETHER IN CONTRACT, STRICT LIABILITY,
 * OR TORT (INCLUDING NEGLIGENCE OR OTHERWISE) ARISING IN ANY WAY OUT OF
 * THE USE OF THIS SOFTWARE, EVEN IF ADVISED OF THE POSSIBILITY OF
 * SUCH DAMAGE.
 *
 * Please inquire about commercial licensing options at
 * contact@bluekitchen-gmbh.com
 *
 */

# define __BTSTACK_FILE__ "wiimote_led_demo.c"

/*
 * wiimote_led_demo.c
 */

/* EXAMPLE_START(wiimote_led_demo): Wiimote LED Demo
 *
 * @text This example implements an Wiimote LED. For now, it connnects to a fixed device, opens the Interrupt channels
 */

# include <inttypes.h>
# include <stdio.h>

# include "btstack_config.h"
# include "btstack.h"

// Wiimote
static const char * wiimote_addr_string = "00-1A-E9-F8-22-52";
static bd_addr_t wiimote_addr;

# define WIIMOTE_DATA_PSM        0x13
# define WIIMOTE_MTU             672

uint8_t wiimote_led = 0;

// L2CAP
static uint16_t           l2cap_wiimote_interrupt_cid = -1;

static btstack_packet_callback_registration_t hci_event_callback_registration;

/* @section Main application configuration
 *
 * @text In the application configuration, L2CAP is initialized
 */

static void hci_packet_handler (uint8_t packet_type, uint16_t channel, uint8_t *packet, uint16_t size);

static void wiimote_host_setup(void){

    // register for HCI events
    hci_event_callback_registration.callback = &hci_packet_handler;
    hci_add_event_handler(&hci_event_callback_registration);

    // Initialize L2CAP
    l2cap_init();

    // Disable stdout buffering
    setbuf(stdout, NULL);
}

/*
 * @section HCI Packet Handler
 *
 * @text The hci packet handler responds to various HCI Events.
 */
static void hci_packet_handler (uint8_t packet_type, uint16_t channel, uint8_t *packet, uint16_t size)
{
    uint8_t   event;
    uint8_t   status;
    uint16_t  l2cap_cid;

    switch (packet_type) {
        case HCI_EVENT_PACKET:
            event = hci_event_packet_get_type(packet);
            switch (event) {
                case BTSTACK_EVENT_STATE:
                    if (btstack_event_state_get_state(packet) == HCI_STATE_WORKING){
                        status = l2cap_create_channel(hci_packet_handler, wiimote_addr, WIIMOTE_DATA_PSM, WIIMOTE_MTU, &l2cap_wiimote_interrupt_cid);
                        if (status){
                            printf("Connecting to Wiimote Interrupt failed: 0x%02x\n", status);
                            break;
                        }
                    }
                    break;

                case L2CAP_EVENT_CHANNEL_OPENED:
                    status = l2cap_event_channel_opened_get_status(packet);
                    if (status){
                        printf("L2CAP Connection failed: 0x%02x\n", status);
                        break;
                    }
                    l2cap_cid  = little_endian_read_16(packet, 13);
                    if (!l2cap_cid) break;
                    if (l2cap_cid == l2cap_wiimote_interrupt_cid){
                        printf("Wiimote Connection established\n");
                    }
                    break;

                case L2CAP_EVENT_CAN_SEND_NOW:
                    if(channel == l2cap_wiimote_interrupt_cid){
                        uint8_t report[] = { 0xA2, 0x11, wiimote_led };
                        l2cap_send(l2cap_wiimote_interrupt_cid, (uint8_t*) report, sizeof(report));
                    }
                    break;
                default:
                    break;
            }
            break;
        case L2CAP_DATA_PACKET:
            if (channel == l2cap_wiimote_interrupt_cid){
                printf("Wiimote Interrupt: ");
                printf_hexdump(packet, size);
            	wiimote_led = (packet[2] & 0xF) << 4;
                printf("Wiimote LEDs: 0x%02x\n", wiimote_led);
                l2cap_request_can_send_now_event(l2cap_wiimote_interrupt_cid);
            } else {
                printf("Unknown channel.\n");
            }
            break;
        default:
            break;
    }
}

int btstack_main(int argc, const char * argv[]);
int btstack_main(int argc, const char * argv[]){

    (void)argc;
    (void)argv;

    wiimote_host_setup();

    // parse human readable Bluetooth address
    sscanf_bd_addr(wiimote_addr_string, wiimote_addr);

    // Turn on the device
    hci_power_control(HCI_POWER_ON);

    return 0;
}

/* EXAMPLE_END */
exampleの展開
Windows10(64bit)のUbuntu上で、port/esp32フォルダへ移動し、exampleを展開します。
展開後、port/esp32/example/wiimote_led_demoフォルダへ移動します。
cd /mnt/c/workgit/btstack/port/esp32
./integrate_btstack.py
cd example/wiimote_led_demo
シリアルポートの設定
menuconfig というプロジェクト設定ツールを起動し、シリアルポートの設定を行います。
make menuconfig
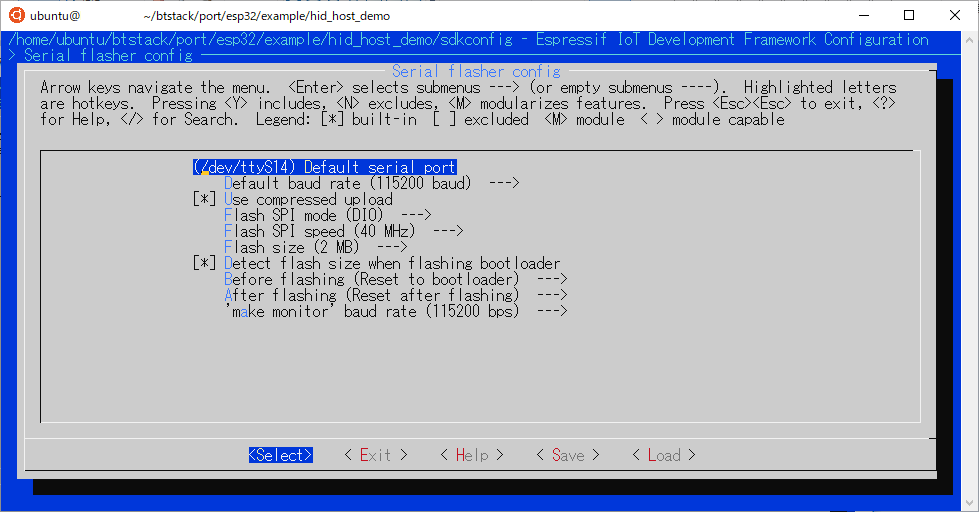
[Serial flasher config] → [Default serial port] で、ESP32と接続しているシリアルポートを設定します(例えば、/dev/ttyS14)。通信速度やオプション指定も図のように合わせてください。
設定後、< Save >で保存し、< Exit >で終了します。
ビルドと書き込み
次のコマンドで、ビルドと書き込みを行います。
make flash
モニター
次のコマンドで、ESP32とモニター接続します。コマンド実行後、すぐにWiiリモコンのAボタンとBボタンとを同時に押し、下部の4つの青色LEDを点滅状態にします。
しばらくすると、ESP32がWiiリモコンと接続し、WiiリモコンのボタンON/OFFに反応します。
十字キーを押下すると、LEDが点灯します。
make monitor
スニペットによる解説
1.Wiiリモコン割り込みチャネルの生成
まず、HCI_STATE_WORKING状態になるのを待ちます。HCI_STATE_WORKING状態のイベントが発生したら、Wiiリモコン割り込みチャネルを生成します(WIIMOTE_DATA_PSM)。
                case BTSTACK_EVENT_STATE:
                    if (btstack_event_state_get_state(packet) == HCI_STATE_WORKING){
                        status = l2cap_create_channel(hci_packet_handler, wiimote_addr, WIIMOTE_DATA_PSM, WIIMOTE_MTU, &l2cap_wiimote_interrupt_cid);
                        if (status){
                            printf("Connecting to Wiimote Interrupt failed: 0x%02x\n", status);
                            break;
                        }
                    }
                    break;
2.Wiiリモコン接続完了の確認(割り込みチャネル)
次にWiiリモコンと接続が完了するとL2CAP_EVENT_CHANNEL_OPENEDイベントが発生し、Wiiリモコンの割り込みチャネルとの接続が完了したことを確認しています(実際は何もしていません)。
                case L2CAP_EVENT_CHANNEL_OPENED:
                    status = l2cap_event_channel_opened_get_status(packet);
                    if (status){
                        printf("L2CAP Connection failed: 0x%02x\n", status);
                        break;
                    }
                    l2cap_cid  = little_endian_read_16(packet, 13);
                    if (!l2cap_cid) break;
                    if (l2cap_cid == l2cap_wiimote_interrupt_cid){
                        printf("Wiimote Connection established\n");
                    }
                    break;
3.Wiiリモコン接続完了直後の受信
Wiiリモコンは、接続完了後、ボタン押下状態のデータを送ってきますので、初めに、L2CAP_DATA_PACKETパケットを受信します。。また、初期状態では、ボタンのON/OFF毎にWiiリモコンがボタン押下状態のデータを送ってきます。
この中で、ボタンの押下状態を調べ、Wiiリモコンへ送る値を設定しています(wiimode_led)。l2cap_sendメソッドでWiiリモコンへコマンドを送りますが、ここでは、l2cap_request_can_send_now_eventメソッドで、l2cap_sendの呼び出し要求をします。
l2cap_sendメソッドを呼び出す前に、送信が可能かどうかを確認しなければなりません。
        case L2CAP_DATA_PACKET:
            if (channel == l2cap_wiimote_interrupt_cid){
                printf("Wiimote Interrupt: ");
                printf_hexdump(packet, size);
            	wiimote_led = (packet[2] & 0xF) << 4;
                printf("Wiimote LEDs: 0x%02x\n", wiimote_led);
                l2cap_request_can_send_now_event(l2cap_wiimote_interrupt_cid);
            } else {
                printf("Unknown channel.\n");
            }
            break;
4. LED点灯コマンドの送信
l2cap_request_can_send_now_eventメソッドの結果、L2CAP_EVENT_CAN_SEND_NOWイベントが発生しますので、ここで、l2cap_sendメソッドにより、LED点灯コマンドを送信します。
以後、WiiリモコンのボタンをON/OFFする毎に、L2CAP_DATA_PACKETパケットの受信とL2CAP_EVENT_CAN_SEND_NOWイベントの発生とを繰り返します。
LED点灯コマンドについては、Wiimote#Player LEDsを参照してください。
                case L2CAP_EVENT_CAN_SEND_NOW:
                    if(channel == l2cap_wiimote_interrupt_cid){
                        uint8_t report[] = { 0xA2, 0x11, wiimote_led };
                        l2cap_send(l2cap_wiimote_interrupt_cid, (uint8_t*) report, sizeof(report));
                    }
                    break;
おわりに
ESP32にWiiリモコンを接続し、十字キーを押下することによってLEDを点灯(Lチカ)させることができました。