前回を引き継いて、文章・記事モジュールの機能要件ごとに、ページの構成を考える。
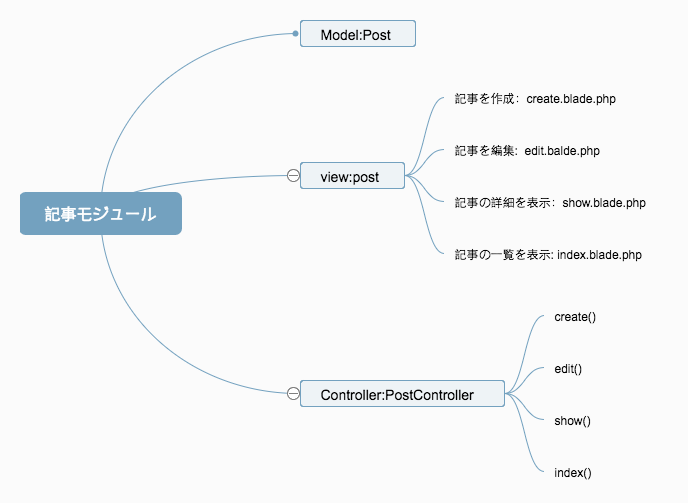
bladeテンプレートを使って、コントローラのメソッドに対応して、ページを四つ作る。
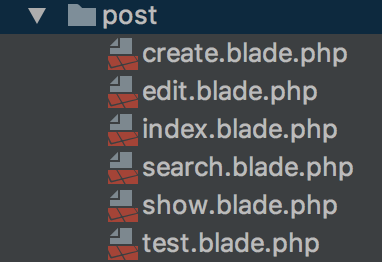
まず、Viewというファイルの直下に下層ファイルPostを作る。
そこに記事モジュールを構成するbladeテンプレートを入れる。
post/create.blade.php
post/edit.blade.php
post/show.blade.php
post/index.blade.php
bladeテンプレートを用いてページを作る
コントローラPostControllerのメッソドはページと対応しているので、
以下のようにコントローラのデータをビュー層に渡す。
  // 文章の一覧
    public function index(){
        $posts=[
            ['title'=>'this is title1',],
            ['title'=>'this is title2',],
            ['title'=>'this is title3',],
            ['title'=>'this is title4',]

        ];

        //引数postsをview層(ページ)に渡して、ページに実際のデータが見えるようになる
        return view("post/index",compact('posts'));

    }
        //文章記事の詳細
    public function show(){
        return view('post/show',['title'=>'this is title','isShow'=>false]);
    }
    //新規に記事を作る
    public function create(){
        return view('post/create');
    }

       //記事を編集
    public function edit(){
        return view('post/edit');
    }
bladeテンプレートについて
1.{{}}の使い方
{{}}の中にPHPコードを直接に記述することができます。
例えば、
ページposts/showの中で、タイトルにデータを表示したい場合、
<h2 class="blog-post-title">XXXXXX</h2>
PostControllerのメッソドshow()にパラメーターである'title'=>'this is title‘を渡して,
public function show(){
        return view('post/show',['title'=>'this is title','isShow'=>false]);
}
テンプレートを以下のように直す。
<h2 class="blog-post-title">{{$title}}</h2>
実際のページのタイトル部分は this is title になります。
2.if文
@if($isShow==true)
この文の意味は、もしisShowのデータは真であれば、テンプレートのifからendifまでの部分が執行。
@if($isShow==true)
<a style="margin: auto"  href="/posts/62/edit">
<span class="glyphicon glyphicon-pencil" aria-hidden="true"></span>
</a>
@endif
ただし、サンプルコードの'is show'は偽であるので、aタグの中の部分は執行しないので、
pencilアイコンが見えなくなるのです。
public function show(){
        return view('post/show',['title'=>'this is title','isShow'=>false]);
}
3.foreach文
記事文章一覧ページの中で、全ての文章のタイトルを表示する必要がある。
なので、タイトルのデータを全部ビューに渡さなければならない。
コントローラにタイトルを一つの配列に入れて、一緒にビューに渡す方法がある。
public function index(){
        $posts=[
            ['title'=>'this is title1',],
            ['title'=>'this is title2',],
            ['title'=>'this is title3',],
            ['title'=>'this is title4',]

        ];
        return view("post/index",compact('posts'));

    }
テンプレートのforeach文を使って、indexテンプレートにデータを表示。
@foreach($posts as $post)
            <div class="blog-post">
                <h2 class="blog-post-title"><a href="/posts/62" >{{$post['title']}}</a></h2>
                <p class="blog-post-meta">May 14, 2017 by <a href="/user/5">Kassandra Ankunding2</a></p>

                <p>こんにちはこんにちはこんにちはこんにちはこんにちはこんにちは
...</p>
                <p class="blog-post-meta">いいね 0  | コメント 0</p>
            </div>
@endforeach
コントローラPostControllerの中で、以下のコードはpostsという引数をビューに渡すという意味だ。
return view("post/index",compact('posts'));
もしタイトルだけでなく、トピックスも一緒に渡したいならば、return の前に、topicsを定義し、compact関数を使って、postsと一緒に渡す。
 public function index(){
        $posts=[
            ['title'=>'this is title1',],
            ['title'=>'this is title2',],
            ['title'=>'this is title3',],
            ['title'=>'this is title4',]

        ];
        $topics=xxx;
        return view("post/index",compact('posts','topics'));

    }
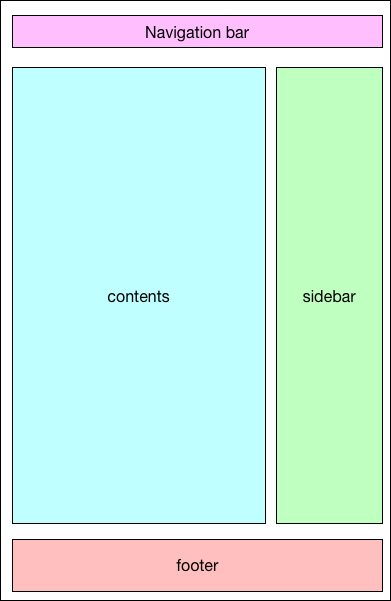
テンプレートの定義 extends/section/yield/content/include
テンプレートの共通部分を抽出し、必要に改造すれば、開発効率が上がります。
ブログシステムのテンプレート構造は以下の図に示している。
<!DOCTYPE html>
{{--header--}}
<head>
<!--ここにmeta情報などを入力-->
</head>
{{--header--}}
<body>
{{--navigation--}}
<!--ここはnavigation-->
{{--navigation--}}

{{--container--}}
<div class="container">
    <div class="blog-header">
    </div>
    <div class="row">
        <!--ここはcontent-->
        {{--sidebar--}}
        <!--ここはsidebar-->
        {{--sidebar--}}
    </div>
</div>
{{--container--}}

{{--footer--}}
 <!--ここはfooter->
{{--footer--}}
<!-- Bootstrap core JavaScript
================================================== -->
<!-- Placed at the end of the document so the pages load faster -->
<script src="XXXX"></script>
</body>
</html>
全てのページの共通の部分はnavigation,sidebar,footerで、contentsだけは違うので、navigation,sidebar,footerを予め作成しておいて、includeディレクティブでmain.blade.phpに入れる。作成したファイルは全てviews/layoutファイルに入れておきます。

contentsはページごとに違うので、yieldディレクティブで指定したセションの内容を表示する。こちらはviews/layout/main.blade.phpの構造です。
<!DOCTYPE html>
<html lang="zh-CN">
{{--header--}}
<head>
    <meta charset="utf-8">
    <meta http-equiv="X-UA-Compatible" content="IE=edge">
    <meta name="viewport" content="width=device-width, initial-scale=1">
    <meta name="description" content="">
    <meta name="author" content="">
    <meta name="csrf-token" content="{{ csrf_token() }}">


    <title>laravel for blog</title>

    <!-- Bootstrap core CSS -->
    <link href="https://cdn.bootcss.com/bootstrap/3.3.7/css/bootstrap.min.css" rel="stylesheet">
    <!-- Custom styles for this template -->
    <link href="/css/blog.css" rel="stylesheet">
    <link rel="stylesheet" type="text/css" href="/css/wangEditor.min.css">

    <!-- HTML5 shim and Respond.js for IE8 support of HTML5 elements and media queries -->
    <!--[if lt IE 9]>
    <script src="https://cdn.bootcss.com/html5shiv/3.7.3/html5shiv.min.js"></script>
    <script src="https://cdn.bootcss.com/respond.js/1.4.2/respond.min.js"></script>

    <![endif]-->
</head>
{{--header--}}
<body>
{{--navigation--}}
@include('layout.navigation')
{{--navigation--}}

{{--container--}}
<div class="container">

    <div class="blog-header">
    </div>

    <div class="row">
        @yield("content")

        {{--sidebar--}}
        @include('layout.sidebar')
        {{--sidebar--}}
    </div>
</div>
{{--container--}}
{{--footer--}}
@include('layout.footer')
{{--footer--}}
<!-- Bootstrap core JavaScript
================================================== -->
<!-- Placed at the end of the document so the pages load faster -->
<script src="https://cdn.bootcss.com/jquery/1.12.4/jquery.min.js"></script>
<script src="https://cdn.bootcss.com/bootstrap/3.3.7/js/bootstrap.min.js"></script>
<script type="text/javascript" src="/js/wangEditor.min.js"></script>
<script type="text/javascript" src="/js/ylaravel.js"></script>

</body>
</html>
これでレイアウトを定義しました。
つぎはextendsを利用してレイアウトを継承して、各ページのテンプレートを完成します。
//index.blade.php
@extends('layout.main')
@section('content')
<div class="col-sm-8 blog-main">
    <!--中身は省略-->
</div>
@endsection
@sectionから@endsectionまではyieldディレクティブで指定した部分です。
文章記事モジュールのテンプレートをviews/post ファイルに入れます。
記事文章のモデルを作る
1.ORM
2.postのモデルを作る
3.tinkerの使用
4.CRUDの基本
1.ORM
Laravelでが、それぞれのデータベーステーブルは関連する「モデル」と結びついている、
モデルにより、データベースのデータを新規作成、取得する、更新、削除することはできる。
2.モデルを作成する命令:
$ php artisan make:model Post
Laravelが推奨しているmodelの命名方式:CamelCase+名詞(英語)
モデル名はPostならば、対応しているテーブルはpostsになる。
3.tinkerについて
tinkerはモデルによりテーブルにデータを操作するツール。
tinkerを開く命令:
$ php artisan tinker
tinkerの使用のサンプル
a.モデルによりデータベースにデータの増加
Psy Shell v0.8.11 (PHP 5.6.30 — cli) by Justin Hileman
>>> $post=new \App\Post();
=> App\Post {#689}
>>> $post->title="this is post1";
=> "this is post1"
>>> $post->content="this is post1 content";
=> "this is post1 content"
>>> $post->save();
=> true
>>>
このとき、データベースのposts テーブルのcreated/updated 時間は正しくないと気づいてる。
configファイルにタイムゾンを設定する必要がある
タイムゾンの設定:config/app.php
'timezone' => 'UTC',
を
'timezone' => 'Asia/Tokyo',
修正したあと、tinkerをもう一度起動する。
で時間は現地時間(東京)になる。
###b.データを取得する操作
1.tinkerに以下のコードを入力
\App\Post::find(2);
idは2のデータを取得。
ご注意:findの引数はテーブルの主キーに限る。
2.title が"this is post1"のデータを探す
 \App\Post::where('title','this is post1')->first();
=> App\Post {#703
     id: 2,
     title: "this is post1",
     content: "this is post1 content",
     user_id: 0,
     created_at: "2017-10-02 08:44:59",
     updated_at: "2017-10-02 08:44:59",
   }
\App\Post::where('title','this is post1')->first();
の他に、
\App\Post::where('title','this is post1')->get();
も使用可能ですが、返却されたのはコレクションです。
c.更新
1.idが2のモデルを取得
$post=\App\Post::find(2);
=> App\Post {#706
     id: 2,
     title: "this is post1",
     content: "this is post1 content",
     user_id: 0,
     created_at: "2017-10-02 08:44:59",
     updated_at: "2017-10-02 08:44:59",
   }
2.モデルのタイトルの内容を更新、保存
>>> $post->title="this is post2";
=> "this is post2"
>>> $post->save();
=> true
>>>
d.删除
1.idが2のモデルを取得
>>> $post=\App\Post::find(2);
=> App\Post {#705
     id: 2,
     title: "this is post2",
     content: "this is post2 content",
     user_id: 0,
     created_at: "2017-10-02 08:44:59",
     updated_at: "2017-10-02 18:07:53",
   }
2、モデルによりデータを削除
>>> $post->delete();
=> true