この記事は2020/6/7 に投稿した**「useContext + useState におけるパフォーマンス上の懸念と、その解消法として(不本意ながら)Reduxを使っちゃう話」**を再調査の上修正したものです。タイトル含め色々と中身が変わっていますので一度ご覧になった方も楽しめる(?)と思います。なお修正前の記事は以下別記事として残しました。興味のある方はご参照ください。
[修正前記事]useContext + useState におけるパフォーマンス上の懸念と、その解消法として(不本意ながら)Reduxを使っちゃう話
本記事では「useContext + useState を用いたグローバルなステート管理は、Providerの利用方法でパフォーマンスが結構変わるかもよ?」ということを、コードベースの実例を用いながら説明します。
Reactの一機能であるContextは、hooksの登場で useContext + useState(useReducer)の組み合わせが注目され、 「グローバルなステート管理」手法の1つとして(主にReduxの対抗馬として)扱われることがあるようです。
ただ気になることもあります。それは少し実装に気を使わないと、不要な再レンダリングを起こしやすいということです。例えば公式のサンプルを組み合わせただけだと、この状態に陥るかもしれません(私だけかも?![]() )。不要な再レンダリングはアプリケーションの規模次第で、パフォーマンス悪化の要因になり得ます。なんとかしたい!(半分趣味)
)。不要な再レンダリングはアプリケーションの規模次第で、パフォーマンス悪化の要因になり得ます。なんとかしたい!(半分趣味)
幸いなことにこの問題は比較的容易に回避できます。注目するべきはProviderの使い方です。Contextを利用するコンポーネントは必ずProviderでラッピングする必要がありますが、この辺りうまく分割したコンポーネントを作ってやると、不要な再レンダリングを避けることができます。
以降Provider周りの実装により「Context利用時の不要な再レンダリング」を無くしていく様子を、コードと実例を交えつつ説明していきたいと思います。useContext + useState 活用時の関連知識としてお役に立てれば幸いです。
謝辞
前述の通り本記事は、[修正前記事]useContext + useState におけるパフォーマンス上の懸念と、その解消法として(不本意ながら)Reduxを使っちゃう話の内容を修正したものになっています。
その際以下の方達より、元の内容の不備に関するコメントや、その後の調査に協力いただくなどで助けていただきました。ここで改めてお礼をさせていただきます。貴重な情報を提供いただき、ありがとうございました。
(いずれもtwitterの名前を記載させていただきました)
- Takepepe(@ takepepe) 様
- はけた(@ excelspeedup) 様
想定読者
- Redux嫌い! なんで useContext + useState じゃダメなの!?
 という憤りを抱えている方
(私の同志) - ステート管理に useContext + useStateとReduxのどちらを使おうか迷っている方
(本記事はあくまで判断材料の1つにはなると思います)
本記事で取り扱わない話
- useContext + useState や Redux(& Redux Toolkit)の使い方
- ReduxのMiddlewareやデバッグツール
- Reduxの明確な利点ではありますが、本記事ではステート管理そのものにフォーカスします
- Apollo(& GraphQL)の話
- 力不足でここはカバーできていません。許してください m(_ _)m
結論
最初に本記事の結論を記載します。
(これだけで理解できてしまう方は、恐らく以降を読む必要は無いでしょう。)
- useContext + useState によるグローバルなステート管理は、実装方法次第で「不要な再レンダリング」を作り込んでしまうことがある
- ↑の問題は、Provider周りを以下のように実装することで回避可能
- Providerを専用コンポーネントに切り出し、
Contextを使うコンポーネントは{props.children}の形で受け取る。 - Contextを分割し、それぞれに専用のコンポーネントを用意してステート/valueを管理する。
- Providerを専用コンポーネントに切り出し、
- Contextが面倒になってきたら、Reduxを用いるという選択肢もある。
本題: useContext + useState 利用時のパフォーマンスはProviderの使い方で決まる!かも。。。?
以降本題です。
とりあえず useContext + useState を使ってみる
何はともかく useContext + useState を使ってみます。
こういう時は公式ドキュメントの情報を参考にするのが王道ですね。具体的にはこの辺りでしょうか?
https://ja.reactjs.org/docs/context.html#dynamic-context
https://ja.reactjs.org/docs/hooks-reference.html#usecontext
https://ja.reactjs.org/docs/hooks-reference.html#usestate
↑を踏まえて簡単なアプリを用意しました。こちらをご覧ください。
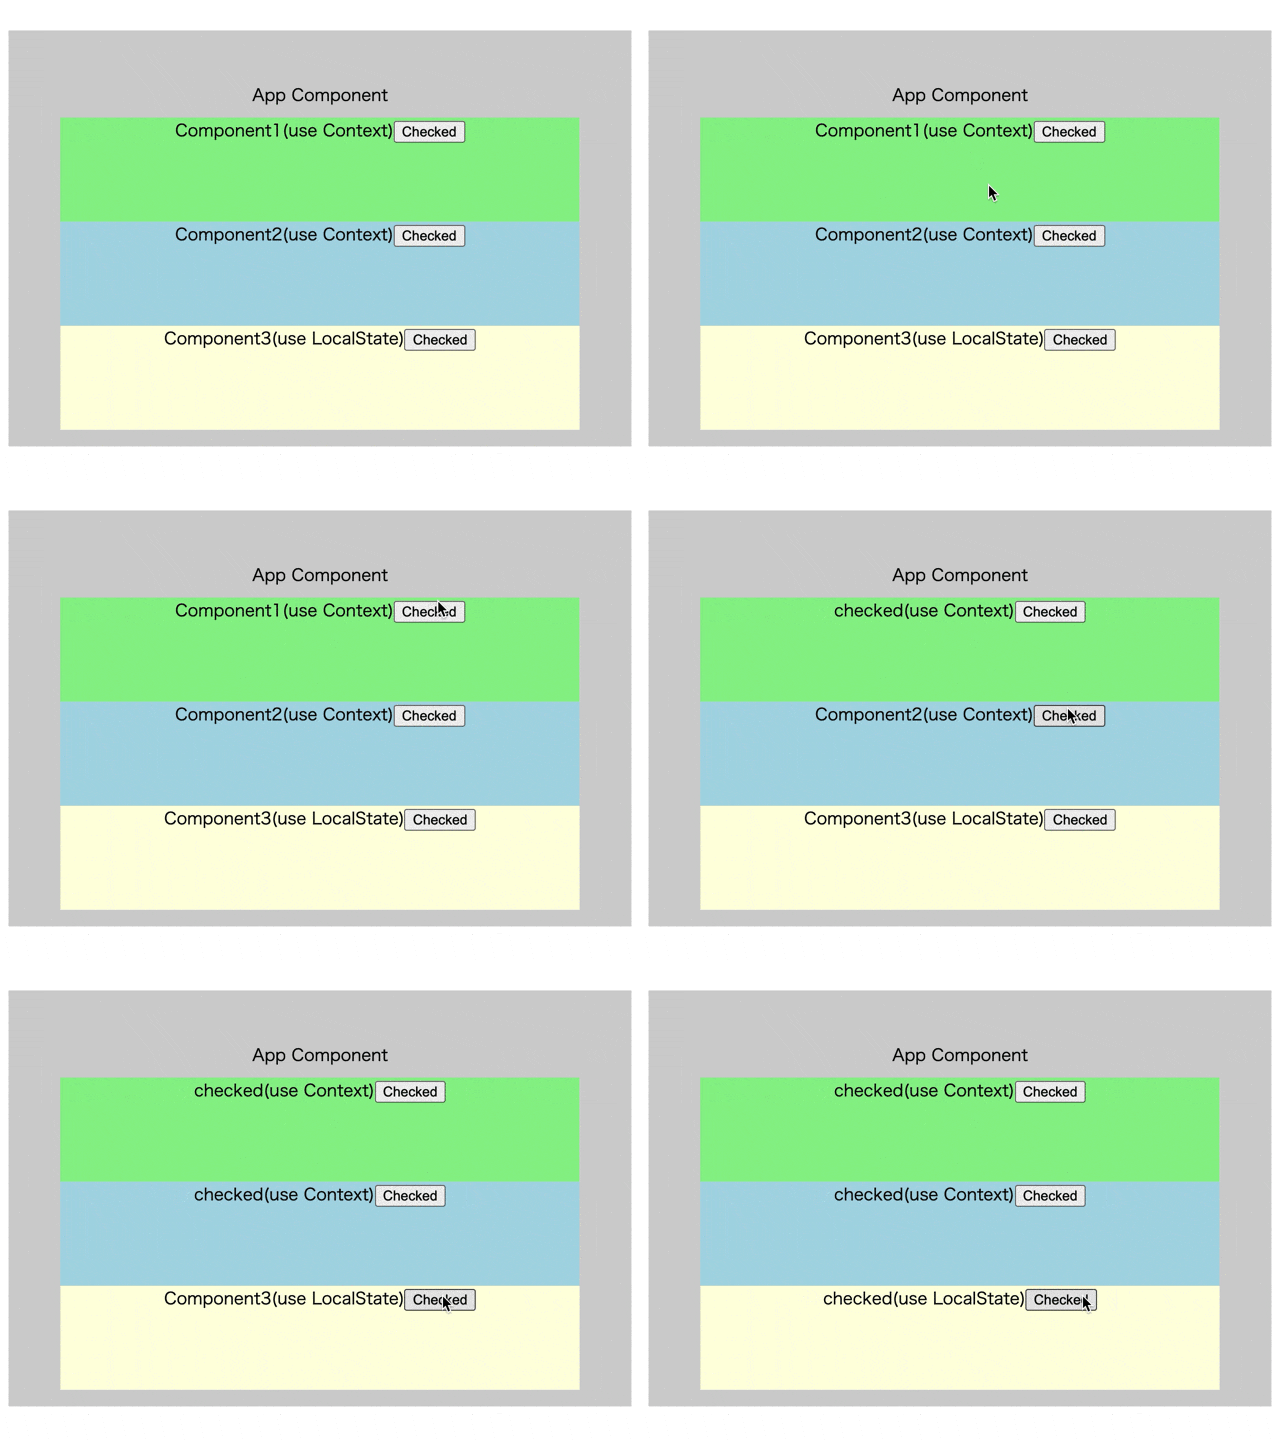
App Component(薄灰色)の配下にComponent1(薄緑), Component2(薄青), Component3(薄黄)の3つの子コンポーネントを配置しています。それぞれのコンポーネントにはテキスト(ComponentX (useXXX))とボタン(checked)が配置されており、ボタンを押すとテキストが変わります。
このアプリではテキストの文言をステートとして扱っています。Component1 & 2は Contextを用いており、Component3だけは通常のローカルなステートを利用しています。各コンポーネントのボタンを押すことでこれらのステートが更新されます。
以下にサンプルコードを示しました。内容はチュートリアルレベルのとても単純なものです。(共通化しよう!とかは言わないでください)
// サンプル1: useContext + useStateの利用
import React, { createContext, useState, useContext, useCallback } from 'react'
import './App.scss'

type TTexts = {
  component1: string,
  component2: string
}

type TTextsContext = {
  texts: TTexts,
  setTexts: React.Dispatch<React.SetStateAction<TTexts>>
}

const initialValue = {
  component1: 'Component1(use Context)',
  component2: 'Component2(use Context)',
}

const TextsContext = createContext({} as TTextsContext)

const App = () => {
  const [texts, setTexts] = useState(initialValue)
  console.log('rendering App')

  return (
    <TextsContext.Provider value={{ texts, setTexts }}>

      <div className="App" >
        <div className="app-text">App Component</div>
        <Component1 />
        <Component2 />
        <Component3 />
      </div>
    </TextsContext.Provider>
  )
}

const Component1 = () => {
  const { texts, setTexts } = useContext(TextsContext)

  console.log('rendering Component1')

  return (
    <div className="component1">
      {texts.component1}
      <button onClick={() => setTexts({ ...texts, component1: 'checked(use Context)' })}>Checked</button>
    </div>
  )
}

const Component2 = () => {
  const { texts, setTexts } = useContext(TextsContext)

  console.log('rendering Component2')
  return (
    <div className="component2">
      {texts.component2}
      <button onClick={() => setTexts({ ...texts, component2: 'checked(use Context)' })}>Checked</button>
    </div>
  )
}

const Component3 = () => {
  const [text, setText] = useState({ component3: 'Component3(use LocalState)'})

  const onClick = useCallback(() => setText({ component3: 'checked(use LocalState)' }), [setText])

  console.log('rendering Component3')
  return (
    <div className="component3">
      {text.component3}
      <button onClick={onClick}>Checked</button>
    </div>
  )
}

export default App;
ボタンを押すとステートが更新され、テキストに反映するために再レンダリングが行われます。見た目上更新されるのは、(当然ですが)ボタンと同一コンポーネントのテキストです。再レンダリングは関連する1つのコンポーネントのみで完結するのが期待動作でしょう。
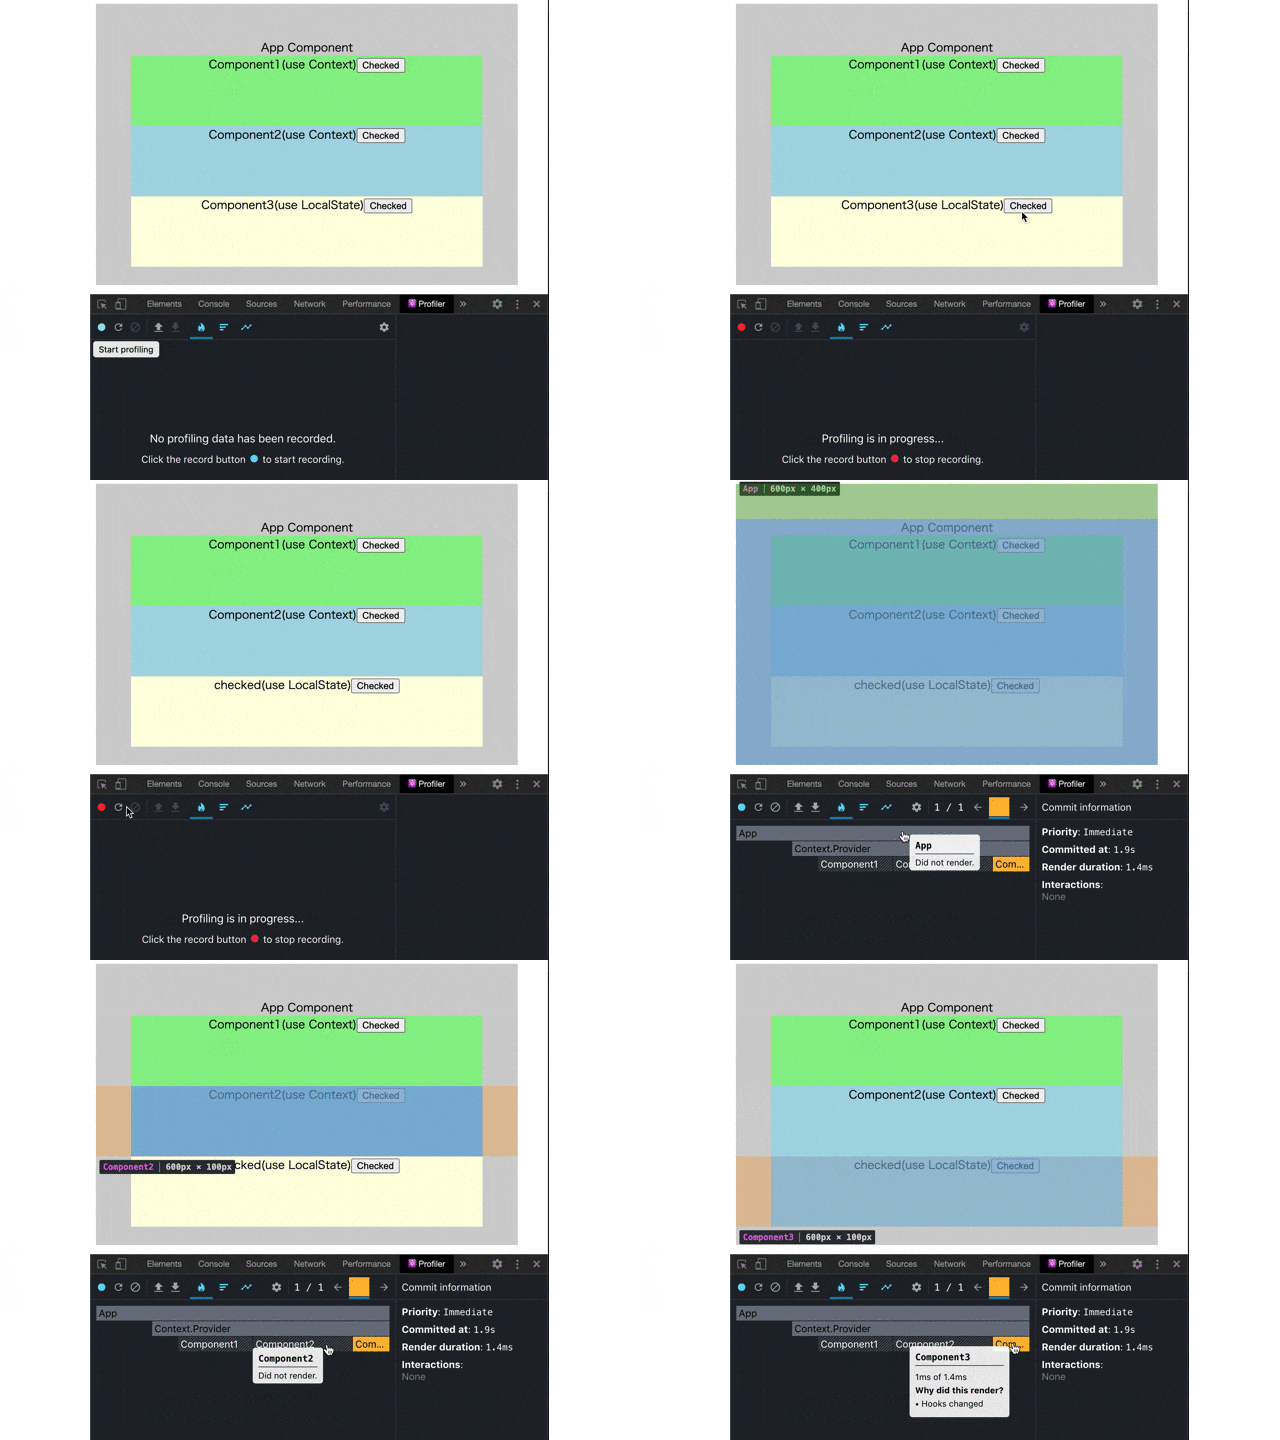
ローカルなステートを用いるComponent3ではこの動作が実現されています。以下のような感じです。
React Develper ToolのProfilerを用いてレンダリングの状況を確認しています(Profilerの詳しい使い方は公式ドキュメント参照: https://reactjs.org/blog/2018/09/10/introducing-the-react-profiler.html )。
Profilerには色々な機能がありますが、本記事では「画像下部のグラフで色のついている箇所が再レンダリングされている」という点だけご留意いただければと思います。今回の例ではComponent3のみ色がついている(= 再レンダリングされている)となります。これは望ましい動作です。
しかし useContext を用いたComponent1, 2では動作が異なります。
(Qiitaのアップロード容量を使い果たしてしまったので、ここからはGoogle Driveへのリンクになります![]() )
)
動作確認結果gif画像へのリンク(Google Drive)
グラフ上で色のついている箇所が、Component3の時と明らかに異なるのが見て取れます。Component1, 2のボタンを押した際は、どちらも全てのコンポーネントが再レンダリングされてしまっていることが分かります。Contextと全く関係ないComponent3ですら再レンダリングされます。
これは全く期待の動作ではありません。このアプリに限って言えば、非常にシンプルな作りですので影響は少ないかもしれません。しかし複数人で中・大規模なアプリを開発する際に同じことが起きたら、つまりボタンを1つ押しただけで全てのコンポーネントが再レンダリングされるようなことになったら、それは到底受け入れられるものではないでしょう。
Providerの実装を工夫して不要な再レンダリングを改善
前述の通り、この不要な再レンダリングはProvider(やその周辺コード)の使い方を工夫することで改善できます。以下修正版のコードを交えつつ、どのように改善していくかを説明します。
Providerを専用コンポーネントを切り出す
最初に必要になるのはProviderコンポーネントの切り出しです。
サンプル1ではAppコンポーネント内で
- useStateによるステートの定義
- TextsContext.Providerの呼び出し
- Component1, 2, 3の呼び出し
を全て行なっています。
この状態で Component1,2 においてContextの更新(ボタンの押下)を行うと Appコンポーネントのステートが更新され、それをトリガーにAppコンポーネントの再レンダリングが行われます。その結果、Appコンポーネントによってレンダリングされている Component1, 2, 3 も再レンダリングが行われてしまいます。
サンプル1において、ボタンを押しただけで全てのコンポーネントが再レンダリングされたように見えたのはこれが原因です。
そこでProviderに関連する処理を別コンポーネントに切り出します。
以下のコードをご確認ください(解説は後述)。
Component1, 2, 3 にはほとんど変更が無いため、Providerに関連する箇所のみを切り出しています。
// サンプル2-1
const AppProvider = (props: { children: React.ReactNode }) => {
  const [texts, setTexts] = useState(initialValue);

  return (
    <TextsContext.Provider value={{ texts, setTexts }}>
      {props.children}
    </TextsContext.Provider>
  );
};

const App = () => {
  console.log("rendering App");

  return (
    <div className="App">
      <div className="app-text">App Component</div>
      <AppProvider>
        <Component1 />
        <Component2 />
        <Component3 />
      </AppProvider>
    </div>
  );
};
まずAppProviderコンポーネントを作成し
- 「useStateによるステートの定義」
- 「TextsContext.Providerの呼び出し」
を担当させます。
- 「Component1, 2, 3の呼び出し」
に関してはAppコンポーネントでコンポジションを用いて行った上で、AppProviderコンポーネントでは {props.children} の形で受け取ったものをそのまま表示します。
このようにコンポジションを利用することで、AppProviderコンポーネントがContextの更新により再レンダリングされても、Appコンポーネントは再レンダリングされなくなります。結果としてComponent1, 2, 3の不要な再レンダリングを無くすことができます(ただし親コンポーネントが再レンダリングされたという要因に限る)。
この解説でピンとこない方は、ぜひ以下の記事をご参照ください(私も最初全くわかりませんでした;)。
コンポジション利用の有無による再レンダリング動作の違いに関して解説している素晴らしい記事です。
「React Element’s “Parent” vs “Rendered By”」
https://medium.com/welldone-software/react-elements-parent-vs-rendered-by-4f879849cd58
Contextを分ける
次に行うのはContextを分けることです。Contextには、「valueが変更されると、それを利用する(useContextを使用する)全てのコンポーネントが再レンダリングされてしまう」という特徴があります。このことは公式ドキュメントでは以下のように記されています。
プロバイダの子孫の全てのコンシューマは、プロバイダの value プロパティが変更されるたびに再レンダーされます。プロバイダからその子孫コンシューマ(.contextType や useContext を含む)への伝播は shouldComponentUpdate メソッドの影響を受けないため、コンシューマは祖先のコンポーネントが更新をスキップしている場合でも更新されます。
https://ja.reactjs.org/docs/context.html
上記を考慮せずにコードを書くと、不要な再レンダリングを作り込んでしまいます。例えばサンプル1では、Component1, 2の両方が同じContextを利用しています(useContext(TextsContext))。 そのため、Component1でContextを変更するとComponent2も自動で再レンダリングされ、逆もまた然りです。
そこでContextを2つに分け、それぞれでProviderを利用します。以下のコードをご確認ください(解説は後述)。
今回もComponent1, 2, 3 にはほとんど変更が無いため、Providerに関連する箇所のみを切り出しています。
// サンプル2-2
const TextContext1 = createContext(
  {} as {
    text1: string
    setText1: React.Dispatch<React.SetStateAction<string>>
  }
)
const TextContext2 = createContext(
  {} as {
    text2: string
    setText2: React.Dispatch<React.SetStateAction<string>>
  }
)

const TextProvider1 = (props: { children: React.ReactNode }) => {
  const [text1, setText1] = useState('Component1(use Context)')

  return (
    <TextContext1.Provider value={{ text1, setText1 }}>
      {props.children}
    </TextContext1.Provider>
  )
}

const TextProvider2 = (props: { children: React.ReactNode }) => {
  const [text2, setText2] = useState('Component1(use Context)')

  return (
    <TextContext2.Provider value={{ text2, setText2 }}>
      {props.children}
    </TextContext2.Provider>
  )
}

const AppProvider = (props: { children: React.ReactNode }) => {
  return (
    <TextProvider1>
      <TextProvider2>
        {props.children}
      </TextProvider2>
    </TextProvider1>
  )
}


const App = () => {
  console.log('rendering App')

  return (
    <div className="App">
      <div className="app-text">App Component</div>
      <AppProvider>
        <Component1 />
        <Component2 />
        <Component3 />
      </AppProvider>
    </div>
  )
}
修正の肝は2つあります。
1つ目はContextを分けたことです。createContextが2つ存在し、AppProviderにおける{props.children}のラッピングも2階層になっています。これは公式ドキュメントにも記載がありますので(複数のコンテクストを使用する)、Contextを分けるなら必然的に行き着く実装だと思います。
2つ目はProviderコンポーネントを3つに分けたことです。サンプル2ではAppProviderコンポーネントのみでしたが、サンプル3ではTextProvider1, TextProvider2を追加しています。3つに分けた理由は、「ステートの宣言」 & 「Providerにvalueを渡す処理」をContext毎に別コンポーネントに分けるためです。
Contextを分けるだけならAppProvider内でステートを2つ宣言し、<TextContext.Provider value={X}>を2階層ラッピングする形でも問題ありません。しかしこの場合、片方のContextが更新されると、AppProviderのステートが更新されるため、AppProviderの再レンダリングが起こってしまいます。その結果(実装のやり方にもよりますが)2つのContextに渡されるvalueも更新されてしまい、結果2つのコンテキストを利用する全てのコンポーネントが一度に再レンダリングされてしまいます。これではContextを分けた意味がありません;
そのためContext毎にProviderコンポーネントを用意し、AppProviderコンポーネントで結合することで、Context修正によるステートの更新の影響を最小限に抑え、前述の問題を解決しています。
(肝の2つ目を実現するコードは、はけた(@ excelspeedup) 様よりいただいたものをベースにしています
https://twitter.com/excelspeedup/status/1271276074530308098)
実際に動作確認をすると以下のようになります。
動作確認結果gif画像へのリンク(Google Drive)
必要最小限のコンポーネントのみ更新されていることがわかります。この形を維持できれば不要なコンポーネントの再レンダリングは起きませんので、アプリケーションの規模が多少大きくなってもパフォーマンス観点の問題は起きにくいでしょう。
なおサンプル2のコード全体は以下のgithubリンクをご参照ください。
サンプル2コード全体
おまけ: Reduxを使ってみる
しかしこう思った方もいらっしゃるかと思います。
「これアプリケーションの規模が大きくなるにつれて、Contextを無数に分ける羽目になってめんどくさいんじゃ。。。」
恐らくそれは事実です。ある程度の段階で、「こんなのやってられねぇ!」ってなるんだろうなぁと思います。そしてこの懸念は(残念ながら)Reduxを用いることで比較的容易に回避できます。
Reduxにはとても面倒なイメージもあると思いますが、Redux Tookit & React Reduxのhooks(useSelector, useDispatch)などを利用することで、useContext + useStateに近い実装負荷に抑えることができる、と言えなくもないです。
(少なくとも素のReduxよりは、はるかにマシです。)
ちなみにreadux(正確にはreact-redux)を利用した際も、内部的にはContextを使って処理を実現しているらしいです(未確認)。そのため実動作としては、Contextを使う場合と大きく変わらないのかもしれません。
ではサンプルコードと動作をお見せします。
// サンプル3: Reduxの利用
import React, { useState, useCallback } from 'react'
import { Provider, useSelector, useDispatch } from 'react-redux'
import { configureStore } from '@reduxjs/toolkit'
import textsReducer, { TTexts, checkedComponent1, checkedComponent2 } from './textsSlice'
import './App.scss'

const store = configureStore({ reducer: textsReducer })

const App = () => {
  console.log('rendering App')

  return (
    <div className="App" >
      <Provider store={store}>
        <div>App Component</div>
        <WrapperComponent />
      </Provider>
    </div>
  )
}

const WrapperComponent = React.memo(() => {
  return (
      <div className="wrapper">
        <div className="wrapper-text">Wrapper Component using React.memo</div>
        <Component1 />
        <Component2 />
        <Component3 />
      </div>
  )
})

const Component1 = () => {
  const component1 = useSelector((state: TTexts) => state.component1)
  const dispatch = useDispatch()

  console.log('rendering Component1')

  return (
    <div className="component1">
      {component1}
      <button onClick={() => dispatch(checkedComponent1())}>Checked</button>
    </div>
  )
}

const Component2 = () => {
  const component2 = useSelector((state: TTexts) => state.component2)
  const dispatch = useDispatch()

  console.log('rendering Component2')
  return (
    <div className="component2">
      {component2}
      <button onClick={() => dispatch(checkedComponent2())}>Checked</button>
    </div>
  )
}

const Component3 = () => {
  const [text, setText] = useState({ component3: 'Component3(use LocalState)'})

  const onClick = useCallback(() => setText({ component3: 'checked(use LocalState)' }), [setText])

  console.log('rendering Component3')
  return (
    <div className="component3">
      {text.component3}
      <button onClick={onClick}>Checked</button>
    </div>
  )
}

export default App;

// textsSlice(別ファイル)
import { createSlice } from '@reduxjs/toolkit'

export type TTexts = {
  component1: string,
  component2: string
}

const textsSlice = createSlice({
  name: 'texts',
  initialState: {
    component1: 'Component1(use Context)',
    component2: 'Component2(use Context)',
  },
  reducers: {
    checkedComponent1(state: TTexts) {
      state.component1 = 'checked(use Redux)'
    },
    checkedComponent2(state: TTexts) {
      state.component2 = 'checked(use Redux)'
    },
  }
})

export const { checkedComponent1, checkedComponent2 } = textsSlice.actions

export default textsSlice.reducer
またサンプル3の動作確認結果は以下をご確認ください。
動作確認結果gif画像へのリンク(Google Drive)
見ての通り、Component1, 2, 3のいずれのボタンを押した際でも、必要最低限のコンポーネントが更新されていることが分かります。特に Redux Tookit & React Reduxのhooksを使うことで connect(HOC)を使う必要がないので、各コンポーネントでかなり気軽にReduxのstoreを利用することができる、と言えなくもないです。
人によっては最初からRedux使った方が良い!と思う方もいるかと思います。この辺は好みになるかもしれませんね。
。。。まぁ個人的にはパフォーマンス考慮(不要なレンダリングの除去等)が必要になるステートの扱い方をするのであれば、(不本意ながら)useContext + useState よりもReduxを使う方が考えることが少なくなって楽そうに感じます。自分でもサンプル作ってみて初めて理解しましたが、useContext + useStateは段々めんどくさくなっていく雰囲気がしますね。悔しいが認めましょう。。。ぐぬぬ。。。
まとめ
でもReduxは嫌いじゃ👹 Recoilはよ。
と言いながらRedux Tookit & React Reduxのhooksの使い心地は悪くなかったので、
多分今後もしばらくはReduxを擦っていく気がする。。。
最後にこの記事で述べたパフォーマンス上の懸念が、実際の開発でどの程度の規模から問題になり得るのかが分からないので。。。知見をお持ちの方がいらっしゃいましたらぜひコメントくださいm(_ _)m
参考サイト
Redux vs. Context vs. State
https://medium.com/better-programming/redux-vs-context-vs-state-4202be6d3e54
「React Element’s “Parent” vs “Rendered By”」
https://medium.com/welldone-software/react-elements-parent-vs-rendered-by-4f879849cd58
Facebook製の新しいステート管理ライブラリ「Recoil」を最速で理解する
https://blog.uhy.ooo/entry/2020-05-16/recoil-first-impression/
コンテクスト – React
https://ja.reactjs.org/docs/context.html

