Railsアプリケーションに必要なパッケージのインストール
・最新バージョンへのアップデート
sudo yum -y update
sudo yum install git bzip2 readline-devel zlib-devel gcc libyaml-devel libffi-devel gdbm-devel ncurses-devel gcc-c++ mysql-devel ImageMagick ImageMagick-devel
ruby-build, rbenvのインストール
git clone https://github.com/sstephenson/rbenv.git ~/.rbenv
git clone https://github.com/sstephenson/ruby-build.git ~/.rbenv/plugins/ruby-build
vim ~/.bash_profile
以下の記述を追記
export PATH=$HOME/.rbenv/bin:$PATH
eval "$(rbenv init -)"
bash
source ~/.bash_profile
Ruby, Bundlerのインストール
rbenv install 2.6.3 #時間がかかるので気長に待つ
rbenv rehash
rbenv global 2.6.3
gem install bundler:1.17.1
nvm, NodeJsのインストール
git clone https://github.com/creationix/nvm.git ~/.nvm
vim ~/.bashrc
以下の記述を追記
export NVM_DIR="$HOME/.nvm"
[ -s "$NVM_DIR/nvm.sh" ] && \. "$NVM_DIR/nvm.sh"
[ -s "$NVM_DIR/bash_completion" ] && \. "$NVM_DIR/bash_completion"
source ~/.bashrc
nvm install v16.16.0
npm install -g yarn
mysqlダウンロード
yum list installed | grep mariadb
sudo yum remove mariadb-libs
yum list installed | grep mariadb
yum info mysql
sudo yum localinstall -y https://dev.mysql.com/get/mysql80-community-release-el7-3.noarch.rpm
sudo yum-config-manager --disable mysql57-community
sudo yum-config-manager --enable mysql80-community
sudo yum install -y mysql-community-client
sudo rpm --import https://repo.mysql.com/RPM-GPG-KEY-mysql-2022
sudo yum install -y mysql-community-client
mysql --version
mysql -u root -p -h rhlky6p6tu6627.crsw7ysdmznk.ap-northeast-1.rds.amazonaws.com
sudo yum -y install mysql-devel
bandle install
下記エラー構文は
An error occurred while installing mysql2 (0.5.4), and Bundler cannot continue.
sudo yum -y install mysql-devel コマンドを実行することで、解消される。
アプリをgithubからダウンロード
sudo mkdir -p /var/www
sudo chmod 755 www
cd /var/www/
sudo chown -R ec2-user:ec2-user .
sudo git clone https://github.com/yuta-ushijima/raisetech-live8-sample-app
gem install rails -v 6.1.3.1
gem install bundler
bundle install
vim config/database.yml 編集
default: &default
  adapter: mysql2
  encoding: utf8mb4
  pool: <%= ENV.fetch("RAILS_MAX_THREADS") { 5 } %>
  username: (登録したアカウント名)
  password: (登録したアカウントのパスワード)
  host: (RDSのエンドポイント)
# Homebrewインストール
/bin/bash -c "$(curl -fsSL https://raw.githubusercontent.com/Homebrew/install/HEAD/install.sh)"
echo 'eval "$(/home/ec2-user/.linuxbrew/bin/brew shellenv)"' >> /home/ec2-user/.bash_profile
source ~/.bash_profile
yarn -v
brew install yarn
rails webpacker:install
bundle install

※Webpacker successfully installed 🎉 🍰

--
bundle exec rails webpaker:install    no! no!コマンド
--
上記コマンドしようしなくてもダウンロードできた
※参考サイト: https://brew.sh/index_ja
※求められるパスワードは、macのユーザーにログインする際のパスワードです。
※Homebrewインストール失敗した時のサイト
https://qiita.com/jun3030/items/afcd3287285a57b32ccb
※Webpakerインストール、下記と通りインストールしたら成功
https://qiita.com/NaokiIshimura/items/8203f74f8dfd5f6b87a0
・credentials.yml.encを削除

EDITOR=vim bin/rails credentials:edit

・credentials.yml.enc 編集(下記参考)

EDITOR="vi" bin/rails credentials:edit -e production

・credentials.yml.encのような画面が出てくるので、全く同じように編集
credentials.yml.enc 編集
aws
   access_key_id: IAMユーザーのアクセスキー
   secret_access_key: シークレットアクセスキー
      active_storage_bucket_name: バケット名

# Used as the base secret for all MessageVerifiers in Rails, including the one protecting cookies.
secret_key_base: 8be8e637d755f79c799048bed8be0c...
※ここで作業することは、awsのインデントを←左の壁にピッタリくっつける。あとは上記の状態で保存する。
bundle exec rails db:create
bundle exec rails db:migrate
bundle exec rails s -b 0.0.0.0
http://54.178.158.245:3000/
※なかなか接続できなかったが、何回か接続すれば、繋がった、
※本番環境で設定していないから、RAILS_ENV=productionを入れなくて良い。
※Mysqlでsockファイルのエラー発生
sockファイル=ローカル
※[mysqld]
socket=/var/lib/mysql/mysql.sock ← 入れてなくても成功する
※エンドポイントとは、FQDNとポート番号で構成されている。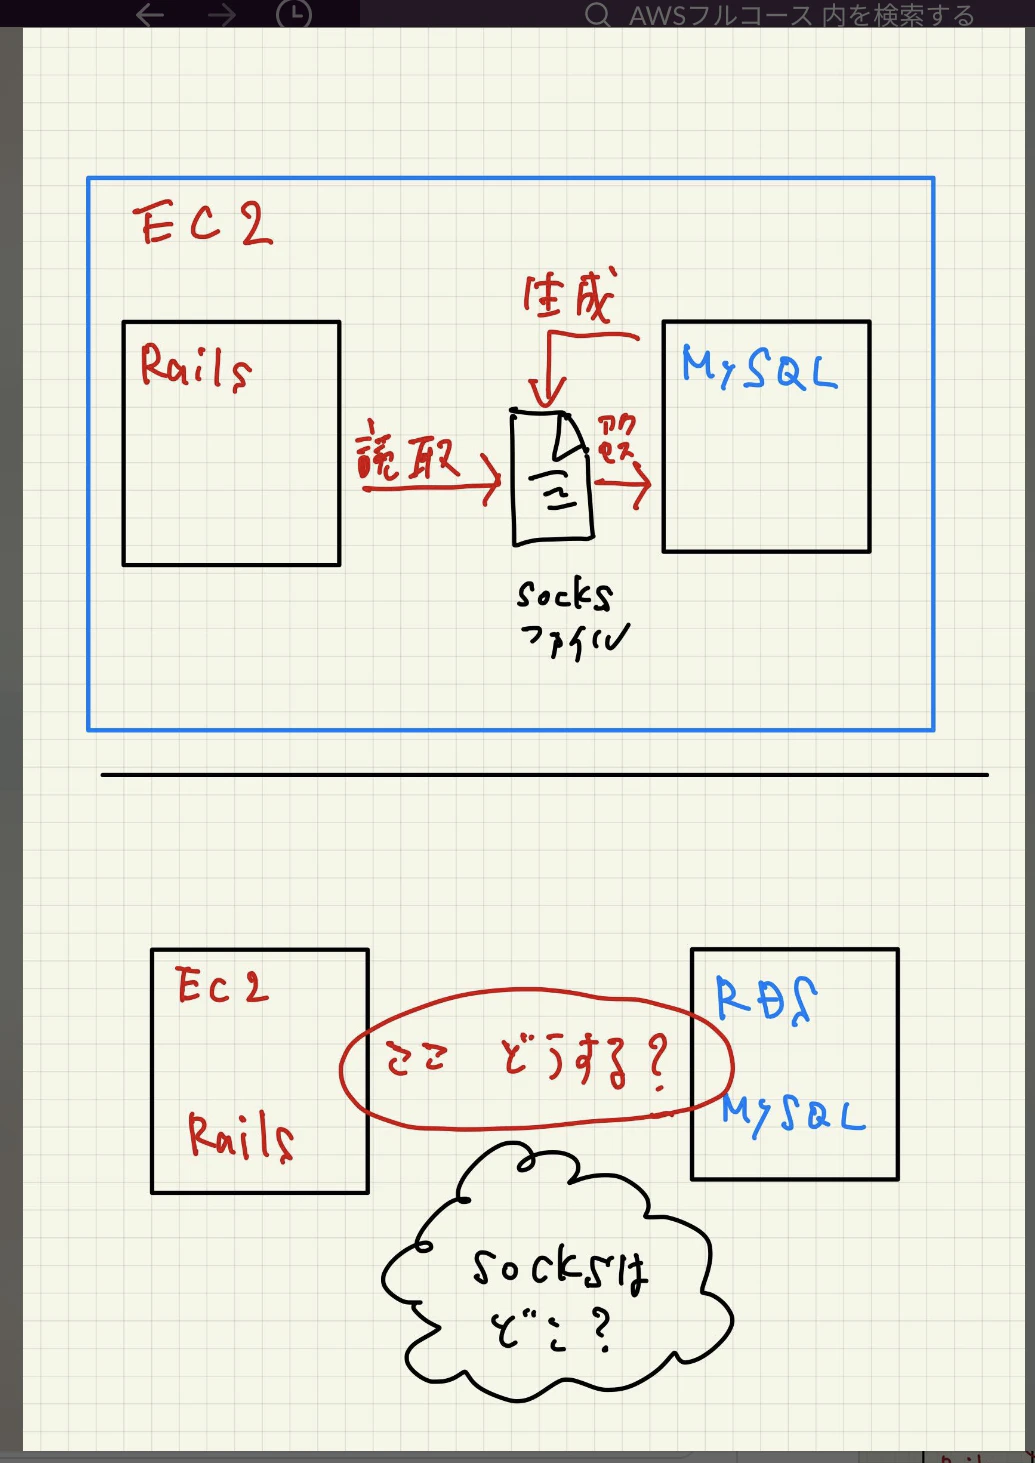
github登録 (gitクローンした場合の登録、)
git --version
git config --global user.name “yuya.sasaki”
git config --global user.email "yuya90360@icloud.com"
git config --global -l
git init
git status
git add -A
git commit -m "first commit"
git branch -M main
git remote rm origin (オリジンがすでに登録されているから一旦削除)
git remote add origin git@github.com:jojo232/raistech-task05.git
git push -u origin main
git push
git push --set-upstream origin main
※オリジンエラー削除サイト
https://qiita.com/yu-ki0718/items/3c8aae2c81ca3f82f522
GitHub上にSSH登録
cd
cd .ssh
ssh-keygen
cat id_rsa.pub
ssh -T git@github.com (本当に登録されている確認する。)
※参考サイト
https://qiita.com/tetsu-upstr/items/e72147250701cf30ee72