Android端末でLLMを動かす完全ガイド:MediaPipeによるオンデバイス推論
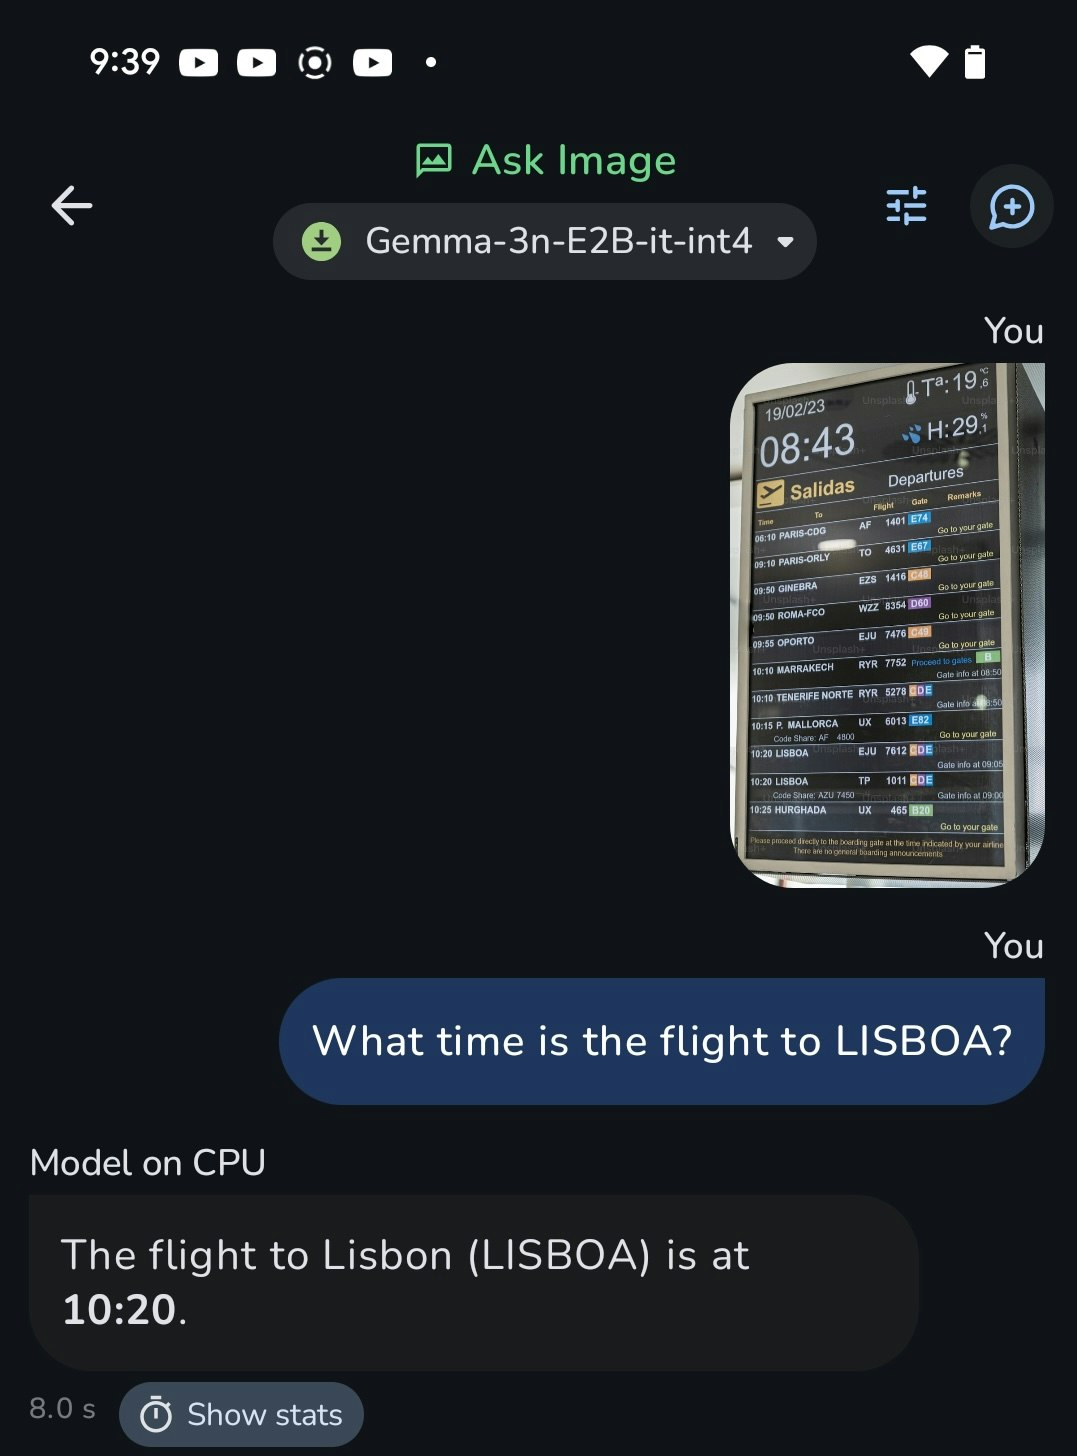
Google Pixel8a(iPhone SE的な廉価版端末)でWebサービスに引けをとらないスピードで動く

ちなみに日本語でも動きます。
↓手元で論文を要約したときの速度
| Processor | Prefill Speed | Decode Speed |
|---|---|---|
| CPU | 30.67token/s | 5.94token/s |
| GPU | 114.77token/s | 7.73token/s |
サンプルアプリは以下
はじめに
AndroidデバイスでLLM(大規模言語モデル)を直接実行できることをご存知ですか?
従来のクラウドAPIとは異なり、デバイス上で直接推論を行うオンデバイスLLMは、以下のメリットを提供します:
- 🔒 完全なプライバシー保護:データが端末から出ない
- ⚡ 低レイテンシ:ネットワーク通信なしで即座にレスポンス
- 💰 コスト削減:API料金不要
- 🌐 オフライン動作:インターネット接続不要
本ガイドでは、GoogleのMediaPipeフレームワークを使用して、Android端末でLLMを実装する方法を、基本的な実装から高度な機能まで段階的に解説します。
実用例:Google AI Edge Gallery
本ガイドでは、Googleが公開する「AI Edge Gallery」アプリを実例として参照しながら、実際のプロダクションレベルの実装方法を学びます。
📖 目次
- なぜオンデバイスLLMなのか
- MediaPipeによるLLM実装の基礎
- 最初の一歩:シンプルなLLMアプリ
- 画像入力対応:マルチモーダルLLM
- チャットアプリケーションの構築
- モデルの準備と変換
- 開発環境の構築とデプロイ
- プロダクション実装例:AI Edge Gallery
なぜオンデバイスLLMなのか
クラウドAPIとの比較
| 項目 | クラウドAPI | オンデバイスLLM |
|---|---|---|
| プライバシー | データを送信 | 完全にローカル |
| レスポンス時間 | ネットワーク依存 | 即座(50-200ms) |
| コスト | 従量課金 | 初期開発のみ |
| オフライン対応 | ❌ | ✅ |
| スケーラビリティ | 無制限 | デバイス性能に依存 |
| モデルサイズ | 制限なし | 1-5GB程度 |
技術的な実現可能性
2025年現在の状況:
- モデル軽量化技術:量子化により1-5GBでGPT-3.5相当の性能
- モバイル端末の性能向上:最新端末は8-16GBメモリ搭載
- 専用フレームワーク:MediaPipe、TensorFlow Lite等の最適化
適用シーンの例
- 個人情報を扱うアプリ:医療、金融、法務
- リアルタイム処理:ライブ翻訳、音声認識
- エンタープライズ:機密データを外部送信できない環境
- 教育・学習:オフライン学習アプリ
MediaPipeによるLLM実装の基礎
MediaPipeとは
GoogleのMediaPipeは、マルチモーダルAIタスクに最適化されたフレームワークです:
- 統一API:テキスト、画像、音声を同じインターフェースで処理
- ハードウェア最適化:GPU、NPU、CPUを自動選択
- ストリーミング対応:リアルタイムでの逐次出力
- プロダクション実績:YouTube、Google Assistant等で使用
アーキテクチャ概要
あなたのAndroidアプリ
    ↓
MediaPipe LLM API
    ↓
.taskファイル(専用モデル形式)
    ↓
ハードウェアアクセラレーション(GPU/CPU/NPU)
    ↓
ストリーミング出力
最初の一歩シンプルなLLMアプリ
環境準備
必要な依存関係:
dependencies {
    implementation("com.google.mediapipe:tasks-genai:0.10.24")
    implementation("androidx.compose.ui:ui:$compose_version")
}
最小限の実装
まずは、1つの関数でLLMを動かしてみましょう:
// シンプルな関数ベースの実装
import android.content.Context
import com.google.mediapipe.tasks.genai.llminference.LlmInference
import com.google.mediapipe.tasks.genai.llminference.LlmInferenceSession

fun simpleLlmExample(context: Context) {
    // 1. 単一のメソッド内で完結する実装
    val modelPath = "models/gemma-2b.task"

    // 2. LLMエンジンの作成
    val llmInference = LlmInference.createFromOptions(
        context,
        LlmInference.LlmInferenceOptions.builder()
            .setModelPath(modelPath)
            .setMaxTokens(256)
            .build()
    )

    // 3. セッションの作成
    val session = LlmInferenceSession.createFromOptions(
        llmInference,
        LlmInferenceSession.LlmInferenceSessionOptions.builder()
            .setTopK(40)
            .setTemperature(0.8f)
            .build()
    )

    // 4. プロンプトを送信して結果を取得
    session.addQueryChunk("Explain AI in one sentence.")

    // 5. レスポンスを処理
    session.generateResponseAsync { partialResult, done ->
        print(partialResult)  // コンソールに出力
        if (done) {
            println("\n--- Generation completed ---")
            // 6. クリーンアップ
            llmInference.close()
        }
    }
}
UI付きアプリケーション
実際のアプリで使えるComposeベースの実装:
// Composeでの使用例
@Composable
fun SimpleLlmChat() {
    val context = LocalContext.current
    var response by remember { mutableStateOf("") }
    var isGenerating by remember { mutableStateOf(false) }

    Column(modifier = Modifier.padding(16.dp)) {
        Button(
            onClick = {
                if (!isGenerating) {
                    isGenerating = true
                    response = ""

                    // インラインでLLMを使用
                    val llm = LlmInference.createFromOptions(
                        context,
                        LlmInference.LlmInferenceOptions.builder()
                            .setModelPath("models/gemma-2b.task")
                            .setMaxTokens(128)
                            .build()
                    )

                    val session = LlmInferenceSession.createFromOptions(
                        llm,
                        LlmInferenceSession.LlmInferenceSessionOptions.builder()
                            .setTemperature(0.7f)
                            .build()
                    )

                    session.addQueryChunk("Tell me a joke")
                    session.generateResponseAsync { partial, done ->
                        response += partial
                        if (done) {
                            isGenerating = false
                            llm.close()
                        }
                    }
                }
            },
            enabled = !isGenerating
        ) {
            Text(if (isGenerating) "Generating..." else "Generate Joke")
        }

        Spacer(modifier = Modifier.height(16.dp))

        Text(
            text = response,
            modifier = Modifier.fillMaxWidth()
        )
    }
}
再利用可能なクラス実装
プロダクション向けの構造化された実装:
// LlmMinimalExample.kt
import android.content.Context
import com.google.mediapipe.tasks.genai.llminference.LlmInference
import com.google.mediapipe.tasks.genai.llminference.LlmInferenceSession

class LlmMinimalExample(private val context: Context) {
    private var llmInference: LlmInference? = null
    private var session: LlmInferenceSession? = null

    fun initialize(modelPath: String) {
        // 1. LLM推論オプションの設定
        val options = LlmInference.LlmInferenceOptions.builder()
            .setModelPath(modelPath)                    // モデルファイルのパス
            .setMaxTokens(512)                          // 最大トークン数
            .setPreferredBackend(LlmInference.Backend.GPU)  // GPU使用
            .build()

        // 2. LLM推論エンジンの作成
        llmInference = LlmInference.createFromOptions(context, options)

        // 3. セッションの作成
        session = LlmInferenceSession.createFromOptions(
            llmInference!!,
            LlmInferenceSession.LlmInferenceSessionOptions.builder()
                .setTopK(40)
                .setTopP(0.95f)
                .setTemperature(0.8f)
                .build()
        )
    }

    fun generateResponse(prompt: String, onResult: (String, Boolean) -> Unit) {
        // 4. プロンプトを追加
        session?.addQueryChunk(prompt)

        // 5. 非同期でレスポンスを生成(ストリーミング)
        session?.generateResponseAsync { partialResult, done ->
            onResult(partialResult, done)
        }
    }

    fun cleanup() {
        // 6. リソースのクリーンアップ
        llmInference?.close()
    }
}
🔑 基本実装のポイント
-
.taskファイル:MediaPipe専用のモデル形式が必要 -
ストリーミング出力:
generateResponseAsyncでリアルタイム表示 -
メモリ管理:必ず
close()でリソース解放 - 非同期処理:UIをブロックしないよう必須
画像入力対応マルチモーダルLLM
Vision Language Modelとは
マルチモーダルLLMは、テキストと画像の両方を理解できるモデルです:
- 画像理解:写真の内容を詳細に説明
- 視覚的質問応答:画像について自然言語で質問可能
- OCR機能:画像内のテキストを読み取り
- シーン解析:複雑な場面の理解と説明
基本的な画像分析実装
// ImageLlmExample.kt
import android.content.Context
import android.graphics.Bitmap
import com.google.mediapipe.framework.image.BitmapImageBuilder
import com.google.mediapipe.tasks.genai.llminference.LlmInference
import com.google.mediapipe.tasks.genai.llminference.LlmInferenceSession
import com.google.mediapipe.tasks.genai.llminference.GraphOptions

class ImageLlmExample(private val context: Context) {
    private var llmInference: LlmInference? = null
    private var session: LlmInferenceSession? = null

    fun initialize(modelPath: String) {
        // 1. 画像対応モデル用のオプション設定
        val options = LlmInference.LlmInferenceOptions.builder()
            .setModelPath(modelPath)
            .setMaxTokens(512)
            .setMaxNumImages(1)  // 画像入力を1枚まで許可
            .setPreferredBackend(LlmInference.Backend.GPU)
            .build()

        llmInference = LlmInference.createFromOptions(context, options)

        // 2. ビジョンモダリティを有効化したセッション
        session = LlmInferenceSession.createFromOptions(
            llmInference!!,
            LlmInferenceSession.LlmInferenceSessionOptions.builder()
                .setTopK(40)
                .setTemperature(0.8f)
                .setGraphOptions(
                    GraphOptions.builder()
                        .setEnableVisionModality(true)  // ビジョン機能を有効化
                        .build()
                )
                .build()
        )
    }

    fun analyzeImage(
        image: Bitmap,
        prompt: String,
        onResult: (String, Boolean) -> Unit
    ) {
        // 3. テキストプロンプトを追加(画像より先に追加する必要がある)
        session?.addQueryChunk(prompt)

        // 4. 画像を追加
        val mpImage = BitmapImageBuilder(image).build()
        session?.addImage(mpImage)

        // 5. レスポンス生成
        session?.generateResponseAsync { partialResult, done ->
            onResult(partialResult, done)
        }
    }

    fun cleanup() {
        llmInference?.close()
    }
}
シンプルな画像分析関数
// 画像を分析する単純な関数
fun analyzeImageSimple(
    context: Context,
    modelPath: String,
    image: Bitmap,
    question: String = "What do you see in this image?"
) {
    // LLMエンジンの作成(画像対応)
    val llm = LlmInference.createFromOptions(
        context,
        LlmInference.LlmInferenceOptions.builder()
            .setModelPath(modelPath)
            .setMaxTokens(256)
            .setMaxNumImages(1)
            .build()
    )

    // セッションの作成(ビジョンモダリティ有効)
    val session = LlmInferenceSession.createFromOptions(
        llm,
        LlmInferenceSession.LlmInferenceSessionOptions.builder()
            .setTemperature(0.7f)
            .setGraphOptions(
                GraphOptions.builder()
                    .setEnableVisionModality(true)
                    .build()
            )
            .build()
    )

    // プロンプトと画像を追加
    session.addQueryChunk(question)
    session.addImage(BitmapImageBuilder(image).build())

    // 結果を出力
    session.generateResponseAsync { partial, done ->
        print(partial)
        if (done) {
            println("\n--- Analysis completed ---")
            llm.close()
        }
    }
}
画像分析UIの完全実装
@Composable
fun ImageAnalysisScreen() {
    val context = LocalContext.current
    var selectedImage by remember { mutableStateOf<Bitmap?>(null) }
    var analysisResult by remember { mutableStateOf("") }
    var isAnalyzing by remember { mutableStateOf(false) }

    // 画像選択ランチャー
    val launcher = rememberLauncherForActivityResult(
        contract = ActivityResultContracts.GetContent()
    ) { uri: Uri? ->
        uri?.let {
            val bitmap = MediaStore.Images.Media.getBitmap(
                context.contentResolver, it
            )
            selectedImage = bitmap
        }
    }

    Column(
        modifier = Modifier
            .fillMaxSize()
            .padding(16.dp)
    ) {
        // 画像選択ボタン
        Button(
            onClick = { launcher.launch("image/*") },
            modifier = Modifier.fillMaxWidth()
        ) {
            Text("Select Image")
        }

        // 選択した画像の表示
        selectedImage?.let { bitmap ->
            Image(
                bitmap = bitmap.asImageBitmap(),
                contentDescription = "Selected image",
                modifier = Modifier
                    .fillMaxWidth()
                    .height(200.dp)
                    .padding(vertical = 8.dp)
            )

            // 分析ボタン
            Button(
                onClick = {
                    if (!isAnalyzing) {
                        isAnalyzing = true
                        analysisResult = ""

                        // インラインでLLM分析を実行
                        val llm = LlmInference.createFromOptions(
                            context,
                            LlmInference.LlmInferenceOptions.builder()
                                .setModelPath("models/gemma-3n-E2B-it-int4.task")
                                .setMaxTokens(256)
                                .setMaxNumImages(1)
                                .build()
                        )

                        val session = LlmInferenceSession.createFromOptions(
                            llm,
                            LlmInferenceSession.LlmInferenceSessionOptions.builder()
                                .setGraphOptions(
                                    GraphOptions.builder()
                                        .setEnableVisionModality(true)
                                        .build()
                                )
                                .build()
                        )

                        session.addQueryChunk("Describe this image in detail.")
                        session.addImage(BitmapImageBuilder(bitmap).build())

                        session.generateResponseAsync { partial, done ->
                            analysisResult += partial
                            if (done) {
                                isAnalyzing = false
                                llm.close()
                            }
                        }
                    }
                },
                enabled = !isAnalyzing,
                modifier = Modifier.fillMaxWidth()
            ) {
                Text(if (isAnalyzing) "Analyzing..." else "Analyze Image")
            }
        }

        // 分析結果の表示
        if (analysisResult.isNotEmpty()) {
            Card(
                modifier = Modifier
                    .fillMaxWidth()
                    .padding(top = 16.dp)
            ) {
                Text(
                    text = analysisResult,
                    modifier = Modifier.padding(16.dp)
                )
            }
        }
    }
}
🔑 マルチモーダル実装のポイント
-
対応モデルの確認:画像入力対応の
.taskファイルが必要 -
順序が重要:
addQueryChunk()→addImage()の順番を守る -
ビジョンモダリティの有効化:
setEnableVisionModality(true)必須 -
画像数制限:
setMaxNumImages()で同時処理可能な画像数を指定
チャットアプリケーションの構築
会話履歴管理の仕組み
AndroidでのLLMチャットアプリは、セッションベースの文脈管理が鍵となります:
-
MediaPipeの自動管理:
LlmInferenceSessionが会話履歴を自動保持 - 累積的なコンテキスト:新しい入力が既存の文脈に追加
- メモリ効率:不要になった古い履歴の自動削除
- リセット機能:セッション再作成で履歴クリア
基本的なチャット実装
AI Edge Galleryのアーキテクチャを参考にした実装:
// LlmChatModelHelper.kt より抜粋

data class LlmModelInstance(val engine: LlmInference, var session: LlmInferenceSession)

object LlmChatModelHelper {
  fun initialize(
    context: Context, model: Model, onDone: (String) -> Unit
  ) {
    // モデル設定の取得
    val maxTokens = model.getIntConfigValue(key = ConfigKey.MAX_TOKENS, defaultValue = DEFAULT_MAX_TOKEN)
    val topK = model.getIntConfigValue(key = ConfigKey.TOPK, defaultValue = DEFAULT_TOPK)
    val topP = model.getFloatConfigValue(key = ConfigKey.TOPP, defaultValue = DEFAULT_TOPP)
    val temperature = model.getFloatConfigValue(key = ConfigKey.TEMPERATURE, defaultValue = DEFAULT_TEMPERATURE)
    val accelerator = model.getStringConfigValue(key = ConfigKey.ACCELERATOR, defaultValue = Accelerator.GPU.label)

    // バックエンドの選択(GPU/CPU)
    val preferredBackend = when (accelerator) {
      Accelerator.CPU.label -> LlmInference.Backend.CPU
      Accelerator.GPU.label -> LlmInference.Backend.GPU
      else -> LlmInference.Backend.GPU
    }

    // LlmInferenceのオプション設定
    val options = LlmInference.LlmInferenceOptions.builder()
      .setModelPath(model.getPath(context = context))
      .setMaxTokens(maxTokens)
      .setPreferredBackend(preferredBackend)
      .setMaxNumImages(if (model.llmSupportImage) 1 else 0)  // マルチモーダル対応
      .build()

    // インスタンスの作成
    val llmInference = LlmInference.createFromOptions(context, options)

    // セッションの作成
    val session = LlmInferenceSession.createFromOptions(
      llmInference,
      LlmInferenceSession.LlmInferenceSessionOptions.builder()
        .setTopK(topK)
        .setTopP(topP)
        .setTemperature(temperature)
        .setGraphOptions(
          GraphOptions.builder()
            .setEnableVisionModality(model.llmSupportImage)
            .build()
        )
        .build()
    )

    model.instance = LlmModelInstance(engine = llmInference, session = session)
  }
推論実行とストリーミング処理
fun runInference(
  model: Model,
  input: String,
  resultListener: ResultListener,
  cleanUpListener: CleanUpListener,
  image: Bitmap? = null,
) {
  val instance = model.instance as LlmModelInstance
  val session = instance.session

  // テキストクエリの追加
  session.addQueryChunk(input)

  // 画像対応モデルの場合、画像を追加
  if (image != null) {
    session.addImage(BitmapImageBuilder(image).build())
  }

  // 非同期でレスポンスを生成(ストリーミング対応)
  session.generateResponseAsync(resultListener)
}
セッション管理の詳細
// セッションのライフサイクル
object LlmChatModelHelper {
    // 1. セッション作成(モデル初期化時)
    fun initialize(context: Context, model: Model) {
        val llmInference = LlmInference.createFromOptions(...)
        val session = LlmInferenceSession.createFromOptions(...)
        model.instance = LlmModelInstance(engine = llmInference, session = session)
    }

    // 2. メッセージ追加と推論
    fun runInference(model: Model, input: String, image: Bitmap?) {
        val session = (model.instance as LlmModelInstance).session
        session.addQueryChunk(input)  // 会話履歴に追加
        if (image != null) {
            session.addImage(BitmapImageBuilder(image).build())
        }
        session.generateResponseAsync(resultListener)  // 全文脈を考慮して応答
    }

    // 3. セッションリセット
    fun resetSession(model: Model) {
        // 古いセッションを閉じて新規作成
        session.close()
        val newSession = LlmInferenceSession.createFromOptions(...)
        instance.session = newSession
    }
}
🔑 チャット機能開発のポイント
- 文脈の自動管理:MediaPipeが会話履歴を透過的に管理
- ストリーミング表示:ユーザー体験向上のため逐次出力必須
- メモリ制限の考慮:長い会話での自動的な履歴削除
- エラー処理:セッション障害時の自動復旧機能
モデルの準備と変換
対応モデル形式の理解
AndroidでのLLM実行には、MediaPipe専用の.taskファイルが必要です:
| 元形式 | 変換後 | 用途 |
|---|---|---|
| PyTorch (.pt) | .task | LLM推論 |
| ONNX (.onnx) | .task | LLM推論 |
| TensorFlow (.pb) | .tflite | 分類タスク |
| Hugging Face | .task | 事前変換済み |
事前変換済みモデルの活用
推奨入手先:
-
Hugging Face:
litert-communityタグ付きモデル - Kaggle Models: Gemmaシリーズ等のMediaPipe対応版
- Google AI Edge: 公式サンプルモデル
人気の画像対応モデル(2024年12月):
-
gemma-3n-E2B-it-int4.task(3.1GB)- Vision対応 -
gemma-3n-E4B-it-int4.task(4.4GB)- Vision対応、高性能
自前モデルの変換方法
MediaPipeでは、独自モデルを.task形式に変換するツールを提供:
1. 環境準備
pip install mediapipe
2. 基本的な変換スクリプト
from mediapipe.tasks.python.genai import bundler

# バンドル設定
config = bundler.BundleConfig(
    tflite_model="model.tflite",           # TFLiteモデルのパス
    tokenizer_model="tokenizer.model",     # SentencePieceトークナイザー
    start_token="<s>",                     # 開始トークン
    stop_tokens=["</s>"],                  # 終了トークンのリスト
    output_filename="my_model.task",       # 出力ファイル名
    enable_bytes_to_unicode_mapping=True,  # GPT-2スタイルのマッピング

    # オプション設定
    system_prompt="You are a helpful assistant.",  # システムプロンプト
    prompt_prefix="User: ",                        # プロンプトの接頭辞
    prompt_suffix="\nAssistant: ",                # プロンプトの接尾辞
)

# .taskファイルを作成
bundler.create_bundle(config)
3. 画像対応モデルの変換
config = bundler.BundleConfig(
    # 基本設定は同じ
    tflite_model="model.tflite",
    tokenizer_model="tokenizer.model",
    start_token="<s>",
    stop_tokens=["</s>"],
    output_filename="vision_model.task",

    # ビジョン関連のモデルを追加
    tflite_vision_encoder="vision_encoder.tflite",  # ビジョンエンコーダー
    tflite_vision_adapter="vision_adapter.tflite",  # ビジョンアダプター
)
モデルサイズとパフォーマンスの最適化
量子化レベルの選択:
- int4: 最小サイズ(1-2GB)、やや精度低下
- int8: バランス型(2-4GB)、実用的な精度
- fp16: 高精度(4-8GB)、最新端末推奨
実機での性能目安:
| 端末クラス | 推奨モデルサイズ | 期待パフォーマンス |
|---|---|---|
| エントリー(4GB RAM) | 1-2GB | 5-10 tokens/sec |
| ミドル(8GB RAM) | 2-4GB | 10-20 tokens/sec |
| ハイエンド(12GB+ RAM) | 4-8GB | 20-50 tokens/sec |
開発環境の構築とデプロイ
開発環境のセットアップ
必要なツールとバージョン:
- Android Studio: Hedgehog以降
- JDK: 11以上(17推奨)
- Android SDK: API 35
- NDK: 25.1.8937393(C++使用時)
プロジェクトの初期設定
build.gradle.kts(アプリレベル):
dependencies {
    // MediaPipe LLM
    implementation("com.google.mediapipe:tasks-genai:0.10.24")

    // UI (Compose)
    implementation("androidx.compose.ui:ui:$compose_version")
    implementation("androidx.activity:activity-compose:1.8.2")

    // Image handling
    implementation("androidx.compose.ui:ui-graphics:$compose_version")
}
AI Edge Galleryのビルド例
実際のプロダクションアプリを参考にしたい場合:
# 1. AI Edge Galleryをクローン
git clone https://github.com/google-ai-edge/gallery.git
cd gallery/Android/src

# 2. 依存関係のダウンロード
./gradlew build --refresh-dependencies

# 3. デバッグ版のビルド
./gradlew assembleDebug

# 4. 実機にインストール
./gradlew installDebug
パフォーマンス測定とプロファイリング
重要な指標:
- Time to First Token (TTFT): 最初のトークンまでの時間
- Tokens per Second: 生成速度
- Memory Usage: ピーク時メモリ使用量
- Battery Impact: バッテリー消費量
測定コード例:
// パフォーマンス測定
val startTime = System.currentTimeMillis()
var firstTokenTime = 0L
var tokenCount = 0

session.generateResponseAsync { partial, done ->
    if (firstTokenTime == 0L) {
        firstTokenTime = System.currentTimeMillis() - startTime
        Log.d("Performance", "TTFT: ${firstTokenTime}ms")
    }

    tokenCount++
    if (done) {
        val totalTime = System.currentTimeMillis() - startTime
        val tokensPerSecond = tokenCount * 1000.0 / totalTime
        Log.d("Performance", "Speed: $tokensPerSecond tokens/sec")
    }
}
プロダクション実装例AI Edge Gallery
プロダクションレベルの機能
1. モデル管理システム
{External Storage}/models/
├── {model_name}/
│   ├── model.task
│   ├── config.json
│   └── metadata.json
2. パフォーマンス最適化
- GPU/CPU/NPUの自動選択
- メモリ使用量の動的監視
- バックグラウンド処理の制御
3. エラー処理とフォールバック
- モデル読み込み失敗時の自動復旧
- メモリ不足時の軽量モデルへの切り替え
- ネットワークエラー時のローカルモデル使用
UI/UXのベストプラクティス
リアルタイム応答表示:
- ストリーミング出力でタイピング効果
- プログレスインジケーターでの処理状況表示
- レスポンス時間の可視化
ユーザビリティ配慮:
- モデル切り替えの簡便性
- 設定パラメータの直感的な調整
- エラー状況の分かりやすい説明
C++レベルでの最適化実装
AI Edge Galleryでは、Kotlin/Javaに加えてC++レベルでの最適化も活用:
// llm_minimal_example.cc
#include <iostream>
#include <string>
#include "mediapipe/tasks/cc/genai/inference/c/llm_inference_engine.h"

// コールバック関数:レスポンスをストリーミング出力
void async_callback(void* context, LlmResponseContext* response_context) {
    std::cout << response_context->response_array[0] << std::flush;
    LlmInferenceEngine_CloseResponseContext(response_context);
}

int main() {
    // 1. モデル設定
    const LlmModelSettings model_settings = {
        .model_path = "path/to/gemma-2b.task",  // モデルファイルのパス
        .cache_dir = "./cache",                  // キャッシュディレクトリ
        .max_num_tokens = 512,                   // 最大トークン数
        .preferred_backend = kLlmPreferredBackendGpu  // GPU使用
    };

    // 2. エンジン作成
    void* engine = nullptr;
    char* error_msg = nullptr;
    if (LlmInferenceEngine_CreateEngine(&model_settings, &engine, &error_msg)) {
        std::cerr << "Engine creation failed: " << error_msg << std::endl;
        free(error_msg);
        return 1;
    }

    // 3. セッション設定と作成
    const LlmSessionConfig session_config = {
        .topk = 40,
        .topp = 0.95f,
        .temperature = 0.8f,
        .random_seed = 42
    };

    void* session = nullptr;
    if (LlmInferenceEngine_CreateSession(engine, &session_config, &session, &error_msg)) {
        std::cerr << "Session creation failed: " << error_msg << std::endl;
        free(error_msg);
        return 1;
    }

    // 4. プロンプト追加
    char prompt[] = "What is machine learning?";
    if (LlmInferenceEngine_Session_AddQueryChunk(session, prompt, &error_msg)) {
        std::cerr << "Failed to add prompt: " << error_msg << std::endl;
        free(error_msg);
        return 1;
    }

    // 5. 非同期推論実行
    std::cout << "Response: ";
    if (LlmInferenceEngine_Session_PredictAsync(session, nullptr, &error_msg, async_callback)) {
        std::cerr << "Prediction failed: " << error_msg << std::endl;
        free(error_msg);
        return 1;
    }

    // 6. クリーンアップ
    LlmInferenceEngine_Session_Delete(session);
    LlmInferenceEngine_Engine_Delete(engine);

    return 0;
}
まとめ:AndroidでのLLM開発の未来
技術的達成点
AndroidでのオンデバイスLLMは、2024年時点で以下を実現しています:
- 🚀 実用的な性能: 最新端末で20-50 tokens/sec
- 📱 モバイル最適化: 1-5GBのコンパクトモデル
- 🔒 完全なプライバシー: データの外部送信不要
- 🌐 オフライン動作: ネットワーク接続不要
開発エコシステム
- MediaPipe: 統一APIでの簡単な実装
- 豊富なモデル: Hugging Face、Kaggleでの事前変換済みモデル
- プロダクション実例: AI Edge Galleryによるベストプラクティス
- クロスプラットフォーム: Android、iOS、デスクトップ対応
今後の発展方向
- 性能向上: NPU活用による更なる高速化
- モデル軽量化: より小さなモデルでの高性能実現
- マルチモーダル拡張: 音声、動画への対応拡大
- 開発者体験: より簡単な実装とデバッグツール
AndroidでのLLM開発は、プライバシーを重視する現代のアプリケーション開発において、重要な選択肢となっています。本ガイドを参考に、ぜひあなた自身のAIアプリケーションを構築してみてください!
🐣
フリーランスエンジニアです。
お仕事のご相談こちらまで
rockyshikoku@gmail.com
Core MLを使ったアプリを作っています。
機械学習関連の情報を発信しています。