ChatGPTをうまく使おう
1、コードを書いてもらう
(質問)
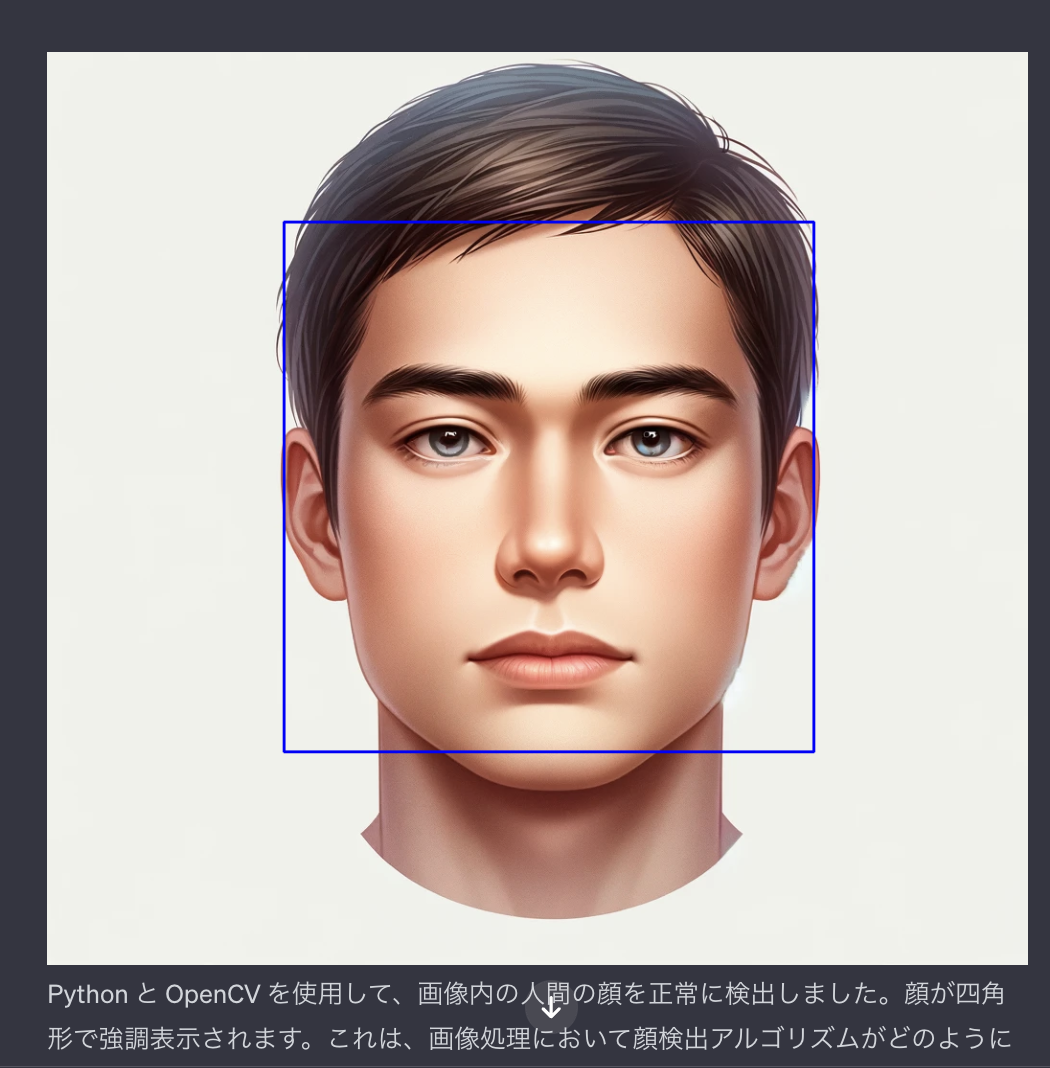
Pythonを用いて画像内で人間の顔を検出するコードを書いてください。

Python と OpenCV を使用して、画像内の人間の顔を正常に検出しました。
from PIL import Image
import cv2
import numpy as np

# Load the image
image_path = '/mnt/data/A_realistic_portrait_of_a_human_being._The_person_.png'
image = Image.open(image_path)

# Convert the image to OpenCV format
opencv_image = cv2.cvtColor(np.array(image), cv2.COLOR_RGB2BGR)

# Use OpenCV's pre-trained Haar cascade classifier for face detection
face_cascade = cv2.CascadeClassifier(cv2.data.haarcascades + 'haarcascade_frontalface_default.xml')

# Convert image to grayscale (required for face detection)
gray = cv2.cvtColor(opencv_image, cv2.COLOR_BGR2GRAY)

# Detect faces in the image
faces = face_cascade.detectMultiScale(gray, scaleFactor=1.1, minNeighbors=5, minSize=(30, 30))

# Draw rectangles around the faces
for (x, y, w, h) in faces:
    cv2.rectangle(opencv_image, (x, y), (x+w, y+h), (255, 0, 0), 2)

# Convert back to PIL format for display
result_image = Image.fromarray(cv2.cvtColor(opencv_image, cv2.COLOR_BGR2RGB))

result_image.show()
2、結果に基づき改善してもらう
(質問)
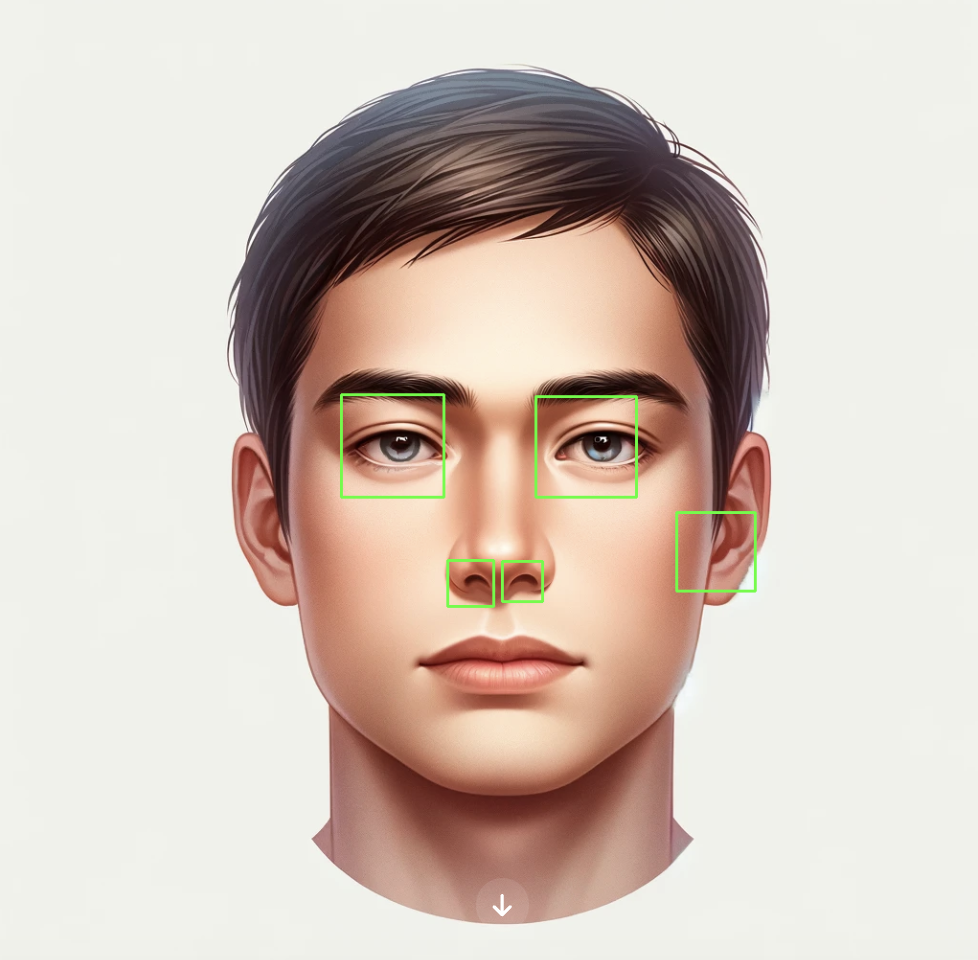
目と鼻と口の位置も検出したい。
鼻と口の検出カスケードを適切にロードできなかったため、エラーが発生したようです。
この問題は、鼻と口の検出のための特定の分類子がデフォルトで OpenCV ライブラリで利用できない場合に発生する可能性があります。
これに対処するために、目検出カスケードは通常、標準の OpenCV インストールに含まれているため、顔の中の目のみを検出するようにコードを更新します。
# Re-initialize the classifiers
face_cascade = cv2.CascadeClassifier(cv2.data.haarcascades + 'haarcascade_frontalface_default.xml')
eye_cascade = cv2.CascadeClassifier(cv2.data.haarcascades + 'haarcascade_eye.xml')

# Reload the original image in OpenCV format
opencv_image = cv2.cvtColor(np.array(image), cv2.COLOR_RGB2BGR)
gray = cv2.cvtColor(opencv_image, cv2.COLOR_BGR2GRAY)

# Detect faces
faces = face_cascade.detectMultiScale(gray, scaleFactor=1.1, minNeighbors=5, minSize=(30, 30))

# Detect eyes within the detected faces
for (x, y, w, h) in faces:
    roi_gray = gray[y:y+h, x:x+w]
    roi_color = opencv_image[y:y+h, x:x+w]

    eyes = eye_cascade.detectMultiScale(roi_gray)
    for (ex, ey, ew, eh) in eyes:
        cv2.rectangle(roi_color, (ex, ey), (ex+ew, ey+eh), (0, 255, 0), 2)

# Convert back to PIL format for display
result_image_with_eyes = Image.fromarray(cv2.cvtColor(opencv_image, cv2.COLOR_BGR2RGB))

result_image_with_eyes.show()
質問
まだちゃんと検出できていません。
opencvではない方法のコードを教えてください。
OpenCVは顔や顔の特徴を検出するための一般的なツールですが、他の方法もあります。
特に、深層学習を使用するアプローチは、より精度の高い検出が可能です。
以下は、Pythonで深層学習ベースの顔特徴検出を行う一例です。

この例では、dlibライブラリと事前訓練されたモデルを使用します。
dlibは、顔検出やランドマーク検出(顔の特徴の位置を特定する)に広く使われているライブラリです。

import dlib
from PIL import Image
import numpy as np

# dlibの顔検出器とランドマーク検出モデルをロード
detector = dlib.get_frontal_face_detector()
predictor = dlib.shape_predictor("shape_predictor_68_face_landmarks.dat")  # 事前にダウンロードする必要があります

# 画像を読み込み
image = Image.open('/path/to/image.jpg')
image = np.array(image)

# dlibを使用して顔を検出
faces = detector(image, 1)

for k, d in enumerate(faces):
    # Get the landmarks/parts for the face in box d.
    shape = predictor(image, d)

    # Draw parts
    for i in range(0, 68):
        # shape.part(i) gives the ith landmark of the face
        cv2.circle(image, (shape.part(i).x, shape.part(i).y), 1, (0, 0, 255), -1)

# 画像を表示
result_image = Image.fromarray(image)
result_image.show()
(質問)
ランドマークを全て描画してしまっているのと、サークルが小さいので、目、鼻、口だけにして、ポイントを5倍してください。
# Adjusting the code to detect and highlight only eyes, nose, and mouth with larger points

import dlib
from PIL import Image
import numpy as np
import cv2

# Load dlib's face detector and landmark predictor
detector = dlib.get_frontal_face_detector()
predictor = dlib.shape_predictor('/mnt/data/shape_predictor_68_face_landmarks.dat')  # Model file path

# Load and convert the image to RGB format
image = Image.open('/mnt/data/A_realistic_portrait_of_a_human_being._The_person_.png').convert('RGB')
image = np.array(image)

# Detect faces in the image
faces = detector(image, 1)

# Define the landmark indices for eyes, nose, and mouth
# Eyes: 36-41 (left eye), 42-47 (right eye)
# Nose: 27-35
# Mouth: 48-67
landmark_indices = list(range(36, 48)) + list(range(27, 36)) + list(range(48, 68))

# Enlarging the landmarks for visibility
point_size = 5

for k, d in enumerate(faces):
    shape = predictor(image, d)

    # Draw only specified landmarks
    for i in landmark_indices:
        cv2.circle(image, (shape.part(i).x, shape.part(i).y), point_size, (0, 255, 0), -1)

# Display the resulting image
result_image = Image.fromarray(image)
result_image.show()

(質問)
取得した目のポイントを用いて、目を大きくするディストーションを与えるコードを書いてください。

import dlib
import numpy as np
import cv2
from PIL import Image

def enlarge_eyes(image, left_eye_center, right_eye_center, radius=20, strength=1.5):
    """
    Enlarge the eyes in the image.
    :param image: The input image as a numpy array.
    :param left_eye_center: The center of the left eye (x, y).
    :param right_eye_center: The center of the right eye (x, y).
    :param radius: The radius around the eye center to apply the distortion.
    :param strength: The strength of the magnification.
    :return: The image with enlarged eyes.
    """
    # Create a copy of the image to work on
    output = image.copy()

    # Function to apply the magnification
    def apply_magnification(x, y, center):
        dx = x - center[0]
        dy = y - center[1]
        distance = np.sqrt(dx**2 + dy**2)
        if distance < radius:
            factor = 1 + strength * (1.0 - distance / radius)
            return center[0] + dx * factor, center[1] + dy * factor
        return x, y

    # Apply magnification around each eye
    for y in range(max(0, left_eye_center[1] - radius), min(output.shape[0], left_eye_center[1] + radius)):
        for x in range(max(0, left_eye_center[0] - radius), min(output.shape[1], left_eye_center[0] + radius)):
            output[y, x] = image[int(apply_magnification(x, y, left_eye_center)[1]), int(apply_magnification(x, y, left_eye_center)[0])]

    for y in range(max(0, right_eye_center[1] - radius), min(output.shape[0], right_eye_center[1] + radius)):
        for x in range(max(0, right_eye_center[0] - radius), min(output.shape[1], right_eye_center[0] + radius)):
            output[y, x] = image[int(apply_magnification(x, y, right_eye_center)[1]), int(apply_magnification(x, y, right_eye_center)[0])]

    return output

# Load the image
image_path = '/path/to/your/image.jpg'
image = cv2.imread(image_path)
image = cv2.cvtColor(image, cv2.COLOR_BGR2RGB)

# Load dlib's face detector and landmark predictor
detector = dlib.get_frontal_face_detector()
predictor = dlib.shape_predictor('/path/to/shape_predictor_68_face_landmarks.dat')

# Detect faces in the image
faces = detector(image, 1)

for k, d in enumerate(faces):
    shape = predictor(image, d)

    # Calculate the center of the left and right eyes
    left_eye_center = np.mean([[shape.part(i).x, shape.part(i).y] for i in range(36, 42)], axis=0).astype(int)
    right_eye_center = np.mean([[shape.part(i).x, shape.part(i).y] for i in range(42, 48)], axis=0).astype(int)

    # Apply the enlargement effect
    image = enlarge_eyes(image, left_eye_center, right_eye_center, radius=20, strength=1.5)

# Convert the image back to PIL format and show it
result_image = Image.fromarray(image)
result_image.show()
留意点
意図通りの文脈の答えが出るまで詰める
望んだ結果が出るまでChatGPTを詰めていくことも大事です。
(どうしてもうまくいかないこともありますが)
できないことは人間がする
ChatGPTはOpenCVなどの基本ライブラリは使えますが、機械学習の最新ライブラリなどは使えないことがあります。
ChatGPTにできることとできないことを使う中で見極めることが大事です。
テストは必ず行う
・出てくるコードが正しいとは限らないので、テストは必ず行います。
・実行時のエラーコードを貼れば原因を教えてくれるかもしれません。
プロジェクトに取り込みやすい形で質問しよう
使用データや周辺のコード、文脈など、なるべく自分のプロジェクトの情報を与えると、取り込みやすい形で結果を教えてくれます。
🐣
フリーランスエンジニアです。
AIについて色々記事を書いていますのでよかったらプロフィールを見てみてください。
もし以下のようなご要望をお持ちでしたらお気軽にご相談ください。
AIサービスを開発したい、ビジネスにAIを組み込んで効率化したい、AIを使ったスマホアプリを開発したい、
ARを使ったアプリケーションを作りたい、スマホアプリを作りたいけどどこに相談したらいいかわからない…
いずれも中間コストを省いたリーズナブルな価格でお請けできます。
お仕事のご相談はこちらまで
rockyshikoku@gmail.com
機械学習やAR技術を使ったアプリケーションを作っています。
機械学習/AR関連の情報を発信しています。