テキストで指定すればオブジェクトを検出してくれる
物体検出の手間を大幅に省いてくれる。
今まではデータを集めて学習させる必要があった。
これが丸々いらない。
YoloWorldは、テキストがなにを指すか知っている。
person, guiter, drums, flower, beer, shoes, wall, shorts, denim
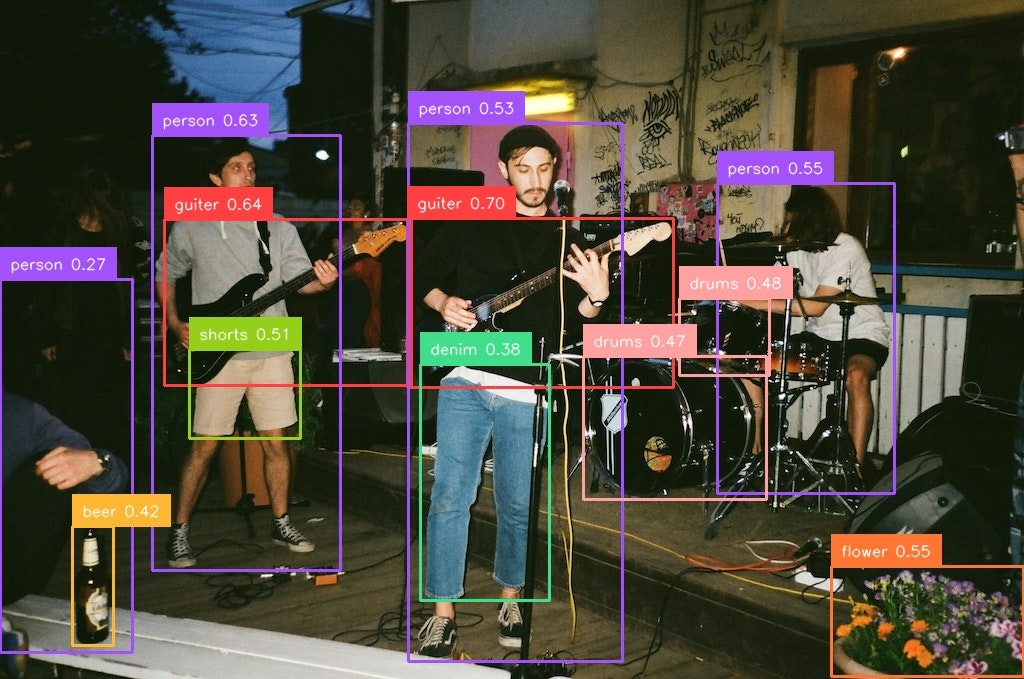
しかもT4GPUで0.1秒と高速実行。
使い方
インストール
Colabで使えるようにしたインストール方法
git clone --recursive https://github.com/AILab-CVC/YOLO-World.git
cd YOLO-World
pip install torch==2.0.0 torchvision==0.15.1
pip install torch wheel -q
pip install -U openmim
mim install mmcv==2.0.1
pip install supervision
pip install mmyolo
pip install mmdet

wget https://huggingface.co/wondervictor/YOLO-World/resolve/main/yolo_world_l_clip_base_dual_vlpan_2e-3adamw_32xb16_100e_o365_goldg_cc3mlite_train_pretrained-7a5eea3b.pth
*公式のインストール方法はリポジトリを参照
*今回モデルはyolo_world_lモデルをダウンロードしている。ネットワークサイズの異なる幾つかのモデルが公式リポジトリで用意されているので参照
実行
python image_demo.py configs/pretrain/yolo_world_l_dual_vlpan_l2norm_2e-3_100e_4x8gpus_obj365v1_goldg_train_lvis_val.py yolo_world_l_clip_base_dual_vlpan_2e-3adamw_32xb16_100e_o365_goldg_cc3mlite_train_pretrained-7a5eea3b.pth input_dir 'person,dog,cat' --topk 100 --threshold 0.25 --output-dir out
引数は、順番に
config
checkpoint
input-dir
prompt
max_det
score_threshold
output-dir
です。
Pythonで実行
import cv2
import os
import os.path as osp
import torch
import supervision as sv
from mmengine.config import Config, DictAction
from mmengine.runner import Runner
from mmengine.runner.amp import autocast
from mmengine.dataset import Compose
from mmengine.utils import ProgressBar
from mmyolo.registry import RUNNERS
BOUNDING_BOX_ANNOTATOR = sv.BoundingBoxAnnotator()
LABEL_ANNOTATOR = sv.LabelAnnotator()
config = "configs/pretrain/yolo_world_l_dual_vlpan_l2norm_2e-3_100e_4x8gpus_obj365v1_goldg_train_lvis_val.py"
checkpoint = "yolo_world_l_clip_base_dual_vlpan_2e-3adamw_32xb16_100e_o365_goldg_cc3mlite_train_pretrained-7a5eea3b.pth"
cfg = Config.fromfile(config)
cfg.work_dir = osp.join('./work_dirs',
osp.splitext(osp.basename(config))[0])
cfg.load_from = checkpoint
if 'runner_type' not in cfg:
runner = Runner.from_cfg(cfg)
else:
runner = RUNNERS.build(cfg)
output_dir = "out"
image = "vegitables.jpg"
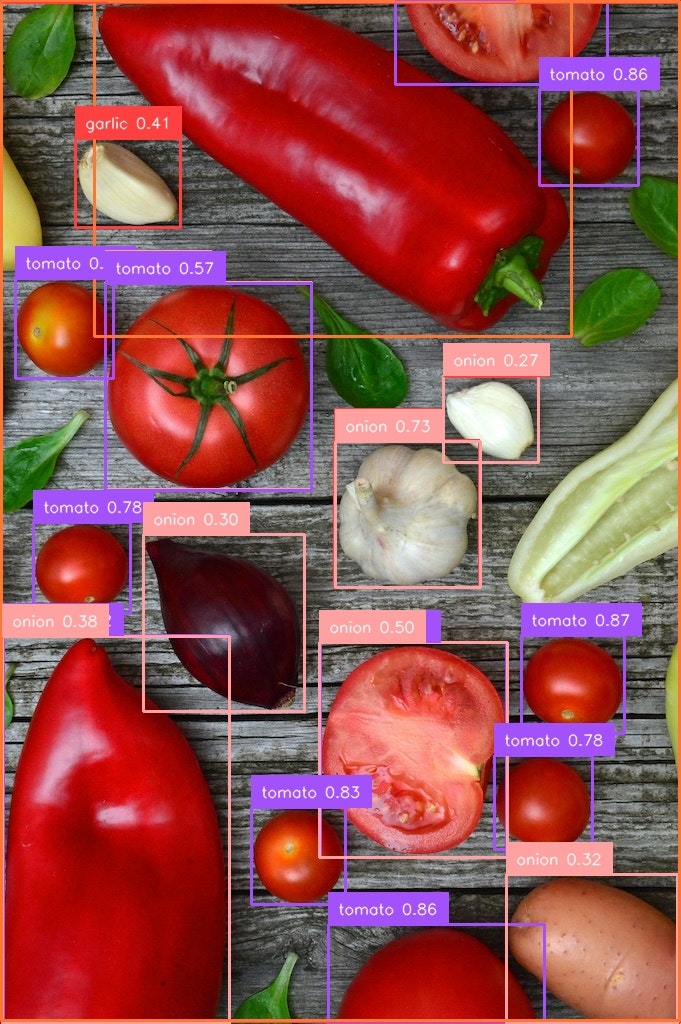
text = "tomato, garlic, onion, vegitable"
score_thr = 0.25
max_dets = 100
use_amp = False
# load text
if text.endswith('.txt'):
with open(text) as f:
lines = f.readlines()
texts = [[t.rstrip('\r\n')] for t in lines] + [[' ']]
else:
texts = [[t.strip()] for t in text.split(',')] + [[' ']]
output_dir = output_dir
if not osp.exists(output_dir):
os.mkdir(output_dir)
runner.call_hook('before_run')
runner.load_or_resume()
pipeline = cfg.test_dataloader.dataset.pipeline
runner.pipeline = Compose(pipeline)
runner.model.eval()
if not osp.isfile(image):
images = [
osp.join(image, img) for img in os.listdir(image)
if img.endswith('.png') or img.endswith('.jpg')
]
else:
images = [image]
for image_path in images:
data_info = dict(img_id=0, img_path=image_path, texts=texts)
data_info = runner.pipeline(data_info)
data_batch = dict(inputs=data_info['inputs'].unsqueeze(0),
data_samples=[data_info['data_samples']])
with autocast(enabled=use_amp), torch.no_grad():
output = runner.model.test_step(data_batch)[0]
pred_instances = output.pred_instances
pred_instances = pred_instances[
pred_instances.scores.float() > score_thr]
if len(pred_instances.scores) > max_dets:
indices = pred_instances.scores.float().topk(max_dets)[1]
pred_instances = pred_instances[indices]
pred_instances = pred_instances.cpu().numpy()
detections = sv.Detections(xyxy=pred_instances['bboxes'],
class_id=pred_instances['labels'],
confidence=pred_instances['scores'])
labels = [
f"{texts[class_id][0]} {confidence:0.2f}" for class_id, confidence in
zip(detections.class_id, detections.confidence)
]
# label images
image = cv2.imread(image_path)
image = BOUNDING_BOX_ANNOTATOR.annotate(image, detections)
image = LABEL_ANNOTATOR.annotate(image, detections, labels=labels)
cv2.imwrite(osp.join(output_dir, osp.basename(image_path)), image)
tomato, onion, garlic, paprika, vegitables
🐣
フリーランスエンジニアです。
AIについて色々記事を書いていますのでよかったらプロフィールを見てみてください。
もし以下のようなご要望をお持ちでしたらお気軽にご相談ください。
AIサービスを開発したい、ビジネスにAIを組み込んで効率化したい、AIを使ったスマホアプリを開発したい、
ARを使ったアプリケーションを作りたい、スマホアプリを作りたいけどどこに相談したらいいかわからない…
いずれも中間コストを省いたリーズナブルな価格でお請けできます。
お仕事のご相談はこちらまで
rockyshikoku@gmail.com
機械学習やAR技術を使ったアプリケーションを作っています。
機械学習/AR関連の情報を発信しています。