Google Cloud Platform (GCP) とは?
Googleがクラウド上で提供するサービス群の総称です。
Google社内で使用されている技術やインフラを利用した、仮想マシンやデータベース、機械学習などの様々なサービスをクラウド上で利用することができます。
この記事では画像分析APIである、Cloud Vision APIを試します。
実施した環境
- Windows10 (64bit)
- Python 3.6.3
必要なもの
- GCPのアカウント
- REST APIを利用できる環境 (今回はPythonで実施)
GCPのセットアップ
以下を参考にさせていただきました。
Google Cloud Visionを使ってみた
のちほど必要になりますので、APIキーをメモしておきます。
Pythonのインストール
下記などを参考にPythonのインストールをします。
Anaconda で Python 環境をインストールする
プログラムについて
Cloud Vision APIを利用する場合、以下の2通りの方法があります。
- 直接REST APIを叩く方法
- Google Cloud SDKを利用する方法
今回は前者の方法で実施します。
後者の方法については、例えばGoogle Cloud Vision APIを使ってみたなどが参考になりました。
1. パッケージのロード
from base64 import b64encode
from sys import argv
import json
import requests
- base64.b64encode: 画像をbase64エンコードする
- sys.argv: コマンドライン引数を受け取る
- json: JSON のエンコードとデコード
- requests: HTTPライブラリ
2. Endpoint URL
ENDPOINT_URL = 'https://vision.googleapis.com/v1/images:annotate'
REST APIリクエスト送信先のURLです。
3. 画像のエンコードとパラメータ付与
    img_requests = []
    for imgname in image_filenames:
        with open(imgname, 'rb') as f:
            ctxt = b64encode(f.read()).decode()
            img_requests.append({
                    'image': {'content': ctxt},
                    'features': [{
                        'type': 'LABEL_DETECTION',
                        'maxResults': 5
                    }]
            })
画像ファイルを読み込んで、base64エンコードを行っています。
また、'features'で分析タイプなどのパラメータを付与します。
分析タイプには以下のものがあります。
今回はLABEL_DETECTION (ラベル検出) を行っています。
| 分析タイプ | 内容 |
|---|---|
| LABEL_DETECTION | ラベル検出 |
| TEXT_DETECTION | 光学文字認識(OCR) |
| FACE_DETECTION | 顔検出 |
| LANDMARK_DETECTION | ランドマーク検出 |
| LOGO_DETECTION | ロゴ検出 |
| SAFE_SEARCH_DETECTION | 不適切コンテンツ検出 |
| IMAGE_PROPERTIES | 画像属性検出 |
| WEB_DETECTION | ウェブ検出 |
4. リクエスト送信
response = requests.post(ENDPOINT_URL,
                             data=json.dumps({"requests": img_requests}).encode(),
                             params={'key': api_key},
                             headers={'Content-Type': 'application/json'})
上記で作成したデータをjson.dumps()でJSON形式にエンコードし、APIキーとヘッダ情報を付与して、Endpointに対してAPIリクエストを送信します。
5. レスポンスの表示
    for idx, resp in enumerate(response.json()['responses']):
        print(json.dumps(resp, indent=2))
レスポンスを1行ずつ表示します。
6. 結果
以下の画像を入力します。
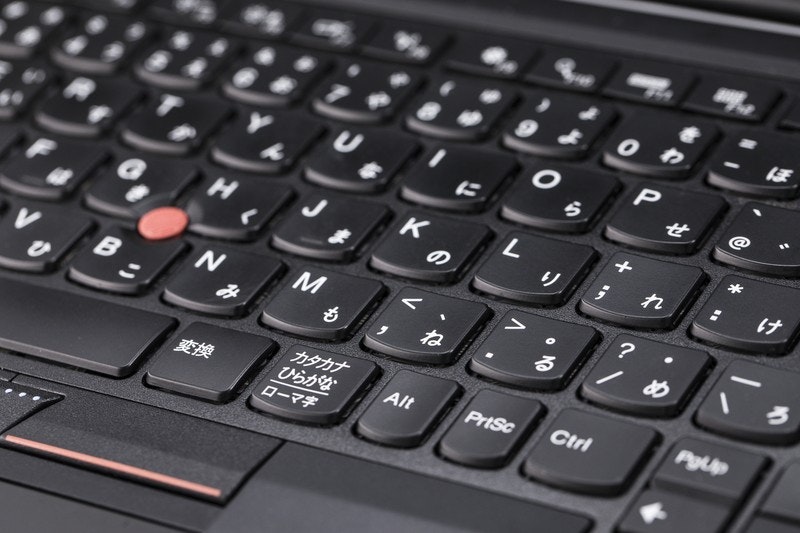
"description"が認識した物体のラベルで、"score"がそのラベルである確率になります。
{
  "labelAnnotations": [
    {
      "topicality": 0.971467,
      "score": 0.971467,
      "mid": "/m/01m2v",
      "description": "computer keyboard"
    },
    {
      "topicality": 0.9437046,
      "score": 0.9437046,
      "mid": "/m/02dwgb",
      "description": "input device"
    },
    {
      "topicality": 0.9312792,
      "score": 0.9312792,
      "mid": "/m/07c1v",
      "description": "technology"
    },
    {
      "topicality": 0.9029412,
      "score": 0.9029412,
      "mid": "/m/0bs7_0t",
      "description": "electronic device"
    },
    {
      "topicality": 0.8821869,
      "score": 0.8821869,
      "mid": "/m/03rb85",
      "description": "space bar"
    }
  ]
}
割と寄っている画像ですが、ちゃんとキーボードと認識しています。
5番目でスペースキー (Space bar) も認識されていますね。
コード全体
from base64 import b64encode
from sys import argv
import json
import requests

ENDPOINT_URL = 'https://vision.googleapis.com/v1/images:annotate'

if __name__ == '__main__':
    api_key, *image_filenames = argv[1:]

    img_requests = []
    for imgname in image_filenames:
        with open(imgname, 'rb') as f:
            ctxt = b64encode(f.read()).decode()
            img_requests.append({
                    'image': {'content': ctxt},
                    'features': [{
                        'type': 'LABEL_DETECTION',
                        'maxResults': 5
                    }]
            })

    response = requests.post(ENDPOINT_URL,
                             data=json.dumps({"requests": img_requests}).encode(),
                             params={'key': api_key},
                             headers={'Content-Type': 'application/json'})

    for idx, resp in enumerate(response.json()['responses']):
        print(json.dumps(resp, indent=2))
コマンドライン引数にAPIキーと画像ファイルのパスを渡して、コマンドプロンプトなどのターミナルから下記のように実行します。
$ python label_detection.py (APIキー) (画像ファイルのパス)
おわりに
簡単にですが、GCPの登録からGoogle Cloud Vision APIを試すところまでを実施しました。
他の画像でも試してみましたが、精度はかなり高いと思います。
機械学習について詳しく知らなくても、APIを利用して簡単に機械学習の成果を試すことができますので、興味がある方はぜひ試してみてください。
また、GCPには画像認識の他にも、翻訳や自然言語処理などのAPIも用意されているので、今後これらも試してみたいと思います。