こちらはフロムスクラッチ Advent Calendar 2017の9日目の記事です。
はじめに

もうすぐ、ポプテピピック始まりますね。
どうも、jkkitakitaです。
概要
掲題通り、consul + supervisordで
プロセス監視、管理に関して、可視化した話します。
きっかけ
どうしても、新規サービス構築や保守運用しはじめて
色々なバッチ処理等のdaemon・プロセスが数十個とかに増えてくると
↓のような悩みがでてくるのではないでしょうか。
- 一時的に、daemonをstopしたい
- daemonがゾンビになってて、再起動したい
- daemonが起動しなかった場合の、daemonのログを見る
- daemonが動いているのかどうか、ぱっとよくわからない。
-
ぱっとわからないから、なんか不安。

個人的には
5.は、結構感じます。笑
安心したいです。笑
ツールとその特徴・選定理由
簡単に本記事で取り扱うツールのバージョン・特徴と
今回ツールを選んだ選定理由を記載します。
| ツール | 特徴 | 選定理由 |
|---|---|---|
|
supervisor v3.3.1 |
1. プロセス管理ツール 2. 2004年から使われており、他でよく使われているdaemon化ツール(upstart, systemd)と比較して、十分枯れている。 3. 柔軟な「プロセス管理」ができる。 4. APIを利用して、プロセスのstart/stop/restart...などが他から実行できる。 |
1.今までupstartを使っていたが、柔軟な「プロセス管理」ができなかったため。 ※ upstartは「プロセス管理」よりかは、「起動設定」の印象。 |
|
consul v1.0.1 |
1. サービスディスカバリ、ヘルスチェック、KVS etc... 2. その他特徴は、他の記事参照。 https://www.slideshare.net/ssuser07ce9c/consul-58146464 |
1. AutoScalingするサーバー・サービスの死活監視 2. 単純に使ってみたかった。(笑) 3. 本投稿のconsul-templateを利用に必要だったから(サービスディスカバリ) |
|
consul-template v0.19.4 |
1. サーバー上で、consul-templateのdaemonを起動して使用 2. consulから値を取得して、設定ファイルの書き換え等を行うためのサービス ex.) AutoScalingGroupでスケールアウトされたwebサーバーのnginx.confの自動書き換え |
1. ansibleのようなpush型の構成管理ツールだと、AutoScalingGroupを使った場合のサーバー内の設定ファイルの書き換えが難しい。 2. user-data/cloud-initを使えば実現できるが、コード/管理が煩雑になる。保守性が低い。 |
|
cesi versionなし |
1. supervisordのダッシュボードツール 2. supervisordで管理されているdaemonを画面から一限管理できる 3. 画面から、start/stop/restartができる 4. 簡易的なユーザー管理による権限制御ができる |
1. とにかく画面がほしかった。 2. 自前でも作れるが、公式ドキュメントに載っていたから 3. 他にもいくつかOSSダッシュボードあったが、一番UIがすっきりしていたから。(笑) |
実際にやってみた
上記ツールを使って
daemonを可視化するために必要な設定をしてみました。
本記事は、全て、ansibleを使って設定していて
基本的なroleは
ansible-galaxyで、juwaiさんのroleを
お借りしています。
https://galaxy.ansible.com/list#/roles?page=1&page_size=10&tags=amazon&users=juwai&autocomplete=consul
supervisor
クライアント側(実際に管理したいdaemonが起動するサーバー)
; Sample supervisor config file.
;
; For more information on the config file, please see:
; http://supervisord.org/configuration.html
;
; Notes:
;  - Shell expansion ("~" or "$HOME") is not supported.  Environment
;    variables can be expanded using this syntax: "%(ENV_HOME)s".
;  - Comments must have a leading space: "a=b ;comment" not "a=b;comment".

[unix_http_server]
file=/tmp/supervisor.sock   ; (the path to the socket file)
;chmod=0700                 ; socket file mode (default 0700)
;chown=nobody:nogroup       ; socket file uid:gid owner
;username=user              ; (default is no username (open server))
;password=123               ; (default is no password (open server))

[inet_http_server]         ; inet (TCP) server disabled by default
port=0.0.0.0:9001        ; (ip_address:port specifier, *:port for all iface)
username=hogehoge              ; (default is no username (open server))
password=fugafuga               ; (default is no password (open server))
;セキュリティ観点から、ここのportは絞る必要有。

[supervisord]
logfile=/tmp/supervisord.log        ; (main log file;default $CWD/supervisord.log)
logfile_maxbytes=50MB               ; (max main logfile bytes b4 rotation;default 50MB)
logfile_backups=10                  ; (num of main logfile rotation backups;default 10)
loglevel=info                       ; (log level;default info; others: debug,warn,trace)
pidfile=/tmp/supervisord.pid        ; (supervisord pidfile;default supervisord.pid)
nodaemon=false ; (start in foreground if true;default false)
minfds=1024                         ; (min. avail startup file descriptors;default 1024)
minprocs=200                        ; (min. avail process descriptors;default 200)

[rpcinterface:supervisor]
supervisor.rpcinterface_factory = supervisor.rpcinterface:make_main_rpcinterface

[supervisorctl]
serverurl=unix:///tmp/supervisor.sock ; use a unix:// URL  for a unix socket

[include]
files=/etc/supervisor.d/*.conf
/etc/supervisor.d/配下に
起動するdaemonを設定します。
[group:daemon]
programs=<daemon-name>
priority=999

[program:<daemon-name>]
command=sudo -u ec2-user -i /bin/bash -c 'cd /opt/<service> && <実行コマンド>'
user=ec2-user
group=ec2-user
directory=/opt/<service>
autostart=true
autorestart=true
redirect_stdout=true
redirect_stderr=true
stopasgroup=true
stopsignal=QUIT
stdout_logfile=/var/log/<service>/daemon.stdout.log
stdout_logfile_maxbytes=20MB
stdout_logfile_backups=10
stderr_logfile=/var/log/<service>/daemon.stderr.log
stderr_logfile_maxbytes=20MB
stderr_logfile_backups=10


[eventlistener:slack_notifier]
command=/usr/bin/process_state_event_listener.py
events=PROCESS_STATE
redirect_stderr=false
stopasgroup=true
stopsignal=QUIT
stdout_logfile=/var/log/<service>/event_listener.stdout.log
stdout_logfile_maxbytes=2MB
stdout_logfile_backups=10
stderr_logfile=/var/log/<service>/event_listener.stderr.log
stderr_logfile_maxbytes=2MB
stderr_logfile_backups=10
environment=SLACK_WEB_HOOK_URL="xxxxxxx"
eventlistener:slack_notifierは、下記投稿を参考に作成。
https://qiita.com/imunew/items/465521e30fae238cf7d0
[root@test02 ~]# supervisorctl status
daemon:<daemon-name>              RUNNING   pid 31513, uptime 13:19:20
slack_notifier                    RUNNING   pid 31511, uptime 13:19:20
server側(daemonの管理画面を表示するwebサーバー)
クライアント側と同様
consul
server側
[root@server01 consul_1.0.1]# pwd
/home/consul/consul_1.0.1

[root@server01 consul_1.0.1]# ll
total 16
drwxr-xr-x 2 consul consul 4096 Dec  3 04:49 bin
drwxr-xr-x 2 consul consul 4096 Dec  3 06:06 consul.d
drwxr-xr-x 4 consul consul 4096 Dec  3 04:50 data
drwxr-xr-x 2 consul consul 4096 Dec  3 04:50 logs

[root@server01 consul.d]# pwd
/home/consul/consul_1.0.1/consul.d

[root@server01 consul.d]# ll
total 16
-rw-r--r-- 1 consul consul 382 Dec  3 06:06 common.json
-rw-r--r-- 1 consul consul 117 Dec  3 04:49 connection.json
-rw-r--r-- 1 consul consul  84 Dec  3 04:49 server.json
-rw-r--r-- 1 consul consul 259 Dec  3 04:49 supervisord.json
{
  "datacenter": "dc1",
  "data_dir": "/home/consul/consul_1.0.1/data",
  "encrypt": "xxxxxxxxxxxxxxx", // consul keygenで発行した値を使用。
  "log_level": "info",
  "enable_syslog": true,
  "enable_debug": true,
  "node_name": "server01",
  "leave_on_terminate": false,
  "skip_leave_on_interrupt": true,
  "enable_script_checks": true, // ここtrueでないと、check script実行できない
  "rejoin_after_leave": true
}
{
  "client_addr": "0.0.0.0",
  "bind_addr": "xxx.xxx.xxx.xxx", // 自身のprivate ip
  "ports": {
    "http": 8500,
    "server": 8300
  }
}
{
  "server": true, // server側なので、true
  "server_name": "server01",
  "bootstrap_expect": 1 // とりあえず、serverは1台クラスタにした
}
{
  "services": [
    {
      "id": "supervisord-server01",
      "name": "supervisord",
      "tags" : [ "common" ],
      "checks": [{
        "script": "/etc/init.d/supervisord status | grep running",
        "interval": "10s"
      }]
    }
  ]
}
consul自体もsupervisordで起動します。
[program:consul]
command=/home/consul/consul_1.0.1/bin/consul agent -config-dir=/home/consul/consul_1.0.1/consul.d -ui // -uiをつけて、uiも含めて起動。
user=consul
group=consul
autostart=true
autorestart=true
redirect_stdout=true
redirect_stderr=true
stdout_logfile=/home/consul/consul_1.0.1/logs/consul.stdout.log
stdout_logfile_maxbytes=20MB
stdout_logfile_backups=10
stderr_logfile=/home/consul/consul_1.0.1/logs/consul.stderr.log
stderr_logfile_maxbytes=20MB
stderr_logfile_backups=10
agent側(管理したいdaemonが起動するサーバー側)
{
  "datacenter": "dc1",
  "data_dir": "/home/consul/consul_1.0.1/data",
  "encrypt": "xxxxxxxxxxxxxxx", // server側と同じencrypt
  "log_level": "info",
  "enable_syslog": true,
  "enable_debug": true,
  "node_name": "agent01",
  "leave_on_terminate": false,
  "skip_leave_on_interrupt": true,
  "enable_script_checks": true,
  "rejoin_after_leave": true,
  "retry_join": ["provider=aws tag_key=Service tag_value=consulserver region=us-west-2 access_key_id=xxxxxxxxxxxxxx secret_access_key=xxxxxxxxxxxxxxx"
  // retry joinでserver側と接続。serverのcluster化も考慮して、provider=awsで、tag_keyを指定。
]
  }
{
  "client_addr": "0.0.0.0",
  "bind_addr": "xxx.xxx.xxx.xxx", // 自身のprivate ip
  "ports": {
    "http": 8500,
    "server": 8300
  }
}
{
  "services": [
        {
      "id": "<daemon-name>-agent01",
      "name": "<daemon-name>",
      "tags" : [ "daemon" ],
      "checks": [{
        "script": "supervisorctl status daemon:<daemon-name> | grep RUNNING",
        "interval": "10s"
      }]
    }
  ]
}
{
  "services": [
    {
      "id": "supervisord-agent01",
      "name": "supervisord",
      "tags" : [ "common" ],
      "checks": [{
        "script": "/etc/init.d/supervisord status | grep running",
        "interval": "10s"
      }]
    }
  ]
}
agent側もsupervisordで管理
[program:consul]
command=/home/consul/consul_1.0.1/bin/consul agent -config-dir=/home/consul/consul_1.0.1/consul.d // -uiは不要
user=consul
group=consul
autostart=true
autorestart=true
redirect_stdout=true
redirect_stderr=true
stdout_logfile=/home/consul/consul_1.0.1/logs/consul.stdout.log
stdout_logfile_maxbytes=20MB
stdout_logfile_backups=10
stderr_logfile=/home/consul/consul_1.0.1/logs/consul.stderr.log
stderr_logfile_maxbytes=20MB
stderr_logfile_backups=10
cesi

こちらのrepoから拝借させていただきました ![]()
基本的な設定は、README.mdに記載されている通り、セットアップします。
[node:server01]
username = hogehoge
password = fugafuga
host = xxx.xxx.xxx.xxx // 対象nodeのprivate ip
port = 9001

[node:test01]
username = hogehoge
password = fugafuga
host = xxx.xxx.xxx.xxx // 対象nodeのprivate ip
port = 9001

[cesi]
database = /path/to/cesi-userinfo.db
activity_log = /path/to/cesi-activity.log
host = 0.0.0.0
(ansibleのroleにもしておく。)
cesiのコマンドも簡単にsupervisordで管理する様に設定します。
[program:cesi]
command=python /var/www/cesi/web.py
user=root
group=root
autostart=true
autorestart=true
redirect_stdout=true
redirect_stderr=true
stopasgroup=true
stopsignal=QUIT
stdout_logfile=/root/cesi.stdout.log
stdout_logfile_maxbytes=20MB
stdout_logfile_backups=10
stderr_logfile=/root/cesi.stderr.log
stderr_logfile_maxbytes=20MB
stderr_logfile_backups=10
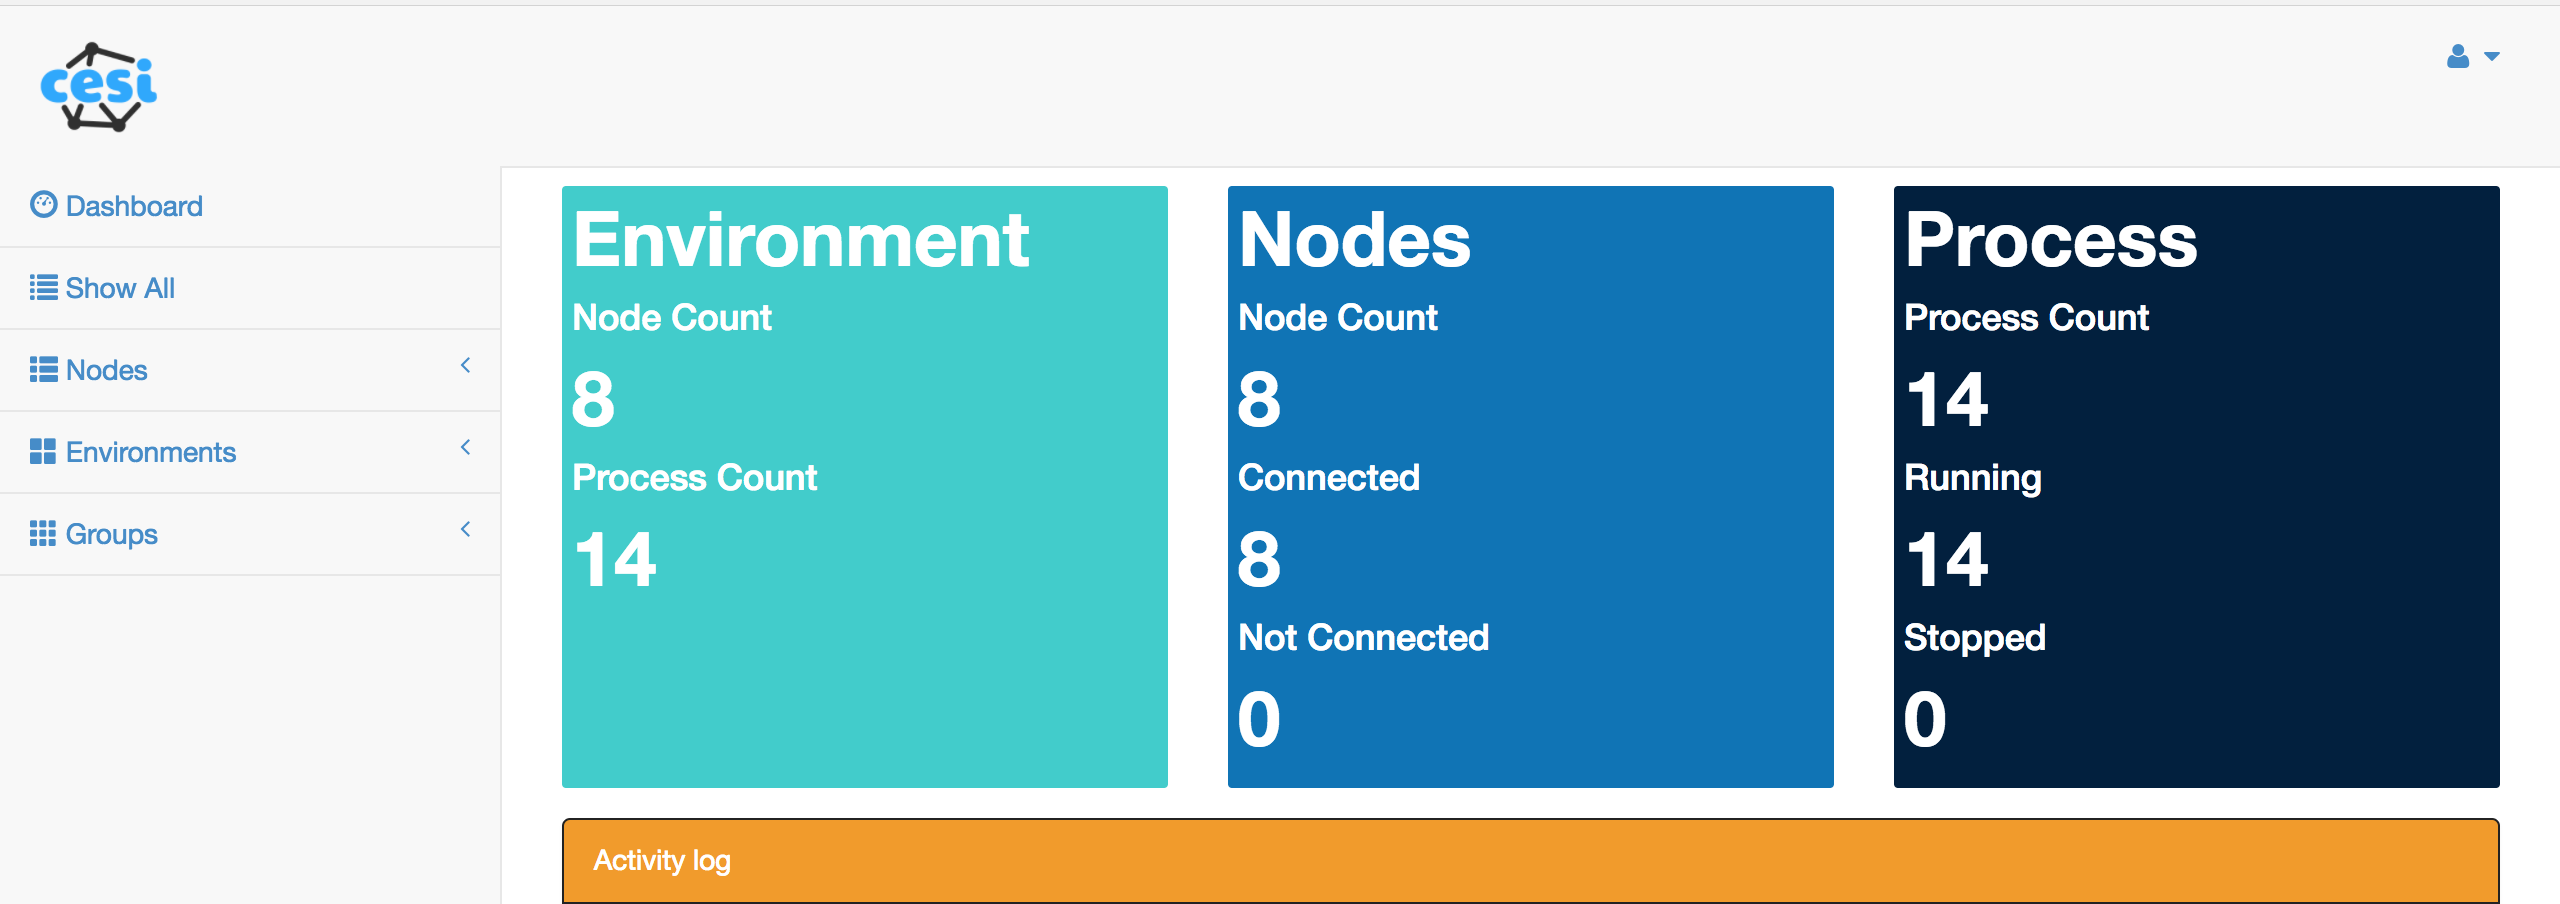
うん、いい感じに画面でてますね。
ただ、この画面の欠点としてnodeが増えるたびに、
都度、 /etc/cesi.confを書き換えては
webサーバーを再起動しなければならない欠点がありました。
なので
今生きているサーバーは何があるのかを把握する必要がありました。
→ まさにサービスディスカバリ。
そこで、設定ファイルの書き方もある一定柔軟にテンプレート化できる
consul-tamplteの登場です。
consul-template
ここも同様にして、ansibleで導入します。
https://github.com/juwai/ansible-role-consul-template
あとは、いい感じに公式ドキュメントをみながら、templateを書けばok。
[root@agent01 config]# ll
total 8
-rwxr-xr-x 1 root   root    220 Dec  4 05:16 consul-template.cfg
consul = "127.0.0.1:8500"
wait = "10s"

template {
  source = "/home/consul/consul-template/templates/cesi.conf.tmpl"
  destination = "/etc/cesi.conf"
  command = "supervisorctl restart cesi"
  command_timeout = "60s"
}
{{range service "supervisord"}}
[node:{{.Node}}]
username = hogehoge
password = fugafuga
host = {{.Address}}
port = 9001

{{end}}

[cesi]
database = /path/to/cesi-userinfo.db
activity_log = /path/to/cesi-activity.log
host = 0.0.0.0
上記のように、consul-tamplateの中で
{{.Node}}という値を入れていれば
consulでsupervisordのnode追加・更新をトリガーとして
consul-templateが起動し
-
/etc/cesi.confの設定ファイルの更新 - cesiのwebserverの再起動
が実現でき、ダッシュボードにて、supervisordが、管理できるようになります。
また
consul-templateは、daemonとして起動しておくものなので
consul-templateもまた、supervisordで管理します。
[program:consul-template]
command=/home/consul/consul-template/bin/consul-template -config /home/consul/consul-template/config/consul-template.cfg
user=root
group=root
autostart=true
autorestart=true
redirect_stdout=true
redirect_stderr=true
stdout_logfile=/home/consul/consul-template/logs/stdout.log
stdout_logfile_maxbytes=20MB
stdout_logfile_backups=10
stderr_logfile=/home/consul/consul-template/logs/stderr.log
stderr_logfile_maxbytes=20MB
stderr_logfile_backups=10
早速、実際サーバーを立ててみると...

うん、いい感じにサーバーの台数が8->9台に増えてますね。
感覚的にも、増えるとほぼ同時に画面側も更新されてるので
結構いい感じです。(減らした時も同じ感じでした。)
めでたしめでたし。
やってみて、感じたこと
Good
- 各サーバーのプロセスの可視化できると確かに「なんか」安心する。
- サーバー入らずに、プロセスのstart/stop/restartできるのは、運用的にもセキュリティ的にも楽。
- supervisordは、探しても記事とかあまりない?気がするが、本当にプロセスを「管理」するのであれば、感覚的には、まぁまぁ使えるんじゃないかと感じた。
- consul-templateの柔軟性が高く、consulの設計次第でなんでもできる感じがよい。
- 遊び半分で作ってみたが、思ったより評判はよさげだった笑
Not Good
- supervisord自体のプロセス監視がうまいことできていない。
- まだまだsupervisordの設定周りを理解しきれていない。。。
※ ネットワーク/権限/セキュリティ周りのところが今後の課題。。usernameとかなんか一致してなくても、取れちゃってる・・・?笑 - consulもまだまだ使えていない。。。
- cesiもいい感じだが、挙動不審なところが若干ある。笑
※ 他のダッシュボードもレガシー感がすごくて、あまり、、、supervisordのもういい感じの画面がほしいな。
http://supervisord.org/plugins.html#dashboards-and-tools-for-multiple-supervisor-instances
さいごに
プロセスって結構気づいたら落ちている気がしますが
(「いや、お前のツールに対する理解が浅いだけだろ!」っていうツッコミはやめてください笑)
単純にダッシュボードという形で
「可視化」して、人の目との接触回数が増えるだけでも
保守/運用性は高まる気がするので
やっぱりダッシュボード的なのはいいなと思いました^^
p.s.
色々と設定ファイルを記載していますが
「ん?ここおかしくないか?」というところがあれば
ぜひ、コメントお願いいたします ![]()