作ったもの
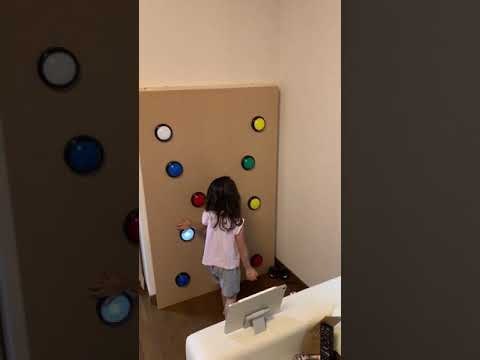
まずはこの動画を見てください。
このようなゲームを子供の頃体験しませんでしたか?30秒の間に光っているボタンが何回押せるかを競うゲームです。なかなか大きいものですし、市販されていません。なければDIYで作る。ということで作りました。
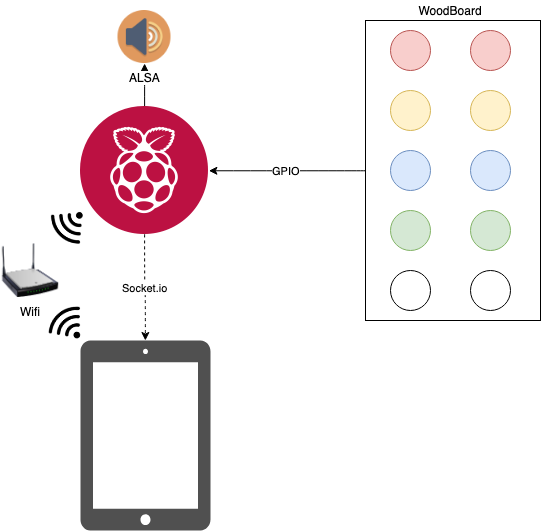
アーキテクチャ概要
まずはボタンの機構を確認してみる
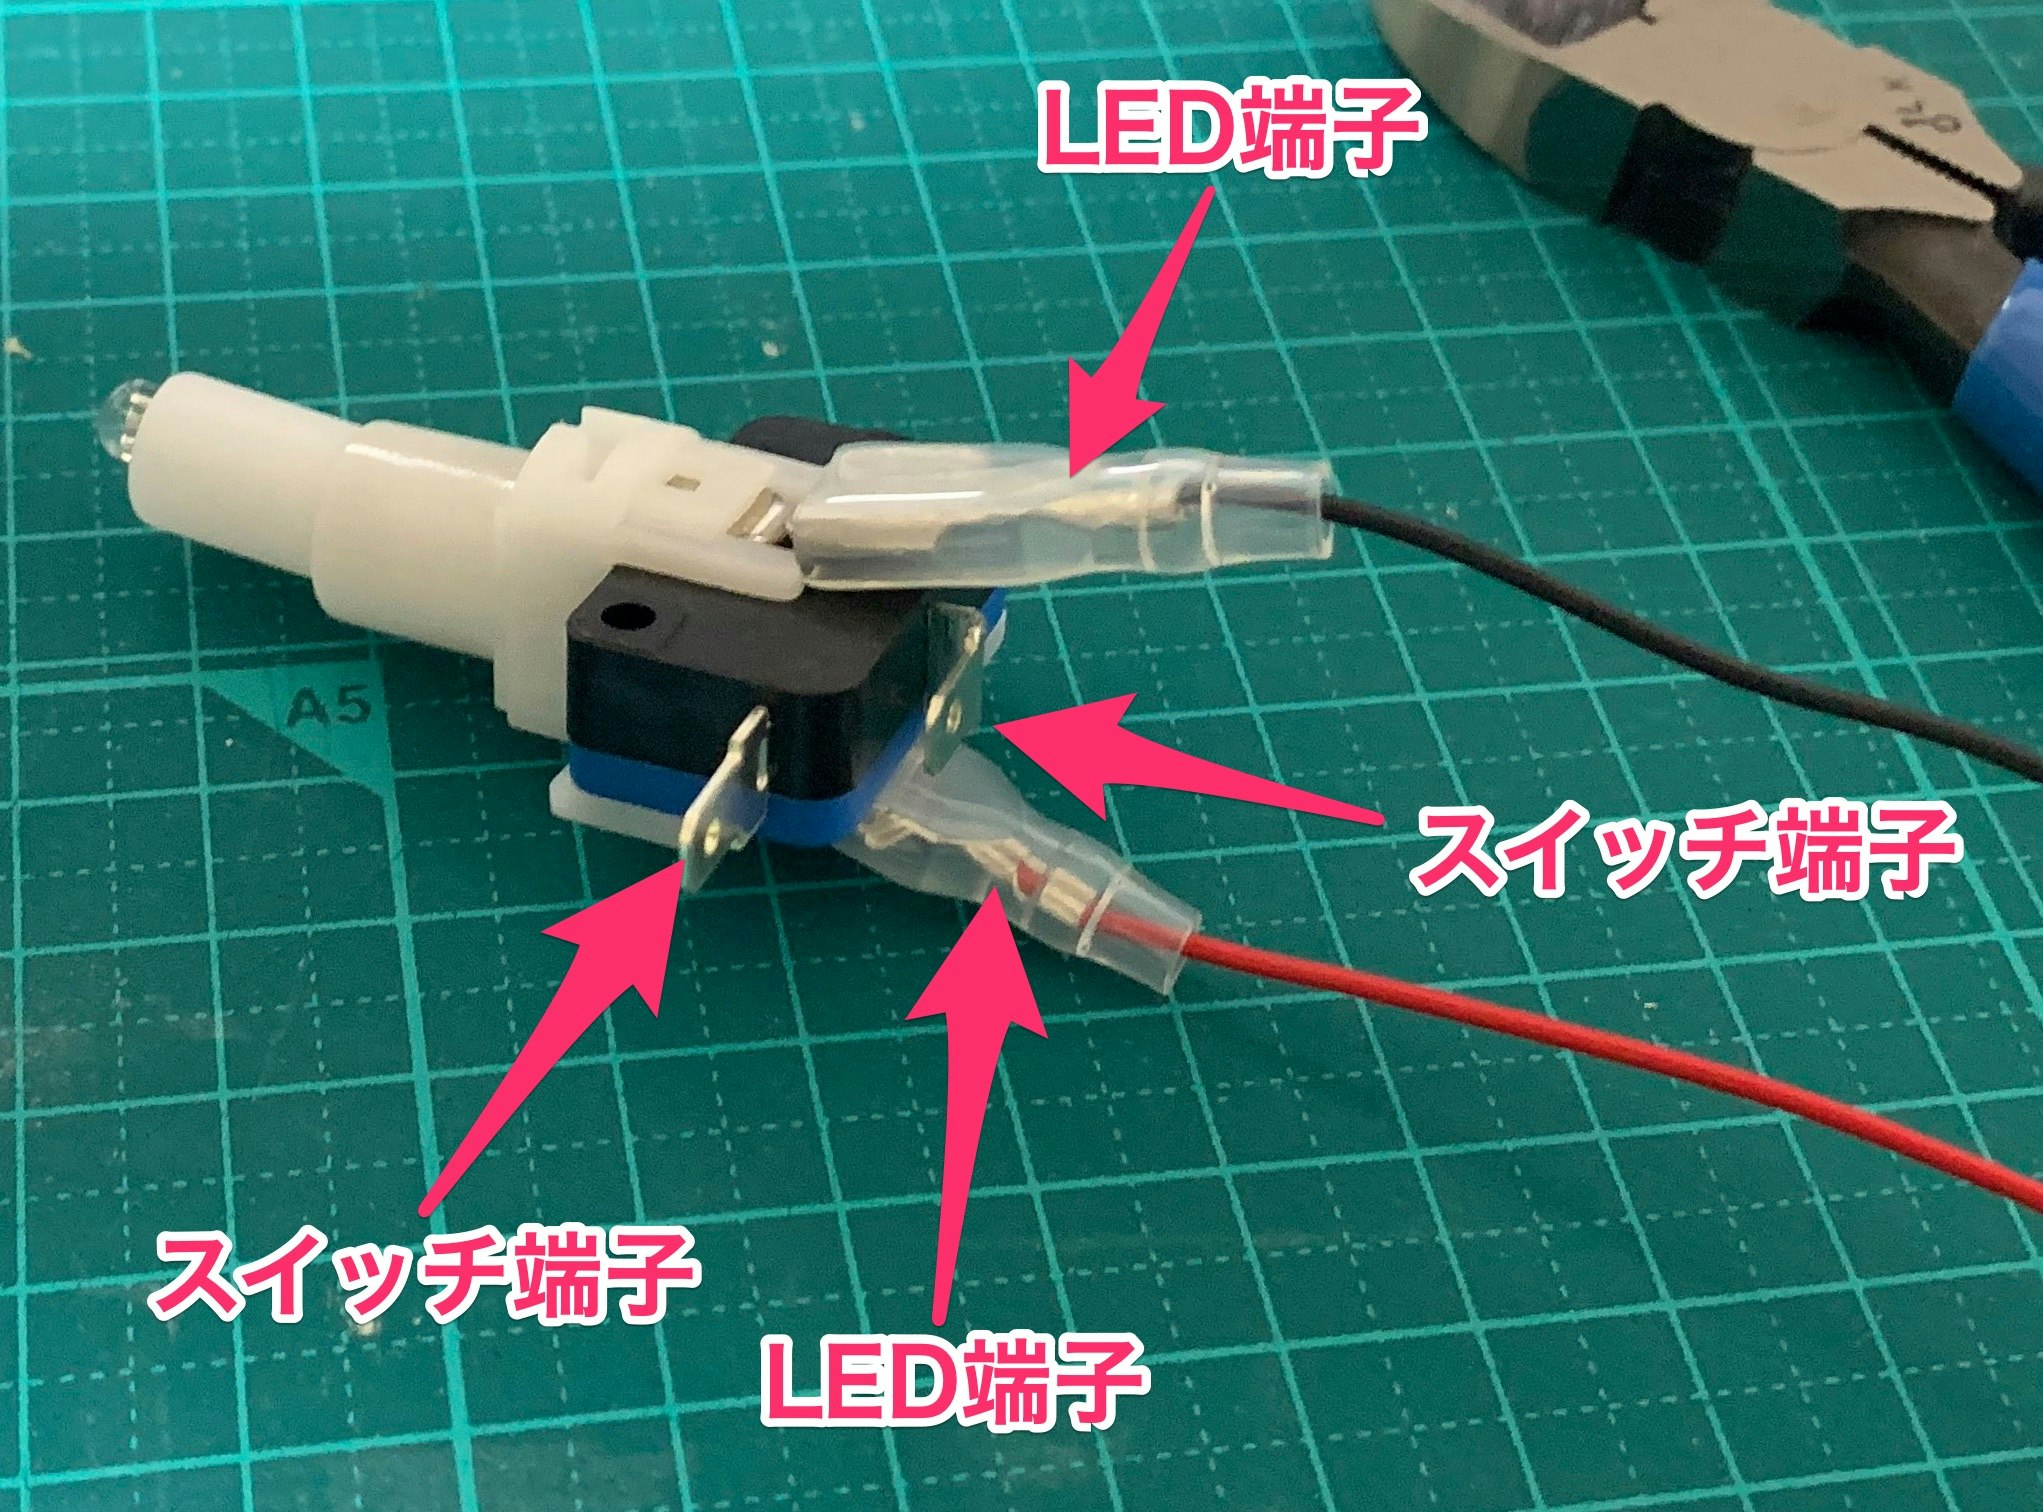
ボタンを開けて確認してみると、ちゃんと回路的には別になっています。
これなら好きな場所を光らせたり、押されたところを判別することができますね。

LEDとRaspberry PIとの通信
LEDに関してはGPIOという仕組みを利用してピンのモードを出力(OUTPUT)にし、回路の電圧をHIGHにしたりLOWにすることでLEDを光らせたり、消したりすることができます。
| 出力 | LEDの状態 |
|---|---|
| HIGH | 点灯 |
| LOW | 消灯 |
スイッチとRaspberry PIとの通信
スイッチに関してもGPIOという仕組みを利用してピンのモードを入力(INPUT、PULL_UP)にし、値を読むことでボタンを押されている間はピンの入力値が0になります。逆に押されていないときは1になります。PULL_UPにしないと、スイッチがOFFのときに値が不定となってしまうため、必ずPULL_UPしておきます。
| ボタンの状態 | GPIOの値 |
|---|---|
| 押されている | 0 |
| 押されていない | 1 |
Node.jsでGPIOを制御する
まずはともあれ、ライブラリを使いましょう。Raspberry PIのライブラリをいくつか試してみたのですが、使い勝手の良かったライブラリはpigpioでした。
使い方は簡単です。LEDを制御するには下記のようにします。
const Gpio = require('pigpio').Gpio;

const led = new Gpio(17, {mode: Gpio.OUTPUT});
led.digitalWrite(1); // ON
led.digitalWrite(0); // OFF
スイッチの変化を検知するには下記のようにします。
const Gpio = require('pigpio').Gpio;
const button = new Gpio(pin, {
  mode: Gpio.INPUT,
  pullUpDown: Gpio.PUD_UP,           // プルアップにしておく
  alert: true
});
button.glitchFilter(20000);          // チャタリングを防ぐためのフィルタ
button.on("alert", onChange(index)); // 変化があったときにイベントの登録
なお、チャタリングとは
可動接点などが接触状態になる際に、微細な非常に速い機械的振動を起こす現象のことである。
チャタリング - Wikipedia
USBオーディオで音を鳴らす
スピーカーにはUSBオーディオの下記のものを用意しました。
エレコム PCスピーカー コンパクト 4W USB接続 ブラック MS-P08USBBK
最初ハマったのですが、同時に複数の音を出すことができませんでした。これはALSAの設定の問題。~/.asoundrcを次のように書き換え、mixerを使用するように設定すれば解決します。mixerを使用しないと一つのプロセスがALSAを専有してしまって複数の音を出せないんですね。
pcm.!default {
  type hw
  card 1
}

ctl.!default {
  type hw
  card 1
}

pcm.!default {
  type plug
  slave.pcm "dmixer"
}

pcm.dmixer {
  type dmix
  ipc_key 1024
  slave {
    pcm "hw:1,0"
    period_time 0
    period_size 1024
    buffer_size 4096
    rate 44100
  }
  bindings {
    0 0
    1 1
  }
}
タブレットとRaspberry PIとの通信
ブラウザを使って画面を表示しますが、今回のコントローラはあくまでWoodBoardのボタン。したがって、タブレットには表示しますが、全てサーバサイドからのプッシュ通知で実現します。サーバサイドはNode.jsを使っているので、素直にSocket.ioを利用します。
使い方は本家のサイトのGet Startedを参考にしました。
サーバサイド側のゲームプログラム
「30秒で何回光ってるボタンを押せるか」のゲームのソースコードのサンプルとして掲載します。ベースとなるクラスがあるので、これだけでは動かないですが、100行もないコードでゲームが動いています。しかも殆どは音を再生するための処理のみ。簡単ですね。
const Game = require('./Game.js');
const { wait } = require('./util.js');
const GAME_TIME = 30; // seconds

class TimeAttack extends Game {
  /** コンストラクタ */
  constructor(io, buttons, leds) {
    super(io, buttons, leds);
    // stateはコンストラクタで設定する
    this.state = {
      remainSeconds: GAME_TIME,
      score: 0,
      mode: 'PLAYING',
      nextIndex: this.getNextIndex()
    };
  }


  /** 初期化処理 */
  async init() {
    await wait(1000);
    await this.play('assets/sound/info-girl1-youi2.mp3');
    await wait(1000);
    this.play('assets/sound/info-girl1-don1.mp3');
    this.playBgm('assets/bgm/tw045_volume.mp3');
    this.getLedPin(this.state.nextIndex).digitalWrite(1);
    this.startTime = new Date().getTime();
    this.seconds = 0;
    this.timer = setInterval(this.loop.bind(this), 100);
  }
  /** 終了時処理 */
  destroy() {
    super.destroy();
    clearInterval(this.timer);
  }
  /** 100ms毎に呼ばれる */
  async loop() {
    const now = new Date().getTime();
    const seconds = parseInt((now - this.startTime) / 1000);
    const remainSeconds = GAME_TIME - seconds;
    if (this.seconds !== seconds) {
      // 残り時間が0になった、または時刻がntpのせいでずれ残り時間がマイナスあるいはゲーム時間よりも多くなった場合は終了する
      if (remainSeconds === 0 || remainSeconds < 0 || remainSeconds > GAME_TIME) {
        this.clearLeds();
        this.state.remainSeconds = remainSeconds;
        this.state.mode = 'SHOW_SCORE';
        this.stopBgm();
        this.emitState();
        clearInterval(this.timer);
        await this.play('assets/sound/info-girl1-zero1.mp3');
        await this.play('assets/sound/info-girl1-sokomade1.mp3');
        await wait(500);
        await this.play('assets/sound/jingle-jazz.mp3');
        this.playBgm('assets/bgm/何を作っているのかな?_volume.mp3');
        await this.waitForAnyButtonPushed();
        this.end();
      }
      if (remainSeconds === 10) this.play('assets/sound/info-girl1-zyuu1.mp3');
      if (remainSeconds === 9) this.play('assets/sound/info-girl1-kyuu1.mp3');
      if (remainSeconds === 8) this.play('assets/sound/info-girl1-hachi1.mp3');
      if (remainSeconds === 7) this.play('assets/sound/info-girl1-nana1.mp3');
      if (remainSeconds === 6) this.play('assets/sound/info-girl1-roku1.mp3');
      if (remainSeconds === 5) this.play('assets/sound/info-girl1-go1.mp3');
      if (remainSeconds === 4) this.play('assets/sound/info-girl1-yon1.mp3');
      if (remainSeconds === 3) this.play('assets/sound/info-girl1-san1.mp3');
      if (remainSeconds === 2) this.play('assets/sound/info-girl1-ni1.mp3');
      if (remainSeconds === 1) this.play('assets/sound/info-girl1-ichi1.mp3');
      this.seconds = seconds;
      this.state.remainSeconds = GAME_TIME - seconds;
      this.emitState();
    }
  }

  /** ボタンが押されたときの処理 */
  onPushed(pin) {
    if (this.state.mode !== 'PLAYING') return;
    if (pin !== this.state.nextIndex) {
      this.play('assets/sound/button62.mp3');
      return;
    }
    this.play('assets/sound/button25.wav');
    this.getLedPin(this.state.nextIndex).digitalWrite(0);
    this.state.nextIndex = this.getNextIndex();
    this.getLedPin(this.state.nextIndex).digitalWrite(1);
    this.state.score++;
    this.emitState();
  }

  /** 次のボタンのインデックスを取得する。連続で同じインデックスは採番しない */
  getNextIndex() {
    while (true) {
      const nextIndex = Math.floor(Math.random() * 10);
      if (!this.state || (this.state.nextIndex !== nextIndex)) return nextIndex;
    }
  }
}

module.exports = TimeAttack;
クライアント側のゲームプログラム Nuxt.js
クライアントサイドはNuxt.jsで実現します。Nuxt.jsは簡単にSPAを作れるので楽ですね。
画面表示だけで割り切っているのでかなり簡単に実現できます。ベースとなるvueファイルはこんなかんじ。
<template>
  <div>
    <title-menu v-if="game === 'TitleMenu'" :socket="socket" />
    <time-attack v-else-if="game === 'TimeAttack'" :socket="socket" />
    <debug v-else-if="game === 'Debug'" :socket="socket" />
    <audio-setting v-else-if="game === 'AudioSetting'" :socket="socket" />
    <exit v-else-if="game === 'Exit'" :socket="socket" />
  </div>
</template>

<script>
import TitleMenu from '~/components/TitleMenu.vue'
import TimeAttack from '~/components/TimeAttack.vue'
import Debug from '~/components/Debug.vue'
import AudioSetting from '~/components/AudioSetting.vue'
import Exit from '~/components/Exit.vue'
import io from 'socket.io-client'

export default {
  components: {
    TitleMenu,
    TimeAttack,
    Debug,
    AudioSetting,
    Exit
  },
  mounted() {
    this.socket = io('http://192.168.1.111:3000')
    this.socket.on('game', this.onGameChange)
  },
  beforeDestroy() {
    this.socket.off('game', this.onGameChange)
  },

  data() {
    return {
      socket: null,
      game: null
    }
  },
  methods: {
    onGameChange(game) {
      this.game = game
    }
  }
}
</script>
終わりに
6月の初旬に思い立ってから完成までで3週間くらいかかりました。ボタンの選定、設計したことのない電子回路、ArduinoでやってみたりRaspberry PIにしたりで方針もぶれたし、慣れないドリルドライバやネジの取り付けなどもあったので、説明書や部材が予め用意されていれば全然時間はかからなそうです。
どうでしょう。一家に一台作ってみませんか?


