Elm Advent Calendar の 19 日目です。
Effect Manager とは
Effect Manager はElm 0.17から導入された新しい仕組みで、Cmd/Sub に関連する複雑な状態を管理することが出来ます。とはいえ、Effect Manager はかなり上級者向けの仕様になっており、導入から半年以上経った今でもドキュメントすらありません。また、Effect Manager を使ったパッケージは現時点では公開できないことになっています。
というわけで、あまり一般ピープルが使うことは想定していないようですが、せっかくなのでどういう仕組みで動いているのかを調べてみました。(以下、非公式の解説なので鵜呑みにしないでください。)
Effect Manager モジュール一覧
Effect Manager は、Effectモジュールという特別なモジュールのみ使うことが出来ます。2016年12月時点で Effect Manager を持っているモジュールは以下の通りです。
| パッケージ | モジュール | Sub | Cmd | Process | sendToSelf |
|---|---|---|---|---|---|
| elm-lang/core | Time | ✓ | ✓ | ✓ | |
| elm-lang/core | Task | ✓ | ✓ | ||
| elm-lang/core | Random | ✓ | |||
| elm-lang/mouse | Mouse | ✓ | ✓ | ✓ | |
| elm-lang/keyboard | Keyboard | ✓ | ✓ | ✓ | |
| elm-lang/window | Window | ✓ | ✓ | ✓ | |
| elm-lang/http | Http.Progress | ✓ | ✓ | ||
| elm-lang/websocket | WebSocket | ✓ | ✓ | ✓ | ✓ |
| elm-lang/geolocation | Geolocation | ✓ | ✓ | ✓ | |
| elm-lang/page-visibility | PageVisibility | ✓ | ✓ | ✓ |
概念
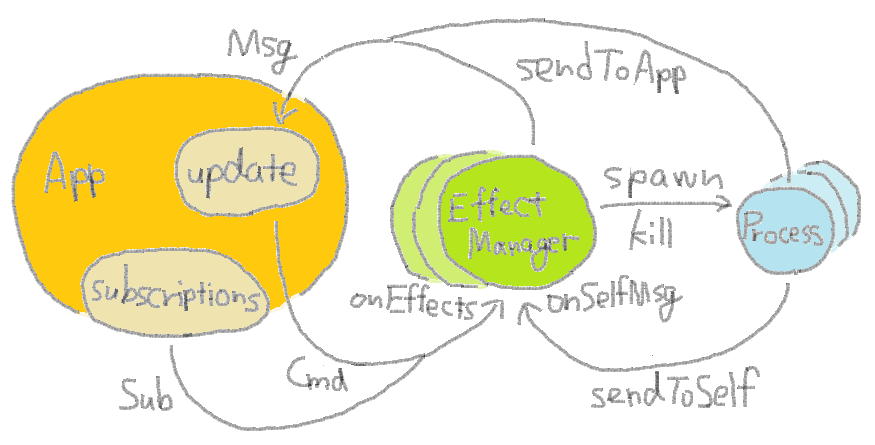
私が理解できた範囲で、簡単に絵を描きました。
Effect Manager は各モジュールにひとつ用意されたシングルトンです。アプリケーションのライフサイクルの中で生成された Cmd や Sub は、それらの生成元であるモジュールの Effect Manager に渡されます。Effect Manager は必要に応じて非同期のプロセスを管理しながら、最終的にアプリケーションにメッセージをフィードバックします。
以下に、主要な2つの概念を示します。
Router
Effect Manager がメッセージ送信のために使います。Router は core パッケージの Platform モジュールに定義されています。なお、SPA の Router とは関係ありません。
type Router appMsg selfMsg

sendToApp : Router msg a -> msg -> Task x ()

sendToSelf : Router a msg -> msg -> Task x ()
sendToAppは Effect Manager からアプリケーションに、sendToSelfは Effect Manager から Effect Manager 自身にそれぞれメッセージを送ります。
Process
非同期実行されるプロセスを扱います。
type Id

spawn : Task x a -> Task y Id

sleep : Time -> Task x ()

kill : Id -> Task x ()
Taskをspawnすると子プロセスが起動します。引数のTask x aは、子プロセスが他のプロセス(アプリケーションまたはEffect Manager)にフィードバックを送信するためのTaskです。spawnを実行することで得られたpid : Process.Idはプロセスをkillする時に使います。
Effectモジュール
Effect Manager を使うにはEffectモジュールという特別なモジュールが必要です。
宣言方法
Effectモジュールを宣言するには、モジュール宣言の変更と、3つの関数が必要です。
effect module ModuleName where { command = cmd, subscription = sub } exposing (..)

init : Task Never state

onEffects : Platform.Router appMsg selfMsg -> List cmd -> List sub -> state -> Task Never state

onSelfMsg : Platform.Router appMsg selfMsg -> selfMsg -> state -> Task Never state
where { command = cmd, subscription = sub }のそれぞれの右辺には任意の型を指定します。ここではそれぞれMyCmd、MySubとします。このwhere句の指定によって、Cmd と Sub を生成する関数が自動生成されます。
command : MyCmd -> Cmd msg

subscription : MySub -> Sub msg
また、stateとselfMsgにも任意の型をあてはめることができます。これらはちょうど型引数のように働き、init、onEffects、onSelfMsgの型が決まります。
effect module ModuleName where { command = MyCmd, subscription = MySub } exposing (..)

-- モジュール内部で使用する型
type MyCmd
type MySub
type State
type Msg

init : Task Never State

onEffects : Platform.Router appMsg Msg -> List MyCmd -> List MySub -> State -> Task Never State

onSelfMsg : Platform.Router appMsg Msg -> selfMsg -> State -> Task Never State
where { command = cmd, subscription = sub }の指定は、どちらか片方でも構いません。この指定の仕方によって、onEffectsの定義が変動します。
-- command, subscription の両方を指定
onEffects : Platform.Router appMsg selfMsg -> List cmd -> List sub -> state -> Task Never state

-- command のみを指定
onEffects : Platform.Router appMsg selfMsg -> List cmd -> state -> Task Never state

-- subscription のみを指定
onEffects : Platform.Router appMsg selfMsg -> List sub -> state -> Task Never state
次に、それぞれの関数について見ていきます。
init
Effect Manager の管理する状態を初期化するために最初に呼ばれます。
init = Task.succeed initialState
onEffects
Program のupdateとsubscriptionsによって収集した Cmd と Sub のうち、このモジュールに関連するものが渡されます。戻り値は新しい状態を生成する Task です。また、その途中で様々な処理をはさみこむことができます。
- Cmd に関連する Process の生成
- タイムアウトによる Process の破棄
- Sub に関連する Process の生成
- Sub の更新によって必要のなくなった Process の破棄
- pid の管理
Process を生成するためには、Process.spawnを使います。この時、Processからのメッセージを受け取るためにRouterを使います。例えば、自分自身にフィードバックが欲しい場合には次のようにします。
Process.spawn (Platform.sendToSelf router msg)
onSelfMsg
Router によって自身にメッセージが送られたときに呼ばれます。典型的には、Process が返したメッセージをここで受け取り、異常がなければアプリケーション側に転送します。(Process は非同期的にふるまうので、生成からメッセージが届くまでの間に Sub の購読者が増えている可能性があります。)
コードリーディング
ここまで書いて、やっぱり例がないと全然わからないと思いました。実際のコードを読んでみましょう。
Cmd の例: Random
以下は、Random.elm の実装からの引用です。
-- command に MyCmd 型を指定
effect module Random where { command = MyCmd } exposing
  ( Generator, Seed
  , bool, int, float
  , list, pair
  , map, map2, map3, map4, map5
  , andThen
  , minInt, maxInt
  , generate
  , step, initialSeed
  )


-- ランダム値をCmdとして生成する公開API
generate : (a -> msg) -> Generator a -> Cmd msg
generate tagger generator =
  command (Generate (map tagger generator))


-- MyCmd は Generator を保持する
type MyCmd msg = Generate (Generator msg)


-- 現在時刻から最初の Seed を作成して、初期状態とする
init : Task Never Seed
init =
  Time.now
    |> Task.andThen (\t -> Task.succeed (initialSeed (round t)))


onEffects : Platform.Router msg Never -> List (MyCmd msg) -> Seed -> Task Never Seed
onEffects router commands seed =
  case commands of
    [] ->
      Task.succeed seed

    Generate generator :: rest ->
      let
        -- ランダム値と新しいSeedを生成
        (value, newSeed) =
          step generator seed
      in
        -- すべての Cmd から順次ランダム値を生み出し、アプリケーションに送り返す
        -- 新しい Seed を次の状態とする
        Platform.sendToApp router value
          |> Task.andThen (\_ -> onEffects router rest newSeed)


-- 使わなかった
onSelfMsg : Platform.Router msg Never -> Never -> Seed -> Task Never Seed
onSelfMsg _ _ seed =
  Task.succeed seed
Sub の例: Mouse
以下は、Mouse.elm の実装からの引用です。
-- subscription に MySub 型を指定
effect module Mouse where { subscription = MySub } exposing
  ( Position, position
  , clicks
  , moves
  , downs, ups
  )


-- イベントの種類と型変換用の関数(タグ)を保持する
type MySub msg
  = MySub String (Position -> msg)


-- クリックイベントを購読する Sub を生成する公開API
clicks : (Position -> msg) -> Sub msg
clicks tagger =
  subscription (MySub "click" tagger)


-- イベントの購読者を辞書で管理
type alias State msg =
  Dict.Dict String (Watcher msg)


-- 購読者とプロセスID
type alias Watcher msg =
  { taggers : List (Position -> msg)
  , pid : Process.Id
  }


-- 初期状態は購読者なし
init : Task Never (State msg)
init =
  Task.succeed Dict.empty


onEffects : Platform.Router msg Msg -> List (MySub msg) -> State msg -> Task Never (State msg)
onEffects router newSubs oldState =
  let
    -- 購読をやめて不要になった Process を破棄
    leftStep category {pid} task =
      Process.kill pid &> task

    -- 同じ種類のイベントの購読者を更新
    bothStep category {pid} taggers task =
      task
        |> Task.andThen (\state -> Task.succeed (Dict.insert category (Watcher taggers pid) state))

    -- 新しい種類のイベントの購読者が現れたため、Processを増やして監視する
    -- イベントの受信者は自分にする
    rightStep category taggers task =
      let
        tracker =
          Dom.onDocument category position (Platform.sendToSelf router << Msg category)
      in
        task
          |> Task.andThen (\state -> Process.spawn tracker
          |> Task.andThen (\pid -> Task.succeed (Dict.insert category (Watcher taggers pid) state)))
  in
    -- 古い購読者一覧と新しい購読者一覧を比較しながら、新しい状態を生成する Task を作る
    Dict.merge
      leftStep
      bothStep
      rightStep
      oldState
      (categorize newSubs)
      (Task.succeed Dict.empty)


onSelfMsg : Platform.Router msg Msg -> Msg -> State msg -> Task Never (State msg)
onSelfMsg router {category,position} state =
  -- イベントが届いたら、その種類のイベントの購読者一覧を調べる
  case Dict.get category state of
    -- 購読者なし
    Nothing ->
      Task.succeed state

    -- 購読者あり
    Just {taggers} ->
      let
        send tagger =
          Platform.sendToApp router (tagger position)
      in
        -- 保持していたタグをつけてアプリケーションに転送する
        Task.sequence (List.map send taggers)
          &> Task.succeed state
これは Sub の典型例なので、似たコードが Window や Keyboard モジュールにもあります。
まとめ
Effect Manager の仕組みを見てきました。分かってしまえば最初の印象よりは難しくないと個人的には思いました。Elm 0.17 のアナウンス によると、Effect Manager の用途として GraphQL、 Elixir Phoenix、 Firebase などを想定しているようです。楽しみですね。
