初めに
こんにちは。CYBIRDエンジニア Advent Calendar最終日担当の@jin_kです。
CYBIRD2015年の新卒入社でゲームインフラ部という部署に所属しております。
24日目は@gotyooooさんのAmazon VPC NAT Gatewayがあるとき。ないとき。でした。
Amazon VPC NATGatewayがあるときとないときが分かりやすく整理されていて、NAT Gatewayを使うと何か良いか書いていますので、ぜひご覧ください!
内容について
今回はJenkinsサーバーからS3経由でWebサーバーにソースコードを配布してみた話をしたいと思います。
(Jenkinsサーバーを立てる過程の説明とかはありません。)
従って今回の話はちょっと変わったCapistranoの話をするので、Capistranoのデプロイ流れや説明・使い方についての話はしません。
とはいえ、自分もまだ初心者なので何か間違ったことが書いてある場合、ご指摘お願いします。
今回のCapistranoの動き
このような動きをした理由
- Capistrano3系でGithubとの連携がHTTPSでアクセスするため、ソースコードにgitのアカウント情報が載せているのでセキュリティー的に良くないです。
- 各自WebサーバーがダウンロードすることでJenkinsのサーバーの負担を減らす。
- いずれにせよ100%信頼はできないが、それでもgitよりS3の方が信頼できる。
仕組み(pull)
 1.gitとJenkinsを連携し、最新のfileをJenkinsに返却します。
(今回は1番に関する内容はありません。)
2.cap実行し、tarでソースコードを固めます。
3.固めたtarをS3にアップロードします。
(現在デプロイするソースコードと同じものがS3にある場合、3番のことはしません。)
4.各自S3からダウンロードするようWebサーバーに命令します。
5.各自Webサーバーがs3からtarをダウンロードします。
6.ダウンロードしたtarを展開します。
### 仕組み(push)

1.gitとJenkinsを連携し、最新のfileをJenkinsに返却します。
(今回は1番に関する内容はありません。)
2.cap実行し、tarでソースコードを固めます。
3.JenkinsサーバーからWebサーバーにtarを送りつけます。
4.tarを展開します。
※pull以外はすべてpushの処理をします。
インストール
- archive/tar/minitar 0.5.2
$ gem install archive-tar-minitar -v 0.5.2
- Ruby 2.1.0p0
$ rvm install ruby-2.1.0
$ rvm use ruby-2.1.0
$ ruby --version
ruby 2.1.0p0 (2013-12-25 revision 44422) [x86_64-linux]
- Capistrano 3.2.1
$ gem install capistrano
$ cap --version
Capistrano Version: 3.2.1 (Rake Version: 10.1.0)
S3へのアップロードするためにRubyのAWS SDKを利用します。
- aws-sdk-core 2.1.16
$ gem install aws-sdk-core -v 2.1.16
- aws-sdk-resources 2.1.16
$ gem install aws-sdk-resources -v 2.1.16
S3経由でデプロイするためAWS CLIが必要となりますのでWebサーバーにinstallします。
CredentialFileはJenkinsサーバー、Webサーバー両方必要です。
# yum -y install python-setuptools
# easy_install pip
# pip install awscli
# vi /etc/aws/credential-file
====
[default]
output = json
region = ap-northeast-1
aws_access_key_id = XXXXXXXXXXXXXXXXXXXX
aws_secret_access_key = xxxxxxxxxxxxxxxxxxxxxxxxxxxxxxxxxxxxxxxx
====
デプロイ方法
ソースコード
$:.unshift File.expand_path(File.dirname(__FILE__) + '/lib')

# Load DSL and Setup Up Stages
require 'capistrano/setup'

# Includes default deployment tasks
require 'capistrano/deploy'

Dir.glob('lib/capistrano/tasks/*.rake').each { |r| import r }
# config valid only for Capistrano 3.1
set :pty, true
lock '3.2.1'
set :log_level, SSHKit::Logger::INFO
set :application, 'JkTest'
set :scm, :tarball_deploy

set :tmp_dir, '/tmp'
set :copy_exclude, ['docs']

set :project_release_id, `git log --pretty=format:'%h' -n 1 HEAD`

# (省略)
set :deploy_to, ENV['DEPLOY_TO']#Webサーバーにソースコードを置くところです。
set :resource_path, ENV['RESOURCE_PATH']#以下のJenkinsサーバーにあるものをtarで固めます。

set :tmp_tarball, '/tmp/production'
set :aws_credential_file, ENV['AWS_CREDENTIAL_FILE']#awsにアクセスするためにcredential-fileが書いているところです。

servers_str = ENV['SERVERS'].to_s
servers_str = servers_str.gsub(/\s/, '')

servers_str.split(',').each do |target_server|
    if target_server.empty?
        next
    end
    server target_server,
        user: ENV['WEB_SERVER_USER'],#Webサーバーのユーザー
        roles: ['app'],
        ssh_options: {
            keys: [ENV['WEB_SERVER_SSH']],#Webサーバーにアクセスするためのsshが置いてある場所
            forward_agent: false,
            auth_methods: ['publickey']
        }
end
set :deploy_to, ENV['DEPLOY_TO']
set :resource_path, ENV['RESOURCE_PATH']

set :tmp_tarball, '/tmp/production'
servers_str = ENV['SERVERS'].to_s
servers_str = servers_str.gsub(/\s/, '')

servers_str.split(',').each do |target_server|
    if target_server.empty?
        next
    end
    server target_server,
        user: ENV['WEB_SERVER_USER'],
        roles: ['app'],
        ssh_options: {
            keys: [ENV['WEB_SERVER_SSH']],
            forward_agent: false,
            auth_methods: ['publickey']
        }
end
require 'digest/md5'
require 'zlib'
require 'archive/tar/minitar'
require 'aws-sdk-core'

namespace :tarball_deploy do

    s3_samefile_check = false#今デプロイするソースコードがS3に同じものがあるかcheckする変数

    if !ENV['DEPLOY_TYPE'].nil?
        # ENVで渡ってきていれば値を上書きする
        set :deploy_type, ENV['DEPLOY_TYPE']
    end

    desc 'check ENV value and configuration'
    task :check do
        if fetch(:tmp_tarball).nil?
            set :tmp_tarball, ENV['TMP_TARBALL'] ? ENV['TMP_TARBALL'] : '/tmp'
        end

        run_locally do
            execute "mkdir -p #{fetch(:tmp_tarball).gsub(/\/$/, '')}"
        end
        on roles(:app) do
            unless test 'which md5sum'
                error 'command `md5sum\' is not found.'
                abort
            end
        end

        if fetch(:deploy_type) == 'pull'
            # check AWS configuration
            #(省略)
        end
    end
ENVで渡している環境変数をcheckします。
# (省略)
            # tarをアップロード
            if fetch(:deploy_type) == 'pull'
                unless (s3_samefile_check)
                    run_locally do
                        upload_tarball_to_s3(tarball)
                    end
                end
            else
                # pull以外はすべてpush型
                on roles(:app) do
                    upload! tarball, fetch(:tmp_dir)
                end
            end
tarをS3にアップロードする関数実行
        on roles(:app) do
            if fetch(:deploy_type) == 'pull'
                # S3からダウンロードする処理
                execute "export AWS_CONFIG_FILE=#{fetch(:aws_credential_file)} && aws s3 cp s3://#{fetch(:bucket_name)}/#{fetch(:s3_path) + File.basename(tarball)} #{fetch(:tmp_dir)}/#{File.basename(tarball)}"
            end

            # check tarball hash
            #(省略)
S3からダウンロードします。
    desc 'create tarball'
    file 'create_resource_tarball' do
        # create tarball on Capistrano installed server
        run_locally do
            if fetch(:deploy_type) == 'pull'
                Aws.config[:credentials] = Aws::SharedCredentials.new(
                path: fetch(:aws_credential_file),
                profile_name: fetch(:aws_profile_name)
                )
                Aws.config[:region] = fetch(:region)
                s3 = Aws::S3::Client.new()
                resp = s3.list_objects(bucket: fetch(:bucket_name),prefix: fetch(:s3_path))
                resp.contents.each do |object|
                    if ("#{fetch(:s3_path)}release-#{fetch(:project_release_id)}.tar.gz" == "#{object.key}")
                        s3_samefile_check = true
                    end
                end
            end

            unless (s3_samefile_check)
                info 'start to create tarball...'
                Zlib::GzipWriter.open("#{fetch(:tmp_tarball)}/release-#{fetch(:project_release_id)}.tar.gz", Zlib::BEST_COMPRESSION) do |gz|
                    out = Archive::Tar::Minitar::Output.new(gz)
                    Dir.chdir("#{fetch(:resource_path)}")

                    files = FileList['**/*']
                    exclude_list = fetch(:copy_exclude) + ['.git']

                    files.exclude(exclude_list).each do |file|
                        Archive::Tar::Minitar::pack_file(file, out)
                    end
                    out.close
                end
                info 'Finished'
                set :tarball_hash_value, Digest::MD5.hexdigest(File.open("#{fetch(:tmp_tarball)}/release-#{fetch(:project_release_id)}.tar.gz").read)
                info "created tarball's hash: #{fetch(:tarball_hash_value)}"
            else
                info 'Alrady updated.'
            end
        end
    end
同じものがS3にない場合、tarを固めます。
# (省略)
    def upload_tarball_to_s3(upload_file)
        Aws.config[:credentials] = Aws::SharedCredentials.new(
            path: fetch(:aws_credential_file),
            profile_name: fetch(:aws_profile_name)
        )
        Aws.config[:region] = fetch(:region)
        s3 = Aws::S3::Client.new()
        s3.put_object(
            bucket: fetch(:bucket_name),
            body: File.open(upload_file),
            key: fetch(:s3_path) + File.basename(upload_file)
        )
    end

    def check_aws_configuration()
    #(省略)
end
Jenkins設定
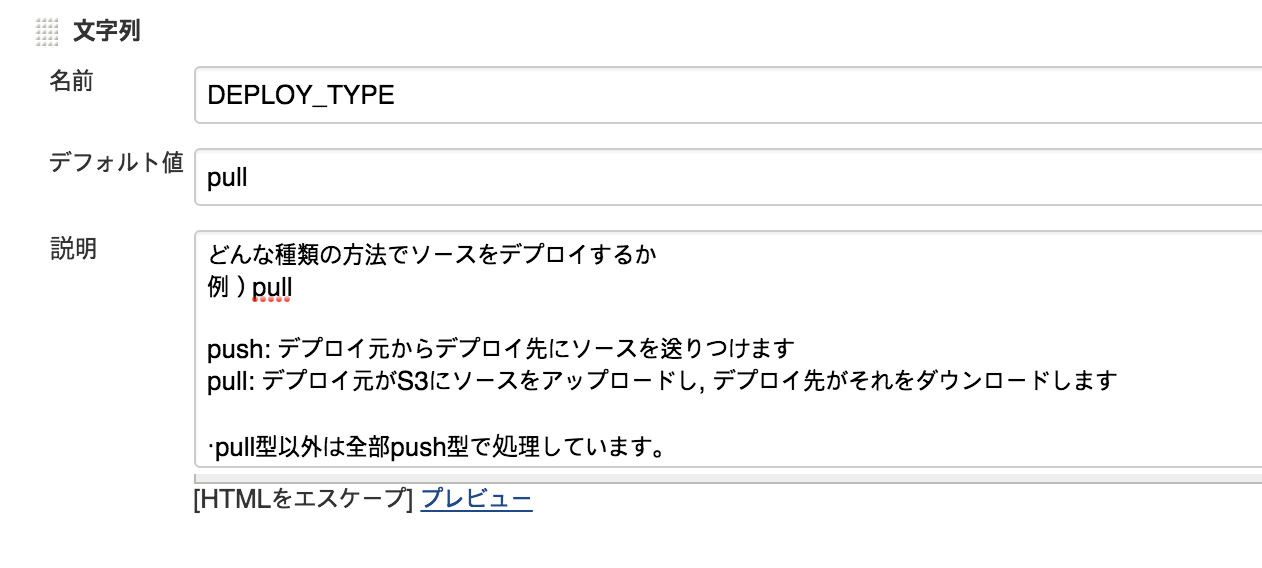
パラメーター設定
以下のようにすべて環境変数で渡したものをパラメーター化します。

シェルスクリプト
cd ${WORKSPACE}/capistrano
SERVERS=${SERVER} /usr/local/bin/cap production_pull deploy DEPLOY_TYPE=${DEPLOY_TYPE} WEB_SERVER_SSH=${WEB_SERVER_SSH} WEB_SERVER_USER=${WEB_SERVER_USER} S3_PATH=${S3_PATH} REGION=${REGION} BUCKET_NAME=${BUCKET_NAME} RESOURCE_PATH=${RESOURCE_PATH} AWS_PROFILE_NAME=${AWS_PROFILE_NAME} AWS_CREDENTIAL_FILE=${AWS_CREDENTIAL_FILE} DEPLOY_TO=${DEPLOY_TO}
起きたエラー
エラー部分:sudo: sorry,you must have a tty to run sudo.
参考:http://qiita.com/e2_adachi/items/7abf974d81067bd2b746
set :pty, trueを書くことで解決
The deploy has failed with an error: Exception while executing as xx@xxxxx: sudo /etc/init.d/httpd
      graceful    exit status: 1
      sudo /etc/init.d/httpd graceful stdout: [sudo] password for xx:
      sudo /etc/init.d/httpd graceful stderr: Nothing written
参考:http://blog.suz-lab.com/2011/01/sudoetcinitdhttpd.html
http://yut.hatenablog.com/entry/20111013/1318436872
/tmp/hudson4186181752264859077.sh: line 3: cap: command not found
参考:http://itpro.nikkeibp.co.jp/article/COLUMN/20060228/230996/
which capで確認したところ、capではなく、/usr/local/bin/capでした。
The deploy has failed with an error: Exception while executing as xx@xxxxxx: getaddrinfo: nodename nor servname provided, or not known
参考:http://www.linux-beginner.com/linux_setei1.html
IPアドレスとそれに対応するホスト名の設定ができてない。
最後に
今回Capistranoのことを書きましたが、いかがでしょうか。誰かの参考になれば幸せです。
Capistranoを知ったきっかけは先輩から社内で使っているCapistranoの改善のことで実行テスト・ソースコード修正をお願いされたことでした。Capistranoを理解やエラーが出ると詰まったり、先輩からお願いされたソースコードの内容が理解できなくって色々大変でしたが、いい経験になりました!
残念ながらCYBIRDエンジニア Advent Calendarは以上となります。
来年がお楽しみです!
Merry Christmas!!!