はじめに
この記事はプログラミング初学者が他の記事を参考にしたり、実際に実装してみたりして、アウトプットの一環としてまとめたものです。内容に不備などあればご指摘いただますと幸いです。
今回Xクローン作成中フォロー機能を実装しました。
そのフォロー機能について備忘録も兼ねて記事を作成していきます。
実現したいこと
ユーザーをフォローしたり、フォロー解除できる機能を実装すること。
フォロー機能について
フォローする時のイメージ
フォロー機能では、フォローするユーザーとフォローされるユーザーの2種類のユーザーがいるので、左側にフォローするユーザー、右側にフォローされるユーザーを配置します。
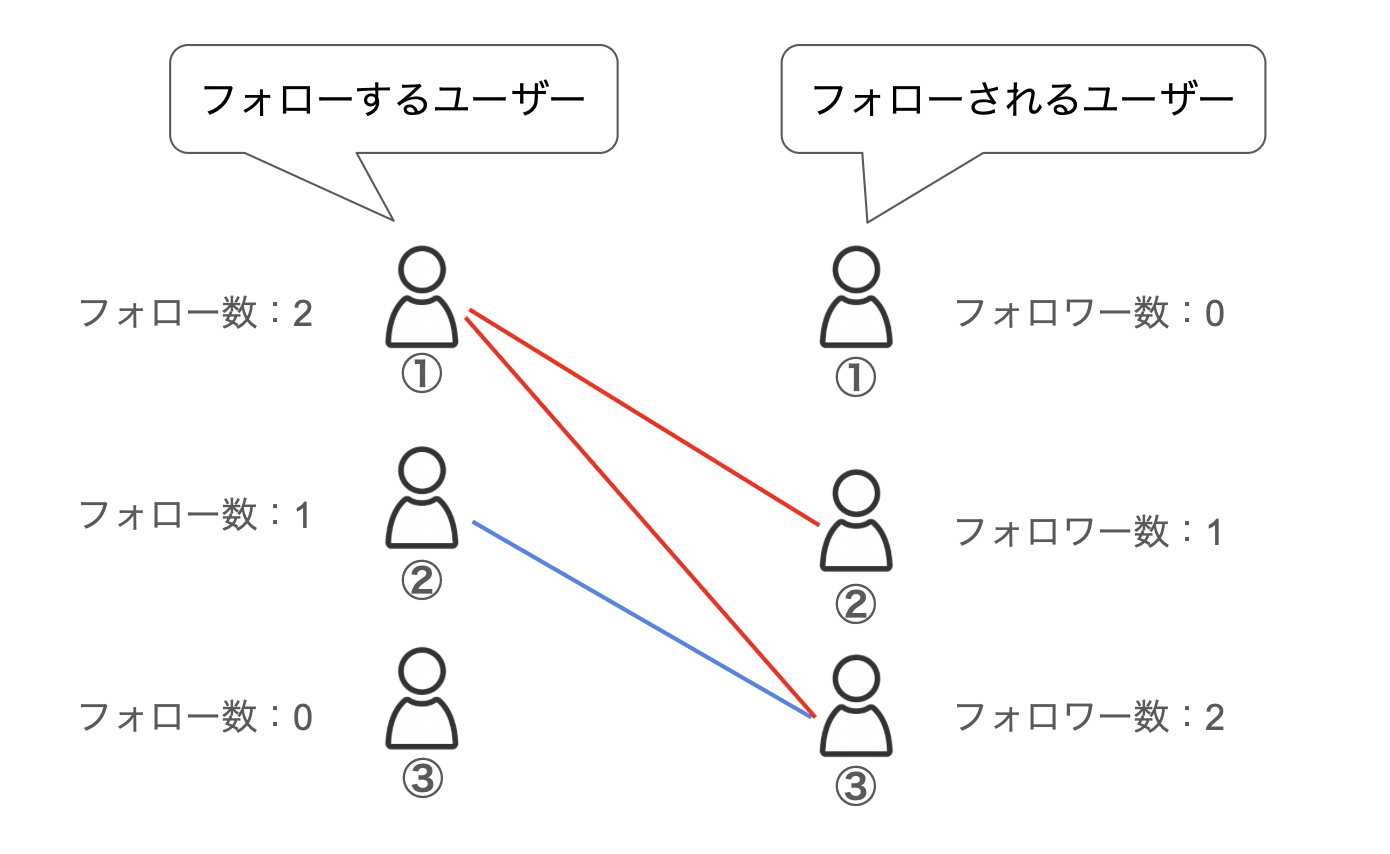
- フォローするユーザー①に注目すると、1人のユーザーから複数の線が伸びています。
→ つまりユーザーは「たくさんのユーザーをフォローする」ことができます。 - フォローされるユーザー③に注目すると、1人のユーザーから複数の線が伸びています。
→つまりユーザーは「たくさんのユーザーにフォローされる」ことがあります。
このように 「フォローする側のユーザーもフォローされる側のユーザーもたくさん持っている」関係を多対多(M:N)の関係 といいます。
そして、多対多(M:N)の関係には中間テーブルが必要!
先ほどの図に中間テーブルを加えてみると

このようになります。
- 中間テーブルでは、フォローするユーザーとフォローされるユーザーの関係を保存しています。
- また、フォローするユーザーと中間テーブルが1対多。
フォローされるユーザーと中間テーブルが1対多。
つまり、中間テーブルを介することで多対多を1対多で表現することができます。
ER図で表すと
フォローする側もフォローされる側もどちらもUserなので、今回は区別するために
- フォローするユーザー
following - フォローされるユーザー
follower
というテーブルを使用します。
(実際にはfollowingsテーブルとfollowersテーブルは存在せずusersテーブルになります)
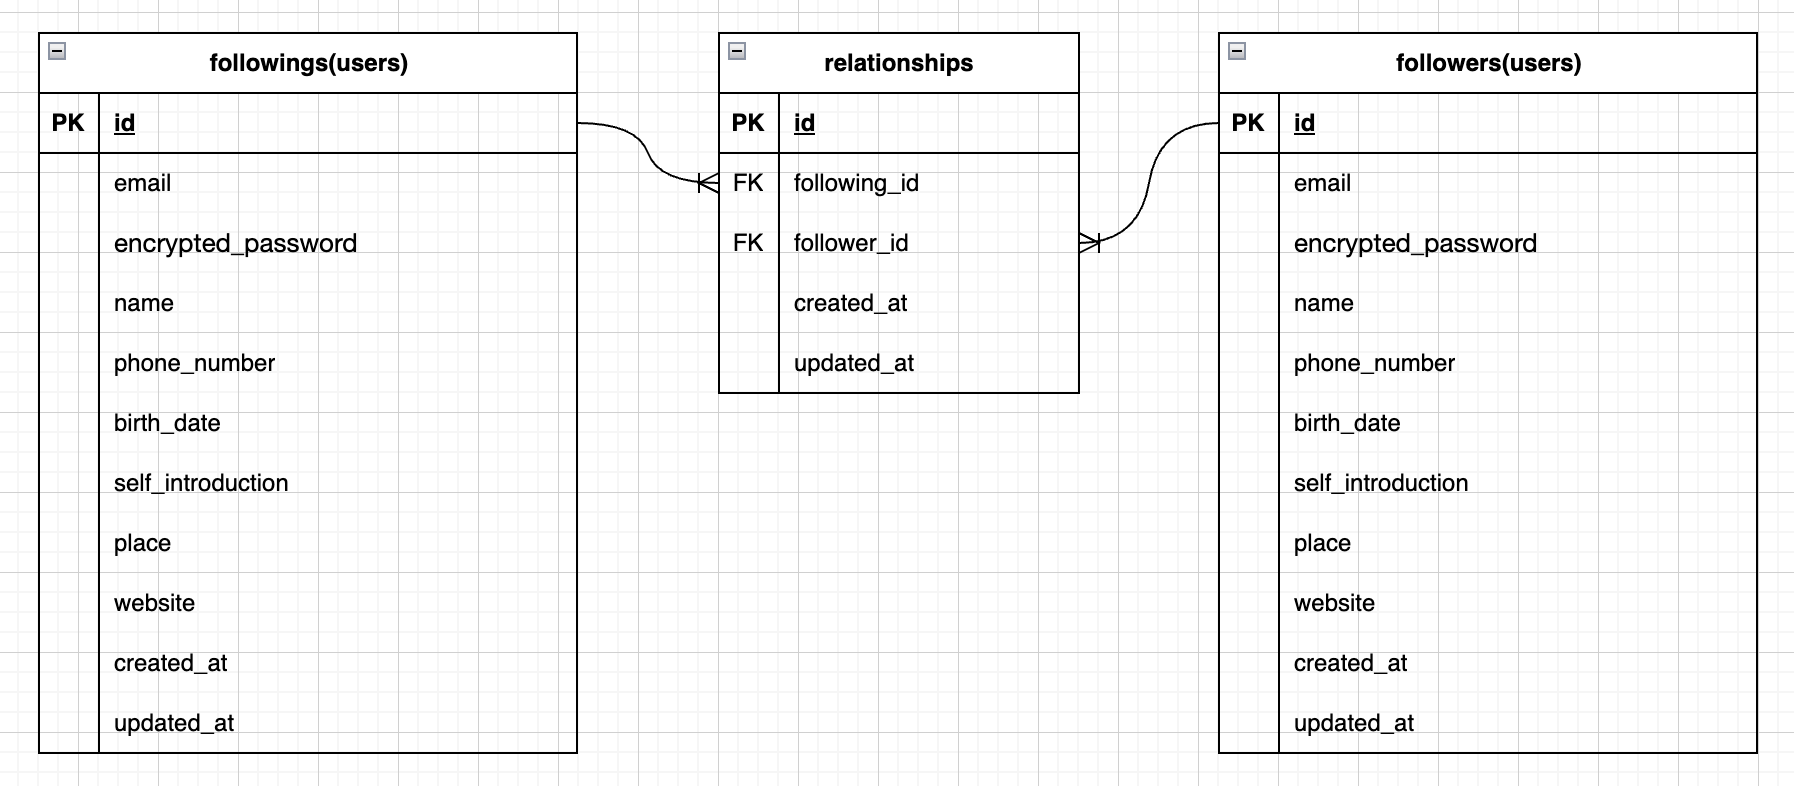
中間テーブルにfollowing_idとfollower_idを保存することで、誰が誰をフォローしているかという情報を格納できます。
Relationshipモデルとテーブルの作成
それでは、実装していきましょう!
以下のコマンドでモデルを作成します。
$ rails g model relationship following_id:integer follower_id:integer
生成されたマイグレーションファイルを以下のように編集します。
class CreateRelationships < ActiveRecord::Migration[7.0]
  def change
    create_table :relationships do |t|
      t.integer :following_id, null: false # 追加
      t.integer :follower_id, null: false # 追加

      t.timestamps
    end
  end
end
以下のコマンドでマイグレーションを実行しましょう。
$ rails db:migrate
アソシエーションの設定
それぞれのファイルに以下を追加します。
belongs_to :following, class_name: 'User'
belongs_to :follower, class_name: 'User'
belongs_to :followingとbelongs_to :followerだと存在しないテーブルが参照されてしまいエラーになります。そこで、usersテーブルを参照させるためにclass_name: 'User'とします。
# フォローする側からのhas_many
has_many :relationships, foreign_key: :following_id, dependent: :destroy
# 一覧画面で使用する(あるユーザーがフォローしている人全員をとってくる)
has_many :followings, through: :relationships, source: :follower

# フォローされる側からのhas_many
has_many :reverse_of_relationships, class_name: 'Relationship', foreign_key: :follower_id, dependent: :destroy
# 一覧画面で使用する(あるユーザーのフォロワー全員をとってくる)
has_many :followers, through: :reverse_of_relationships, source: :following
foreign_key
foreign_keyを設定することでフォローする側からのhas_manyのアソシエーションなのかフォローされる側からのhas_manyのアソシエーションなのかを明示しています。
dependent: :destroy
dependent: :destroyは、has_manyで使えるオプションです。
1:Nの関係において、「1」のデータが削除された場合、関連する「N」のデータも削除される設定。
has_many :reverse_of_relationships
has_many :relationshipsと書いてしまうとフォローする側からのアソシエーションと重複してしまうためreverse_of_relationshipsとしています。
class_name: 'Relationship'
先ほどと同じ考え方でreverse_of_relationshipsという存在しないテーブルが参照されてしまうのでrelationshipsテーブルを参照するようにしています。
has_many through
中間テーブルを介して向こう側のテーブルからデータをとってくることができます。
source
何のデータをとってくるか指定します。
なぜ、source: :followerを指定することで、ユーザーがフォローしている人全員をとってくることができるのか?
まずフォローするとは、複数のフォローされる側のユーザーをフォローしているということです。
つまり、フォローされる側のユーザー(source: :follower)をとってくることでフォローしている人をとってくることができるのです。
ルーティングの設定
親であるuserのidが欲しいため、usersの中にネストしましょう。
resources :users do
  resource :relationships, only: [:create, :destroy]
end
Controllerの作成
以下のコマンドでコントローラを作成します。
$ rails g controller relationships
生成されたコントローラのファイルを以下のように編集します。
class RelationshipsController < ApplicationController
  def create
    # current_userに紐付いたRelationshipクラスの新しいインスタンスを作成。
    # つまり、relationship.following_id = current_user.idが済んだ状態で生成されている。
    # buildはnewと同じ意味で、アソシエーションしながらインスタンスをnewする時に形式的に使われる。
    follow = current_user.relationships.build(follower_id: params[:user_id])
    follow.save!
    # 直前のページにリダイレクトする。
    redirect_to request.referer, notice: "#{follow.follower.name}さんをフォローしました。"
  end

  def destroy
    follow = current_user.relationships.find_by(follower_id: params[:user_id])
    follow.destroy!
    redirect_to request.referer, notice: "#{follow.follower.name}さんのフォローを解除しました。"
  end
end
ユーザーがフォロー済みかどうか判定するメソッド
ユーザーがフォロー済みかどうか判定したいので以下のように記載します。
# あるユーザが引数で渡されたuserにフォローされているか調べるメソッド
def followed_by?(user)
  reverse_of_relationships.find_by(following_id: user.id).present?
end
Viewの作成
= @tweets.each do |tweet|

:
省略
:

div.dropdown.ms-auto
  = link_to("#", role: "button", "data-bs-toggle": "dropdown", "aria-expanded": "false") do
    i.bi.bi-three-dots
  - if current_user != tweet.user # current_userとtweet.userが等しくないかどうかで分岐(自分のツイートにはフォローボタンを表示しない)
    ul.dropdown-menu
      - if tweet.user.followed_by?(current_user) #tweet.userがcurrent_userにフォローされているかどうかで分岐
        li
          = link_to user_relationships_path(tweet.user.id), data: { turbo_method: :delete }, class: "dropdown-item" do
            = tweet.user.name
            | さんのフォローを解除
      - else
        li
          = link_to user_relationships_path(tweet.user.id), data: { turbo_method: :post }, class: "dropdown-item" do
            = tweet.user.name
            | さんをフォロー

:
省略
:
- 概略説明として、投稿内容をデータベースから取得して
@tweetsインスタンス変数に代入しています。
@tweetsをeach文で1つずつ展開して内容を表示させるコードとなっています。 - レイアウトには、bootstrapのドロップダウンを使用しています。
ドロップダウン · Bootstrap v5.3
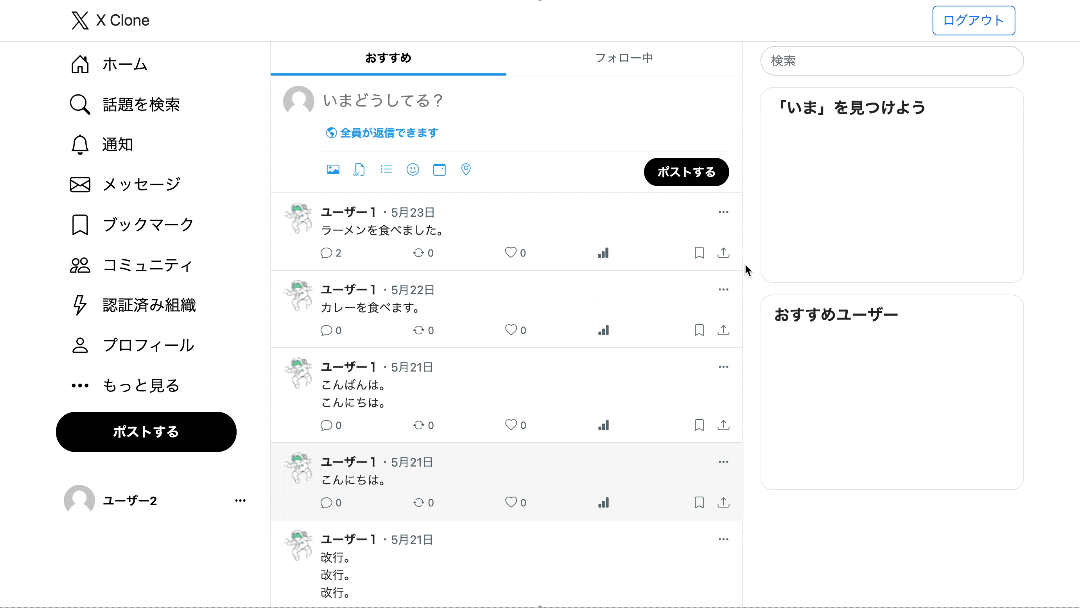
実際の動作画面はこのようになります。
おわりに
最後まで読んでいただきありがとうございました。
少しでも皆さんの参考になれば幸いです。
参考にしたサイト