WebdriverIO からヘッドレス Chrome を起動してブラウザテストを実施する手順をまとめます。
必要条件
- Chrome 59 以降がインストールされていること
WebdriverIO およびブラウザテストについて
Seleniumアレルギーのための処方箋 - Qiita にとても詳しくまとめられていますので、ぜひご一読ください。
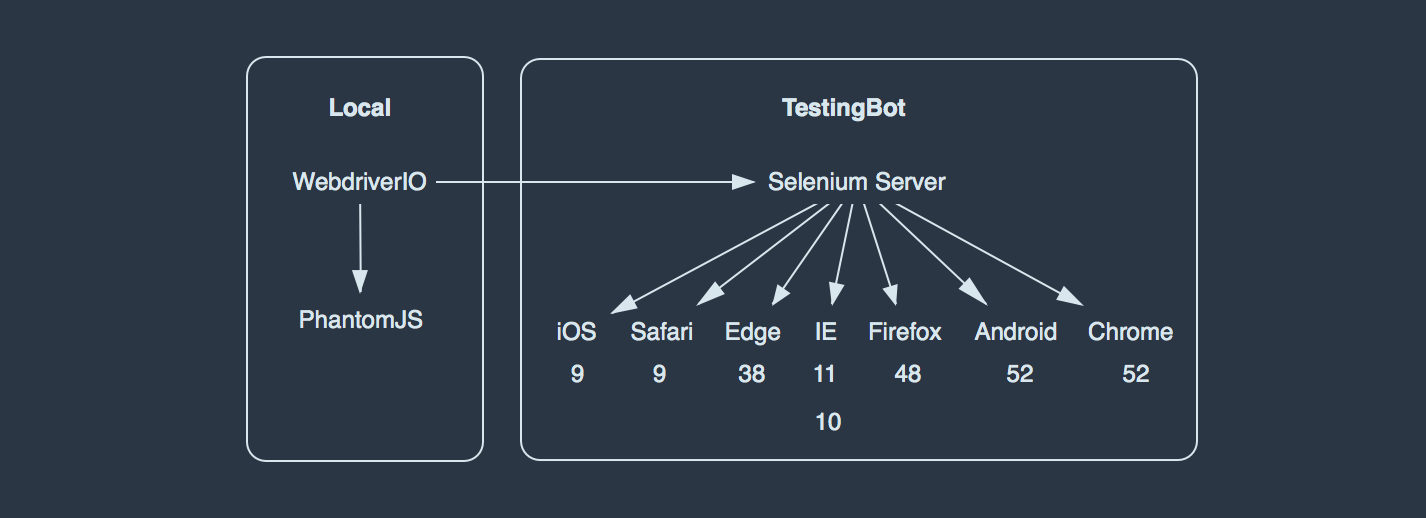
本投稿は、この記事にある、以下の構成図の「Local」という枠の中に関する話です。ここの「PhantomJS」のかわりに「ヘッドレスChrome」を利用する方法について紹介します。
導入手順
ChromeDriver のインストール
WebdriverIO から ヘッドレスChrome を起動するには ChromeDriver が必要です。
公式サイトから直接ダウンロードしてもよいのですが、パスを通したり、異なるプラットフォーム(OS)に対応したインストールプロセスを組んだりしなければならないのがちょっと面倒です。
そのあたりをいい感じに面倒みてくれる selenium-standalone を利用するのがおすすめです。
$ npm install selenium-standalone --save-dev
で selenium-standalone をインストールした後、
$ selenium-standalone install
を実行すると ChromeDriver がインストールされて実行可能になります。npm-scripts の postinstall コマンドに定義しておくと、他の人がプロジェクトを導入するときに親切ですね。
{
  "scripts": {
    "postinstall": "selenium-standalone install"
  }
}
WebdriverIO のインストール
次に WebdriverIO をインストールします。
$ npm install webdriverio --save-dev
これで wdio というコマンドが使えるようになります。
$ wdio --help
WebdriverIO CLI runner

Usage: wdio [options] [configFile]
Usage: wdio config
Usage: wdio repl [browserName]
config file defaults to wdio.conf.js
The [options] object will override values from the config file.

Options:
  --help, -h            prints WebdriverIO help menu
  --version, -v         prints WebdriverIO version
  --host                Selenium server host address
  --port                Selenium server port
  --path                Selenium server path (default: /wd/hub)
  --user, -u            username if using a cloud service as Selenium backend
  --key, -k             corresponding access key to the user
  --watch               watch specs for changes
  --logLevel, -l        level of logging verbosity (default: silent)
  --coloredLogs, -c     if true enables colors for log output (default: true)                                                                        [default: true]
  --bail                stop test runner after specific amount of tests have failed (default: 0 - don't bail)
  --screenshotPath, -s  saves a screenshot to a given path if a command fails
  --baseUrl, -b         shorten url command calls by setting a base url
  --waitforTimeout, -w  timeout for all waitForXXX commands (default: 1000ms)
  --framework, -f       defines the framework (Mocha, Jasmine or Cucumber) to run the specs (default: mocha)
  --reporters, -r       reporters to print out the results on stdout
  --suite               overwrites the specs attribute and runs the defined suite
  --spec                run only a certain spec file
  --cucumberOpts.*      Cucumber options, see the full list options at https://github.com/webdriverio/wdio-cucumber-framework#cucumberopts-options
  --jasmineOpts.*       Jasmine options, see the full list options at https://github.com/webdriverio/wdio-jasmine-framework#jasminenodeopts-options
  --mochaOpts.*         Mocha options, see the full list options at http://mochajs.org
WebdriverIO の設定
次に WebdriverIO の設定ファイルを作成します。wdio config を実行すると、設定ファイルを生成するためのウィザードが始まります。
framework や reporter は好きなものを選んでください。
「Do you want to add a service to your test setup?」という質問では 「selenium-standalone」 を選びます。
完了すると wdio.conf.js が生成されるので、ファイルを開いて capabilities というセクションを探してください。
    capabilities: [{
        browserName: 'firefox'
    }],
デフォルトでは Firefox が起動するようになっています。次のように変更して、ヘッドレスChrome を使うようにします。
    capabilities: [{
        browserName: 'chrome',
        'goog:chromeOptions': {
          args: ['--headless', '--disable-gpu'],
        },
    }],
--headless というフラグを指定すると、ヘッドレスモードで Chrome を実行することができます。
また、--disable-gpu も現時点(2017年9月時点)ではヘッドレスモードで実行する際に必要です。
(参考:ヘッドレス Chrome ことはじめ | Web | Google Developers)
なお、これらのフラグを指定しなかった場合は、通常モードの Chrome が起動します。
テストの実行
試しに、適当なテストコードを用意して、wdio コマンドでテストを実行してみましょう。
var assert = require('assert')

describe('webdriver.io page', function() {
  it('should be a pending test')

  it('should have the right title - the fancy generator way', function() {
    browser.url('http://webdriver.io/')
    var title = browser.getTitle()
    assert.equal(title, 'WebdriverIO - WebDriver bindings for Node.js')
  })
})
$ wdio wdio.conf.js
macOS の場合だと、Dock に Chrome のアイコンが出現して(ブラウザウインドウは表示されません)、テストが実行されれば成功です。![]()

