やること
YouTube Data Apiを使用して、4つの作業をPython3のプログラムで行ってみようと思います。
以下の順番で行います。
- 動画のアップロード
- サムネイルの追加
- 動画情報の編集
- 動画の削除
環境
実行する環境を以下に示します。
| 項目 | バージョン |
|---|---|
| OS | macOS Ventura 13.1 |
| Python | 3.9.9 |
手順
GCPの利用開始はされている前提とします。
GCP関連
プロジェクトの作成
GCPコンソールにログインして、新しいプロジェクトを作成します。
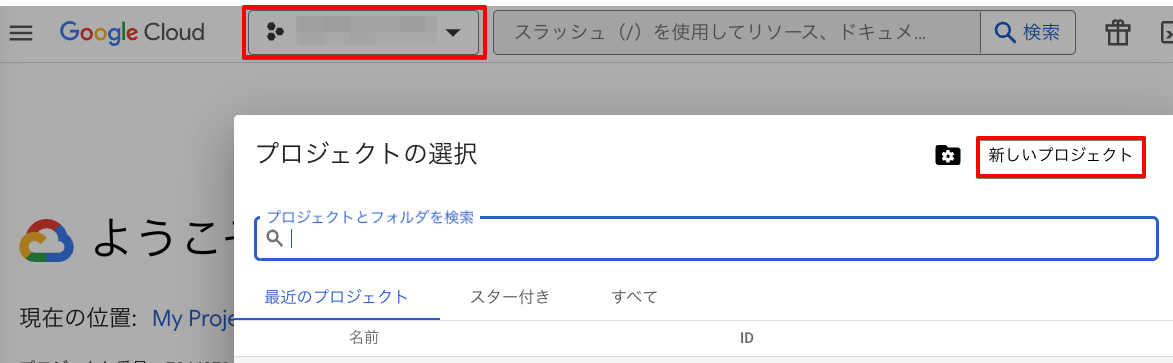
ここでは「Project YouTubeAPI」としました。

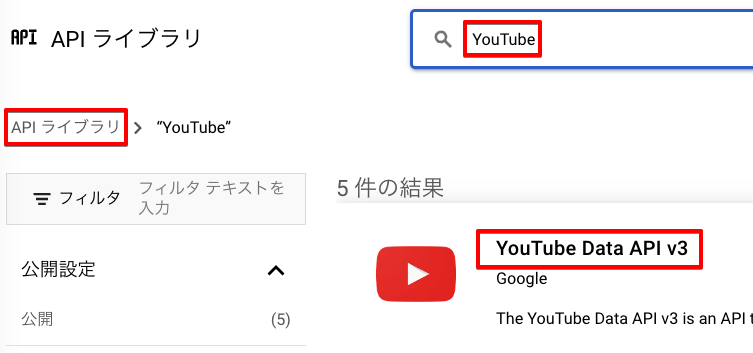
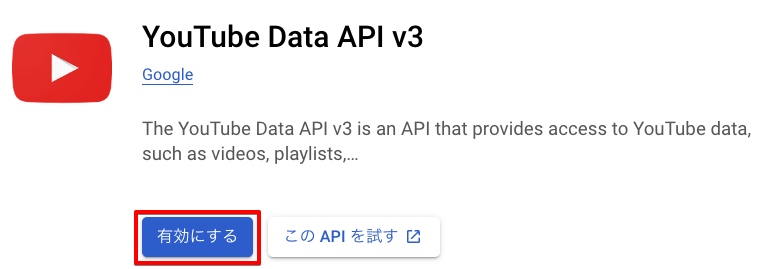
YouTube Data Apiの有効化
ライブラリで"YouTube"で検索して、「YouTube Data Api v3」をクリックします。
「有効にする」ボタンをクリックして有効にします。
認証関連の作成
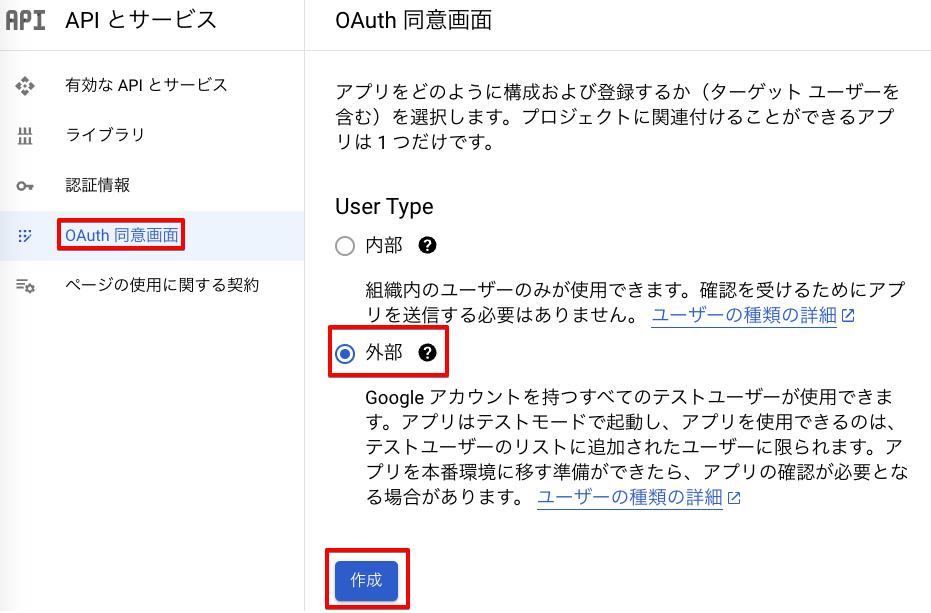
OAuth同意画面の作成
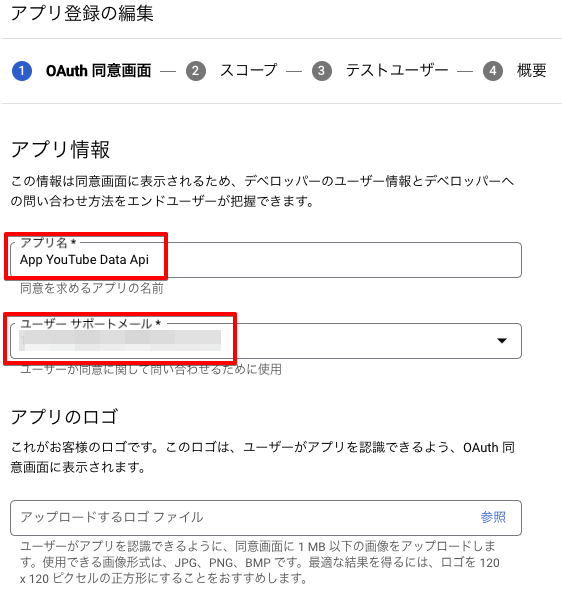
OAuth同意画面を作成します。プログラムを実行したときに表示される認証画面のカスタマイズです。
「User Type」は「外部」で「作成」をクリックします。
アプリ名はここでは「App YouTube Data Api」としました。
サポートメールをプルダウンから選択します。
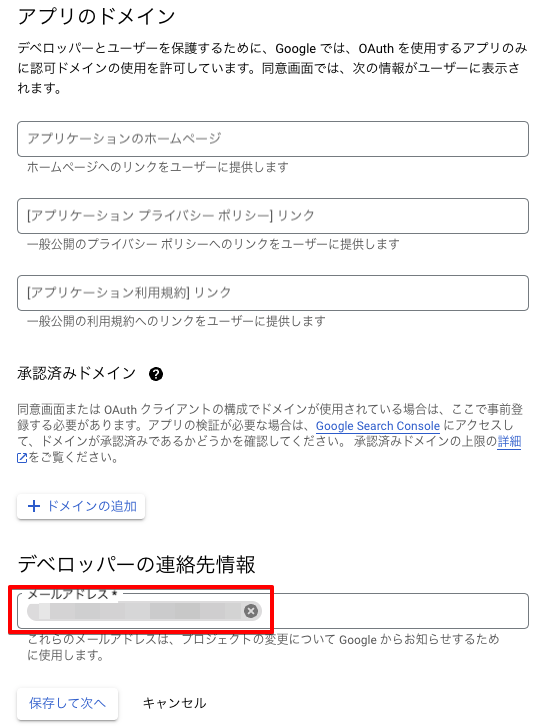
デベロッパーの連絡先情報に、メールアドレスを入力して「保存して次へ」をクリックします。
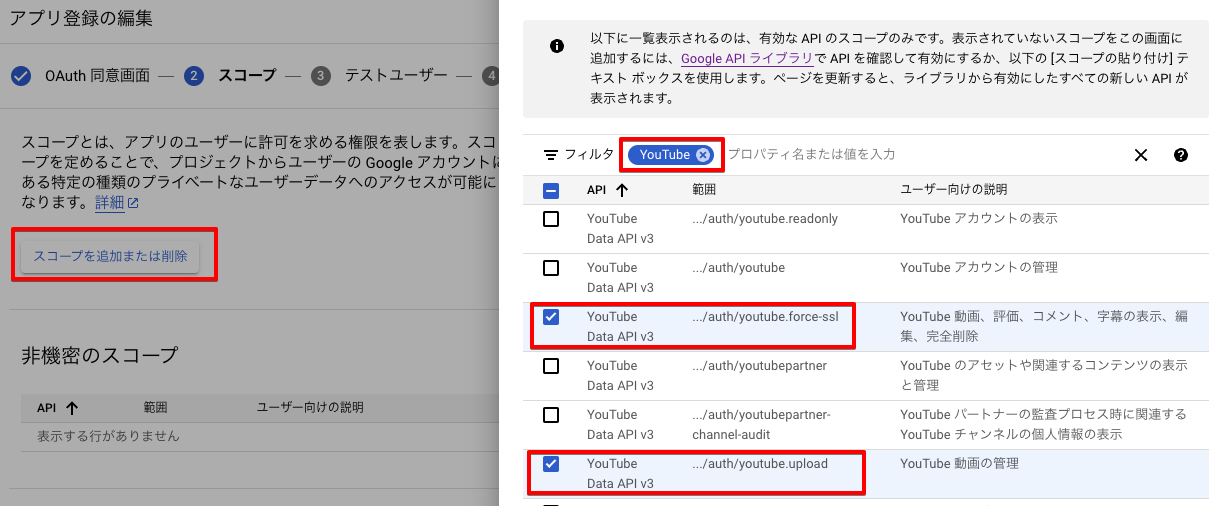
スコープを追加します。
| やりたいこと | 必要なスコープ |
|---|---|
| 動画の投稿 | https://www.googleapis.com/auth/youtube.upload |
| サムネイルの追加 | https://www.googleapis.com/auth/youtube.force-ssl |
| 動画の編集 | 同上 |
| 動画の削除 | 同上 |
今回必要なスコープは上の表のとおりとなるので、二種類のスコープを追加しました。
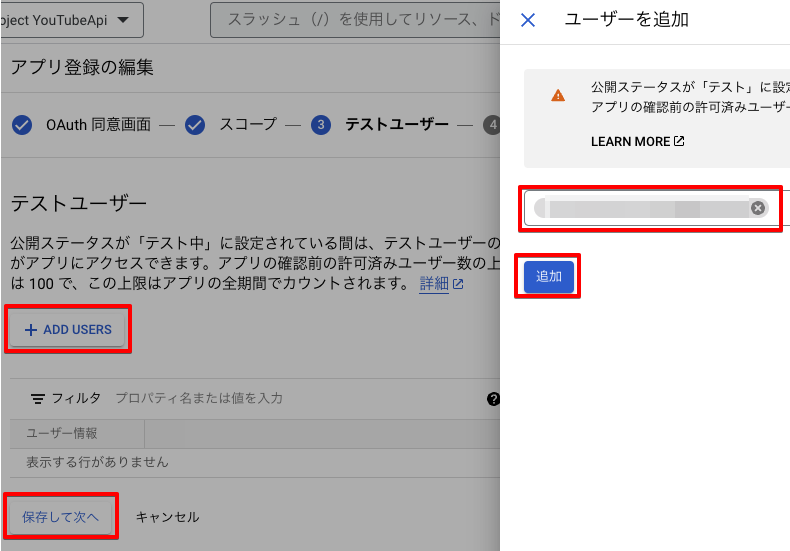
テストに使用するユーザーを追加して、「保存して次へ」をクリックすると完了です。
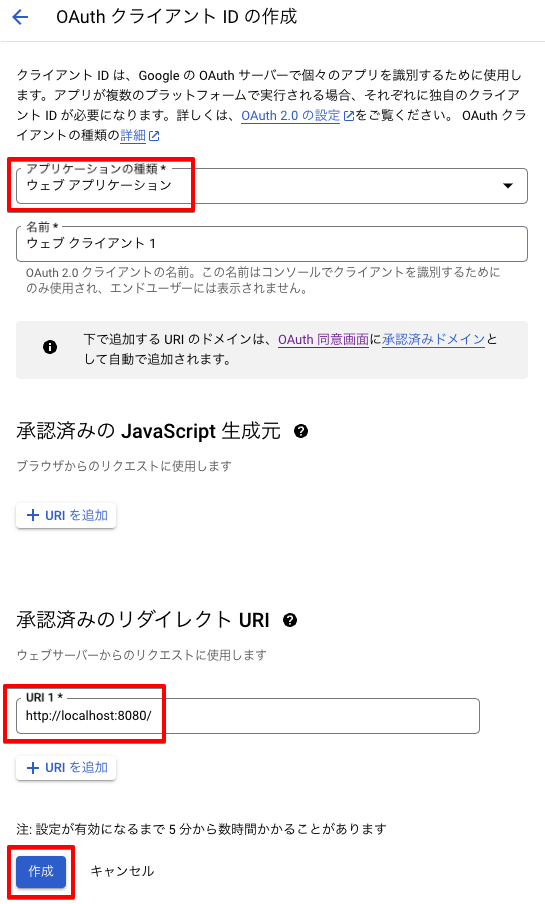
OAuthクライアントIDの作成
「認証情報」から「認証情報を作成」→「OAuthクライアントID」をクリックします。
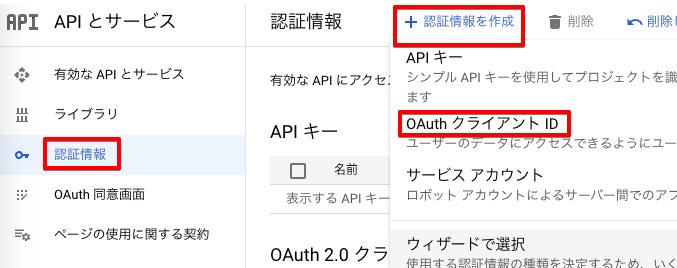
「アプリケーションの種類」は「ウェブアプリケーション」を選択し、「承認済みのリダイレクトURI」にはhttp://localhost:8080/を入力します。
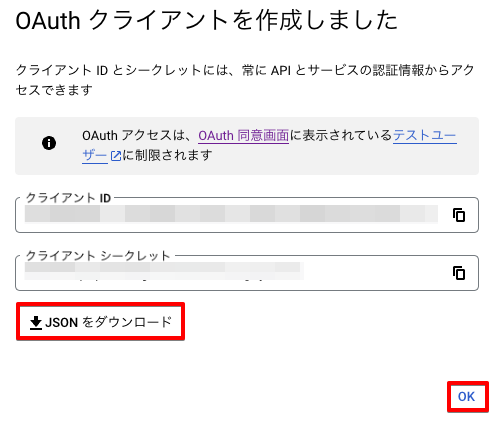
OAuthクライアントIDの作成が完了するので、シークレットのJSONファイルをダウンロードしておきます。
プログラム
準備
サンプルコードの取得方法
Python3で書かれたサンプルコードが公開されています。
YouTube Data ApiのReferenceにアクセスします。
例えば、動画の投稿のサンプルコードであれば、左側ペインから「Videos」→「insert」と展開し、画面右側にある「Try this method」の拡大ボタンをクリックします。
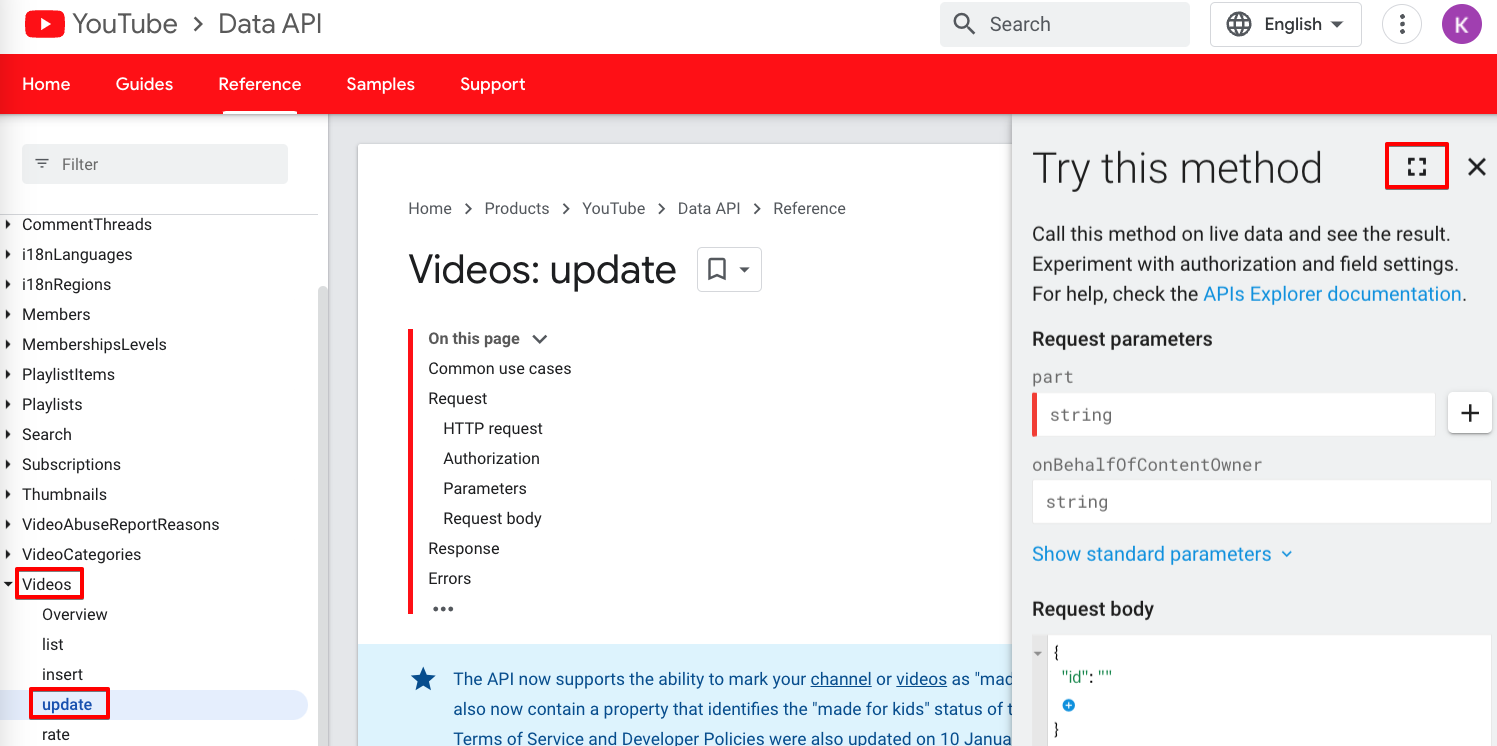
タブから「Python」を選択すれば、Pythonのサンプルコードをコピーすることができます。
シークレットのJSONファイルの配置
これから動画の投稿、サムネイルの追加、動画情報の編集、動画の削除を行っていきますが、その際に実行するPythonファイル(ここではすべてmain.py)と同じ階層に、先ほどダウンロードしたシークレット情報が記載されたJSONファイルを配置します。
必要パッケージのダウンロード
PythonのGoogle APIs Client LibraryをPIPでダウンロードします。必要に応じてPython仮想環境を用意します。
% python -m venv .venv
% source .venv/bin/activate
(.venv) % pip install --upgrade google-api-python-client
google-auth-oauthlibとgoogle-auth-httplib2もダウンロードします。
(.venv) % pip install --upgrade google-auth-oauthlib google-auth-httplib2
動画投稿
コード
まず、動画を投稿してみます。
ReferenceのVideos: insertからサンプルコードをコピーして修正しました。
概ね修正箇所は以下のとおりです。
-
client_secrets_file変数にはシークレット情報が記載されたJSONファイル(ダウンロードしたもの)へのファイルパスを記載します。ここではmain.pyと同じディレクトリに保存しているのでファイル名となっています。 -
youtube.videos().insert()メソッドにアップロードする動画の情報などを記載していきますが、partパラメータとbodyパラメータが必要になってきます。 -
partパラメータにはbodyパラメータで使用するプロパティを代入します。ここでは、snippetとstatusのプロパティを使用しています。 -
snippetプロパティでは以下の値を設定しています。
| プロパティ | 内容 |
|---|---|
| channelId | 動画を投稿するチャンネルのID |
| title | 動画のタイトル |
| description | 動画の説明 |
| tags | 動画のタグ。リスト型で指定 |
| categoryId | 動画のカテゴリを数字で指定。ここでは「旅行とイベント」のカテゴリの19を指定 |
| defaultLanguage | タイトルと説明の言語 |
| defaultAudioLanguage | 動画の言語 |
-
statusプロパティでは以下の値を設定しています。
| プロパティ | 内容 |
|---|---|
| uploadStatus | アップロードされたビデオのステータス。公開予約のときはこのプロパティは使用しない。publishAtを使用する |
| privacyStatus | 公開設定。ここでは非公開にしている |
| license | ライセンス。youtubeは「標準のYouTubeライセンス」 |
| embeddable | 埋め込みを許可する |
-
media_body=MediaFileUpload("test.mp4")の部分ですが、MediaFileUploadメソッドの引数に動画ファイルのパスを渡します。ここでは同じディレクトリにあるtest.mp4ファイルを指定しています。 - 最後に、コードの
flowにはrun_console()はありませんでした。VS Codeで「型定義へ移動」で調べてみるとrun_local_server()だったため修正しています。
# -*- coding: utf-8 -*-

# Sample Python code for youtube.videos.insert
# NOTES:
# 1. This sample code uploads a file and can't be executed via this interface.
#    To test this code, you must run it locally using your own API credentials.
#    See: https://developers.google.com/explorer-help/code-samples#python
# 2. This example makes a simple upload request. We recommend that you consider
#    using resumable uploads instead, particularly if you are transferring large
#    files or there's a high likelihood of a network interruption or other
#    transmission failure. To learn more about resumable uploads, see:
#    https://developers.google.com/api-client-library/python/guide/media_upload

import os

import google_auth_oauthlib.flow
import googleapiclient.discovery
import googleapiclient.errors
from googleapiclient.http import MediaFileUpload

scopes = ["https://www.googleapis.com/auth/youtube.upload"]

def main():
    # Disable OAuthlib's HTTPS verification when running locally.
    # *DO NOT* leave this option enabled in production.
    os.environ["OAUTHLIB_INSECURE_TRANSPORT"] = "1"

    api_service_name = "youtube"
    api_version = "v3"
    client_secrets_file = "client_secrets.json" # 修正(ダウンロードしたJSONファイル名)

    # Get credentials and create an API client
    flow = google_auth_oauthlib.flow.InstalledAppFlow.from_client_secrets_file(
        client_secrets_file, scopes)
    credentials = flow.run_local_server() # 修正(「flow.run_console()」から「flow.run_local_server()」)
    youtube = googleapiclient.discovery.build(
        api_service_name, api_version, credentials=credentials)

    request = youtube.videos().insert(
        part="snippet,status", # 追記
        body={
            ### 追記(ここから) ###
            "snippet": {
                "channelId": "XXXXXXXXXXXXXXXXXXXXXXXX", # 動画を投稿するチャンネルIDを記載
                "title": "タイトルのテスト", # 動画のタイトルを設定
                "description": "説明のテストです。", # 動画の説明を追加
                "tags": ["Tag 1", "Tag 2", "Tag 3"], # タグを追加
                "categoryId": "19", # "19"は「旅行とイベント」のカテゴリ。
                "defaultLanguage": "ja_JP", # タイトルと説明の言語
                "defaultAudioLanguage": "ja_JP", # 動画の言語
            },
            "status": {
                "uploadStatus": "uploaded", # アップロードされたビデオのステータス
                "privacyStatus": "private", # 公開設定は「非公開」
                "license": "youtube", # 標準のYouTubeライセンス
                "embeddable": "true", # 動画の埋め込みを許可する
            },
            ### 追記(ここまで) ###
        },

        # TODO: For this request to work, you must replace "YOUR_FILE"
        #       with a pointer to the actual file you are uploading.
        media_body=MediaFileUpload("test.mp4") # 修正(動画ファイルのパスを記載)
    )
    response = request.execute()

    print(response)

if __name__ == "__main__":
    main()
動作確認
実行してみます。
(.venv) % python main.py
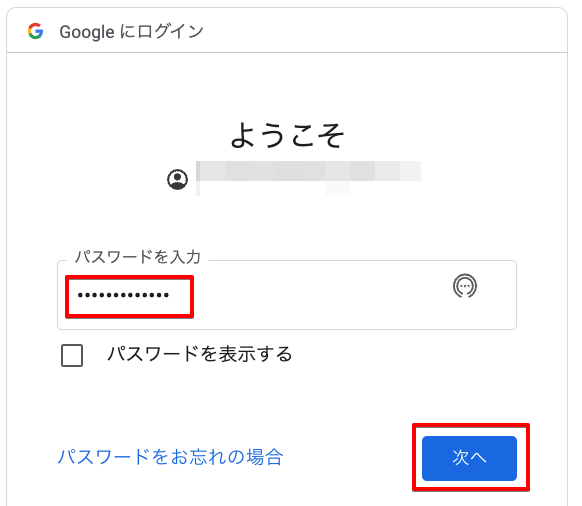
OAuthの画面がブラウザで起動します。下は初めてログインするブラウザでの動きです。
使用するアカウントのメールアドレスを入力します。

パスワードを入力して「次へ」をクリックします。
複数のアカウントが表示された場合は、チャンネルを保有するアカウントを選択します。

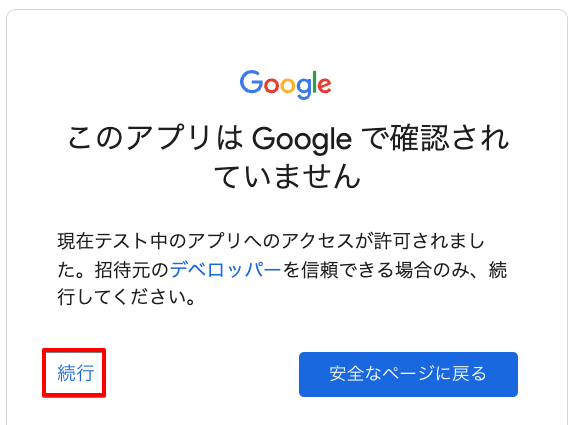
下記の画面が表示されたら「続行」をクリックします。
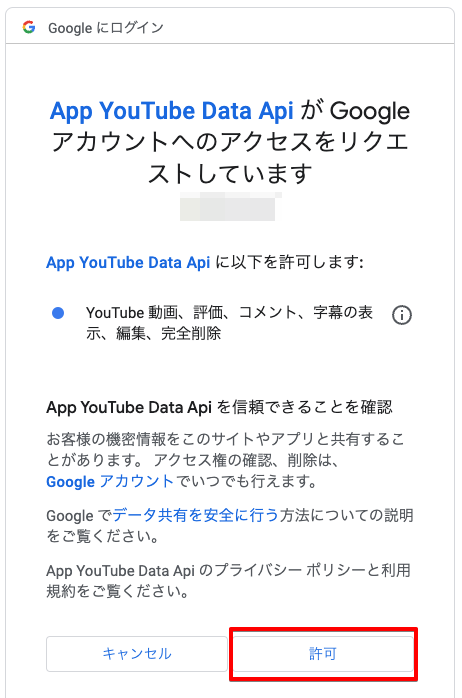
下記の画面が表示されたら「許可」をクリックします。
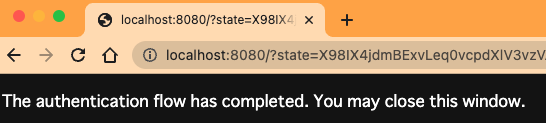
「The authentication flow has completed. You may close this window.」と表示されたら、ブラウザの画面は閉じます。
ターミナルで以下のような結果が返ってきています。
(.venv) % python main.py
Please visit this URL to authorize this application: https://accounts.google.com/o/oauth2/auth?response_type=code&client_id=(
(省略)&access_type=offline
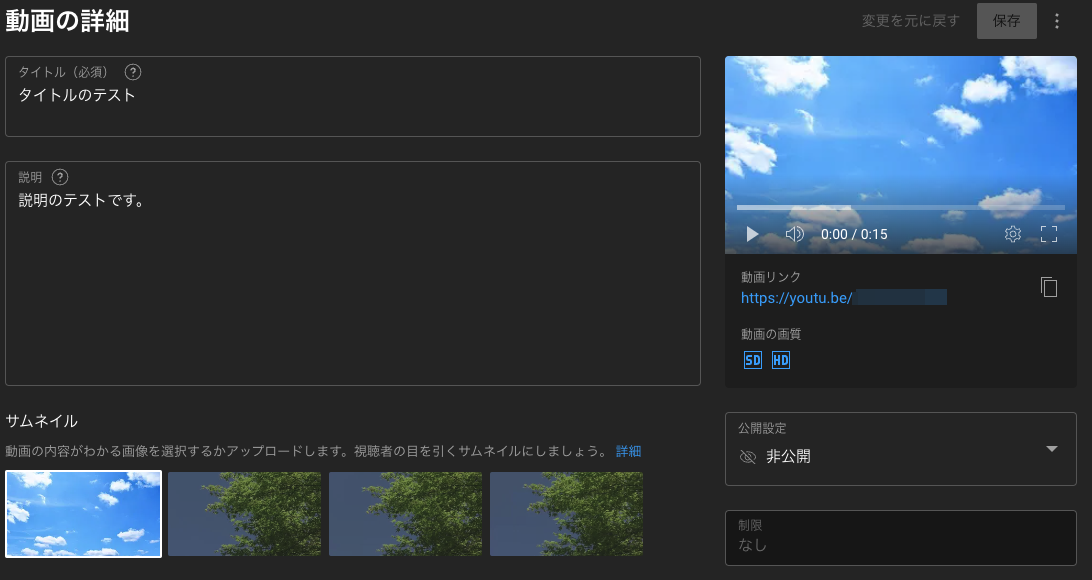
{'kind': 'youtube#video', 'etag': 'XXXXXXXXXXXXXX_XXX_XX_XXXXX', 'id': 'XXXXXXXXXXX', 'snippet': {'publishedAt': '2023-02-16T05:00:35Z', 'channelId': 'UCxUKQ85KZ200o4ioltA2kJQ', 'title': 'タイトルのテスト', 'description': '説明のテストです。', 'thumbnails': {'default': {'url': 'https://i9.ytimg.com/vi/XXXXXXXXXXX/default.jpg?sqp=CNDwtp8G&rs=AOn4CLA1gObdbPgQNTemcse9Hrul6EiVsg', 'width': 120, 'height': 90}, 'medium': {'url': 'https://i9.ytimg.com/vi/XXXXXXXXXXX/mqdefault.jpg?sqp=CNDwtp8G&rs=AOn4CLCvezrVCeWzUdnDuLgJYDJsOudvkA', 'width': 320, 'height': 180}, 'high': {'url': 'https://i9.ytimg.com/vi/XXXXXXXXXXX/hqdefault.jpg?sqp=CNDwtp8G&rs=AOn4CLBTfv9ceJNaIsL09wWQ-uCpaGwVLQ', 'width': 480, 'height': 360}}, 'channelTitle': 'XXXXX', 'tags': ['Tag 1', 'Tag 2', 'Tag 3'], 'categoryId': '19', 'liveBroadcastContent': 'none', 'defaultLanguage': 'ja', 'localized': {'title': 'タイトルのテスト', 'description': '説明のテストです。'}, 'defaultAudioLanguage': 'ja'}, 'status': {'uploadStatus': 'uploaded', 'privacyStatus': 'private', 'license': 'youtube', 'embeddable': True, 'publicStatsViewable': True}}
戻り値のJSONのみフォーマットしてみると以下のようなものでした。シングルクォーテーションをダブルクォーテーションに置換しています。
- 戻り値(参考)
アップロードした動画の設定値が返ってきていることがわかります。
{
    "kind": "youtube#video",
    "etag": "XXXXXXXXXXXXXX_XXX_XX_XXXXX",
    "id": "XXXXXXXXXXX",
    "snippet": {
        "publishedAt": "2023-02-16T05: 00: 35Z",
        "channelId": "XXXXXXXXXXXXXXXXXXXXXXXX",
        "title": "タイトルのテスト",
        "description": "説明のテストです。",
        "thumbnails": {
            "default": {
                "url": "https: //i9.ytimg.com/vi/XXXXXXXXXXX/default.jpg?sqp=CNDwtp8G&rs=AOn4CLA1gObdbPgQNTemcse9Hrul6EiVsg",
                "width": 120,
                "height": 90
            },
            "medium": {
                "url": "https://i9.ytimg.com/vi/XXXXXXXXXXX/mqdefault.jpg?sqp=CNDwtp8G&rs=AOn4CLCvezrVCeWzUdnDuLgJYDJsOudvkA",
                "width": 320,
                "height": 180
            },
            "high": {
                "url": "https://i9.ytimg.com/vi/XXXXXXXXXXX/hqdefault.jpg?sqp=CNDwtp8G&rs=AOn4CLBTfv9ceJNaIsL09wWQ-uCpaGwVLQ",
                "width": 480,
                "height": 360
            }
        },
        "channelTitle": "[ここにはチャンネル名が表示されます]",
        "tags": [
            "Tag 1",
            "Tag 2",
            "Tag 3"
        ],
        "categoryId": "19",
        "liveBroadcastContent": "none",
        "defaultLanguage": "ja",
        "localized": {
            "title": "タイトルのテスト",
            "description": "説明のテストです。"
        },
        "defaultAudioLanguage": "ja"
    },
    "status": {
        "uploadStatus": "uploaded",
        "privacyStatus": "private",
        "license": "youtube",
        "embeddable": True,
        "publicStatsViewable": True
    }
}
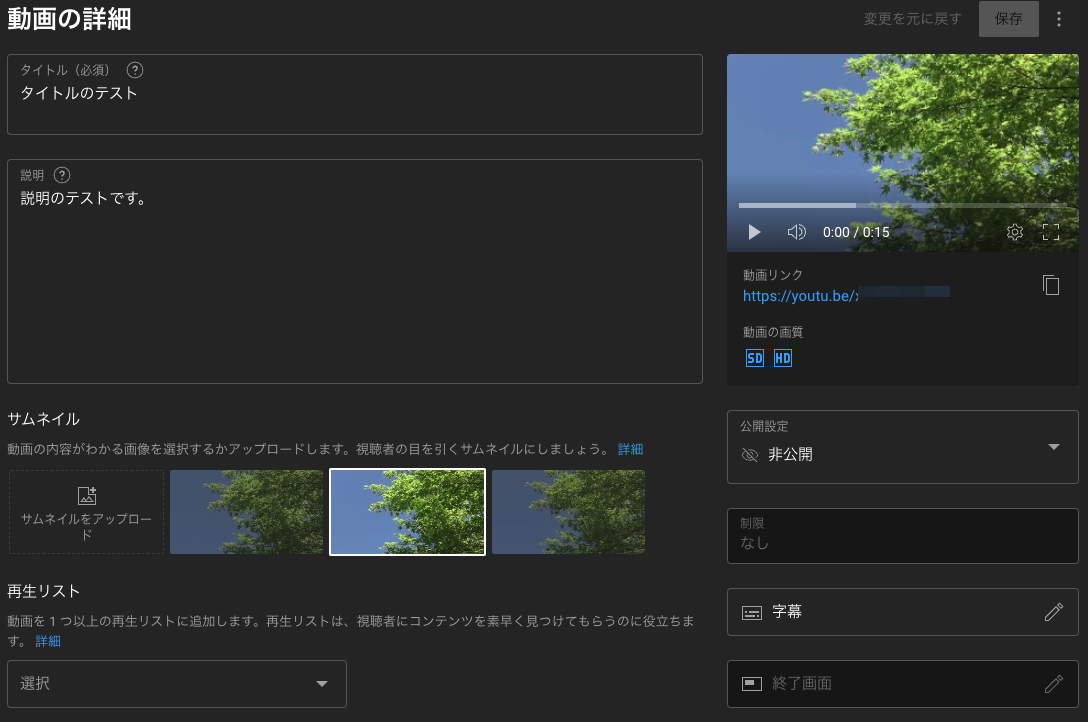
実際にアップロードした動画を詳細画面は以下のようになっていました。
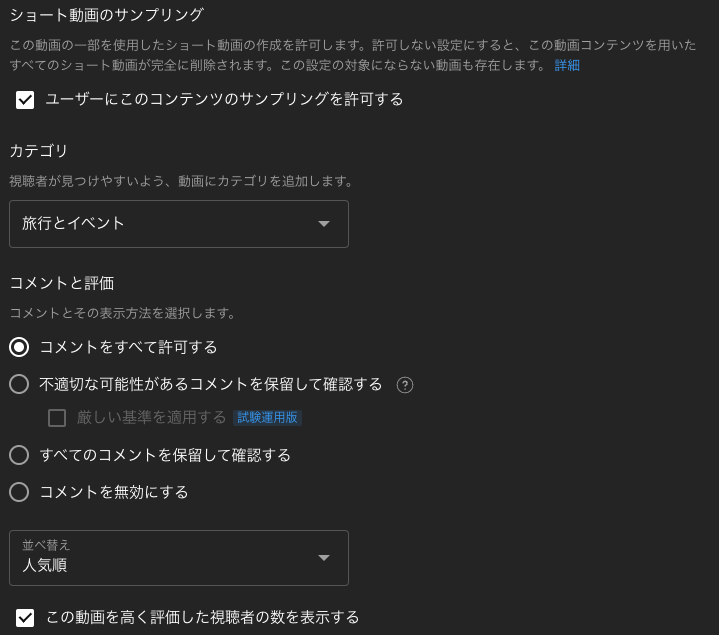
サムネイルの追加
次は投稿した動画へ、カスタムのサムネイルを追加してみたいと思います。
コード
サンプルコードはReferenceのThumbnails: setの「Try this method」からコピーします。
修正箇所は以下になります。
- 動画投稿のときと同じで、Pythonファイルと同じディレクトリに
client_secrets.jsonを配置しています。コード上のclient_secrets_fileに代入します。 -
videoIdパラメータを追記しています。動画のIDをString型で渡します。動画のIDは動画のURL(https://youtu.be/XXXXXXXXXXX)のXXXXXXXXXXXの部分です。 - 動画投稿のときと同じように、
flowにはrun_console()はありませんでした。run_local_server()に修正しています。 -
MediaFileUploadメソッドの引数にサムネイル画像のファイルパスを指定します。ここでは同じディレクトリのtest.jpgを渡しています。ちなみに画像はフリー素材をダウンロードしました。

# -*- coding: utf-8 -*-

# Sample Python code for youtube.thumbnails.set
# NOTES:
# 1. This sample code uploads a file and can't be executed via this interface.
#    To test this code, you must run it locally using your own API credentials.
#    See: https://developers.google.com/explorer-help/code-samples#python
# 2. This example makes a simple upload request. We recommend that you consider
#    using resumable uploads instead, particularly if you are transferring large
#    files or there's a high likelihood of a network interruption or other
#    transmission failure. To learn more about resumable uploads, see:
#    https://developers.google.com/api-client-library/python/guide/media_upload

import os

import google_auth_oauthlib.flow
import googleapiclient.discovery
import googleapiclient.errors
from googleapiclient.http import MediaFileUpload

scopes = ["https://www.googleapis.com/auth/youtube.force-ssl"]

def main():
    # Disable OAuthlib's HTTPS verification when running locally.
    # *DO NOT* leave this option enabled in production.
    os.environ["OAUTHLIB_INSECURE_TRANSPORT"] = "1"

    api_service_name = "youtube"
    api_version = "v3"
    client_secrets_file = "client_secrets.json" # 修正(ダウンロードしたJSONファイル名)

    # Get credentials and create an API client
    flow = google_auth_oauthlib.flow.InstalledAppFlow.from_client_secrets_file(
        client_secrets_file, scopes)
    credentials = flow.run_local_server() # 修正(「flow.run_console()」から「flow.run_local_server()」)
    youtube = googleapiclient.discovery.build(
        api_service_name, api_version, credentials=credentials)

    request = youtube.thumbnails().set(

        # TODO: For this request to work, you must replace "YOUR_FILE"
        #       with a pointer to the actual file you are uploading.
        media_body=MediaFileUpload("test.jpg"), # 修正(サムネイル画像のパス)
        videoId="XXXXXXXXXXX" # 追記(動画のIDを指定)
    )
    response = request.execute()

    print(response)

if __name__ == "__main__":
    main()
動作確認
実行してみます。
(.venv) % python main.py
動画投稿のときと同じようにブラウザで認証画面が表示されるので、同じように進みます。
認可が完了すると、値がJSONで返ってきます。
Please visit this URL to authorize this application: https://accounts.google.com/o/oauth2/auth?response_type=code&client_id=(
(省略)&access_type=offline
{'kind': 'youtube#thumbnailSetResponse', 'etag': 'XXXXXXXXXXXXXXXXXXXXXXXXXXX', 'items': [{'default': {'url': 'https://i9.ytimg.com/vi/XXXXXXXXXXX/default.jpg?sqp=CNiUuJ8G&rs=AOn4CLBaEMKtMTXACu0arWMChlQK3jAolw', 'width': 120, 'height': 90}, 'medium': {'url': 'https://i9.ytimg.com/vi/XXXXXXXXXXX/mqdefault.jpg?sqp=CNiUuJ8G&rs=AOn4CLD4jdFlQCbNMuR9ytqrQBM7kbORlQ', 'width': 320, 'height': 180}, 'high': {'url': 'https://i9.ytimg.com/vi/XXXXXXXXXXX/hqdefault.jpg?sqp=CNiUuJ8G&rs=AOn4CLB_3RzsRv94GQNfiuASGeAOQIMxng', 'width': 480, 'height': 360}, 'standard': {'url': 'https://i9.ytimg.com/vi/XXXXXXXXXXX/sddefault.jpg?sqp=CNiUuJ8G&rs=AOn4CLDqwUTjD2gYJxkRpvHrUJys9JsyQw', 'width': 640, 'height': 480}}]}
YouTube Studioで動画の詳細を見てみます。
サムネイルがセットされていることが確認できました。
動画情報の編集
次は動画の情報の編集を行ってみます。
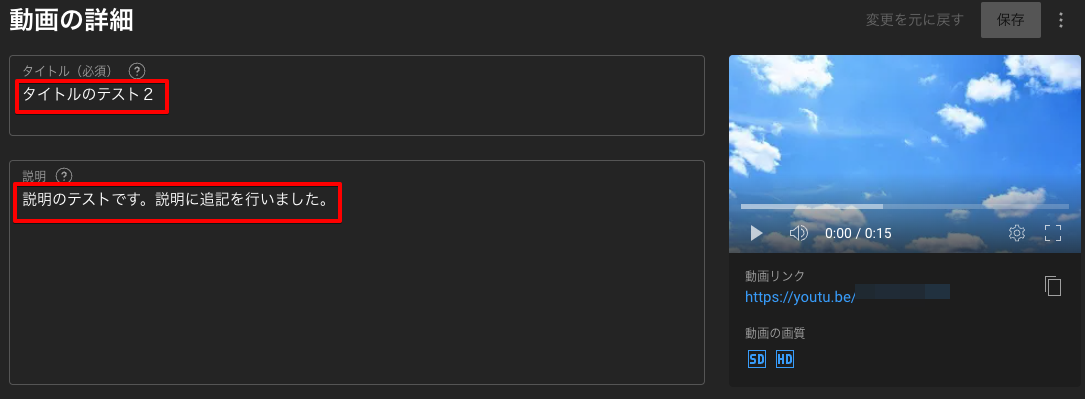
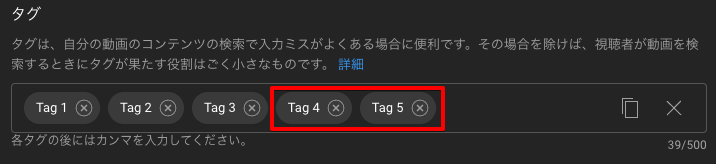
ここでは、タイトルの修正、説明の修正、タグの追加を行ってみたいと思います。
コード
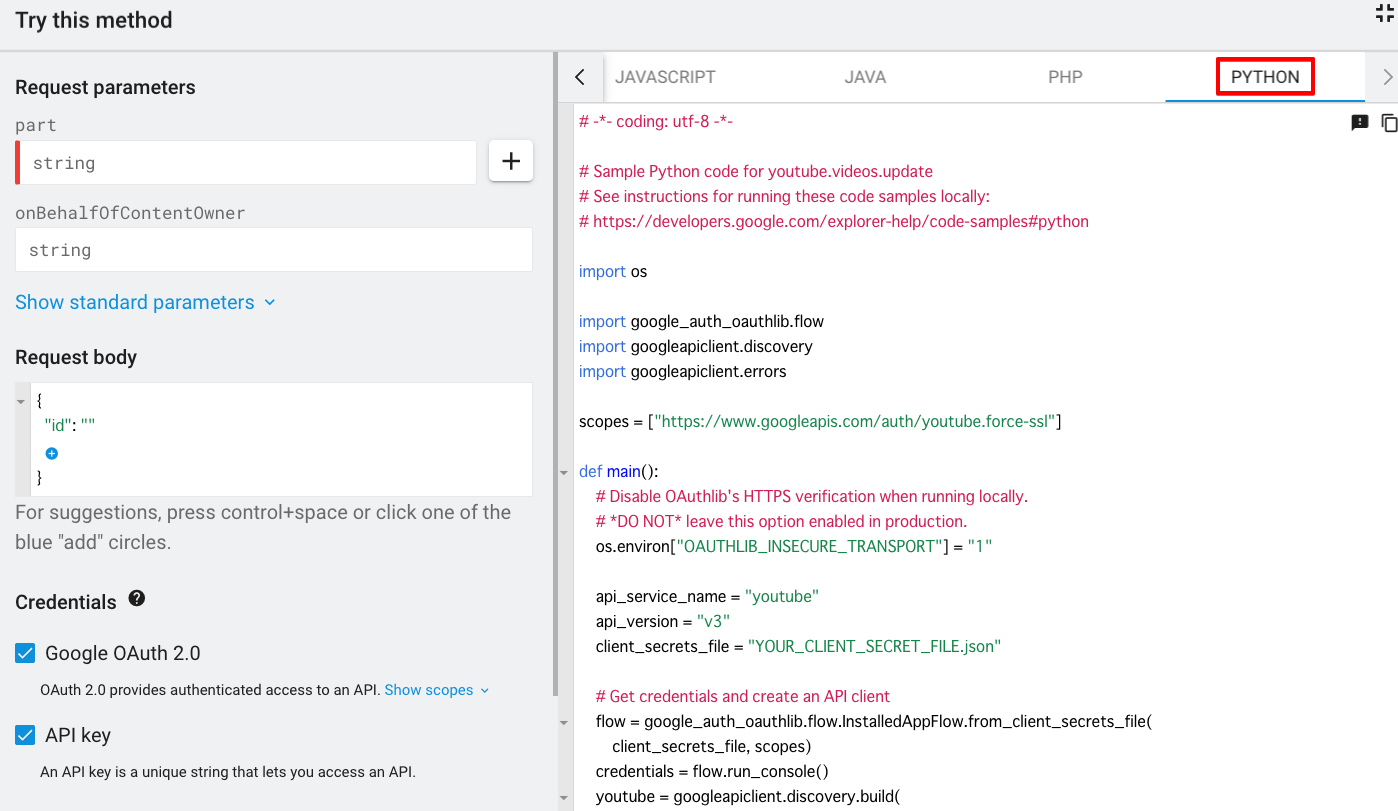
サンプルコードはReferenceのVideos: updateのTry this methodから取得します。
修正箇所は以下になります。
- 動画投稿のときと同じように、
client_secrets.jsonを渡します。 -
run_console()をrun_local_server()に修正します。 -
partパラメータが必要なため追記します。bodyパラメータ内でidとsnippetを使用するためpartに渡します。 -
idは動画のIDになります。 - 動画投稿のときと同じように、
channelId、title、description、tagsを使用しています。修正したい文言に変えて渡しています。
※categoryIdを指定しないとエラーになったため加えています。
# -*- coding: utf-8 -*-

# Sample Python code for youtube.videos.update
# See instructions for running these code samples locally:
# https://developers.google.com/explorer-help/code-samples#python

import os

import google_auth_oauthlib.flow
import googleapiclient.discovery
import googleapiclient.errors

scopes = ["https://www.googleapis.com/auth/youtube.force-ssl"]

def main():
    # Disable OAuthlib's HTTPS verification when running locally.
    # *DO NOT* leave this option enabled in production.
    os.environ["OAUTHLIB_INSECURE_TRANSPORT"] = "1"

    api_service_name = "youtube"
    api_version = "v3"
    client_secrets_file = "client_secrets.json"

    # Get credentials and create an API client
    flow = google_auth_oauthlib.flow.InstalledAppFlow.from_client_secrets_file(
        client_secrets_file, scopes)
    credentials = flow.run_local_server() # 修正(「flow.run_console()」から「flow.run_local_server()」)
    youtube = googleapiclient.discovery.build(
        api_service_name, api_version, credentials=credentials)

    request = youtube.videos().update(
        part="id,snippet",
        body={
            "id": "XXXXXXXXXXX", # 動画のIDを指定
            "snippet": {
                "channelId": "XXXXXXXXXXXXXXXXXXXXXXXX", # 動画を投稿するチャンネルIDを記載
                "title": "タイトルのテスト2", # 「タイトルのテスト2」に修正
                "description": "説明のテストです。説明に追記を行いました。", # 「説明に追記を行いました。」を追記
                "tags": ["Tag 1", "Tag 2", "Tag 3", "Tag 4", "Tag 5"], # "Tag 4"と"Tag 5"を追加
                "categoryId": "19" # カテゴリはそのまま
            }
        }
    )
    response = request.execute()

    print(response)

if __name__ == "__main__":
    main()
動作確認
実行してみます。
OAuthの認証画面の操作は同じです。
(.venv) % python main.py
Please visit this URL to authorize this application: https://accounts.google.com/o/oauth2/auth?response_type=code&client_id=(省略)&access_type=offline
{'kind': 'youtube#video', 'etag': 'XXXXXXXXXX_XXXXXXXXXXXXXXXX', 'id': 'XXXXXXXXXXX', 'snippet': {'publishedAt': '2023-02-16T05:00:35Z', 'channelId': 'XXXXXXXXXXXXXXXXXXXXXXXX', 'title': 'タイトルのテスト2', 'description': '説明のテストです。説明に追記を行いました。', 'thumbnails': {'default': {'url': 'https://i9.ytimg.com/vi/XXXXXXXXXXX/default.jpg?sqp=COSpuJ8G&rs=AOn4CLBFhXnimgfVcqrVPlYaSBbuKqxt1Q', 'width': 120, 'height': 90}, 'medium': {'url': 'https://i9.ytimg.com/vi/XXXXXXXXXXX/mqdefault.jpg?sqp=COSpuJ8G&rs=AOn4CLAeLDZwAPoSpR4D4Dd9u_RgUxwMHw', 'width': 320, 'height': 180}, 'high': {'url': 'https://i9.ytimg.com/vi/XXXXXXXXXXX/hqdefault.jpg?sqp=COSpuJ8G&rs=AOn4CLBnEzWO9Pm9XGWJLoaHHWbEZRCx6A', 'width': 480, 'height': 360}, 'standard': {'url': 'https://i9.ytimg.com/vi/XXXXXXXXXXX/sddefault.jpg?sqp=COSpuJ8G&rs=AOn4CLAf5qcrYqq_z85JwJ5KKxZAisd4zQ', 'width': 640, 'height': 480}}, 'channelTitle': 'あつのすけ', 'tags': ['Tag 1', 'Tag 2', 'Tag 3', 'Tag 4', 'Tag 5'], 'categoryId': '19', 'liveBroadcastContent': 'none', 'defaultLanguage': 'ja', 'localized': {'title': 'タイトルのテスト2', 'description': '説明のテストです。説明に追記を行いました。'}, 'defaultAudioLanguage': 'ja'}}
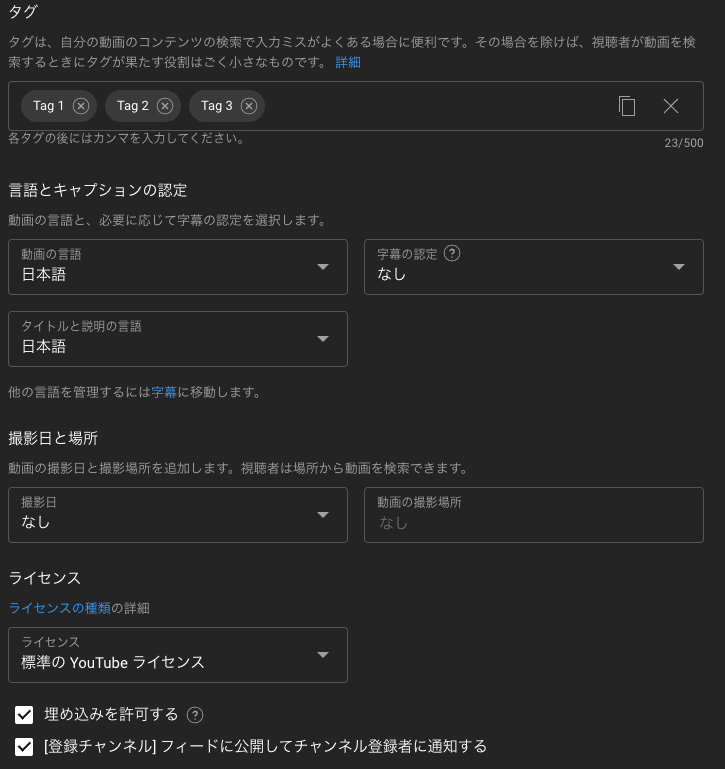
YouTube Studioで確認しても変更されていることがわかりました。
動画の削除
最後に動画の削除を行います。
コード
サンプルコードはReferenceのVideos: deleteのTry this methodから取得します。
修正箇所は以下のとおりです。
- 動画投稿のときと同じように、
client_secrets.jsonを渡します。 -
run_console()をrun_local_server()に修正します。 -
idに動画のIDを渡します。
# -*- coding: utf-8 -*-

# Sample Python code for youtube.videos.delete
# See instructions for running these code samples locally:
# https://developers.google.com/explorer-help/code-samples#python

import os

import google_auth_oauthlib.flow
import googleapiclient.discovery
import googleapiclient.errors

scopes = ["https://www.googleapis.com/auth/youtube.force-ssl"]

def main():
    # Disable OAuthlib's HTTPS verification when running locally.
    # *DO NOT* leave this option enabled in production.
    os.environ["OAUTHLIB_INSECURE_TRANSPORT"] = "1"

    api_service_name = "youtube"
    api_version = "v3"
    client_secrets_file = "client_secrets.json" # 修正(ダウンロードしたJSONファイル名)

    # Get credentials and create an API client
    flow = google_auth_oauthlib.flow.InstalledAppFlow.from_client_secrets_file(
        client_secrets_file, scopes)
    credentials = flow.run_local_server() # 修正(「flow.run_console()」から「flow.run_local_server()」)
    youtube = googleapiclient.discovery.build(
        api_service_name, api_version, credentials=credentials)

    request = youtube.videos().delete(
        id="XXXXXXXXXXX" # 動画のIDを指定
    )
    request.execute()

if __name__ == "__main__":
    main()
動作確認
実行します。
(.venv) % python main.py
Please visit this URL to authorize this application: https://accounts.google.com/o/oauth2/auth?response_type=code&client_id=(省略)&access_type=offline
動画が削除されました。

所感
一日に実行できるリミットはありますが、使いこなせれば便利なのではないかと思いました。YouTube Studioでポチポチボタンを押したりコピペを繰り返したりする必要がなくなるので。
また、Pythonプログラムを修正して、argsなどを使えばひとつのプログラムで異なった動画をアップロードすることができると思いました。
argsとスプレッドシートやExcelの関数を使えば、スプレッドシートやExcelに動画の情報を書き込み、関数でPythonを実行するときのコマンドを作成し、コピペでさまざまな動画をアップロードできると感じました。
参考になれば幸いです。
参考サイト