はじめに
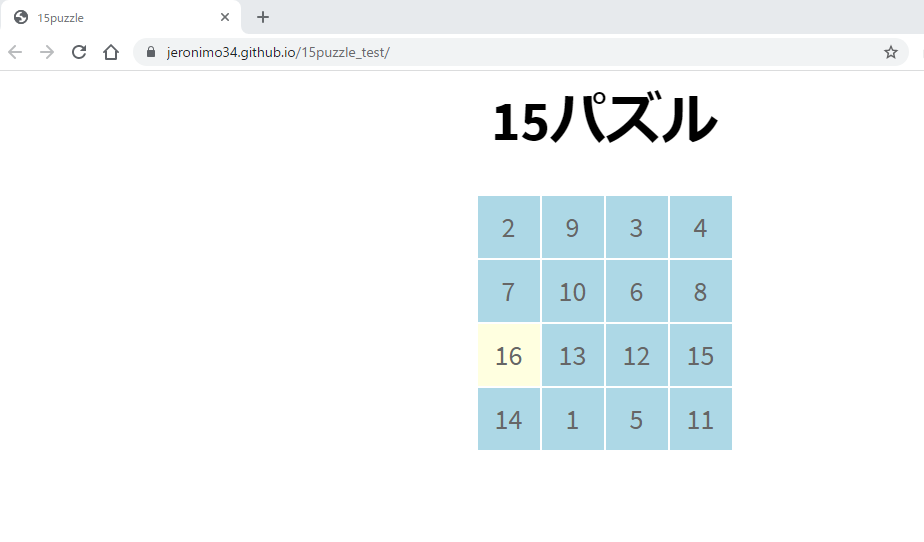
Nuxt.jsを使って15パズルを作成してみました。本稿では作成手順とGitHub Pagesへの公開方法を説明します。最終的に↓こんなのができます。

ソースコード
https://github.com/jeronimo34/15puzzle_nuxtjs
環境
Windows 10 Home
前提
Node.js
npm
git
などインストール済み
プロジェクトの作成
以下コマンドを実行しプロジェクトを作成します。
npm init nuxt-app 15puzzle
プロジェクトの初期設定をしていきます。

以下の2つに関しては次に示す値を設定します。それ以外はEnterを押します。
Rendering mode = Single Page App
Deployment target = Static
初期設定が完了したら動作確認をしてみます。以下のコマンドを実行します。
cd 15puzzle
npm run dev
以下のURLをブラウザで開きNuxt.jsの初期画面が表示されることを確認します。
http://localhost:3000/

これでアプリの雛形が完成しました。
実装
実装していきます。
こちらの記事を参考にさせて頂きました。
不要なファイルの削除
まず使用しないファイルを消します。
/components/Tutorial.vueを削除します。
ファイルの追加
以下のファイルを追加します。
| ファイル名 | 説明 |
|---|---|
| /pages/index.vue | ビュー |
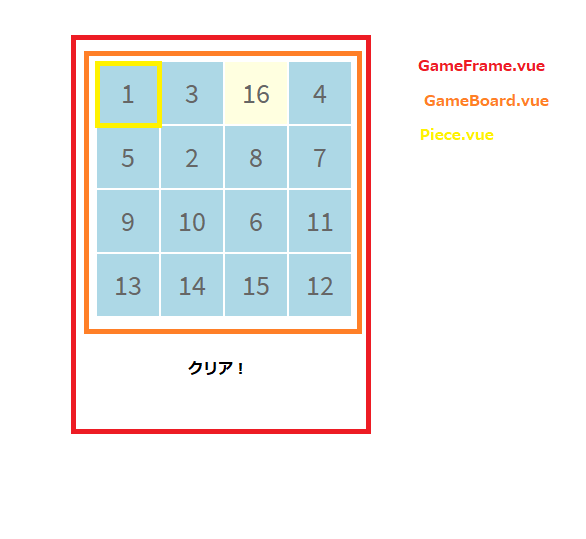
| /components/GameFrame.vue | 「クリア!」などのメッセージ表示 |
| /components/GameBoard.vue | パズル全体 |
| /components/Piece.vue | パズルのピース |
| /store/game.js | ゲームのロジック |
コンポーネントの図解
各ファイルに以下の内容をコピペします。
<template>
  <div>
    <h1>15パズル</h1>
    <section id="container">
      <GameFrame/>
    </section>
  </div>
</template>

<script>
  import GameFrame from '~/components/GameFrame.vue'
  export default {
    components: {
      GameFrame
    }
  }
</script>

<style>
html {
  font-family: "Source Sans Pro", -apple-system, BlinkMacSystemFont, "Segoe UI", Roboto, "Helvetica Neue", Arial, sans-serif;
  font-size: 28px;
  word-spacing: 1px;
  -ms-text-size-adjust: 100%;
  -webkit-text-size-adjust: 100%;
  -moz-osx-font-smoothing: grayscale;
  -webkit-font-smoothing: antialiased;
  box-sizing: border-box;

}
*, *:before, *:after {
  box-sizing: border-box;
  margin: 0;
}
html, body {margin: 0; height: 100%; overflow: hidden}
h1{
    text-align: center;
    margin-top:10px;
    margin-bottom:30px;
}
</style>
<template>
    <div>
        <GameBoard/>
        <div class="clearArea">
            <p v-if="$store.state.game.isClear">クリア!</p>
            <button v-if="$store.state.game.isClear" v-on:click="resetGame()">リトライ</button>
        </div>
    </div>
</template>

<script>
  import GameBoard from '~/components/GameBoard.vue'
  export default {
    components: {
      GameBoard
    },
    methods: {
        resetGame(){
            this.$store.commit('game/resetGame')
        }
    }
  }
</script>

<style scoped>
  .clearArea{
    text-align: center;
  }
  .clearArea p {
      margin:10px;
  }
  .clearArea button {
      margin:10px;
  }

</style>
<template>
    <div class="gameboard">
        <Piece
            v-for="piece in pieces"
            :key="piece.pos"
            :number="piece.number"
            :y="Math.floor(piece.pos/4)"
            :x="Math.floor(piece.pos%4)"
        />
    </div>
</template>

<script>
  import Piece from '~/components/Piece.vue'
  export default {
    computed: {
        pieces(){
            return this.$store.state.game.pieces;
        }
    },
    components: {
      Piece
    }
  }

</script>

<style scoped>
  .gameboard{
    position: relative;
    width: 256px;
    height: 256px;
    margin: auto;
  }
</style>
<template>
    <div class="piece"
        v-if="number!==16" @click="movePiece(x,y)" :style="{top:`${y*64}px`, left:`${x*64}px`}">
        <span>{{number}}</span>
    </div>
    <div
        class="blank"
        v-else @click="movePiece(x,y)" :style="{top:`${y*64}px`, left:`${x*64}px`}">
        <span>{{number}}</span>
    </div>
</template>

<script>
  export default {
    props: ['number','y', 'x'],
    methods: {
        movePiece (x, y) {
            this.$store.commit('game/movePiece', {x, y})
        }
    }
  }

</script>

<style scoped>
  .piece{
    height: 64px;
    width: 64px;
    border: ridge 1px #fff;
    position: absolute;
    background: lightblue;
    cursor: pointer;
    color:#666666;
  }
  .piece:hover{
    opacity:0.3;
    color:white;
  }
  .blank{
    height: 64px;
    width: 64px;
    border: ridge 1px #fff;
    position: absolute;
    background: lightyellow;
    cursor: default;
    color:#666666;
  }
  span{
    top: 50%;
    left: 50%;
    position: absolute;
    transform: translate(-50%, -50%);
  }
</style>
const BOARD_X = 4
const BOARD_Y = 4
const BLANK = 16;

// 初期状態
const initialState = {
  // ピースの初期位置
  pieces: [
    {pos:0, number:2},
    {pos:1, number:9},
    {pos:2, number:3},
    {pos:3, number:4},
    {pos:4, number:7},
    {pos:5, number:10},
    {pos:6, number:6},
    {pos:7, number:8},
    {pos:8, number:13},
    {pos:9, number:1},
    {pos:10, number:16},
    {pos:11, number:15},
    {pos:12, number:14},
    {pos:13, number:5},
    {pos:14, number:12},
    {pos:15, number:11},
  ],
  // クリアフラグ
  isClear: false
}

// 状態初期化
export const state = () => JSON.parse(JSON.stringify(initialState))

// 状態リセット
function resetState(state){
    Object.assign(state, JSON.parse(JSON.stringify(initialState)))
}

export const mutations = {
    // リセットボタン押下時処理
    resetGame (state) {
        resetState(state);
    },
    // ピースの移動処理
    movePiece(state, {x,y}){
        // クリア済みならピースを移動させない
        if(state.isClear) return;

        // ピースの移動処理開始
        let pos = y * 4 + x;
        let clickedPiece = state.pieces.find((x)=>x.pos === pos);

        // クリックしたピースと、空白のマスの位置を入れ替える
        let dx = [1,0,-1,0];
        let dy = [0,1,0,-1];
        for(let i = 0; i < 4; ++i){
            let tx = x + dx[i];
            let ty = y + dy[i];
            if(tx < 0 || BOARD_X <= tx) continue;
            if(ty < 0 || BOARD_Y <= ty) continue;

            let newPos = ty * BOARD_X + tx;
            let targetPiece = state.pieces.find((x)=>x.pos === newPos && x.number === BLANK);

            if(targetPiece === undefined) continue;

            let tmpNumber = clickedPiece.number;
            clickedPiece.number = targetPiece.number;
            targetPiece.number = tmpNumber;

            break;
        }

        // クリア判定
        state.isClear = state.pieces.every(x => x.pos === x.number-1);
    }
}
以下のコマンドを実行し、動作を確認します。
npm run dev
GitHub Pagesへの公開
以下の内容を実行していきます。
https://nuxtjs.org/ja/deployments/github-pages#deploy-nuxt-on-github-pages
GitHubにレポジトリを作成します。
ローカルレポジトリに変更をコミットします。
git add -A
git commit -m "first commit"
nuxt.config.jsにレポジトリ名を設定します。
  // GitHub Pagesにデプロイしたとき正常に動作させるための設定
  router: {
    base: '/<レポジトリ名>/'
  },

以下のコマンドを実行します。
npm install push-dir --save-dev
package.jsonに以下を追記します。
"scripts": {
  "dev": "nuxt",
  "generate": "nuxt generate",
  "start": "nuxt start",
  "deploy": "push-dir --dir=dist --branch=gh-pages --cleanup"
},

以下のコマンドを実行し、GitHub Pagesに成果物をデプロイします。
npm run generate
npm run deploy
以下のURLをブラウザで開き公開されていることを確認します。
https://<ユーザ名>.github.io/<レポジトリ名>/
作業は以上です。お疲れ様でした。
おわりに
Nuxt.jsは開発を容易にする機能やレンダリングモードの切り替えなど、様々な機能を提供しています。
今回作成したアプリは単一のページ、かつ、機能も少なかったので、Nuxt.jsの機能を全て試してみることはできませんでしたが、ディレクトリ構造が決められていたり、GitHub Pagesに成果物を公開する手段が用意されていたりするところは便利だと思いました。
参考
https://qiita.com/dorarep/items/b9783ea6cd18308a06a0
https://nuxtjs.org/ja/docs/get-started/installation
https://nuxtjs.org/ja/deployments/github-pages/#deploy-nuxt-on-github-pages