こんにちは、ジェルファレザです!
今回、ずっと前からの自分の悩みを解決する記事を書きたいと思います。
きっかけ
今まではWindowsでVagrantかDockerかしか使えませんでした。
ということは、DockerとVagrantを同時に実行することはできません。ですが、もう2021になったのでこのような悩みも要らないでしょう!
開発者として、VagrantとDockerは仲良くしてしてほしいですね。🥰
条件
始まる前に、私の設定は下記のようになります。
- Windows 10 Pro x64 ver 1909 build 18363
- Vagrant ver 2.2.14
- Virtualbox ver 6.1.18
- Docker Desktop ver 3.2.2
とりあえず、1~3があれば大丈夫です。No 4は下で設定するので今の段階インストールしなくてもいいです。
ちなみに、Windows 10 Home Editionも行けるらしい。。(確認要)
やり方
Hyper-V
20210325更新:Hyper-Vは本当に必要か、要確認。別のマシンでDockerを立てたらHyper-Vの設定が出てませんので影響を調べていきます。
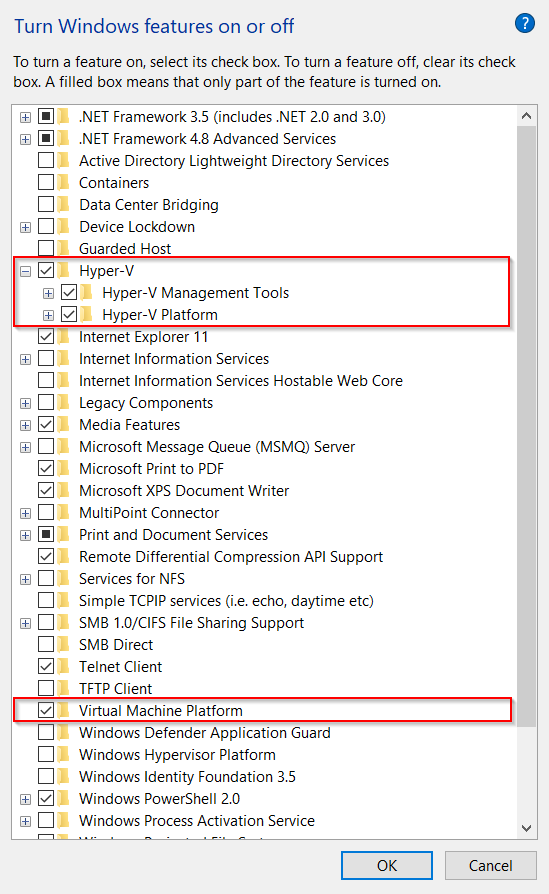
まず、WindowsのHyper-Vを有効にします。設定の**[Windows の機能の有効化または無効化]**からHyper-Vをチェックします。
そのあとWindowsリスタートが必要です。
Hyper-V有効化後Vagrantをupすると、
VT-x is disabled in the BIOS for all CPU modesというエラーが出ればBIOS設定が必要です。
こちらにご参考ください。
Dockerインストール
最新のDocker Desktop for Windowsをダウンロードします。
インストールすると、WSL2コンポネントをインストールするというオプションも出てるはずです。
もしそのオプションが出てない場合、こちらのステップを従ってください。
- もう一度Windows情報を確認します。WSL2を使うため、Windows build 18362以降しか使えなさそうです。
- そのbuild versionでも
WSL2コンポネントをインストールするが出てないなら多分私と同じ状態です。私のWindows build versionは合ってますが、なんでWSL2は設定できないのか。謎です。
深掘りするとbuild versionだけではなく、特定のWindows updateも必要とのことです。
Windows update kb4566116
会社のポリシーによるこのupdateは除外されてる可能性があるため、自己インストールです。
Dockerインストール後、またWindowsリスタートが必要です。そのあと、Dockerが使えるはずです!
j-daviano@HOMER C:\Users\j-daviano
$ docker --version
Docker version 20.10.5, build 55c4c88
よさそうです!
Vagrant調整
ここまでは、Vagrantがなかったら終わりですが、この記事はVagrantとDockerを仲良くさせるミッションでしょう。
では、Vagrantを起動しましょう。
j-daviano@HOMER C:\Users\j-daviano\Documents\vagrantDocker
$ vagrant up
Bringing machine 'default' up with 'virtualbox' provider...
==> default: Checking if box 'gbailey/amzn2' version '20210127.0.0' is up to date...
==> default: Clearing any previously set forwarded ports...
==> default: Clearing any previously set network interfaces...
==> default: Preparing network interfaces based on configuration...
    default: Adapter 1: nat
    default: Adapter 2: hostonly
==> default: Forwarding ports...
    default: 3000 (guest) => 3000 (host) (adapter 1)
    default: 22 (guest) => 2222 (host) (adapter 1)
==> default: Running 'pre-boot' VM customizations...
==> default: Booting VM...
==> default: Waiting for machine to boot. This may take a few minutes...
    default: SSH address: 127.0.0.1:2222
    default: SSH username: vagrant
    default: SSH auth method: private key
    default: Warning: Connection reset. Retrying...
    default: Warning: Connection aborted. Retrying...
    default: Warning: Remote connection disconnect. Retrying...
    default: Warning: Remote connection disconnect. Retrying...
    default: Warning: Remote connection disconnect. Retrying...
==> default: Machine booted and ready!
==> default: Checking for guest additions in VM...
==> default: Configuring and enabling network interfaces...
==> default: Exporting NFS shared folders...
==> default: Preparing to edit nfs mounting file.
[NFS] Status: halted
[NFS] Start: started
==> default: Mounting NFS shared folders...
==> default: Mounting shared folders...
    default: /vagrant => C:/Users/j-daviano/Documents/vagrantDocker
==> default: Machine already provisioned. Run `vagrant provision` or use the `--provision`
==> default: flag to force provisioning. Provisioners marked to run always will still run.
**行けました!**🎊🎊
もしVagrant bootのときにタイムアウトが発生しまったら、Hyper-VのParavirtualization Interfaceが必要かもしれませんのでVagrantFileに下の設定を追加してvagrant reloadしてください。
Timed out while waiting for the machine to boot. This means that
Vagrant was unable to communicate with the guest machine within
the configured ("config.vm.boot_timeout" value) time period.
config.vm.provider "virtualbox" do |vb|
  vb.customize [
    "modifyvm", :id,
     "--paravirtprovider", "hyperv"
  ]
end
あとがき
やっと、VagrantとDockerは一緒に遊んでます。
これでスムーズな開発ができるはず。皆さんもぜひ、試してくださいね!
私は、今後React+Go+DBをDocker化にしたいです!また次の記事!


